
Alexander Grabovetskiy, woodcarver, School of Woodcarving · Published 2023
How do you carve a hole through a relief panel?
Quick answer: Piercing a relief carving is a plug cut, made using the number 9 gouge, pointed in and twisted, then worked from a second side until you are through. Across this Venetian wall those openings make a solid board look airy. They also prove a piece was not glued on.

Piercing a relief carving is a plug cut, made with a number 9 gouge that you point in and then rotate. You aim it at a target and come at the hole from two sides. On these Venetian panels that turns a solid block into something that reads as air, and it settles any argument about whether a part was glued on.

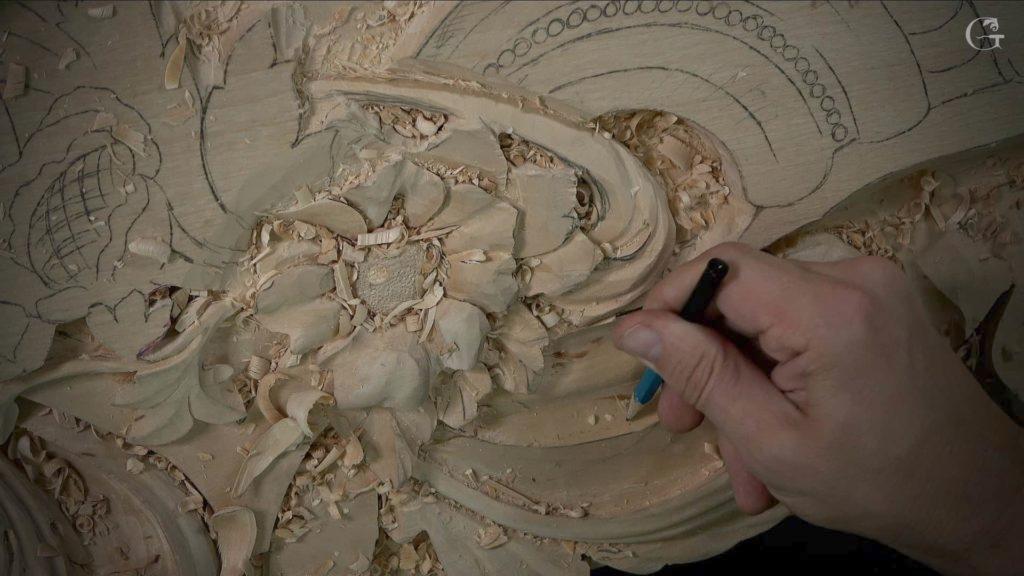
Somebody looks at a relief carving with an open leaf standing off the ground and assumes there is a joint hiding under it. Nothing of the kind. That leaf came out of the panel itself, an inch and a half thick, 38 mm, and the way to prove it is to make daylight come through.
Have you ever carved a leaf that looked heavy no matter how much you took off the background? Have you gone deeper and still wanted it to look lighter? Going deeper with a smaller tool helps. But for a really airy look, the wood has to be gone.
These twelve workshops carve the flowers that are the hero of the whole panel and the acanthus that frames them, and along the way the panel gets holes carved right through it in several places. None of it is strictly necessary. But I think it just adds some more interest.
What the hole is actually for
- A plug cut is a deep number 9 driven straight in and twisted, so it lifts a plug of wood out instead of shaving it. Rotate, crank, remove. Then go at the same spot from the other side until the two meet.
- The tools are ordinary. Ten millimetres to start, a quarter inch (6 mm) to refine, and 3 mm for the small openings.
- Piercing buys extra shadow, and it makes the piece feel airy, not like a solid block.
- Lightness costs strength, so pay some back on purpose. Run a piece under a neighbouring leaf, or reinforce with glue thinned with water.
- The flowers get the detail. Everything around them is a frame, with a lot less detail than on the flowers.

What is a plug cut in wood carving?
A plug cut takes out a cylinder of wood rather than a shaving. Drive a deep sweep gouge, the number 9, straight down into the surface and then rotate the handle. The tool bites a ring, the waste inside snaps loose, and out it comes in a lump. That is why I call it a plug.

My first one on this panel went in with a number 9 at ten millimetres, three eighths of an inch, and a mallet behind it. The sound it makes going deep is kind of scary, and I always have to be careful not to break my tools.
You can hear my granddaughter somewhere behind me on one of these recordings. She was visiting that day and I was not going to stop the camera for her sake or mine.
Once the first hole is open, everything gets easier. A bigger opening lets you angle the tool, so I switched to a quarter inch gouge by Auriou, a French maker, and tipped it toward the spot I wanted to open, my target. After that I attacked it from another side too, the same plug cut, until I was through.

How do you go through without splitting the panel?
Aim, and then come at the hole from two sides. Beside one leaf I went in from one side, then attacked from the opposite side, number 9, an eighth of an inch, and I was through. I could already see it on both sides.
Grain decides the rest. Where the opening runs along the grain the wood is supported and I can be bold about it. Still, going through, I take it little by little, and I don't force the tool. One division is where I said it out loud. Force it and it breaks, and I almost broke it.

The panel itself is glued up from boards, and even with that thickness I still worry as I go lower. One plug cut with an eighth inch number 9 went about five eighths of an inch, 16 mm at least, and then I came at it from the opposite direction.

What happens to your bench when the tool goes through?
Plan the exit before you drive the tool. A gouge that goes all the way through a board keeps going, and what it meets underneath is your bench top.
Two habits handle that. Where a part has to go underneath and I only need an indication, I stop a quarter inch (6 mm) short and leave the waste for later. Afterwards I lay the veiner almost flat against the bench and clear that last bit sideways, so the tool travels along the surface instead of down into it.

The other habit is simply moving. Move the whole piece over, then work on it there. Cheaper than a bench.
Working close to the bench is its own trap, and I felt it on the last big concave of this part. I was carving with a 30 mm number 11, and I could not go too deep because the bench sat right underneath. That would have been a big mistake, and I said so on camera.
Before one dark spot I pulled the drawing up on the iPad and checked what I was planning there. Double check. Just before I dig, I want to make sure I'm not making any mistakes.
| What I opened | The tool that started the opening | How deep | What the hole gives back |
|---|---|---|---|
| Eye of the scroll | Number 9 at ten millimetres with a mallet | All through | Daylight, and a lighter, airy look |
| Under a leaf | Eighth inch number 9 from both sides | All through | Proof that piece is not glued |
| Behind a division | Three millimetre number 9 pointed inside | 16 mm | Extra shadow, not a solid block |
| Under a separation | Number 5, carefully, a little at a time | Right through | A darker spot, more shadow |
Why does a hole beat a deeper groove?
I use both, because it is all about the shadow and light. A deeper groove darkens the area. An opening that goes right through gives me another darker spot, another shadow spot.

My ladder for shadow runs 5 mm, then 3, then 2, then 1, all number 11 veiners, each one going deeper into the same line. Every step darkens it a bit more.
Do I need every one of these openings? Not at all. Some are purely for the shadow's sake, and I say that out loud while I carve them. One plug cut I called a really unnecessary step, and I did it anyway. I really like a dark spot, and the piece is more alive with the dark spot than without it.

What keeps a pierced carving from breaking?
Three things hold it, and only one of them is glue. The first is where you put the opening: leave the fibres running along the length of the part rather than across it, and a thin part should not be as fragile.

The second is design. Elsewhere I had planned a gap and changed my mind, because the piece needed something to hang onto. Tucking that part under the neighbouring acanthus gave it a second anchor. It has to look light. It also needs stability.
The third is glue, thinned with water and left to soak in. That works here because this panel is paint grade. On a stain grade piece the same trick would leave the wood blotchy where the glue soaked in, and that would be a mistake. Know which one you are carving before you reach for the bottle.

Both halves of this wall have to match, and that changes how I hold the tool. Each straight down pass here is a true 90 degrees with no lean, because the second side carries the same design flipped and I can't lose the position of the lines. Undercut here by accident, and it would be a big mistake.
One more payoff comes with it. Once you can see through a leaf from both sides, nobody can tell me I glued that piece on. I still glue on one of the spots, because that was the idea from the beginning. You will understand once you see the whole picture.

How is the flower itself carved?
Begin with a dome and then take the dome apart. Once the outline is down and the field around it has been lowered, the whole flower is a dome sitting on the panel. I start it with a flatter tool, a number 3, and follow with the 7 mm number 11 that went around it.
It won't be just a dome, though. It gets some extra shadow in one section, and I have to open that middle part up or it won't be visible.
Divisions come next, and they are straight down passes, nothing clever about them. Preliminary ones first, then I make the decision where each will go, and only then start shaping. Each petal gets a concave, some get a smaller second one heading toward the centre, one goes a little more upward, and I undercut a little underneath another, or it won't look nice.

For the centre I bore a small 7 mm plug, just for the shadow's sake, and it already points the direction I want. Around it I use a punch set. I don't really have to do anything else there. Just punches.
Where should you stop adding detail?
Detail belongs where the eye goes first, and on this panel that is the flowers. Everything around them is a frame made of acanthus, and a frame carries fewer marks on purpose. Those frame parts should not draw attention too much.

Two other places earn nothing. Anything that will never be in the eye of a human person, I skip, and I say why. I do not want to spend more time than I have to.
Then I turn round and contradict myself. On one hidden spot I put in a shadow with a 1 mm veiner anyway. Once it is installed, you are not going to see it. It makes me happier, because I know that I did it.

A rasp has its place too. I reached for one off camera and said to myself, why not. The whole panel gets painted, and the rasp saves me time. Rasp it and forget it.
How many veins belong on a carved leaf?
Fewer than you think. Just a few soft ones running toward the middle line. Put in too many small ones and it looks too busy, and then it's going to look awful.

The middle line itself is not down the centre. I take the two edges, step six parts out of ten between them, and run the line there. Same proportion, the golden ratio, I use for the head of an acanthus and its middle line.

Edges get the same restraint and the opposite treatment. A petal edge left straight won't look real, so I give it some waviness using a number 11 and a number 7. Almost nothing in life runs dead straight. On another edge I made the waves with a knife.

Inside each petal I put one deep concave, sometimes a second smaller one heading toward the centre. Sometimes in real life you can see that concave look on a flower. I exaggerate it, the real-life exaggeration, and that gives a lot more dimension to the ornament.
Does a number 3 mean the same thing on every gouge?
Sweep numbers do not match across brands. A number 2 by Pfeil is roughly the same curve as a number 3 by Ashley Iles or Henry Taylor. In England they do it differently.

My normal number 11 is a Pfeil, because Pfeil does a much better job with the 11s. In these workshops I also pick up an Ashley Iles fishtail and a Henry Taylor number 3. Whichever first set you buy, it will need an edge. You will see me stop in the middle of a flower to sharpen my tool.

One more thing about the number 11. A veiner is a U, which means the side of it works like a flat gouge. Lean the pressure onto one wall of the U and you have a number 3 in your hand without changing tools, which is how I shaped one concave here with the same 20 mm veiner.

All of this sits on the work in the earlier parts of the room. If you have not seen how depth gets measured before the first pass, or how the angle of the flute decides a wall, begin there. New to all of it? The plain first steps are here, and full access to every workshop opens the whole room, one hundred and sixty three workshops of it.
The room follows the Italian style of the 15th and the beginning of the 16th century. Venice already knew what an opening does to ornament. Stone tracery on the Ca d Oro is pierced clean through, and the whole front of the building changes as the light moves across it. Wood will do the same trick on a smaller scale, and my only job is to keep the thing standing while it does.
Would you rather carve deeper, or carve through?
How it's done
- Pick the target first. Decide where the opening comes out before you start, and point the tool at that spot, your target.
- Sink the first plug. Drive a 10 mm number 9 straight in, twist the handle, and lift the waste out as a lump. A mallet helps. The sound can be scary, so be careful not to break the tool.
- Widen enough to aim. Open the mouth a little so the handle can tip. A bigger hole gives you a lot more room to turn the tool the right way.
- Come in from the other side. Attack it again, the same plug cut, until you are through.
- Protect what is underneath. Move the whole piece over, or stop short and clear the last of it with a veiner laid almost flat.
- Pay the strength back. Tuck the light part under a neighbour, or soak thinned glue right in. Save that second trick for paint grade work only.
Frequently asked questions
What is a plug cut in wood carving?
A deep sweep gouge driven straight into the surface and then rotated will bite a ring and free the waste inside it as a lump rather than a shaving. I call it a plug cut for that reason, and each time you repeat it, the hole gets deeper fast.
Can you pierce a relief carving without breaking it?
It still holds, though you can break it if you want to. Along the grain the wood is supported, so put the opening there. Where a part still feels weak, run it under a neighbouring leaf so it gains a second anchor.
Why does a pierced carving look better than a deep one?
A deep groove darkens the area. Go all the way through and you get one more dark spot, and the piece looks lighter, almost airy. I want both, since it's all about shadow and light.
What to carve next