

Alexander Grabovetskiy, woodcarver, School of Woodcarving · Published 2022
How do you keep the movement of a flower while you hollow it out?
Quick answer: Keeping a flower's movement while you hollow it is watching the whole shape, and the hole is one piece of it. In class 11 of my Grinling Gibbons course in Maine I carved through a tulip on purpose, kept its roundness using a back bent, and named its movement out loud more than once as the thing to protect.
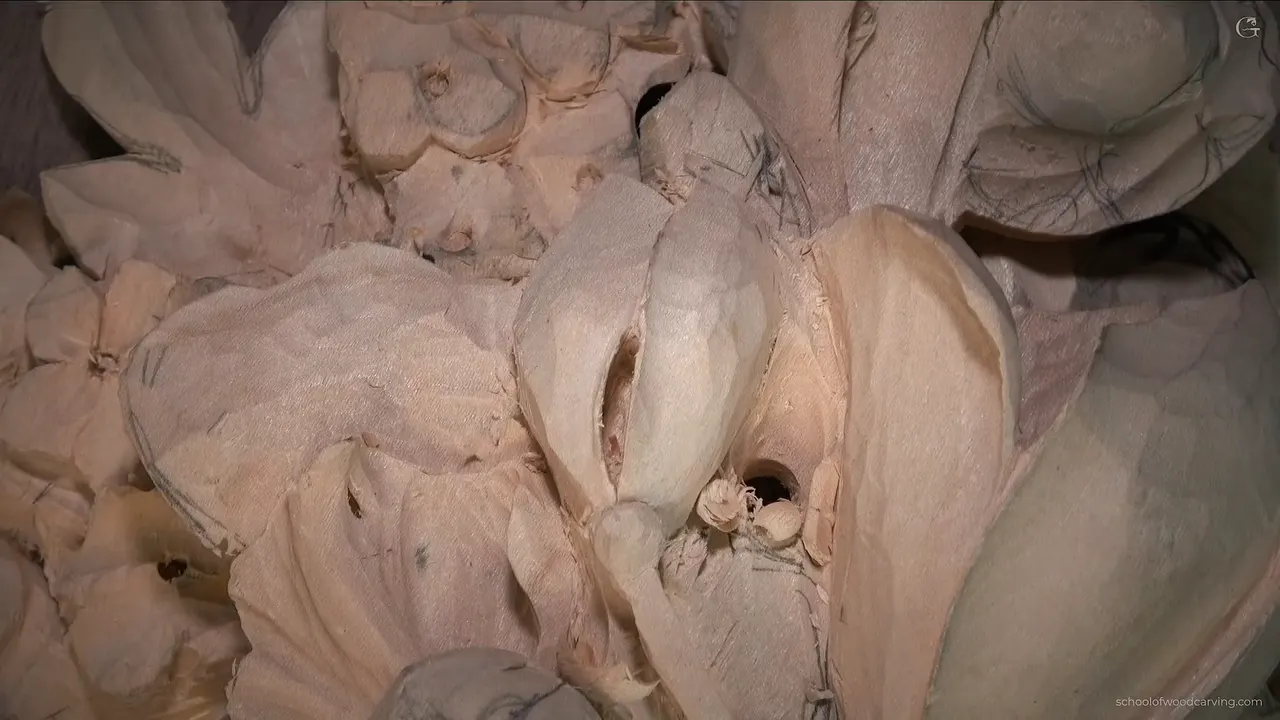
Hollowing a flower without losing its movement means you watch the whole shape every time a tool goes in. In class 11 of my Grinling Gibbons course in Maine I carved through a tulip. On that same flower I said out loud that the feel of its movement had to stay. Its roundness mattered to me just as much.
Maybe you hollowed a flower once and ended up with a bowl. Part 11-1 shows how I try to stay out of that on a layered relief panel, one careful pass at a time.

Six things I watched on one tulip
- The feel of the movement, which I named out loud more than once in this one video.
- Roundness, kept by a back bent worked upside down inside the flower.
- One spot carved straight through, for a deep shadow.
- A tool that was a little too big for that spot, which I swapped.
- One part bulging, so I made it smaller.
- The original picture, which I checked on the one small detail that escaped me.
What does it mean to lose a flower's movement?
It means the hollow stops following the flower. The big tulip on this panel has petals that wrap around. About seventeen minutes into 11-1 I told you part of one petal was going to wrap, so I had to excavate much deeper and make sure it just rolls. In part 11-2 I called it the barrel, which meant the next part had to roll the same way.
While I dug, I was after the overall shape of the flower. A hole is only a piece of that.
At the start of 11-1 I told you the panel did not look nice yet, because it was too choppy and too pancake like, with the layers showing from the side. Let me work on it, I said.

Why carve through the tulip on purpose?
For a deep shadow, and I took the chance knowing it could go wrong. Maybe I could excavate straight through and make a darker spot, I told you, and it would look really nice if you could see the background. Obviously, I said, I did not want to make a mistake.
The board behind this panel is walnut, a darker ground. Early in class 11 I said the first background we made was not authentic to Gibbons, who most likely used oak, I told you, going by my books. I had a piece of walnut on hand, and it still made a somewhat darker background.
A plug cut came first. I used a number 9, six millimeters, about a quarter inch, and set it straight down, and I turned it with a rotation motion, though not a full rotation. Could I have turned it all the way around? Sure, but do I have to? I don't think so.
How deep that spot ran was a mystery to me. Then the tool broke through, I said oops, and in the next breath it was fine and I pointed at the depth. That deep shadow was my goal, a beautiful one. On camera you don't really see it, I told you.

After that I slowed down, because the detail around the spot had to stay and so did the feel of this movement, and I said six millimeters could be a little too big of a tool in that place.
What does a back bent do for the roundness of a flower?
It gets me inside without wrecking the outside. I took a number 3 back bent, a Henry Taylor. The London pattern calls that tool a number 4, and the European pattern calls it a 3, about the same. A back bent is a gouge, and a gouge is a kind of chisel. Mine went in upside down.
Roundness was the reason. I was after the overall shape of this flower. Next I flipped the tool to the opposite direction and gave the big tulip the same effect.

No forcing. Forcing anything would be a big mistake, I said. Even with a back bent I was aiming for a slicing cut, and if my chips flew inside, that was fine, since there was plenty of space underneath to clean it a little later.
Multiple ways could have gotten me there, but I really like this one. With the back bent the result comes much easier.

Where do you look to check the roundness when the opening gets wider?
Look at the shadow. As the flower got round, the opening grew wider and wider, and I pointed at the space. See how deep the shadow casts, I said. That gave me a really good feel for how much material I had on that petal.
Tight spots wanted a smaller tool, so I picked up my number 11, two millimeters (about 0.08 in). Mine is a German one, and it does not have to be antique. Any 2 millimeter number 11 will do. I love a number 11, especially in an area like that, where you get into really small spots.

From there I went back and forth between the number 11 and the back bent. After the small tool I checked how big an opening I had made, then picked the back bent up again to round it a little more. Halfway through I said I had to make sure I was not making a mistake in that area, since the overall feel of this movement was on the line.
What do you do when part of a flower bulges too much?
Make it smaller. First came a check of the original, because one little detail escaped me. Honestly, I have no idea, I said. It had to be quite a bit lower, I knew, so down it was going.
A second look said that part was too bulging, and not good. It had to drop down, and the inside needed excavating. It would be part of the petal that wraps around, so it needed much deeper excavation to make sure it rolls. My excavation on the inside came out the way I liked. The overall shape was the trouble.
A bigger tool was the answer, a big skew that took off the extra chunk. The other side got the same. I know I am going against the grain, I said, and I can fix that. Turning the camera each time was just not convenient.

A slight bulge was fine by me. With the same tool I rolled the wood slightly underneath. Carving against the grain is not something I encourage, and I knew I could clean it later. When I finished, I called it much better.

What happened to the flower in parts 11-2 and 11-3?
In 11-2 the back bent came out again, and for flowers I called back bents probably must-have tools. This time the tool could go with the grain and make that roundness. After a few passes the flower looked nicer and smaller, and I loved it.
About a quarter inch, about six millimeters, was left on that petal to make some movement, and it pays to know what you have below. Later in that video I worked the inside from the sides and asked if a round inside matters. Yes, I think it does.
The inside has its own rules. For the opening I took a number 9, a quarter inch (close to 6 mm). The angle matters, since I could excavate too deep and hit the opposite side, so I aimed at that little thing and kept the pace slow.
Later a tiny one, number 11 at maybe one millimeter (about 0.04 in), went in from the hole, upside down, then the normal way, then upside down again. That side was really fragile, and it looked like a crack was already showing, so I wanted no more of it. I came at it from a different side and took my time. It is a slow process.

On 11-3 one petal had to go underneath another on the inside of the flower. That is kind of hard, but not impossible. The back bent in my hand was a small one, and it hit the movement on the inside and cleaned it, because it was really ragged.

Only the beginning of that cut came from the back bent, and the rest came from the opposite movement. Rushing was out. One section opened up completely, and it was airborne now, I said, so you can see it actually moving. I was not sure the camera caught that. Which way petals overlap is the subject of Maine class 8.
On the edge I compared my petal with the original and said I had done something different, and that this petal is longer than that one, but I thought it was fine. The edge was ragged, so I cleaned it with my knife upside down until I was happy, and tried to wrap it a little and make it softer. Earlier in 11-3, a petal I worked with the knife lay right on top of the first layer and just blended, and that area was not pancake anymore. I finished that side super happy with this movement.
Where else do I guard a flower's movement?
In my other courses on wood carving I use nearly the same sentence, and the tool changes. Here is where, with what I did, in the order of the table.
| Where I said it | The trouble I named in that spot | The fix |
|---|---|---|
| Maine, part 11-1 | A tulip with a hole through it, and its feel guarded | A back bent, upside down |
| Hashemi 48 | The bottom flower and its movement | Waste taken out between the upper and lower one |
| Hashemi 45 | A round shape, kept while the petals twist | A concave cut, then a look at the edge |
| Bouquet panel 23 | The feel of roundness on a section sticking up | A quarter inch gouge knocking it down |
| Venice 40 | A pipe that got almost no concave | A ridge, small and blended |
| Panel 33 | A flower's movement along its center line | Slices with a number 7, concave and convex |
| Grape Onlay 11 | One leaf and the way it moves | A plan to excavate right underneath it |
| Butterflies 3 | Overall movement near a wing | A quarter inch limit on depth |
In Hashemi lesson 48 I wanted to keep the movement on the bottom one. I undercut and took out as much as I could between the upper one and the lower one, using just an eighth of an inch (about 3 mm), carefully, with no wish to overdo it. Then came a number 11 at one millimeter (about 0.04 in), going on to the same hole.

In Hashemi lesson 45 a concave cut left my overall shape in place. The shape is still round, I said, because your eye still catches that edge and it reads as the same round. All those crazy movements on the petals just create a beautiful thing.
On the furniture panel, in the main flowers bouquet lesson 23, one section stuck up too much. A bigger gouge came to mind first. The small one won out, a quarter inch, which is about 6 mm, and I said I still wanted to maintain that feel of the roundness.

Over in Venice Room workshop 40 a pipe got almost no concave, though some, and up came a small ridge. Blending it kept the overall roundness, and the opposite side of the pipe could get the same. An exaggerated eye would be more readable, I said, probably one millimeter or one and a half, like 1/16 of an inch (about 1.6 mm).

The furniture panel lesson 33 ran on the same idea. Using a number 7, about three eighths of an inch (about 10 mm), carved concave, concave, convex, again and again. The passes follow the center line, since the movement itself must stay. In that section some parts go along the grain and I could catch them easily, so I told you to really slice.

In Grape Onlay lesson 11 it was a leaf that mattered. It moves this way and that way, and one small section belongs to it. That leaf could not go down any further, I said, and I wanted to keep it. The next job was to excavate right underneath it.

The class on the butterfly plate got a short line from me: go no deeper than a quarter of an inch (about 6 mm) near a wing. Overall movement is at risk there, so be careful around that area.

A line can go and the movement can stay. Back in Venice Room workshop 3 I lost my lines and said it was okay, since I could reestablish them. That did not scare me, as long as the overall movement survived.
Where does this tulip go next?
The same panel keeps going after 11-1, and you can pick it up in class 10 or class 12. Why the panel got a darker ground is in class 1, and how two glued layers read as one carving is in class 9. Every class sits on the Maine course page, and the plan that opens them is here: see the tuition.
How it's done
- Say what you want to keep. I named the movement's feel and the flower's roundness as the two things to protect.
- Open a spot for the shadow. Set straight down and turned with a rotation motion, not a full rotation: a number 9 at six millimeters, which is about 1/4 in.
- Go in with a back bent. Upside down, my Henry Taylor got inside and kept the roundness, and flipped the opposite way it did the next side.
- Switch to a smaller tool for tight spots. Two millimeters (about 0.08 in), a number 11, got into the small places, and I went back to the back bent after it.
- Check the original. When I could not recall a detail, I checked the original, and it had to go quite lower.
- Slim what bulges. A big skew took off the extra chunk, and the same tool rolled slightly underneath.
Frequently asked questions
Why did I carve through the flower on purpose?
A deep shadow. I said it would look really nice if you could see the background, and I wanted that spot even with a mistake possible. Straight down went a number 9, six millimeters wide.
Which tool kept the flower round while I hollowed it?
My Henry Taylor, the number 3, went in upside down to get inside. After that I flipped it the opposite way for the big tulip. Of the multiple ways I could have done it, I said I really like that approach.
Can I tell how much wood is left on a petal?
I watch the opening. As the roundness came, my opening got wider and wider, and I pointed at how deep the shadow cast. That gave me a really good feel for how much material I had on that petal.
What to carve next