
Alexander Grabovetskiy, woodcarver, School of Woodcarving · Published 2019
What is a vanishing point cut in wood carving?
Quick answer: Carving to a vanishing point means driving the groove so deep that the eye cannot find where it ends. On a carved flower it runs where two petals meet until the shadow reads as a gap right through the piece. A tapered bit sets the deepest of them, and every later cut is steered into that bore.
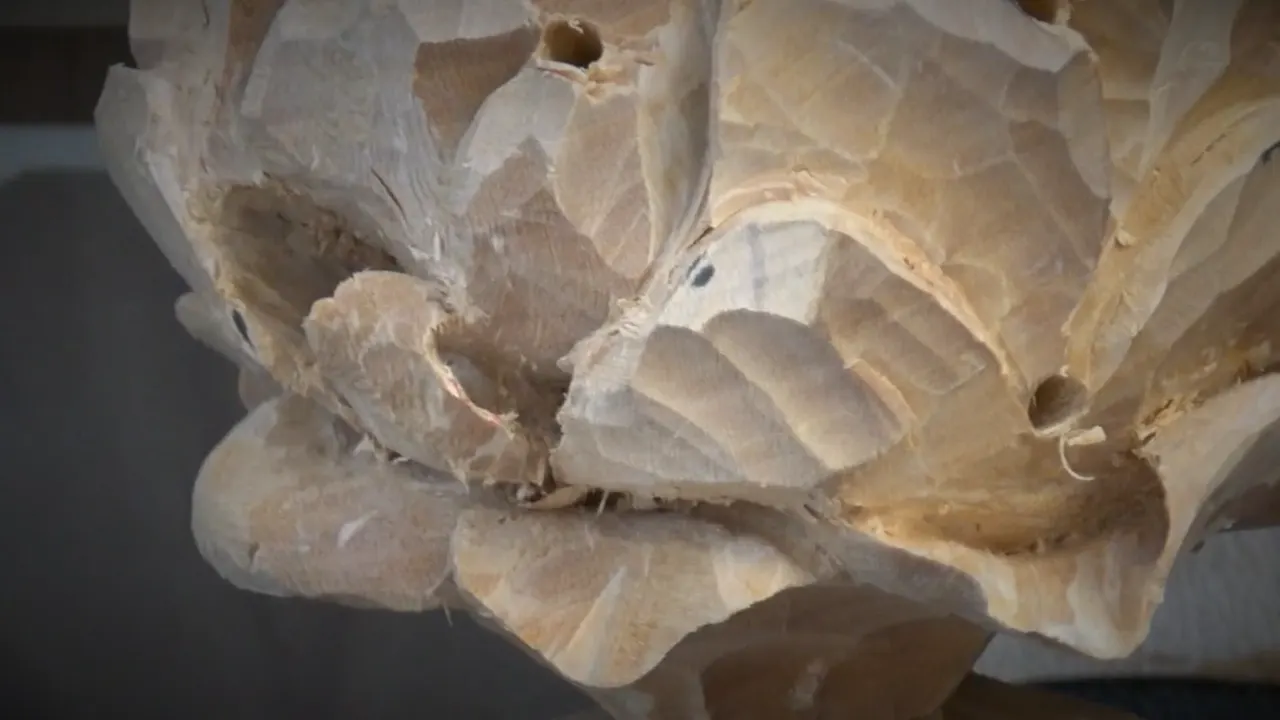
It is a cut driven so far in that your eye loses the end of it. No trick of light, no dark wax, nothing painted. The trench simply runs further than a viewer can follow, and the shadow does the rest.
Have you ever looked at a carved flower and been sure the petals were separate pieces glued on? Then turned it over and found one block of wood?
That is what this is for. Lesson 45 of the Hashemi flowers panel goes after the deepest joins on a peony with a half millimetre veiner, a small spoon gouge, and one thing most carvers never expect to see me pick up: a tapered drill bit.

What the drill is actually for
- The groove ends where nobody can follow it any further.
- Drill a tapered hole at the deepest join, then steer every later cut into it.
- That bore has to vanish. A visible circle ruins the effect it was made for.
- Lose it under chips, and a toothpick will find it again for you.
- Never drill between every pair of petals. Some of them belong close together.
- Leave a connecting point where a petal would otherwise be too fragile to survive.
- No sandpaper anywhere, so the tool marks left behind become the light play.
What is a vanishing point cut in wood carving?
A cut taken until you cannot see where it ends. The whole definition sits in that sentence, and I use those words on camera because no other phrase describes what I am chasing.
On the join between any two petals of this peony the gap has to read as though it goes right through the flower. It does not go through. The wood is solid and the grain will tell anyone who looks. What sells it is that the trench between them runs deeper than the light does, so the bottom is black, and a black bottom reads as air. The leftover wood between petals is where that problem starts.

Why drill into a carving you are still shaping?
To put the deep point there before any carving can reach it. Backwards, I know. In the lesson I say out loud that drilling those holes is kind of scary.
Here is the difficulty. The deepest join on this flower sits under two overlapping petals, and no gouge in my rack can reach the bottom of it from any direction. So instead of carving toward a point I cannot get to, I drill a tapered bore straight into it, pointed inward where the petals all begin, the way the flower actually opens. Now the deep point exists. Everything after that is carving toward something rather than hoping to arrive.

How deep does the drilled hole go?
Deeper than you would guess, and deeper than you need. I go really deep, and I tell you plainly that you do not have to.
The bit is tapered, which matters: it makes a cone rather than a tube, so the opening flares and the small gouges that follow have somewhere to sit. Each one leans differently as well, because the petals do, and the bore has to follow them. Drill them all on the same axis and the flower gains a pattern nobody asked for.

Making the bore disappear
You carve everything into it from every side until nothing round is left.
Right after drilling you can still detect a round hole sitting there, and a round hole is wrong. Nothing in a flower is round like that. So I take a small gouge, an eighth of an inch or smaller, and work each direction in turn, taking every cut down to that one point. The circle stops being a circle. It becomes the place where four or five carved surfaces run out of room at the same time, which is what a real petal join looks like. Then I come at it from underneath as well.

What do you do when you lose the hole?
A toothpick. Not a joke, and possibly the most useful thing in this lesson.
Once the bore is deep and half buried in shavings, you genuinely cannot see it any more, and carving blind toward a point you have lost means the cuts land anywhere. Push a toothpick in and it stands up out of the wood, marking the target. Take it out, carve toward where it stood, and drop it back whenever the target needs checking again. The chips also have to come out constantly, because everything in that trench is cut already. It simply has to be removed. Keeping a carving clean as you work covers that habit in full.

Should you drill between every pair of petals?
Drilling everywhere is the commonest way to spoil the whole effect.
If you make one everywhere, it will not look as nice, and it will not look natural. Some petals on a real peony sit close to a neighbour and some stand well apart, and a drilled bore creates a big space every single time. Space everywhere is the same as space nowhere. I place them only where a pair really does part company, and carve the rest by hand, which also means some joins stay shallow on purpose.

Reaching the joins nothing else can get to
| Stage | Tool | Reach | What you are watching for |
|---|---|---|---|
| Opening the join | The V tool, any of them | Until the walls close on it | Nothing yet |
| Going deeper | The eleven at one millimetre | Further | Resistance climbing, so step down a size |
| Finishing it | Point five | Past what anyone can follow | Snapping the tip on one deep push |
| Setting the deep point | Tapered bit | Anywhere | Point it at the middle of the flower |
| Dissolving the bore | Eighth inch gouge, then smaller | Every side | Anything that still reads round |
| Undercutting | Back bent, number seven or twenty five, three millimetres | Behind | Pressure on a petal that cannot take it |

Why the back bent?
Straight tools get in their own way, and I hold one up in this lesson to show exactly where it stops travelling.
To undercut behind a petal, the edge has to travel in and then turn back on itself. No straight shaft manages that. The handle fouls the petal in front long before the edge arrives. The back bent curves away from the work, so the shaft clears while the edge carries on. Mine are a number seven and a number twenty five, both three millimetres. Small tools do the same job in some places, and for the very finest work I like the micro tools made by Ashley Iles with Peter Benson, and the Dockyard range.

Does the cut ever go right through?
On this flower it did, and I said out loud how happy that made me.
One join opened right through to the far side. Nobody will see it from above. Light will find it, travel through the flower and come back as shadow under every petal near it, and that is what makes a carved peony read from across a room instead of dying into a pale lump. My goal from there is to keep removing material until the petals look as fragile as they can. They will be fragile too. Relief work at this depth is always a negotiation with breakage.

How do you stop a petal snapping off?
Leave it attached somewhere. A connecting point is worth more than a clean silhouette.
Twice in this lesson I choose to keep one petal joined to its neighbour rather than separate it completely, and both times for the same reason: separated, it becomes fragile enough to break, and a broken petal costs an afternoon. That decision also rules out drilling there, since a bore pulls every cut toward itself and the connection is the first thing to go. When I do work beside a fragile one, there is no pressure at all, none, and I say so while my hands are on it. Holding a carving too fragile for a vise is the same problem one stage later.

Why must the cuts be clean if they are that deep?
Sandpaper never touches this flower. Nor any of my work, so what the tool leaves is what the owner looks at forever.
Two things make a cut clean: a sharp edge and the right direction. Sharpening is not optional here, and I say plainly that without sharp tools you will not get the same result I am getting. Direction matters most while blending, where a pass the wrong way across grain tears instead of slicing. And the ridges left behind are not flaws to be removed. They catch the light and move it across the petal as you walk past, the way it does across any piece of carved work lit from one side. Concaves and convexes explains what those surfaces do.

Could a knife do the same job?
Sometimes. Grain decides, not you.
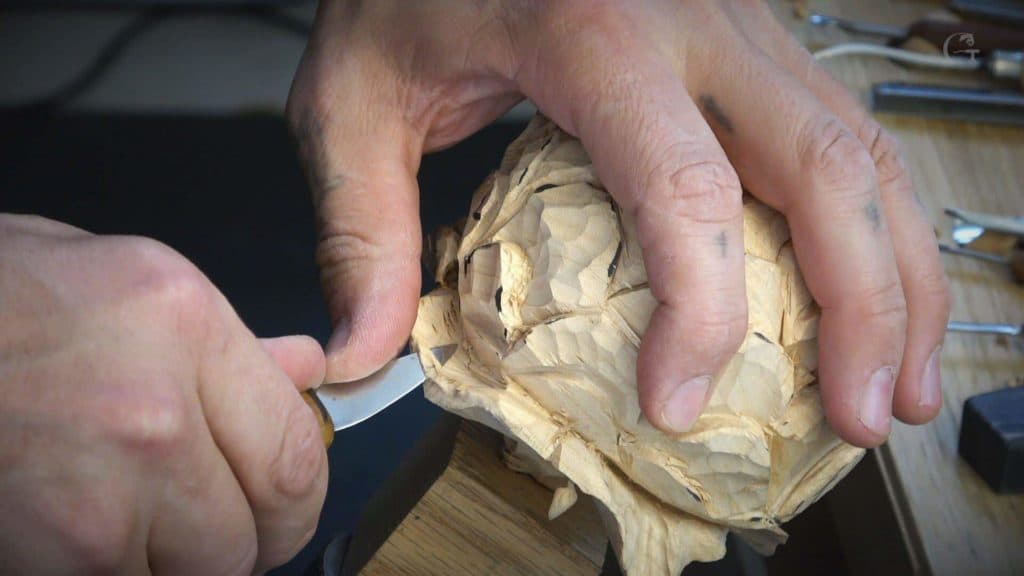
I reach for a knife often in this lesson, and it will take a cut to its vanishing point in the right spot. It is not always convenient, and there are places where grain direction simply refuses a blade at that angle. Then the veiner goes back in. The rule I work by is dull and reliable: try the tool that is already in your hand, and the moment it starts to force, change tool rather than push. Whether carvers have a favourite gouge answers the question underneath that one.

Is this worth the risk on your own work?
If you carve flowers seriously, yes, and I would start on one join rather than twenty.
Work in lime or basswood, pick the single join on your piece where a pair really does separate, and take it right down. You will see immediately what the shadow does. Then study the flowers in the V and A sculpture rooms and notice how many of those joins go dark at the bottom. Paint has nothing to do with any of that.

Which way should every cut point?
Inward. Always inward, toward the centre of the flower. Everything on a flower has to run there, and I repeat it in this lesson until listening must get tiresome.
Petals grow from the inside out, so the carving has to agree with them. That rule decides the angle of every bore I drill, since each one leans toward the middle the way the flower itself grows. It decides the direction of the small gouges afterwards as well, because a cut that runs across the flower instead of into it fights the shape it is meant to describe. Once you accept that one rule, most of the decisions in this lesson stop being decisions. How many petals a flower should have counts the same structure from the outside in.

Does the flower still read as round?
From across the room, yes, and that surprised me the first time I noticed it.
All the movement here is inside the outline. I curl one petal in, twist another out, drop a hollow into a third, and the overall shape stays the same round it always was, because the eye catches the outer edge and reads a circle. What changes is everything within that circle. Every one of those crazy little movements on the petals makes the flower alive instead of carved, and none of them cost me the silhouette. Worth knowing before you start, because it means you can be bold inside the edge without ruining the piece from a distance. Telling whether a carved line flows is the check I use on each one.

How fragile does a petal get?
Fragile enough that I stop touching it. That is the point of all this removal, and it is also the limit on it.
My aim once a join is open is to keep taking material out until the petals look as fragile as they possibly can. They will genuinely be fragile too, and there is no way round that. When I work beside one that has already been thinned, the tool goes in with no pressure at all, none, and I say so out loud while my hands are moving. A carved flower that looks safe looks heavy. The whole reason for the deep grooves and the bores and the back bent gouge is that a petal reading as thin as paper is what separates a flower from a lump with lines on it. How thin a carved leaf should go puts a number on the same question for foliage.

What this lesson leaves you with
One band of a peony finished, holes drilled and then carved out of existence, and a flower that has started throwing real shadow instead of pretending to.
Breaking a carving tool is the risk that comes with working at this depth, and the hardest flower to carve explains why I keep choosing the peony anyway.
How it's done
- Open the join with a V tool. It removes the bulk while there is still room for it, and it establishes which petal lies over which.
- Carry the trench down with veiners. A number eleven at one millimetre, then the same profile at half a millimetre, working from both sides of the join.
- Drill the deepest point. Use a tapered bit, leaning it the way the petals lean and pointing it inward. Only where two petals genuinely part.
- Carve every surface into the bore. An eighth inch gouge and smaller, taken from each direction in turn, until no circle is left to see.
- Find it again with a toothpick. Once shavings bury the hole, a toothpick stands in it and marks the target while you carve toward it.
- Undercut with a back bent. The shaft of a straight tool fouls the petal in front. A back bent clears it, so the edge keeps travelling behind the work.
- Keep a connecting point where it is needed. A petal separated on every side breaks. Leave it joined somewhere and do not drill beside it.
Frequently asked questions
A vanishing point in wood carving means what, exactly?
It describes a cut taken so deep that nobody can see where it stops. The bottom goes black, and a black bottom reads to the eye as open air between two carved shapes.
Is it acceptable to drill holes in a wood carving?
For the deepest joins, yes. The bore puts a reachable low point where no gouge could arrive, and it is then carved away until no circle remains.
What hides a drilled hole in a carving?
Small gouges worked in from every side, so that several carved surfaces run out of room at the same spot. A circle that stays a circle has not been finished.
What to carve next
- Carving Hashemi Flowers
- Breaking a carving tool
- The hardest flower to carve
- Concaves and convexes
- The leftover wood between petals
- Do carvers have a favourite gouge
- Holding a carving too fragile for a vise
- Keeping a carving clean as you work
- How many petals a flower should have
- Telling whether a carved line flows
- How thin a carved leaf should go