

Alexander Grabovetskiy, woodcarver, School of Woodcarving · Published 2020
Can you draw on wood with a marker before you carve it?
Quick answer: Drawing on wood with a marker is how I keep a leaf's middle line through pass after pass of the gouge. Short strokes or dots do the job in any color. The same ink sinks well below the surface, and later that depth has to be carved away.
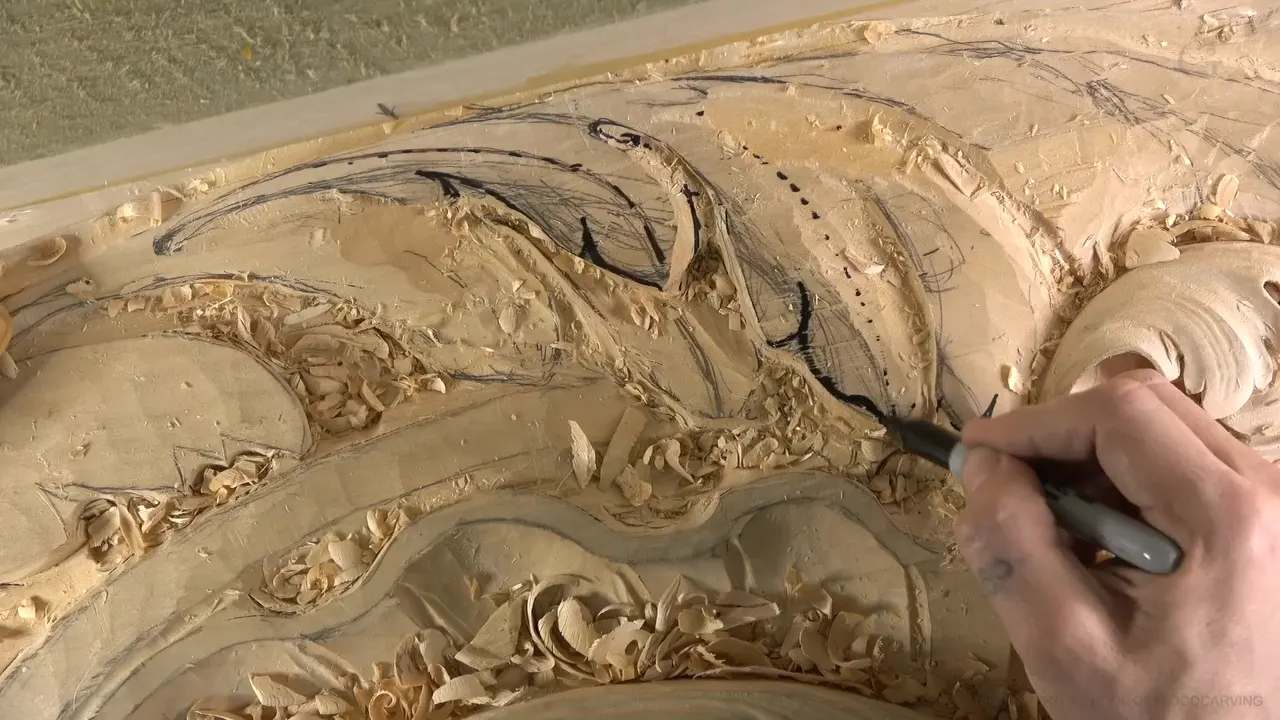
A marker on wood is how I keep the middle line of a leaf while the wood around it keeps coming off. In workshop 33 of the Venice room ceiling I put that line down as short strokes, then as plain dots, and I told the camera the color does not matter. Four parts later I regretted it. By part eight the marker was back in my hand anyway.
Is a pencil line easy to see on clean wood? Does every pass of a gouge take away the top of that wood? Then every pass takes a little of your drawing with it, and the lines you cannot afford to lose need a mark that sits deeper, or a notch in the wood itself.
All of it happened in the twelve parts of that one workshop, while I took a single acanthus element to its almost final look. I will tell you which lines got ink on my board, which stayed in pencil, and which got a notch from a #11. The ink part has a price, and I paid it in part six.
Before ink touches your board
Pencil works for most marks. On this board I admitted there were too many of them.
The middle line gets the marker, because it is the one line I cannot lose.
Strokes or dots are enough, in any color you like.
Ink can go really deep in the fibers, so plan on carving it away later.
A preliminary notch, set with a small #11, holds a separation you are about to carve around.
After a cleaning pass, put the center line back, and a pencil will do.

What are you really trying not to lose?
The movement, more than any one line. Early in part two I said it twice in a row. I don't want to lose overall movement, and that has to go all the way like this. Six parts later, working near a future eye, I said it again, and added that you probably don't see it.
Part one shows why it matters to me. I chipped one side away right away, because otherwise it just disappears and I cannot see what I am doing. Before that I excavated a little with the same #11, not the final excavation, only enough to see and read the final movement much better. The marks in this workshop are there to keep that movement readable while the wood keeps changing.

Can you use a permanent marker on wood you plan to carve?
You can, and on this ceiling board I did, for the lines that had to survive. Whether it was a permanent marker or a milder one, the recording does not say. What I did say in part two is that the color does not matter, and that you could use a black one if you wish.
It came out in the middle of a busy leaf, with pencil marks all over the wood. Too many, I said. The middle line had to stand apart from all that gray, so I set it apart with the marker, and that way I was not going to lose it.

You do not have to draw a solid line. Short strokes are enough, and with them you know exactly where the middle line will run. The next stretch got exactly the same. Or even dots, and with dots I see the direction much better.

Why does the middle line get the ink?
The lobe's movement follows it. Part two did not start with ink. A smaller number 11 went in a little deeper first, and that gave me the ability to place the middle line in the right position and give it the right movement. Only then did the marker come out.
My eye puts the line on the wood, and the marker only holds it there for a while. Later on, in part eight, the concave beside it had to wrap around a future eye and still get more gradual toward that center line, so it would blend in.
Where a middle line belongs on a lobe is a design question with a lesson of its own. If a cleaning pass wipes yours out, finding a lost center line by eye is covered too.

Should you draw on wood in pencil first?
A pencil is fine for most of the drawing, and it is what covers my board before any ink goes on. On this board the marker went on the lines that had to outlast the carving around them, which meant the middle line, the separations, one S curve and, later, the subdivisions.
Every kind of mark I made in workshop 33 is in this table, in the order it came up.
| Mark | Purpose | Moment |
|---|---|---|
| Pencil marks everywhere | Too many, I admitted before the marker came | Early in the second part |
| Short marker strokes | Enough to show where the middle line runs | Same part, on the lobe |
| Plain black dots | Easier to read than one long solid line | A minute later, same part |
| One preliminary notch | Set so the second separation is not lost | Fifth part, before the concave |
| Blue pencil again | Recreates the center line after my ink complaint | Sixth part, after the complaint |
| Marker, used again | Out before the subdivisions of this leaf vanished | Eighth part, after the regret |
| Main preliminary boundary | Seven millimeter #11, a bit over 1/4 inch | Eighth part, a minute later |
| Couple of notches | Five millimeter #11 divides up the next section | Late in the eleventh part |
Three of those rows hold no ink or graphite at all, only gouge work in the wood.
What does a marker do to the fibers under the line?
Ink goes down into the fibers, and sometimes the marker goes really deep. I'm going to be honest with you. Part six is where I noticed, and it was not a happy moment.
I had just looked over one element of the leaf and said it looks really, really nice. Beautiful. It makes me happy. In the next breath I said the one thing that does not make me happy is that I used a marker. That's okay, I said, I'll take care of it. Then I started working my way in.
The same depth that kept that line from getting lost is the depth I then had to carve out of the leaf. That staying power is why a colored mark shows up in my Roman acanthus lessons, and part six showed me its other half.
Ink was not the only thing on that board. My fingers had green paste on them in part ten from sharpening off camera, and green paste leaves lots of dirt too.

Why pick the marker up again after regretting it?
The subdivisions were about to disappear, and I said so. Let me use a marker before I lose my subdivisions, those were my words in part eight, and the marker went on. I named the middle point, said which part was this leaf, took out a piece I could now remove safely, and outlined the leaf before I lost it.
Nothing in part eight mentions my complaint from part six. A marker was in reach, lines were about to go, and the marker won.

Next came a preliminary notch, or separation, I should say, and a better outline in that direction. Later on I would excavate this leaf underneath the other one. For now all I needed was a really nice overall movement for this part of the leaf.
What is a preliminary notch?
A preliminary notch is a small first pass with a #11, set where a separation will go, so the wood itself keeps the place. I made one in part five. This will be the second separation, I said, and maybe I can notch it right here, or I'll lose it.

Next I went after a much bigger concave using a #11 of about three quarters of an inch, 19 mm. Somewhere in that concave I almost lost where the separation was supposed to be. I did not lose it.

Part eight has the bigger version. A #11 at 7 mm, a little bigger than a quarter inch, went in carefully along the division, and I gave the result a name. That is my main preliminary boundary. That's what I call it.

The boundary gave me a really nice movement on the inside, and then a 20 mm #11, about three quarters of an inch, started the bigger concave. Yes, I was wiggling it, because I was working upward.

Near the end of part eleven a 5 mm #11, about 3/16 of an inch, set a couple of preliminary notches to divide the next section before I started outlining. During the last part a big number five or six chopped along one line, and I could have done exactly the same along the next one, but I didn't really need it.
When is it too early to mark a line?
Too early is any time the surface under the line is not clean yet. At the start of part three I had the middle line where I wanted it, and I even thought about moving it a little toward one side. Then I stopped myself. Probably too early, I said, because it is not as clean yet, and I still had to undercut underneath a little more.
Logically, the eye needed to sit much deeper right there. Sometimes it is even a good idea to hide an eye, and I said out loud maybe I would, maybe not, we would see how I felt about it.
Part six had the cleaning, and right after my complaint about the marker I recreated the center line with a blue pencil. In part eleven, once the surface was making more sense, I said it once more. That is going to be the middle line.
So a middle line on a leaf like this gets drawn, carved away and drawn again, more than once in one workshop. And if a line is already gone, bringing it back from the drawing is its own lesson.

How do you mark separations you have not carved yet?
With the marker, a quick line wherever each one will go. On some projects I use a marker a lot, and it makes sense, because with the separations drawn I can clearly see how I can work my way in. I said it three times in a row in part two, one line after another. That will be a separation later on.
The marker sometimes helps a lot. In the same part I repeated that movement on the letter S shape right next to it.

Chips cover the lines as well. In part four I cleared them with a normal hair dryer, the old one I've got, instead of an air compressor, which would send the chips flying all over the room. The dryer just moves them out a little, without much mess and no dust.

Right after that I looked at the whole element and gave it some preliminary subdivisions, just the idea of how I would divide it, because that tells me what I am missing, if I am missing anything. An eye would go there, and a little division of one of the three parts. One and two and three. How many parts a leaf wants is a question for the design course.
By part eleven I was naming the divisions for the camera, the first one and then a second you probably could not see well from where it sat. I could have added an eye and a pipe in both areas. I asked myself if there was any reason for it, decided there was none, and left it alone.
How do you work where you cannot see the line?
You go by feel. Part three has me apologizing to the camera, because there was no way I could place it to show exactly how I was going in. Part nine brought another apology, this time for my head, because sometimes I have to stick it forward or I cannot see at all.
Part eleven has a better answer. I ran a number three over one stretch of the leaf, and it still went smoothly without digging in, which told me I was doing the right thing. Sometimes it is impossible to see while you are carving, but you can always feel how it goes.
A rasp came next, on the same area, one of those spots where the eye does not see much, and it hit only the high spots. The grain mattered too, back in part three. I had to keep an eye on what it does and change my position to follow it.

What should you try on a scrap first?
Draw one middle line on a scrap of basswood, half in pencil and half in marker, and carve a concave beside it. Watch which half you lose first. When you finally carve through the ink, look at how far down the color went.
Then set a preliminary notch with a small #11 where one separation will go, and see if it outlives both marks. If this made sense and you have no course yet, pick a first one here.

This workshop sits in the Venice room part 3 course, right between workshop 32 and workshop 34, and the workshops in part 2 built the acanthus head this element grows out of. If gouge numbers are new to you, the tools course walks the whole rack, and the lessons map shows how everything connects.

Near the very end of workshop 33 I kept bumping one edge with the tool, and I let it go. Not the final edge yet.
How it's done
- Set the line by eye. Find the spot that gives the lobe its movement before the marker comes near it.
- Mark it lightly. Dashes are enough, or a row of points.
- Mark future separations. Put a quick line wherever a division will go, then count the parts out loud, one and two and three.
- Notch what must not vanish. Take a small #11 and set one shallow preliminary notch at each separation you cannot afford to lose.
- Wait for clean wood. Hold off on the next line until the surface under it has been cleaned up.
- Redraw after cleaning. When a cleaning pass takes the old mark, put the center line back, and a plain pencil is enough for that.
Frequently asked questions
Does a permanent marker line carve off?
Carving takes it off, but a quick skim may leave color behind, because ink can soak really deep into the fibers. On the Venice room board I said I would take care of it with the gouge, and when the center line went back on, a pencil drew it.
What color marker is best for marking wood?
Any color will do, and I said on camera that a black one is fine if you wish. Pick one you can read against your wood, and keep the marks light, a few strokes or a row of dots rather than one solid line.
Is pencil or marker better for drawing on wood before carving?
Pencil suits the many marks, and my board carried plenty of them, too many by my own count. The marker takes the few that must stay put, like a middle line. For a separation you really cannot lose, carve a small preliminary notch with a #11.
What to carve next