

Alexander Grabovetskiy, woodcarver, School of Woodcarving · Published 2020
Why do carvers use acanthus leaves to connect two parts of a design?
Quick answer: Acanthus used as a connector is a carved leaf set where two elements of a design meet. A carver can reach for it because a leaf fits almost anywhere and still looks as if it was meant to be there. Alexander Grabovetskiy calls it a cover-up, the leaf he uses when he is not sure what should link two elements.
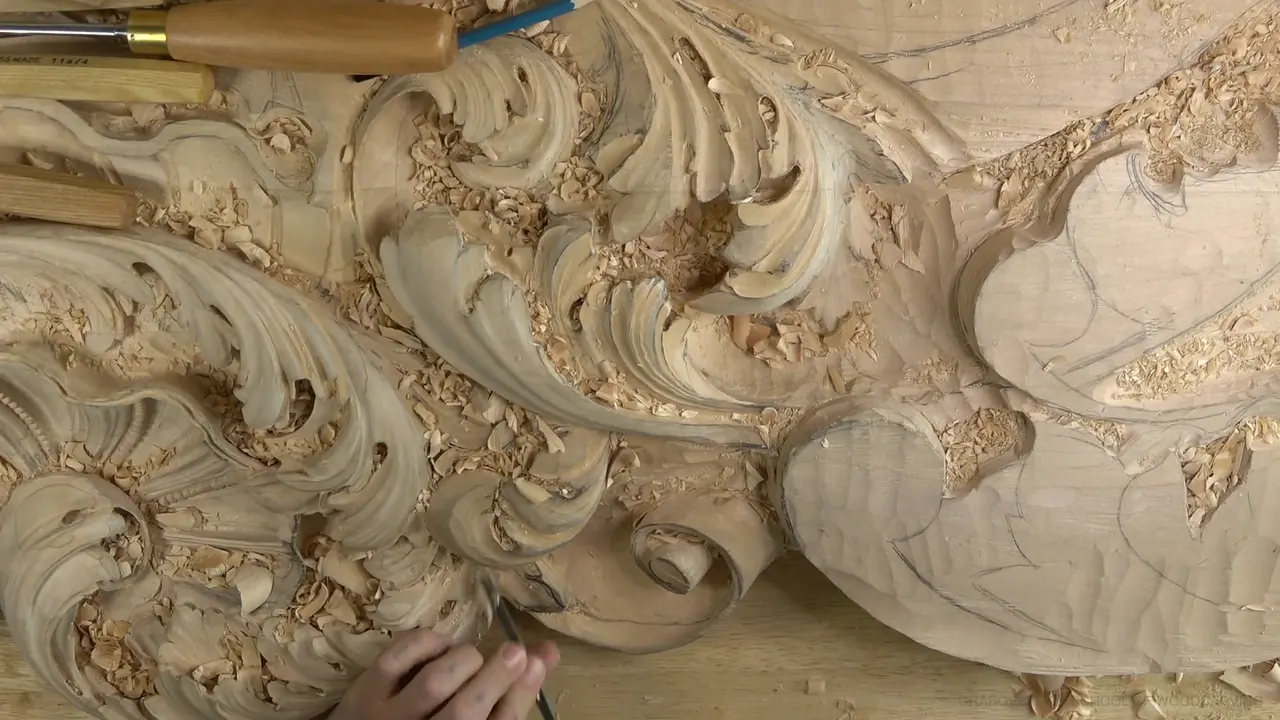
An acanthus used as a connector is a carved leaf placed where two shapes on a board meet, and it looks as if it was always meant to be there. I call it a cover-up, and I said so on camera in workshop 32. The acanthus motif can go almost anywhere on a board. When I don't know what should link two shapes, a leaf can do it.
Have you seen a carved leaf curling out of the corner of an old frame, or off the top of a Corinthian column? Did it look like it grew right there? Look again at where it sits. Sometimes that leaf has one plain job, and it is covering the spot where two other shapes meet.
Workshop 32 of this Venice room holds a cover-up leaf in its third part, and then a second acanthus that I design with a pencil right on the ceiling board over the last four parts. You'll hear what I honestly think of the trick. Then you'll see what I leave out on purpose, and where one division and one eye go inside the leaf, where you won't see them.

What a connecting leaf needs, in six lines
A leaf can sit in nearly any spot on a board and still look planned.
Everything starts from one main movement, here a letter S, and each separation ties back into it.
A twisting line that pulls the eye can stay out.
One side of a pipe can rise until its hollow nearly vanishes.
A second leaf can repeat a movement you like from somewhere else on the board.
A division and an eye can sit inside, under a lobe that rides a little higher.

Why is the acanthus motif used to connect two parts of a carving?
You can put one pretty much anywhere you wish. I stopped in the third part of workshop 32 and said it straight out. An acanthus works like a cover-up, and it still looks beautiful wherever it goes, like it was supposed to be that way.
I'm going to be honest with you about the rest of what I said. Sometimes it really is just a cover-up, for the times you don't know what would be best to connect two elements. So you use acanthus. Then I went back to the leaf, and a minute and a half later I said it again. Cover-up acanthus.

The carved leaf copies real plants such as Acanthus mollis, and builders were putting it on the tops of stone columns long before anyone carved this room. Over the centuries it turned into one of the most common plant forms in ornament. On the bench the reason is smaller and more practical.
A filler is a different tool for a different gap. Small flowers fill an empty space between bigger shapes, and there is a page on filling the empty spaces of a panel and another on the filler flower if that is your problem. A connecting leaf has to tie into whatever sits beside it. On this board the eye I planned connects right into the main acanthus, into its main movement.
If you have no course yet and this part made sense, start here.

How do you start a leaf that has to link two shapes?
Start with the one movement that carries the leaf. For this board it was a letter S, and I set it in right away.
Then came a separation going down, and then another one, and both connect back to that main movement. I planned an eye too. Thinking it through on camera, I said this acanthus was nothing complicated. Two separations, one eye and one S, and a plain leaf is doing the connecting.
Before any of that I smoothed the area with a spoon gouge, a number 3 at about 5/8 of an inch, 15 or 16 mm. It worked right there and gave me a really nice, smooth surface. In another spot it would not work at all, and I said so.

Because this relief board will be looked at from below, I took a skew and gave the leaf a better shape. Workshop 29 has a page on carving for that view. I stopped to double-check the thickness, knocked one side out, and wished out loud for a spoon, which would have helped a lot more.
The second leaf, in the last four parts, started for a different reason. I had left some wood inside the volute, because I still was not sure what I wanted to see there. So I jumped over and developed the acanthus first. It would tell me what the volute needed. Most of this workshop's first eight parts go into that volute, and workshop 31 is where to start on it.

What can you leave out of a connecting acanthus?
A twisting line can stay out, and so can a hollow beside the pipe. After I smoothed that area, it still didn't make much sense yet, because there should be a secondary line somewhere too, one that goes in, twists, and disappears. But that detail is not always done, because it just distracts the eye. I left it out.
Normally there's a pipe with a hollow on each side of it, the cross section I always carve. On this Venetian panel I raised one side up a little, until there was almost no concave left on it, because I thought it would look really nice. This one doesn't have to be too complicated, I said.

Let me tell you a story. I took a back bent gouge to blend the middle region, and in about thirty seconds I destroyed my concave. It happens. I went back in with the number 11 and fixed it. I looked again, said maybe yes, maybe no, maybe it's okay, and admitted the tool was too big. A smaller one gave me a nicer movement.
Extra subdivisions went in right away, with a 5 mm number 11, which is about 3/16 of an inch, because they were going to look much better. I even said that tool was a little too big for the job. We can try, I told you, and I kept going. The final cleaning waited until all my decisions were made. Before that, I wanted to look at the leaf the way it's supposed to be seen, to check if I needed to add anything or take anything away.
If your own leaf looks busy, the crowded acanthus lesson fixes it by taking mass away. The page on extra separations explains why old Venetian carvers added small ones, and a leaf whose movements disagree is the reason a carved acanthus looks wrong.
Here are six choices on the two leaves, and where each one shows up in the workshop.
| Choice | Result | Where |
|---|---|---|
| Main letter S | goes in first, and each separation meets it | third part, about minute five |
| Secondary twisting line | left out, because it pulls the eye away | early in the third part |
| One pipe side | raised until almost no concave is left there | start of the fourth part |
| A hidden division | tucks under its neighbor, out of sight inside | second minute of part ten |
| An invisible eye | sits inside, with part of the leaf above | part twelve, near minute two |
| One tiny division | planned as a trial, easy to chop out | part ten, near minute five |

How do you place a second leaf so it answers the first?
Find a movement you like and repeat it. Design has laws, and I went through them on the furniture panel, a different project. One of them is the rule of repetition. You repeat one detail, and it has to reflect somewhere else on the piece.
I really liked one element on the board. One part goes downhill, and then another part goes above it. So in part 9 I found a spot for something similar, planned to lower one part and let the other ride above, a lot more above this time, and said we'll see.

The new parts sit on a flow line, an invisible one, and judging a flow line has its own page. The position of an eye has to flow with it, and it felt like I should place it right there. Placing an eye is a judgment you make with the wood in front of you, which is what the page on where the eye goes says too.
Next I looked at my main movement and didn't like it. It was one big chunk. So I planned to widen it and make the smaller piece one of its divisions. It has to be divided in three, I said, and then I said it again.

But three divisions don't all have to show. One of them can slide underneath the part next to it and stay hidden inside, and that's what I planned. I still wanted more divisions inside, for a richer look. Old stone and wood carvers usually gave a leaf at least three divisions, some five and some eight, and those are Fibonacci numbers.
Where does a hidden eye go on a connecting leaf?
Inside, under a piece of the leaf that sits a little higher than the eye itself. I didn't start out that way. While outlining one area in part 12, I stopped and said well, actually, no, I'm not going to do this part this way. An invisible eye would go on the inside, with this part of the acanthus a little above it.

I had to lean it toward one direction and excavate little by little. Then deeper underneath the next part. Same idea, exactly the same idea.
A straight tool would probably do there, and I said I didn't have to use a bent one. Going underneath the new division in part 10, I could still have used straight tools, but logically it wanted a long bent or a short bent. I took a long bent number 11, about 3/8 of an inch or 10 mm, because of the ceiling part.

The part above has to stay above. One area stayed high on purpose in part 11, because I still needed a space for undercutting there, and I went down only where I could. I didn't want it to look awkward, so it has to have a more organic look.
Finding the right position is the hard part. On a gouge or a veiner one side always cuts clean and the other doesn't, because one side cuts with the grain and the other doesn't. So you hunt for the sweet spot. I carved against the grain in part 11, and that was just the position I was in.

What happens when you change your mind halfway through a leaf?
You redraw, and you keep enough wood to change it. In part 10 I told you twice that I was just thinking out loud, and I was.
At one point I wanted a small extra division, just a really small one, to give the leaf a more detailed look. Why not? If I don't like it, I can always chop it out.
I put the pencil marks back more than once, because I don't want to lose the idea I'm trying to develop. Near the end of part 12 I redrew the main idea, because later on I have to subdivide it.

Keep the wood you haven't decided about. In part 9 I roughed the new area about half an inch deep, 12 or 13 mm, and I told you I was eyeballing it. Another shell was coming, so I took a little more out with a number 6. Only a little, because there were going to be overlaps and I'd need that material.
A bent tool would have been better for that depth, I said, since a bent is a lot easier when you're driving it with a mallet. By part 11 some of the area was about 20 mm in, three quarters of an inch, and I said that's deep enough for now. I can always make it deeper later, with no problem. Late in part 11 I decided to lower one area to push more movement that way, and said it would still be readable.

The twelfth part opens on an earlier cut that went a little too deep. Plenty of material here, so no big problem. On thinner wood you need to be really mindful how deep your preliminary cuts go. It's always tempting to work quicker, and then you have a problem to deal with. The page on adding a leaf that was not in the drawing shows another side of changing a design on the wood.
If acanthus is new to you, carve one plain leaf before you try to connect anything. Carving Greek Acanthus Leaf is where I'd send you first, and Acanthus over Moldings puts a leaf on an ordinary molding profile. The Venice Room part 3 course has this whole workshop, workshop 33 picks up the board after it, and the lessons map shows how the courses connect.

The last thing I say in part 12 is about one more cut. And yes, that can go in.
How it's done
- Find the main movement. Draw the one curve that carries the leaf before anything else. Here it was a letter S, set in right away.
- Tie every separation back to it. Run each separation into that main curve, and connect any eye you add to the same movement.
- Repeat a movement you already like. Look around the board for a shape that works, such as one part dipping downhill while another rides above, and echo it in the new spot.
- Divide it in three. Split the main movement into three divisions. One may tuck underneath the next one and stay hidden.
- Leave out what grabs attention. Skip a secondary twist that fights for attention. A connecting leaf can stay plain.
- Rough, then redraw. Take the area down about half an inch first, then to roughly 20 mm, three quarters of an inch, where it needs depth. Put the pencil lines back and subdivide later.
- Carve under what must stay high. Keep raised parts raised and leave room to undercut them. A long bent number 11 at about 3/8 inch went under the new division here.
Frequently asked questions
Which details can you leave off an acanthus leaf?
A secondary line that dips in, twists and fades out is one. Alexander left it off this Venice ceiling board because it distracts the eye, and he says the detail is not always done anyway. A leaf that only connects two shapes does not have to be complicated, in his words.
What is an invisible eye in acanthus carving?
An eye carved on the inside of a leaf, under a lobe that rides slightly higher, where it stays out of view. Alexander chose one halfway through outlining a part, excavated toward it little by little, then went deeper under the next lobe the same way.
Can you change an acanthus design after you start carving?
Plenty of it stays open while you work. Alexander puts the pencil marks back so he does not lose the idea, keeps wood for overlaps still to come, and thinks out loud about new divisions. He offered one tiny division as a trial, since he could always chop it out if he didn't like it.
What to carve next