

Alexander Grabovetskiy, woodcarver, School of Woodcarving · Published 2021
How do you shape an acanthus leaf into one rounded form?
Quick answer: Acanthus leaf shaping is the stage where a stack of glued boards turns into one solid looking form. Gouges round the top board down in an unbroken arc until it reaches the board underneath, the joint vanishes inside that arc, and lobes get separated out only once the rounding is finished.
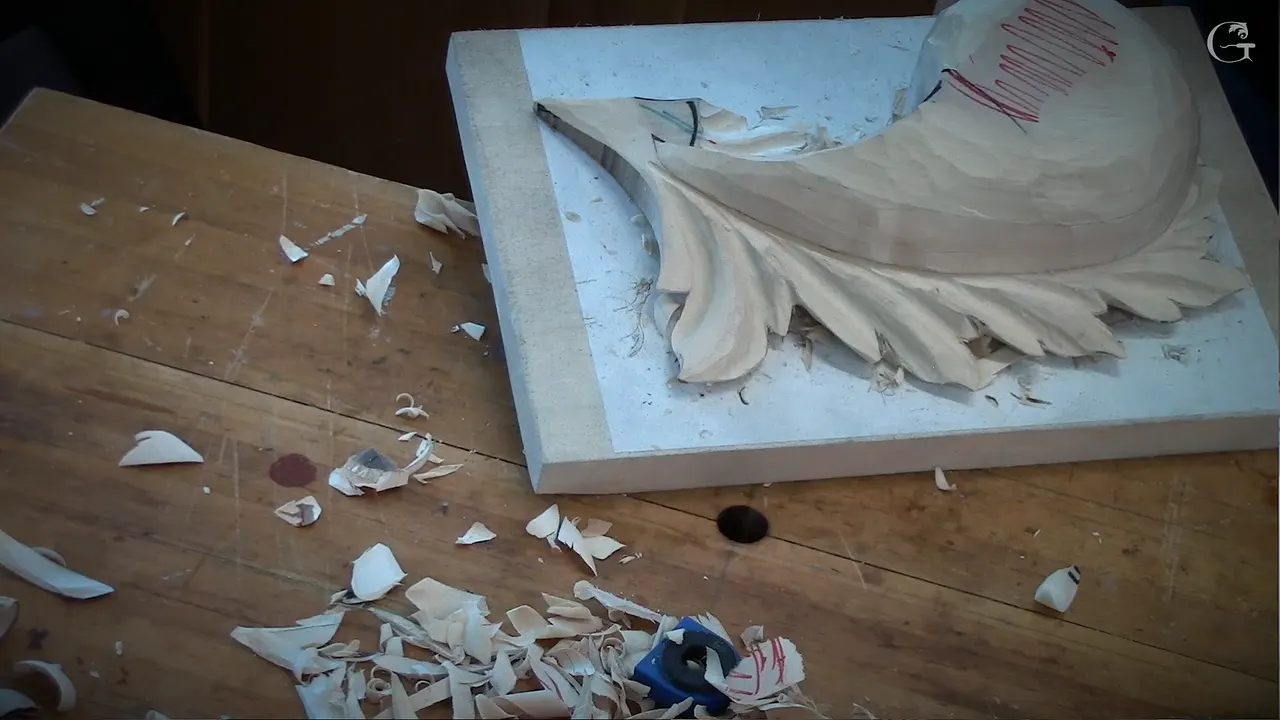
Shaping an acanthus leaf means rounding the whole glued stack into one continuous form first, and splitting it into lobes only afterwards. A gouge takes the top board down in a smooth arc until it meets the board below, the joint between them disappears under that arc, and only then does the leaf get split into its separate lobes.

You glued three boards together last week and right now the thing on your bench looks like three boards glued together. Two hard edges, a pencil line you can still see, and a silhouette with a step in it. By the end of this class a visitor will pick the leaf up and ask how you carved it out of a block that thick.
There was no block. There is a way of rounding that hides the evidence, and it starts at the exact line you have been told all week not to touch.

What has to be true before the first division
- Round the whole stack before you divide anything, because a square shape only ever divides into square pieces.
- The outer arc you carved last lesson is untouchable. Blend down to it, never below it.
- Working uphill is fine here so long as the edge is genuinely sharp. Dull, and you go round the other way.
- A number 11 at 3 mm opens every separation, and a number 9 at 20 mm does all the blending that follows.
- Leave about 5 mm, 3/16 of an inch, standing at the edge of each division.
- Middle line first, then the divisions, because reversing that order means nothing lines up.

What does filleting mean on a carved leaf?
Rounding a hard corner away into a curve, which is what the word means to a machinist too. Think of an upside down bowl, or a piece of a sphere, sitting where your flat top board used to be. Every part of that surface has to rise from one point, climb, and roll back down the other side without a single straight run in it.

Any flatter tool will do the work. A number 2 or a number 3 in whatever width your roll happens to hold is plenty, and the wider the sweep the fewer facets you leave behind for later. Keep one high spot as you go, because that high spot is where the eye will land when the panel is on a wall.


Which edge must you never go below?
The outer arc, the one you drew with a marker and carved to in the previous lesson. Everything else on this board is yours to round over. That line is not. Drop below it by a millimetre and the beautiful sweep you spent an afternoon on turns into a wobble nobody can fix.

I say this to every class and somebody always does it anyway, usually while they are concentrating hard on something else four inches away. Put your thumb on the edge if that helps. Look at that edge before every single pass you make.

Can you work uphill on this shape?
Uphill is fine, and I do it on camera in this class. Slicing uphill into the grain works when the edge is properly sharp, and breaks out the moment it is not. A tool that has been on the strop in the last twenty minutes will slice uphill through basswood without complaint.

When the tool is dull, stop breaking the rule and go round. Attack the same surface from the other direction, downhill, and the fibres lie down instead of tearing. Sharpening is what buys you the freedom to ignore the rule in the first place, which is why it sits second in the three things I teach.

What makes a glue line disappear?
Blend the upper board down until it arrives at the line, then take the line itself off with a small tool. Start where the joint begins. Work the whole of the top board into a dome that runs down to meet the layer beneath, staying above the black line the entire time, and leave the line there while you shape.

Once the dome is right, a number 11 at 3 mm cuts a shallow channel along the joint. Follow that with a number 9, or the same 11 if that is all you own, and roll the channel away into the surrounding surface. Look at the panel from above afterwards and the joint has gone. From six inches with the light raking across you can just about find it.


My own joint ended up about a sixteenth of an inch, 1.5 mm, from where I originally drew it. Moving a glue line while you blend is completely normal and nobody will ever measure it. The whole leaf only has to look like it grew that way.


Why does one side roll under and the other blend out?
Depth. On the side where the leaf meets its neighbour the surface runs out flat and blends away to nothing, because the two shapes have to read as continuous. The far side does the opposite and tucks underneath itself, which is what gives you the bowl effect and the dark line beneath an edge.

Neither side should finish with a wall standing straight down. Straight walls are what make relief look like a cutout stuck on a board, and the undercut you already know how to make is the cure.


Why is every acanthus a boat?
A leaf and a fisherman's boat are the same shape, and the day you see that you stop being frightened of the ornament. Two long curves meeting at a point at each end. A raised centre running between them. Everything else, every lobe and eye and pipe on any acanthus from any century, is a division made inside that boat.

Twist the boat and it stays a boat. Roll it over on its side, stand it up, curl it back on itself the way a Corinthian capital does, and the underlying shape has not changed at all. Once a student gets hold of that idea they can invent their own leaves instead of copying mine, which is the whole point of learning the design rather than the pattern.


Which line do you draw first?
Everything downstream of it. Establish the borders of the boat, then draw one line up the centre, and that line fixes where every division will sit and which way each one leans. I always start there and I have never once regretted spending five minutes on it with a marker before any tool comes out.

The line does not have to run straight up the middle of the shape. Mine climbs and dies near the top of the leaf, which makes the whole ornament lift. Draw it low and the same leaf slumps.


What is the head of a leaf?
The top lobe, the one that finishes the whole movement. Everything below it is preparation. I call the head the most important part of an acanthus and I mean it literally, because a visitor walking past a panel runs their eye up the stem, arrives there, and stops. Get the head wrong and the forty minutes you spent on the lobes underneath will not rescue the carving.

Develop it last, once the lower divisions have settled. Working the other way round means guessing where the weight of the leaf will finish up, and you guess wrong often enough to learn that on your own. Halfway through all this I announced to nobody in particular that I had to buy some kind of string, which had nothing whatever to do with the bench.

Where should the movement stop?
| Tip direction | What that does to the whole leaf | When I pick it |
|---|---|---|
| Uphill | Lifts. Reads energetic, and the class picked this one | Panels that sit above eye level, where the lift is visible from the floor |
| Downhill | Settles and calms down | A run of leaves needing somewhere quiet to rest |
| Straight out | Neutral, and the hardest of the three to make interesting | Rarely |

Somebody in the room asked which one looks best and the honest answer is that nobody knows until it is carved. We picked uphill that afternoon by vote. Any of the three is defensible and the choice changes the character of the finished leaf more than any cut you will make afterwards.

I stopped twice that hour to photograph the piece, once before the rounding and once after, partly because I wanted the reference and partly because I forget what things looked like. Somebody at the back asked whether a chainsaw would be quicker. Probably.

How many divisions does one leaf get?
Follow the Fibonacci numbers and you will not go wrong. One division, then two, then three, then five. I break the lower part of this leaf in two steps rather than three for exactly that reason, and the proportions come out right without measuring anything.

Those same numbers are behind the golden ratio, and behind most ornament that has survived long enough for us to copy it. Nobody carving in the sixth century was doing arithmetic. They had eyes, and eyes keep arriving where the numbers do.

Why concave, then convex, then concave?
Surfaces have to alternate or the leaf goes dead on you. A hollow sitting beside another hollow reads as one bigger hollow and the eye slides straight across it without stopping. Put a raised roll between the two and there are suddenly twice as many shapes, with a bright line running along the ridge where the light catches the top of it.

I chant this in class until people are sick of hearing me. Concave, convex, concave. Then convex, concave, convex going back the other way. Inside the wall you have just shaped there will be a dome, and the centre of that dome runs down into the surfaces underneath so the whole movement comes back to where it started.


How much wood stays standing at each division?
About five millimetres, 3/16 of an inch, along the edge you are blending toward. Take the number 9 down from the high point and run it almost the whole way, then stop short. That last sliver of standing wood is what keeps one lobe readable against the next while every surface around it is still moving.

Run it right down to nothing and the two lobes melt back into a single lump. Removing the sliver later takes a minute. Putting it back is a different afternoon.

Why does the proportion flip when you add the second lobe?
Measure the thickness either side of the line you just drew, and by eye is perfectly fine. Mine came out around sixty to forty, the fat side toward the base, which is where I wanted the weight. Then the next division goes in and the sixty is suddenly on the other side, because the piece that was the whole leaf is now only part of it.

Watch for that. Carvers who fix a proportion in their head at the start and then hold it through every division end up with a leaf that repeats itself and looks mechanical. Each new lobe rebalances what came before it.


What shape should the eye end up?
Like a drop of water, wide at one end and closing to a point. Two cuts with the small number 11 make the notch, one either side of that line, and a deeper pass with a 5 mm opens the shadow if you want more. A drill can take it further still, later, once the surrounding surfaces are settled.

After the notch, a flatter tool tucks the lower lobe underneath the one above it. Overlapping is the point. Leaves sitting all at one height read as a pattern, and leaves that pass over and under each other read as a plant.


When is the shape finished?
Walk round it. I stopped three times during this class because the movement was not there yet, and each time the fix was obvious from a standing position I had not tried. Carving is a three dimensional business and a bench keeps you looking at it from one chair.

John was filming from the far side that day, which meant he had the best view in the room of the one thing I could not see myself, and he told me so more than once.

Every cut is still a slicing cut, by the way. Push straight down and the fibres crush ahead of the edge. Slide the blade sideways as it goes and you get a surface off the tool that needs no sandpaper at all.

Lesson eight turns every one of those divisions into a pipe, and that is where the leaf stops looking like a carving exercise and starts looking Baroque. Shall we carve?

How it's done
- Round the top board into a dome. Wide flat sweep, working outward from the highest point, until no corner survives anywhere along that upper surface.
- Stay above the outer arc. Line drawn last week marks a floor. Everything happens above it, and a millimetre below ruins an afternoon of work.
- Bring the dome down to the joint. Surface has to arrive at the black line rather than stopping short of it or running past into the board beneath.
- Take the line off with a small sweep. Three millimetre 11 opens a shallow groove right along the seam, which blends away far more easily than a painted stripe.
- Roll the groove away. Number 9 at 20 mm, starting from nothing and rotating as it travels. Seen from above, the seam has gone entirely.
- Tuck the far side underneath. Opposite edge rolls under instead of blending out, which puts a dark line beneath it and lifts the whole lobe.
- Draw the centre before dividing. Marker, not a tool. Where that line climbs or falls decides the character of every lobe you are about to separate.
- Divide by Fibonacci. One, then two, then three, then five. Counting on fingers beats measuring, and proportions land right with no arithmetic at all.
- Open the eyes last. Two notches from the small 11, then a flat tool tucking each lower lobe under its neighbour so overlaps read properly.
Frequently asked questions
What is filleting in wood carving?
Rounding away a sharp corner so two surfaces meet in a curve instead of an angle. Machinists use the same word for the same idea. On an acanthus every hard edge left behind by sawing and gluing has to go this way before any detail begins.
Why can you still see a glue line after sanding?
Sanding flattens a joint without hiding it, and a flat surface shows every difference of colour and grain between two boards. Rounding the surface over sends light across the joint at an angle instead, and that is what makes the line disappear.
Is carving against the grain always wrong?
Sharp tools make it perfectly safe and dull ones make it a disaster. Test your edge on a scrap corner first. When the shaving lifts off cleanly going uphill you can work whichever direction the shape happens to want.
What to carve next