

Alexander Grabovetskiy, woodcarver, School of Woodcarving · Published 2021
How do you build a Byzantine acanthus in three layers?
Quick answer: Byzantine acanthus in three layers is a stack, not a carving worked out of one plank. You hollow the underside of every board so light dies in the gap once the boards meet. Scrap sawn from around the outline supplies the top board, and thirty minutes of clamp time holds the whole thing together.
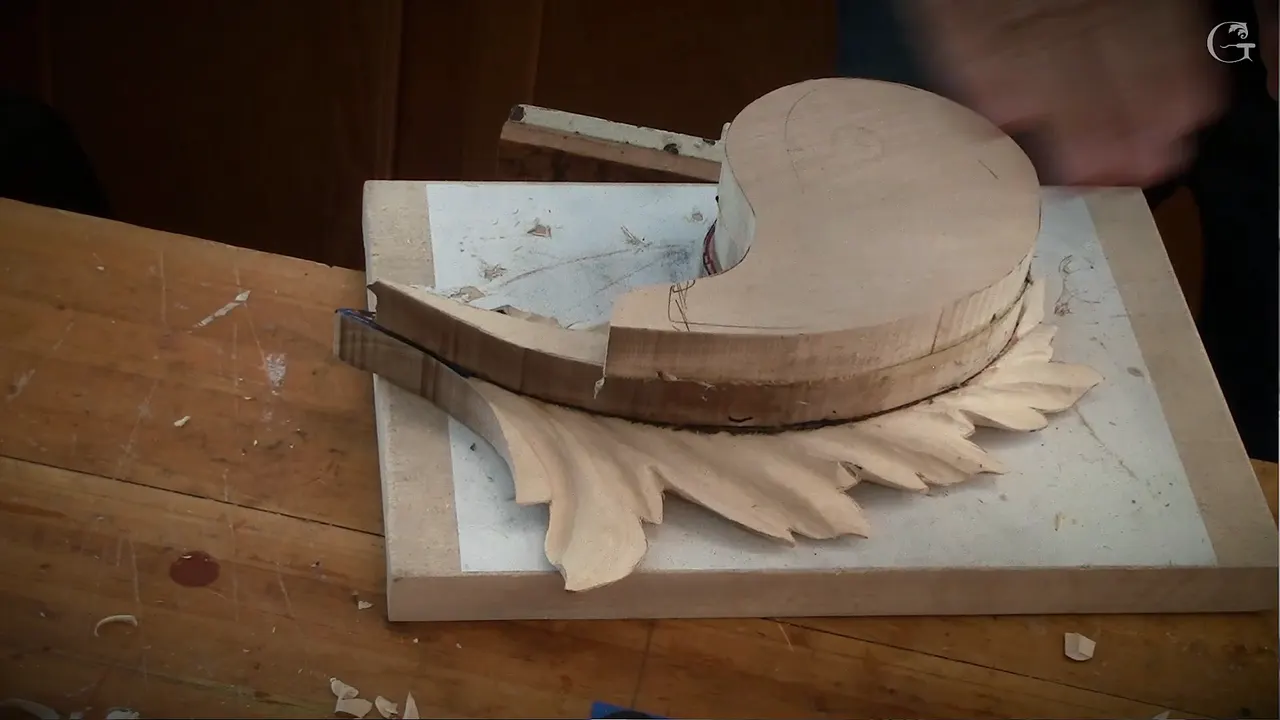
A three layer Byzantine acanthus is one carving built from stacked boards instead of a single thick block. Each board gets a hollow scooped out of its back, then goes face down on the one below, so the hollow shows up as a black gap along the joint.

Have you ever glued two boards together, sanded the joint flat, and then watched a grey seam come up out of nowhere the moment somebody carried the panel past a window? Or run out of wood halfway up a leaf? Both of those go wrong on the back of the board, hours before any glue leaves the bottle.
Lesson six is where the leaf stops being a carving and becomes a stack. Three boards, and two glue lines nobody will ever find. I will show you the one stretch of stem that stays untouched, why the second hollow goes shallower than the first, and what the scrap you nearly swept into the bin is actually for.

What decides whether the layers read as one piece
- The last 50 mm of stem, about two inches, gets nothing done to it. No undercutting there at all.
- Layer two gets a shallower hollow than layer one, because the ridges you carve on the face still have to come out of that thickness.
- Dish across the grain when you hollow. Never along it.
- Titebond original or Titebond 2, thirty minutes under clamps, and you are carving again. Titebond 3 is the wrong glue indoors, and I will say why.
- The curved offcut from the outline becomes layer three, which is what gets you to true Byzantine height.
- Get every trace of marker off a face before glue touches it, or the line lives under the surface forever.

Why does the second hollow go shallower than the first?
Wood for the face has to come from somewhere. On the first board I dug the back out properly, edge to edge, because that board has exactly one job and the job is shadow. The second board is a different animal. It has to carry the convex ridges and the hollows that get carved on the front later, and every one of those eats into the thickness you left.

A student asked me straight out during the class whether a true three layer leaf wants the bowl deeper on the second board. My answer was no. We are still only chasing a shadow, and there will be a lot of blending on top of it before the leaf is done. Dig deeper than you need and you come through the face while you are shaping it.

We need that meat. I say it in nearly every class and I will keep saying it, because thickness is the one thing you cannot add back after it is gone.

Which two inches of the stem must stay untouched?
The tail end of the stem, roughly 50 mm of it, gets nothing done to it at all. No undercutting there, and nothing else either, however much the shape seems to ask for it. I stopped the whole class mid-sentence the moment I saw hands drifting toward that area, and I was glad I caught it in time.

I make all the mistakes myself, which is how I know what this one costs. That end has to stay solid because it is the part that carries the leaf when the panel gets mounted. Undercut it and you have made yourself a hinge.

What happens to the piece you cut out of the middle?
Save it. Every curved scrap that comes off the outline of the second board is layer three, and layer three is what takes an ordinary two layer leaf up to the height the Byzantine carvers actually worked at.

Think about what you have in your hand when you scroll that shape out. A piece off the same board, cut to matching thickness, and it already carries the curve of the leaf it came out of. You could not saw a better match on purpose. I cut mine a little longer than it needed to be, because a piece that runs past the joint blends down into the board below and a piece that stops short leaves a step you have to carve around.


What stops the tool tearing out of the back?
Work across the grain. When you are dishing out the back of a board the tool wants to follow the grain, and following it is how you get a dig that runs away from you into good wood. Rotate the board and work across it instead. Same tools as the first layer, same sweeps, nothing new to buy.

A quarter of an inch, 6 mm, is all that comes out at the shallow end. Nobody will ever see this bowl. What you are carving is a place where light cannot reach, and light is the only thing that will ever use it.

Skip the clamps and skip the glue for now. Scoop, check it against the piece below, put it down, and leave it. Glue comes later.

What is the point of a hollow nobody ever sees?
Shadow is the point, and shadow is most of what relief carving actually sells. A leaf lying flat on a board reads as a drawing. Put a black line under its edge and suddenly you want to get a fingernail underneath. Nobody in the room ever sees the dish on the back, and every one of them sees what it does.

Every acanthus I teach runs on that trade. The same bargain sits behind the whole acanthus runs on. Hours of work on surfaces facing the wall, so the surfaces facing the room have somewhere dark to sit against. Look at any undercut edge from the earlier lessons and you are looking at the same idea, done from the other side.

Which glue lets you carve the same afternoon?
Titebond original or Titebond 2, and half an hour is genuinely all the clamp time you need before the tool goes back in. Both are ordinary yellow PVA. Nothing exotic, nothing expensive, and you can buy either one in any hardware store on the planet.

Titebond 3 is where people go wrong here. It is a fine glue and I use it on anything that will live outdoors, because it handles weather that would ruin the other two. For a panel that will hang inside a house it only costs you time. You clamp up, you wait, and you wait some more, and the afternoon is gone.


What each of the three boards is actually for
| The layer | What its back gets | Why the hollow is worth an afternoon |
|---|---|---|
| First board | Hollowed right out, edge to edge, since this one only ever has to throw a shadow | A black line under the whole leaf |
| Second board | Shallow, barely a dish | Thickness kept back for every ridge and hollow you will carve on the face |
| The offcut | Left solid | True Byzantine height, and a tip that rolls back over itself |
| Paper | Not a layer at all, just a way to get the leaf off your bench when it is done | Clean release |

What keeps you from carving the wrong face?
Write a letter on it. I put an F on the front with a marker and I have never once regretted the two seconds it takes. Sounds childish. It stops being childish the first time you watch somebody hollow out the face of a leaf they spent a whole day drawing, and there is no undo on a board.

I wrote the word bowl on the back of mine in marker, then stopped and asked the room whether I had spelled it right. Nobody answered straight away. That is the kind of pause you get in a shop where every man is looking at his own board and only half listening to the teacher.

Sometimes I trace through with carbon paper and sometimes I just press hard through the drawing itself. Either works. The second board takes the pattern off the plastic sheet the same way the first one did, and if you followed my drawing in the first lesson then what I draw on my board will land in the right place on yours.


Why does one glue joint vanish and another shows forever?
Marker is usually the reason. I drew my arc with a Sharpie on camera, glued before the ink was off, and that joint carries a grey shadow through it to this day. Glue soaks into clean fibres beautifully and it soaks into ink just as happily, and once it has cured the stain sits under the surface where no gouge is going to reach.

Clean wood gives you the other result, and the other result is worth chasing. My own joint on this leaf moved about a sixteenth of an inch, 1.5 mm, off where I first drew it, and after blending you cannot find it by eye or by fingernail. People ask how the leaf was carved out of a block that thick. There was no block.

What shape does the stack make from the side?
Round all the way over, with nothing flat left anywhere on it. Stand it on edge and look down the silhouette. You want no straight line anywhere, and no sudden step where the second board sits on the first. What you are after is closer to a claw that reaches out, lifts, and turns back over itself, which is the arabesque idea underneath every acanthus I teach.

I showed the class a photograph of a finished piece and then a second one from a Baroque carving of Venus, because the leaves on that one do exactly this. Out, up, and back. Where you finish the tip is yours to decide. Upward, downhill, or straight out to the side all work, and the choice changes the whole character of the leaf.


How high does the tip sit?
About three eighths of an inch, 10 mm, measured point to point. Lower than that and the arc goes flat. Push it higher and the tip stops reading as part of the leaf and starts looking like a separate object somebody glued onto the panel, which is exactly what it is and exactly what nobody should be able to tell.

From that height the surface runs down in one smooth arc. Not a ramp. An arc, the way the edge of a saucer runs, and I drew mine on with a Sharpie before I touched it so the class could see the line I was carving to.


Where do you start carving that arc?
Begin at nothing and work down. Put the knife or the skew where the new board is thinnest, take a shaving that starts at zero depth, and let the surface fall away from there. A flatter tool does the same job if you have no knife you trust. Keep the far side high for now.


We are working in three dimensions here and every decision shows from some angle. Turn the piece constantly. A shape that looks right from where you are standing can be a mess from the chair by the door, and the person who eventually owns this panel will walk past it from every direction there is.

Can you put something inside before you close it?
Sign it now or never. Once those boards are clamped, the inside of that leaf is sealed for as long as the panel survives, and on decent basswood that could be a very long time. Sign it, date it, or leave a line for whoever opens this panel up two hundred years from now. All of it goes in before the glue does.

One more piece of housekeeping before the clamps. The leaf goes back down onto a fresh sheet of paper, the same paper sandwich you have used since lesson one, so the finished carving comes off the bench without a fight later on.


What do you do when a piece breaks off?
Redesign around it. A chunk came away under my knife while the camera was running and I did not reach for the glue bottle. I rolled the broken end over into a new tip and told the room it was French now. Half a joke. Whole styles have drifted apart on exactly that kind of accident, one broken corner at a time, and nobody looking at the finished leaf will ever know which shapes I chose and which the wood chose for me.


Eli had walked off with my Sharpie that morning, so there was a gap of about a minute in the middle of all this where I could not draw anything at all and the class just watched me look for it.

Ten lessons carve this one leaf, and six of them are behind you by the end of this class. Lesson seven takes the stack you just glued and rounds it into a single form, and after that the divisions and the pipes start. Shall we carve?

How it's done
- Lay the sheet over the finished board. Plastic on top, black lines showing through it, and a pencil follows them. Working off the drawing itself beats working off memory every single time.
- Mark which side is the front. One letter in marker settles an argument you would otherwise have with yourself an hour from now, holding a ruined board and wondering.
- Take the back out, travelling sideways. Tool runs at ninety degrees to the fibres. Along them invites a dig that keeps going well after you meant to stop it.
- Stop short of the depth you used before. Roughly 6 mm here against the full excavation on the board underneath. Whatever gets shaped on the front afterwards has to come out of what stays.
- Leave the tail of the stem alone. Final 50 mm carries weight when the panel goes up on a wall. Thin it down and you have built a hinge into your own work.
- Keep whatever the saw leaves behind. Curved scrap already owns the profile and the thickness board three wants. Sawing a fresh one takes longer and fits worse.
- Wipe the faces before any adhesive. Ink drinks glue as readily as bare fibre does, and a stained joint ends up below where any tool can reach.
- Thirty minutes under pressure. Yellow PVA of the plain indoor sort. Waterproof grade belongs on a door, not on something destined for a hallway.
Frequently asked questions
How many layers does a Byzantine acanthus need?
Three boards give you the height the old carvers worked at. Two will read fine on a wall and one ends up looking like a drawing with edges. Every board you add costs another glue line to hide, and hiding them is the real work.
Can I carve this from one thick board instead?
Working from solid stock is possible and a good deal harder. Getting a gouge underneath an edge from a single block means reaching into a hollow you cannot see into. Stacking lets you shape all of that flat on the bench, before anything gets joined.
Which wood glue works for stacked carving?
Ordinary yellow PVA, the indoor grade, sets firm in around thirty minutes and carves like the fibre beside it. Waterproof grade is a better glue outdoors and a worse one here, purely because you spend your afternoon waiting on it.
What to carve next