

Alexander Grabovetskiy, woodcarver, School of Woodcarving · Published 2021
How deep should you carve at the roughing stage?
Quick answer: Roughing out finishes three eighths of an inch clear of the ground and goes no further. That band stays standing across the whole piece, because undercutting, shadow and every bit of later modelling gets cut from it. Remove it early and no amount of skill afterwards puts it back.
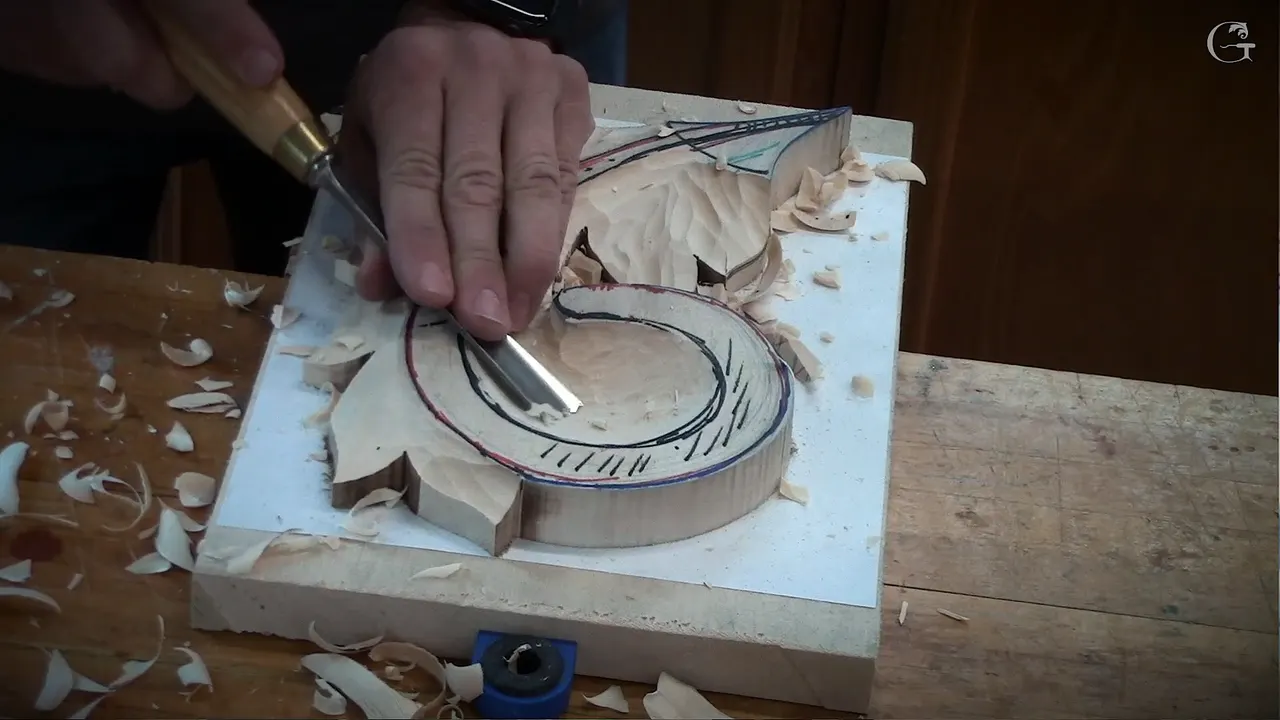
Stop ten millimetres above the surface and leave it there. That three eighths of an inch is not waste and it is not timidity. Every undercut, every shadow and every bit of modelling still to come has to be cut out of it, and once it is gone nothing brings it back.
Today is the roughest day of the whole course and also the one that decides the piece. Shape arrives now, in big movements, with the widest gouge you own.

Detail comes later and it comes easily. Rescuing a panel whose overall movement went wrong on the first morning never comes easily at all, because by then the wood that would have fixed it is in a heap under the bench.
Key takeaways
- Nothing drops below ten millimetres.
- Take the biggest gouge you own, not the smallest, because a wide sweep leaves a fair surface while a narrow one leaves ridges you then have to remove all over again.
- Rough is exactly what correct looks like today.
- Rotate the gouge as it travels and the cut slices instead of ploughing, which halves the effort and doubles the control.
- Guide the blade with your free hand up near the edge, and keep it off the handle entirely.
- Slope the leaves downhill without hollowing them, since concaves and convexes come later and they need material left standing for them.
What is bosting, and why is rough correct?
Bosting is establishing the overall shape and nothing beyond it. English carvers have used the word for centuries and it describes a stage rather than a technique.

Nothing looks good today. The surfaces are facetted, the transitions are crude, and a beginner watching their own bench at this point usually concludes they have ruined it.
They have not. Rough is the correct appearance of a piece whose movements are right and whose detail has not started, and learning to sit with that is half of what this workshop teaches.

Big movements first, then detail. Reverse that order and you will find yourself defending some beautifully cut ornament that sits at the wrong height, refusing to cut it away because of the hours already in it.
What do people actually get wrong here?
Detail first. It is the commonest fault I see and it is entirely understandable, because detail is the enjoyable part and roughing out is work.
What happens next is predictable. The overall shape turns out to need lowering, the carver looks at a finished eye or a finished lobe sitting in the way, and suddenly they cannot bring themselves to sacrifice it.
So the panel gets built around a mistake. Every later decision bends to accommodate the one detail that should have been cut off in the first hour, and the finished relief never quite reads.

How deep, exactly?
Ten millimetres clear of the surface, or three eighths in inches, right round the piece. Eyeball it rather than measuring, since a rule slows you to a crawl and the eye is plenty accurate for this.

You cannot measure it anyway once the surface starts moving. Detecting it is the skill: you look along the work, you see where the ground sits, and you stop while there is still a clear band of wood above it.

What stays standing is the budget for everything ahead. Undercutting eats into it, every deep shadow comes out of it, and the modelling that makes a acanthus leaf in the Byzantine manner look alive is spent from the same account.

Inside leaves get the same treatment as the outer ones. Everything comes down to that mark, and nothing on the piece is exempt from it.
Which part of the board must stay untouched?
A strip along one edge, somewhere between two and a half and three inches of it. No tool goes near that at all.


It gets carved later with the second piece, because the two get glued together and have to blend into the background as though they were always one thing. Cut it now and that blend becomes impossible.

I say it twice on camera and I would say it a third time. This is the kind of instruction people nod at and then forget forty minutes later with a gouge in their hand.
Which gouge does this?
The biggest one you own. A number nine at three quarters of an inch is mine, around twenty millimetres, and its half round sweep is what makes it right for hollowing at speed.


An eleven at thirty millimetres would be quicker still. That one is a favourite of mine and it removes material at a rate that surprises people watching for the first time.

Own neither? An eight does the job. So does a ten millimetre nine, more slowly, and a student in this very class had precisely that and got through the session perfectly well.
Pin the work down before any of it. Bench dogs, a vice, whatever your bench offers, because a piece that shifts under a big sweep is a piece that will take a chunk out of somewhere you needed.

What is the slicing cut?
Rotation while you push. Set the gouge down, turn it toward one side while it moves forward, and the edge slices through fibres instead of shoving them.


Far less resistance, simply by the logic of how a blade meets wood at an angle. The same muscle takes off twice the material and the surface behind it is better, which is not a trade you often get offered.


Watch how quickly waste comes away once it is running. That speed is the whole reason a big roughing session takes an hour rather than a weekend.
Where does your second hand go?
On the blade, as far forward as it will comfortably sit. Never on the handle alongside the other one, and I demonstrate the wrong version on camera specifically so it lodges in your memory.


Two hands on the handle gives you power and no control. The tool becomes something you are aiming rather than something you are guiding, and on a large sweep that difference shows up as a gouge mark you did not intend.
Do it properly for long enough and the thing stops feeling like a tool. It becomes an extension of your hand, which sounds like a saying until the afternoon it happens to you.

Carving is not painting with a brush, either. The pressure, the angle and the travel are all one movement, and nothing about it resembles laying colour on a surface.
| Decision | What I do | Why |
|---|---|---|
| Depth | Stop ten millimetres above the ground, everywhere on the piece without exception | Undercutting and shadow come out of that band |
| Tool | Biggest number nine you own | A wide sweep leaves a fairer surface, and a narrow one leaves ridges you will only have to take out again later |
| Grip | Second hand on the blade | Control |
| Cut | Rotate as you push | Slicing meets far less resistance in the fibres than shoving does |
| The outer leaves | Downhill, and never hollowed | Concave work is later, and it needs wood that is still standing there |
| The border strip | Nothing at all | Carved later, with the second piece |
Why must the leaves not be spooned out?
Hollows belong to a later session, and there is a reason for the order. Slope an outer leaf downhill by all means, then stop the instant it starts dishing itself into a spoon.

We still need meat. Concaves and convexes are what turn a slab into a leaf, and both get cut out of material that must still be standing when the time comes.
A student did it in front of me and it is an easy mistake. Downhill and hollow feel like the same movement in the hand, and they are not the same thing at all on the wood.
What does it look like when the shape is right?
Light, and attractive, even covered in facets. A correctly bosted panel has a quality you can see across a workshop, and it has nothing to do with how clean the surface happens to be.
Movement is what you are seeing. The outer leaves fall away, the inner ones climb, and the eye travels the route the drawing promised it would travel a week ago.
Run your hand over it with your eyes shut. Fingers read a three dimensional flow far better than eyes do while facets are still catching the light, so that is the honest test today.
How does this go in a room full of students?
Slowly, then all at once. I show a cut at half speed, ask whether everybody followed it, get a round of nods, and then watch three people do something else entirely.
Watching the monitor rather than the bench is the usual culprit. The screen is bigger and easier, and it also flattens everything, so I keep pulling people back to the real hand two feet in front of them.
Nobody is allowed to be tired on the first roughing day either. Said with a smile, and meant, because this stage is genuinely physical and the way through it is to keep going.
What about the grain?
Rotate the piece. Deliberately not the full answer, and enough to be going on with.

When the grain fights you, turn the work and come at the same spot from the opposite direction. Being lazy about that is how people end up tearing a surface they will spend an hour repairing.
I am not explaining grain properly yet, and that is on purpose. Once you have felt the problem in your own hands the explanation lands; given beforehand it is a paragraph nobody remembers.
Does the piece need glue anywhere yet?
Not today, and thinking about it now still matters. Two layers eventually meet, and a joint that was cut carelessly at the roughing stage reads as a weird seam forever afterwards.
Solid contact is what you are protecting here. Any surface destined to carry adhesive stays flat, unmarked and exactly where the drawing put it, and that alone is why the border strip is untouchable.
Weird is the word I use for what happens otherwise. A joint that was roughed carelessly shows as a line nobody can name and everybody notices, long after the leaf itself has stopped being looked at.
How do you dig a dish?
Across the grain, from both sides, meeting in the middle. One area of this piece gets hollowed properly and it goes deep, almost all the way down but not quite.


Escape the cut rather than burying it. Go in, then lift out again slowly, because a gouge driven in and left there splits wood ahead of the edge where you cannot see it happening.

Keep rotating throughout. Whatever slices on a flat surface slices inside a hollow too, and nothing else keeps those walls fair.

Blend every high spot into its neighbour as you go. Steps left in a rough surface become steps in a finished one, and hunting them down later costs more than avoiding them now.

What gets finished today and never touched again?
That dish. Once the second layer goes on there is no reaching into it, so this one area gets taken to its final surface while access still exists.
Something flatter does the last of it. Number six, twenty millimetres, slicing the facets off, the way a well sharpened tool should, and note that even a flat tool gets the same rotation as the roughing ones did.

Everything else on the board stays rough tonight. One finished hollow, a whole panel of facets around it, and a shape that finally moves the way the drawing promised.
Second of ten workshops. Workshop one draws the design and sticks the blank down on paper, then three, four and five carry the shape further. Detail fills six, seven and eight, and nine with ten bring it home, all of it inside the course. The same leaf argued differently sits in the Greek acanthus, the Roman, the Corinthian and a modern one, and it wraps a curve in acanthus over moldings. Why a movement reads at all belongs to the design course, the gouges are chosen in the tools course, and a slicing cut only slices on an edge that sharpening has earned. Beginning from nothing? First cuts needs one knife.
You have the biggest gouge in the roll and ten millimetres you must not cross. Access to the school opens the other nine workshops.
How it's done
- Pin the work down first. Dogs or a vice. A board that shifts under a wide sweep takes material from somewhere you were going to need it.
- Pick up the widest tool you own. Three quarter inch nine here. Small blades leave corrugations now, and each one is extra work you asked for.
- Turn the blade while pushing. Push and rotate together so the edge slices rather than shoves. Same effort spent, twice the waste gone, and a better surface left behind you.
- Guide with your free hand up by the blade. Keep it off the handle. Power without guidance leaves a mark where you never wanted one, and on a wide sweep that mark is deep.
- Halt at the three eighths mark. Judge by eye, right across the piece, nothing exempt. Undercutting and shadow both get spent out of what remains.
- Slope the leaves, do not dish them. Downhill is right; spooning is wrong. Hollows come in a later session and they need timber nobody has taken away.
Frequently asked questions
Why not carve right down today?
Undercutting comes out of what you leave, and so does every deep shadow. Go past that line while roughing and the modelling which makes a leaf look alive has nothing left to come from.
Should I use a small gouge for control?
Quite the opposite. Something broad clears ground in few passes while a narrow blade leaves corrugations, and taking those out again is work you volunteered for.
What does bosting mean?
Establishing overall shape and nothing else. English carvers have used the word a very long time, and it names a stage of the job rather than any particular cut.