

Alexander Grabovetskiy, woodcarver, School of Woodcarving · Published 2021
How do you hold a carving blank without clamps?
Quick answer: Holding a blank is done here with paper rather than clamps. Both faces get sprayed, the adhesive is left until it goes tacky instead of wet, and the wood is pressed onto a sheet of paper over a backing board. A pair of carved lions almost four feet tall were held by nothing else at all.
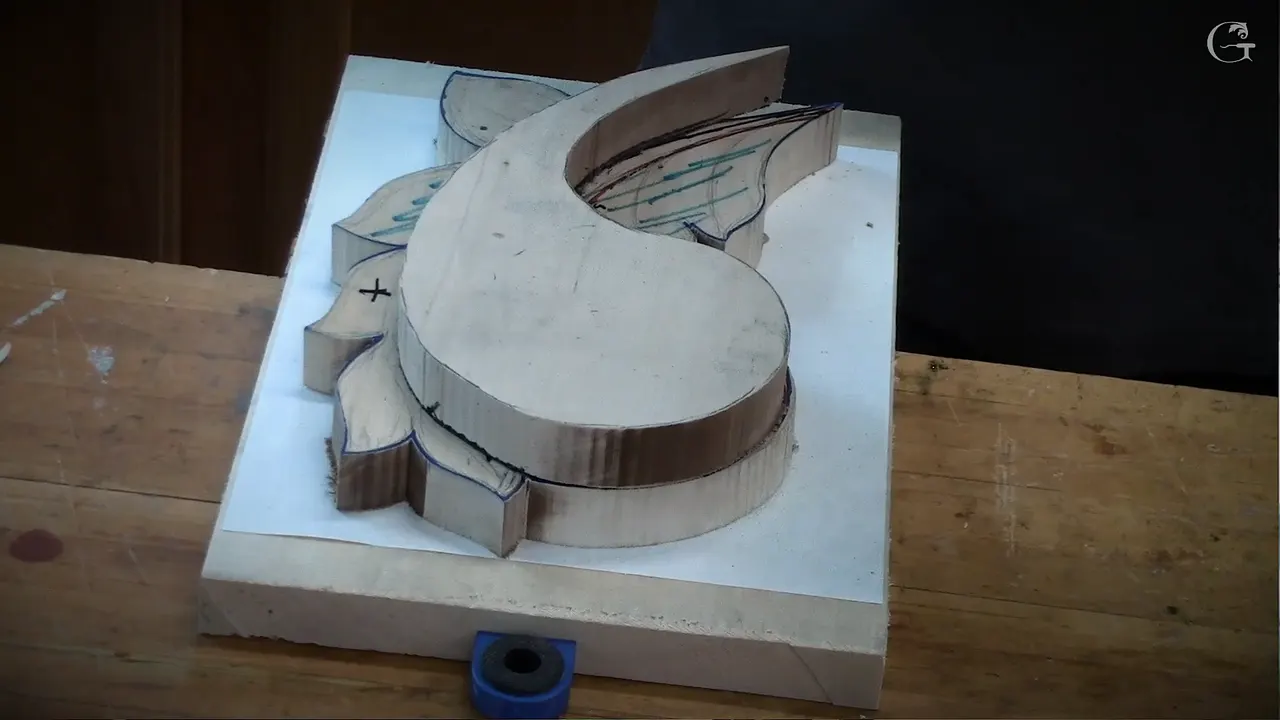
Paper holds this carving, and nothing else does. Coat both faces, leave the adhesive until it goes tacky instead of wet, then press the blank down on paper over a scrap board. Two lions of forty seven inches were carved that way, and no clamp came near either of them.
Not one cut happens in this session. A gouge is mentioned once, and only to say that it must never touch a particular strip of wood.
Everything here is drawing, transferring and sticking down. Skip it and the carving that follows will be crooked, unglueable, or held by something that stops your tool halfway across the board.

This was filmed in a class with students at the bench, so you will hear pens being borrowed and time running short. Real sessions go exactly like that, and pretending otherwise would teach nobody anything worth knowing.
Key takeaways
- Trace the pattern onto plastic, not paper.
- Flip the sheet instead of drawing the mirror image, which is how one movement can cover an entire wall of ornament without a second drawing ever being made.
- Blue means concave, orange means convex.
- Coat both surfaces and let them go tacky, because pressing them together wet gives a joint that slides under the first heavy cut.
- A border the width of your thumb stays untouched by any tool at all.
- The whole thing is built from two separate layers and it has to end up looking like one piece of wood.
What is the cheap man technique?
My own name for working intelligently rather than expensively. Nothing about it is shabby, and the phrase is a joke against people who think a good result needs an expensive route.

Drop cloth is the material. A few dollars buys enough for a lifetime of patterns, and the sheet takes a marker, it survives handling, and the drawing shows through it.

Buy the slightly thicker grade of it. Thin sheet tears while you are tracing, usually at the worst possible moment, and the difference in price is nothing worth defending.

Why trace onto plastic at all?
For what you can do with it afterwards. Draw once, put the sheet over it and trace with a marker, and you own a template that never wears out.

Then flip it. Flip it again. Keep flipping and one swirl becomes a running band, then a border, then a whole church interior, out of a single drawing made in one afternoon.

Nobody needs to draw the mirror image of anything. That is the trick, and it is why a small workshop three hundred years ago could cover more wall than most people manage now with better machines.
Two sheets get cut at the start, one for each layer. Sizing them is done by eye against the blank, since the pattern only has to be bigger than what it carries.
What did carvers use before plastic existed?
Wood. They cut the pattern out of a plain board, laid it down, drew round it, flipped it and drew round it again.

Identical logic, older material. Grinling Gibbons worked this way, and so did the Byzantine workshops whose ornament this course is built on.
Carbon paper is the modern half of the job. A sheet of it lasts for years, costs almost nothing, and puts the traced line onto your blank exactly where you want it.

Use a ballpoint for the transfer. Gel pens skate and smear, which is a small opinion held firmly.
What goes into the drawing?
Three divisions, and then the movements that hang off them. Division one, division two, and the main movement that carries the eye through the whole piece.


Count the finished thing and you get eight. Seven movements running outward and the main one turning back, which I call Fibonacci because that is how the proportions land when the eye is allowed to decide.

However complicated a swirl looks, it is still a leaf. It simply twists, and once you have seen that, the drawing stops being intimidating.

Full three dimensions, from the first pencil line. My hand traces the path in the air above the board before any of it is committed: out that way, up, up, up, and back.


Why does the main movement matter more than the rest?
Everything else is subordinate to it. Division one and division two are supports; the main movement is the line a person follows without knowing they are following anything.
Get that wrong and no amount of detail rescues the panel. A viewer will stand in front of beautifully cut leaves and feel that something is off, and not one of them will be able to say what.
Which is why I stand back so often. A drawing that is correct on paper can still be dead on the wall, and the only instrument for that is a pair of eyes at the far side of the room.
What do the colours mean?
They are a working language, not decoration. Blue is the first layer and it means concave, going deep like an ocean.

Orange is the second layer and it means convex, standing up. Black exists only so the camera can see something, and I tell students to use a pencil instead because it cleans off.


Write the key on the board itself. Nobody should be holding a colour scheme in their head while also trying to read grain and depth.

| Colour | Which layer | What it tells your gouge |
|---|---|---|
| Blue | First | Hollow it out, and go deep, because this is the ocean floor of the piece |
| Orange | Second, glued on afterwards | Convex |
| Black | Neither | Drawn purely so a camera can read the line, and a pencil would be the better choice |
| The orange border | Where the two layers come together and are glued | No tool, ever |
Why two layers instead of one thick board?
Depth without weight, and repairability. The second piece gets cut on a scroll saw and stuck to the first, and the finished relief reads far deeper than either board alone.

Byzantine builders went further and made it removable. Their upper piece was tacked, not glued, so a knock that destroyed the top layer cost one panel instead of the whole carving.

Later Orthodox churches used screws from the back. Toothpicks, pegs and screws all do the same job, and mine is going to be glued because I have no intention of taking it apart.

Where is the border you must not touch?
Three quarters of an inch, running all the way round where the second layer will land. Five eighths would hold well enough; the wider one gives more gluing surface, and that settles it.

No gouge goes near it. Not a test cut, not a slip, nothing, because a chewed gluing face means the two layers will never sit down properly on each other.

It tapers as it travels. Later that taper gets blended away to nothing against the background, and the joint disappears entirely.
How exact does the drawing have to be?
Loose, within limits. Perfect is not the target and chasing it will cost you the afternoon, because a hand drawn ornament that looks hand drawn is the entire point of the exercise.
Drifting an inch is a different matter. The two halves have to answer each other, and a line that wanders that far turns a balanced design into an accident nobody will read as deliberate.
Proportion is the thing I keep checking, and I check it by eye. The count comes out at eight and I still stand back, look, and change something if it does not sit right, because the number matters less than whether it looks good.
Can you hide something inside a piece like this?
People do, and it is one of the pleasures of two layer work. A student in one of my classes carved a small fly, or a bee, into a spot that would be buried once the upper layer went on.
Nobody sees it afterwards. Therein lies the appeal: somebody eventually asks how on earth a detail got in there, and the answer is a secret you can keep for the rest of your life.
Put a signature there instead if you prefer. Decide now, while you can still reach the surface, because once these two pieces meet that space is sealed for good.
What about the scroll saw?
It cuts the second layer, and the safety talk is short. A scroll saw is among the safer machines in any shop and it will still hurt somebody who is careless with it.
Tension and blade choice are their own subject. In the class this got as far as being named before the saw turned out not to be set up, so we transferred the pattern instead and carried on.
Keep your cutoffs. The offcuts from a second layer are exactly the right thickness for small experiments, and throwing them away is a habit worth losing.
What happens to the background?
Undecided at this stage, deliberately. Texturing it is one option, some kind of movement across it is another, and which one wins depends on how fast the carving itself goes.
Leaving that open is normal. The background is the last thing anybody touches and the first thing a viewer stops noticing, so there is no need to commit to it before the leaf exists.
How do you hold a blank with no clamps?
The paper sandwich, which is one of the best methods there is. Coat the backing board, coat one side of your paper, and wait.

Waiting is the part everybody rushes past. Touch it with a finger and if the adhesive still sticks to you it is too wet, so let it go tacky before anything meets anything.


Coat the second face last and lay the blank down. A scrap of plywood underneath, paper between, carving on top, and no clamps anywhere near the bench.

Two lions held that way through their entire carving. Just under four feet each, heavy enough to be awkward, and paper was all that stopped them moving.

When the carving is done a chisel pops the joint apart and the paper splits along its own thickness. Nothing gets marked. Nothing gets dented, and no clamp ever stood between a gouge and the wood it was heading for.
How does a class like this actually run?
Faster than anybody expects, and untidily. Pens get borrowed mid sentence, somebody brings coffee and forgets the biscuits, and there are ten minutes left when half the job remains.
None of that is a failure of organisation. Real carving happens in exactly those conditions, and a course filmed to look frictionless would be teaching you something untrue about the trade.
Choosing your background comes first of all, before the drawing. That decision was made off camera at this bench and it governs everything downstream, so make it deliberately rather than by default.
Then somebody has to start. The hardest moment in any workshop is the one where a person is holding a marker over a clean board, and the only cure is beginning badly and correcting afterwards.
What actually gets carved next?
A hollow, almost a bowl, sunk into the first layer while that gluing border stays proud. This session ends with it drawn and the blank stuck down ready.

Understanding beats following. I would rather you knew why each of these steps exists than watched you copy them at speed without ever asking, because the day something goes wrong is the day the reasons matter.
Done properly, nobody will work out how it was made. Two pieces of carved wood, a paper joint, a plastic template and a hidden border, and the finished acanthus looks like it came out of one solid block.
First of ten workshops. Workshop two takes the first shavings off and sets every level, then three, four and five build the shape out. The detail arrives across six, seven and eight, with nine and ten closing it, and the course holds every one. The same leaf in other hands lives in the Greek acanthus, the Roman one, the Corinthian and a modern reading of it, while acanthus over moldings puts it on a curve. Proportion and movement are argued properly in the design course, gouges get chosen in the tools course, and none of them cut without sharpening. Never held a gouge at all? Start at first cuts.
You have a plastic sheet, a marker and a pot of spray. Access to the school puts the other nine workshops in front of you.
How it's done
- Draw the design once, on the board. Three divisions and the movements hanging off them. Nothing measured, nothing traced from anywhere, and the count comes out at eight.
- Trace it onto plastic drop cloth. A marker and the thicker grade of sheet. Thin plastic tears mid trace and costs you the drawing you just spent an hour on.
- Flip the sheet for the other half. Nobody draws a mirror image. Flipping is what turns one swirl into a band, and a band into a wall of it.
- Transfer with carbon paper and a ballpoint. Gel pens skate and smear. Carbon lasts for years, and the line lands exactly where the sheet says it should.
- Colour the two layers differently. Blue for the concave first layer, orange for the convex second. Write the key on the board so nobody has to carry it in their head.
- Stick the blank down on paper. Spray both surfaces, wait for the tack, press. No clamp then stands between your gouge and any part of the work.
Frequently asked questions
Can paper really hold a carving?
It held two carved lions, each a shade under four feet, through their whole carving. Heavier and more awkward than anything most people will attempt. Coat board and paper both, let the adhesive go tacky, press them together.
Why plastic for the pattern instead of paper?
Plastic takes a marker, survives handling, lets the drawing show through and flips without falling apart. Drop cloth from any hardware shop does it, and the slightly thicker grade is worth the extra coins.
Do I have to draw the design myself?
Not at all. Lift mine straight off the sheet and transfer it. The drawing is a means to an end, and nothing about copying it will cost you a skill you needed today.