

Alexander Grabovetskiy, woodcarver, School of Woodcarving · Published 2021
How do you pierce through an acanthus leaf without a drill?
Quick answer: Piercing an acanthus leaf is done with a gouge instead of a drill. A wide sweep goes straight down and lifts out a plug of wood, more plugs follow until the hole runs right through, and the sides get opened toward that hole afterwards. Support underneath stays until the very end.
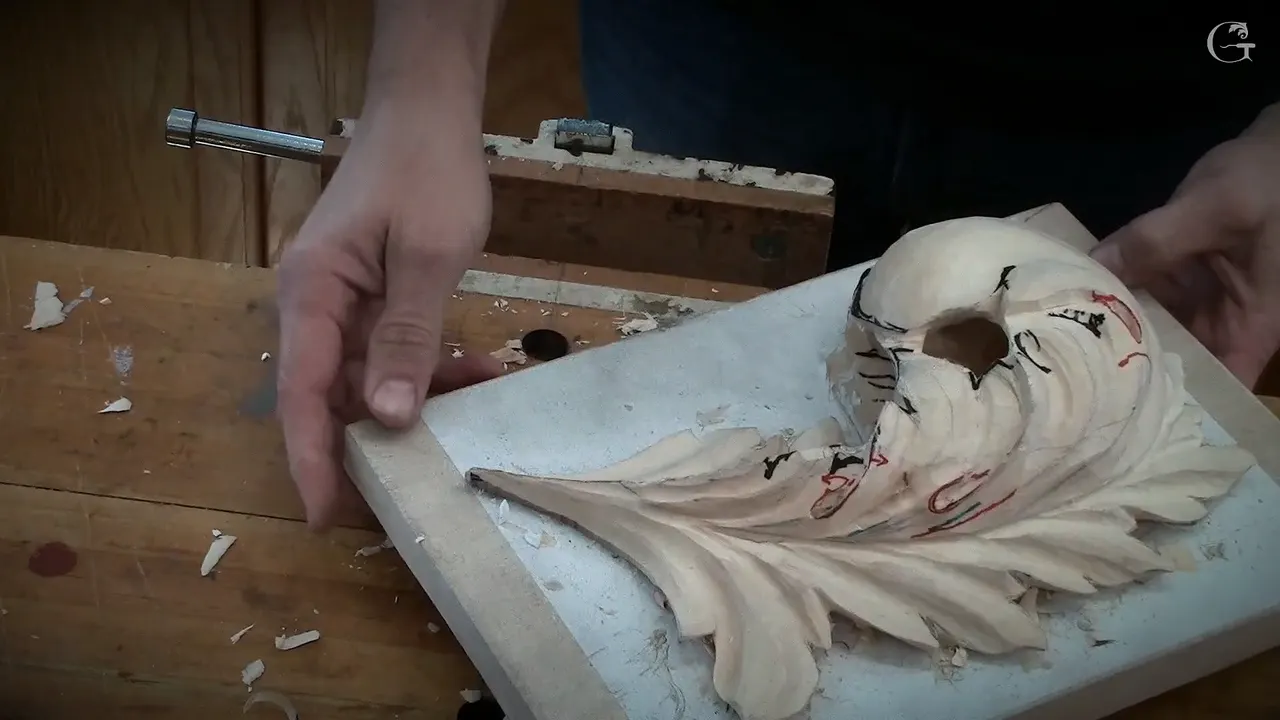
A plug cut is a straight downward stab with a wide gouge that lifts a plug clean out of the panel. Repeat it along a line and the hole travels right through the leaf, and the walls of that opening get worked from the sides once the way is clear.

Every carver reaches the same moment on a pierced panel. The design asks for daylight behind a leaf, there is no drill press in the room, and a hand drill would tear the far side to pieces on its way out. So people either skip the hole or ruin the piece finding out why they should have skipped it.
A gouge does it better than a drill, and this class is where I show how.

What has to be true before you cut a hole
- Find the eyes first. Three eyes mean three leaves, and every eye sits where two of them separate.
- Mark with a pencil, since a marker line is a nuisance to clean off afterwards.
- Relief first, every time. A separation that has not been relieved will split when the tool goes in beside it.
- Leave about a quarter of an inch, 6 mm, between the ridge and the hole while you are roughing.
- Keep the bridge until the very last operation, whatever else you take off.
- Once wood starts coming out, the whole leaf turns fragile, so handle it from then on as though it is already broken.

Why start with the eyes and nothing else?
Every other line on the panel depends on them. A page covered in pencil looks like chaos until you notice there are only three eyes on it, and the moment you see those three the whole leaf resolves into three sections with a middle line running down each one. An eye is never in the middle of a leaf. It marks the place where one leaf ends and the next begins.

Put a line between each pair of eyes and that line wants to be convex, though not the high hard ridge you carved on the big pipes. Smooth is the word. Each of those three leaves then gets three separations of its own, and one separation in each always runs underneath its neighbour.


How many separations does one leaf carry?
Three apiece, which gives nine across the panel once the whole thing is drawn. Take a single main leaf and find its middle line. Three smaller movements sit inside it, waiting to be separated, and one always tucks under its neighbour. That tucking is what keeps the panel from reading as stripes.

Each smaller leaf gets its own convex down the centre, smooth rather than sharp, and each carries a pipe that lifts toward its eye. Where the volute of a stem crosses the design, the same S curve you drew on the first day is what holds the whole arc together.


Why pencil instead of a marker here?
Pencil lifts off with a light pass. Marker does not, and I use one on camera only so the class can see what I am drawing from ten feet away. Every marker line I put down is a line somebody has to carve off later, which is a poor trade on a surface that will be visible.

Confusion is the real enemy at this stage and it comes from the number of lines, not from the difficulty of any one of them. Students look down at forty pencil marks and freeze. Count the eyes instead. Three eyes, three leaves, and everything else on that panel hangs off one of those three, which turns an hour of staring into about a minute of looking.

What opens the wood if you have no drill?
Stand the gouge upright and push it in. Three quarters of an inch is ideal and a number 9 at 10 or 12 mm does perfectly well, and what comes out is a plug rather than a shaving. Take another plug beside it, then another, and the middle of that section empties itself while the outline stays exactly where you drew it.


A mallet speeds the whole thing up. Somebody in the class asked whether we were archaeologists now, which is fair, because the goal really is to look inside. Keep the cut straight down for this stage. Undercutting comes later and a wall that leans in early will haunt every shape you try to carve near it.


What do you do once the hole is open?
Work from the sides toward it. Lay the tool so it points at the opening, keep the slicing rotation in every pass, and open the wall out until the hole stops looking punched and starts looking carved. That step is the one that gives the leaf its likeness, more than any detail you add afterwards.


Take the big number 9 for the bulk of it. Rotate as you go, and aim for a transition off the first layer so smooth that nobody can point at where one board stops and the next starts. If the grain fights, drop to a smaller sweep and take smaller bites rather than forcing it.


Why does the leaf get easier once it is thin?
Less wood stands between your tool and the shape you want. That sounds obvious written down, and in the room it surprises people every time, because they expect the fragile stage to be the hard one. Opening the hole early takes so much waste out that every surface afterwards needs two passes instead of ten.

The cost is real though. Once material starts leaving, that leaf will snap if you lean on it, and more you remove the less it forgives. Airy and light is the goal and overdoing it is how the goal turns into firewood. I say this to every class and somebody still tests it.

What happens to the wall on the inside?
Most of it goes. Look into the opening you just made and there is a vertical wall standing between you and the dome hollowed into the back of the board underneath. Carve that wall away in rotations until the two surfaces meet, and be careful about where the tool exits, since the layer below it is finished work.

Rotating rather than pushing is what protects that lower layer. A straight shove buries the corner of the sweep and the corner is what catches. Roll the tool through the wood instead and the shaving lifts away from everything you care about.

Which cut has to come first every time?
The relief. Wherever two leaves separate, a relief cut goes in before anything else touches that area, which means a clean stop cut along the line so the wood beside it has somewhere to break to. Skip it and the fibres tear past your line into the leaf you were trying to protect.

Carefully, too. The same gouge will do the relief and the shaping, but the relief wants a lighter hand and a slower pass, and this is a rare place on the panel where hurrying costs you a whole afternoon of repair.

How close do you get to the edge?
Five or six millimetres, call it a quarter of an inch, and no closer while the shape is still moving. There will be a refining pass later and that pass needs something to refine. Arrive at the line now and any small correction afterwards leaves you short of wood with nothing to take it from.


What each stage of the opening buys you
| The stage | Tool | What it changes about the panel |
|---|---|---|
| Plug cut | The widest 9 you own, driven straight down | Daylight |
| Opening the sides toward the hole | Same gouge | The likeness of the whole leaf, which is most of the day's work |
| Blending into the board below | Big 9, rotating | Two boards begin to read as one |
| The line inside | The 3 mm eleven, worked by feel | Gone |

Why was the first layer left so thick?
Support, and somebody always asks. Students look at that bottom board and wonder why we did not carve it away back when it was easy to reach. The answer is that I knew we would be hitting this panel with a mallet for two more days, and a carving with nothing solid underneath it splits the first time you swing. Ask me how I happen to know that one.


What is the bridge, and when does it come off?
A thin strip of waste spanning an opening, and it comes off last. While undercutting you will lean on the piece without meaning to, and the bridge is what takes that load. Remove it early and the basswood runs its grain straight across the gap with nothing holding it, so a knock breaks the leaf rather than the waste.

One man in the room found this out in real time. He took his off, it broke, and I told the class that is exactly why mine was still there. Every support you can keep, keep.


Does the hole have to go all the way through?
A deep hollow reads the same from three feet away. Go through where the design wants real daylight, and where it does not, take the same shape down far enough to go black and stop. People looking at the finished panel will swear both are holes. Only one of them is.


Piercing does change the piece, though. With one opening cut clean through, the leaf stops being a relief and starts behaving like a sculpture you can walk around, and that is the moment this course has been building toward since the boards were glued up.

What shape does the opened eye take?
A water drop, wide at one end and closing to a point, exactly as it was drawn. Plug cut through with a 3 mm tool, then a knife or any small flat tool shapes the opening from both faces. You can undercut with the same tool while you are in there, which saves the walk to the rack.


Small tools make this far easier and I left them off the class list on purpose, because they are hard to find on the open market and I will not put a student in a shop hunting for something that may not exist.

What takes the inside joint away?
Number 11 at 3 mm, working the black line until there is nothing left of it. Same tool, same idea as the outside of the leaf, only now you are reaching into a hollow with two surfaces meeting at the bottom of it. Blend, look, blend again. Finished properly it looks like the whole thing came out of one solid block.


This is also where a signature can live. Carve it into the first layer from the solid, rather than gluing anything on, and whoever finds it two centuries from now will have no idea how it got in there.

There is also a pencil line waiting inside the hollow, an arch I drew before any of this started, and all the wood above it is destined to go. I put a marker over it so the class could see, which contradicts what I told you about pencil, and I did it anyway because a camera cannot read graphite from across a room.

When the inside needs working, the bench dog earns its keep. Clamp the panel flat against it and you get both hands free for a surface that is otherwise awkward to reach at any angle.


What happens when a shape goes wrong?
Redesign it, and I did exactly that on camera. There was a small lobe on my leaf that never looked right, so I opened the whole area up and let it go. The result still carries one separation, still sits inside Fibonacci, and reads more organic than the thing I had been protecting.


My own mistake that afternoon came from picking a tool that was too big for the space, and the honest fix was a smaller one next time instead of some clever recovery. Bill had the mallet and I am fairly sure I never got it back, and nobody in that room ever once admitted to having moved the thing either. Gary and John were both ahead of me on their holes by then. I said so out loud, mostly to slow them down.


Lesson ten finishes the leaf and textures the board behind it, and the ten lessons together cover more of the carving world than any other week I teach. Shall we carve?

How it's done
- Count the eyes before anything else. Three of them on this panel, and each one marks where two leaves part company. Everything else hangs off those three points.
- Join them up in pencil. Graphite wipes away afterwards and marker does not. Keep that centre smooth and slightly raised, never a hard ridge.
- Relieve every parting line. Stop cut first, shaping second. Fibres torn past a line cannot be put back, and the repair costs an afternoon.
- Drive the gouge straight down. Three quarters of an inch is ideal, though a 10 mm nine does fine. What lifts out is a plug, not a shaving.
- Keep going until you see through. Borrow a mallet and the whole thing moves along. Straight down throughout, since a wall that leans early ruins every later shape.
- Open the sides toward the opening. Tool pointed at the hole, rotating on every pass. This step gives the leaf its likeness more than any detail afterwards.
- Stop 6 mm short of the outline. Roughly a quarter inch of spare wood. Refinement comes later and refinement needs something left to refine.
- Blend the inside line away. A 3 mm eleven, reaching into the hollow, working until the joint between two boards has nothing left of it.
- Take the bridge off last. Every other operation happens first. Grain runs straight across that span and it breaks the moment nothing supports it.
Frequently asked questions
Can you pierce a carving using only hand tools?
Gouges do this job better than any drill bit. Driven straight down it removes a short cylinder of wood, and enough of them in a row open a hole with no torn fibres on the far face. Carvers were doing this centuries before power tools existed.
What is a plug cut in wood carving?
Sinking a gouge vertically so it lifts a small cylinder of wood out whole, rather than paring a shaving off the surface. Repeating it clears the middle of an area fast while leaving your drawn outline completely untouched.
Why leave a bridge on a pierced panel?
Undercutting puts sideways load on thin wood, and a bridge takes that load instead of the carving. Grain across an opening has almost no strength on its own. One man in my class removed his early and broke the leaf within a minute.
What to carve next