

Alexander Grabovetskiy, woodcarver, School of Woodcarving · Published 2021
How do you finish a carved acanthus leaf and its background?
Quick answer: Finishing a carved acanthus is mostly edges. Overlaps get opened underneath with the smallest tool in the roll, every surface then travels out until it meets the outline and stops sharp, and the board behind the leaf takes a run of tool marks so it holds shadow instead of glare.
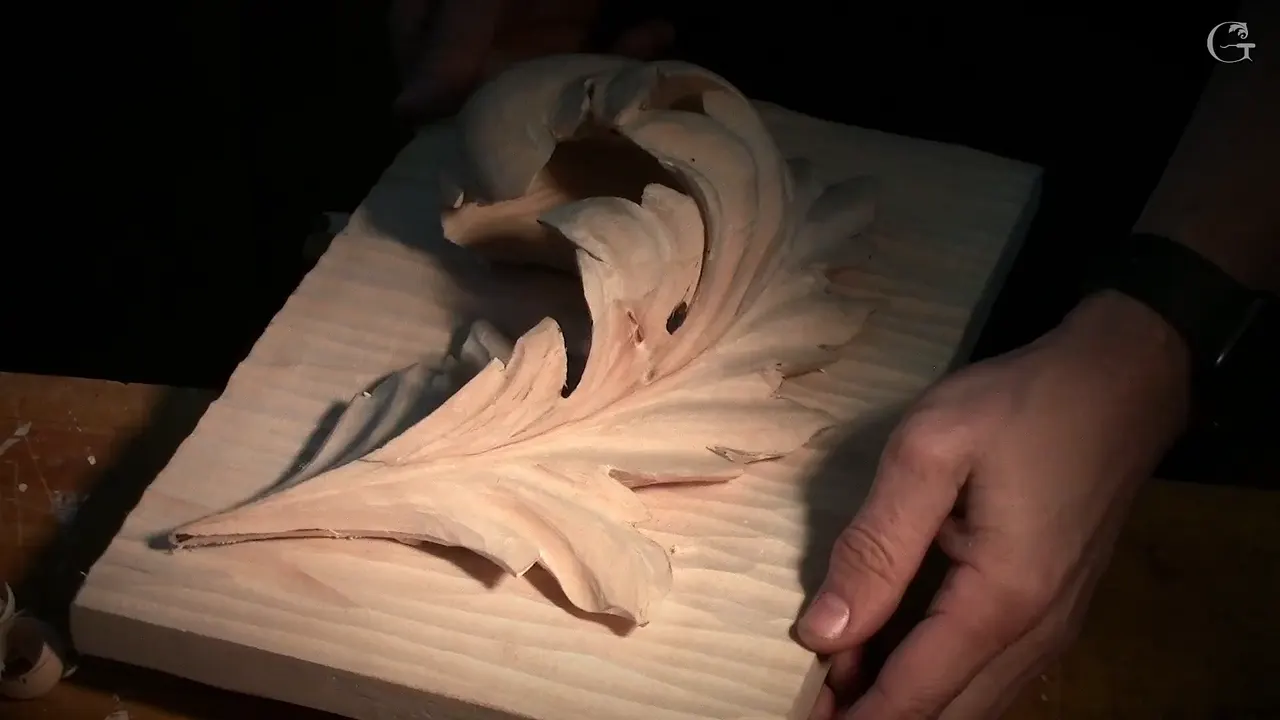
Finishing a Byzantine acanthus means undercutting every overlap, working each surface out to a sharp edge, and texturing the board behind it. A gouge a single millimetre wide opens the overlaps, a flat number 2 carries surfaces to the line, and the background takes a run of tool marks that throw their own shadow.

Your leaf is carved and it still looks like an exercise. Everything sits at the right height, the pipes are there, the eyes are open, and somehow it reads flat next to the photographs. One day of work sits between those two states and almost none of it is about adding shapes.
It is about edges, and about what sits behind the carving.

What separates a finished leaf from a carved one
- Every overlap gets undercut with the millimetre eleven, held at about three o'clock.
- Surfaces run all the way out to the edge and stop sharp, with the flat 2 or a knife.
- The bigger part overlaps the smaller, whatever your eye tells you about which one sits higher.
- Extra concaves stay shallow, since deep ones turn the leaf into stripes.
- The background gets textured before the leaf is glued down, leaving only the glue spot flat.
- Facets come off with a flat gouge ridden across them, never with sandpaper.

Why is a big plain head a problem?
Too big and too plain. On my own leaf the head was the largest single area on the panel and carried almost nothing inside it, so the eye arrived there and found no reason to stay. Two extra separations fixed it, drawn curly rather than straight, and the whole head came alive inside about ten minutes.

Somebody in the room asked whether a micro eye could go where the marker was sitting. Yes, and then another beside it, and each one brings its own small pipe travelling in its own direction inside the big movement. Nothing caps this.


Where do the boundaries go before you divide?
Around the outside of whatever you are about to break up. Draw the border first and you can see the shape whole, the way you would look at a boat or a leaf, and the divisions inside it then have something to answer to. Divide before the boundary exists and the pieces wander off the edge.

Everything flows to the same line after that. One division comes out slightly smaller, which is the sixty and forty showing up again without being asked, and it earns its place. A curve that started on the left has to still feel like it is travelling when it reaches the right.


Which leaf overlaps which?
The bigger one, always, even when your eye argues. Stand back and one lobe looks higher than its neighbour, and everything in you wants to lay that high one over the top. Wrong. Follow the flow instead, let the larger part pass over the smaller, and the ornament reads as a plant growing rather than a stack of separate pieces.


A 3 mm eleven starts each excavation and a knife or the flat 2 blends what it leaves. Not as deep as the earlier work, since these are the small movements now, and their ridges want dyeing in rather than standing proud.


Why not carve every concave deep?
Depth everywhere kills the overall shape. A pipe inside one of these late divisions is thinner than the ones you carved in the pipes lesson, and it only needs an indication that movement is happening there. Push those hollows down hard and the leaf goes stripey, which is no bueno and no amount of cleaning brings it back.


Raise the ridge between them all the same. From the hollow it climbs, the eye above it keeps its water drop, and even at this small scale a surface that goes up reads differently from a surface that just goes along.


A pipe still belongs inside these late concaves, thinner than before but travelling in the same direction as everything else. Two hollows either side of a drawn line, exactly the method from the pipes lesson, only shallow enough that the surface never stops being one surface. Relieve first wherever a division is about to be made, since that has not changed either.


What is the one millimetre tool for?
Undercutting overlaps, and nothing else does it as cleanly. Lay the flute over at about three o'clock, slide it under the edge of the leaf that passes above, and go down as far as you like. Light stops reaching under there, and darkness under an edge is the entire point.


What comes out of it is strange and useful. The area underneath ends up connected at the bottom and looks completely separated from above, so a viewer reads two leaves where the wood is still one piece. On my panel there were only two spots that wanted this, plus a few on the first layer where leaves cross.


What does bringing everything to the edge mean?
Every surface travels until it meets the outline and stops there, sharply. Take a flat number 2, work inward from the boundary, and refuse to let any shoulder stand anywhere along the perimeter. A number 12 knife makes the same job faster if you own one.


Does the first layer want this as well?
Anywhere leaves cross on it, yes. The bottom board has its own overlaps from weeks earlier and those were carved before you owned the millimetre tool. A pass with it now deepens every one, and the whole panel gains depth for five minutes of work.

Every hollow you carve makes a visible difference at this stage. That surprises people, because the cuts are tiny compared with the plug cuts of a few days ago, and yet each one changes how the leaf sits against what is behind it.

The result is the trick that makes people stop in front of a panel. It looks paper thin, and it is solid. Nothing has actually been made thinner. All that has changed is that every edge now ends in a line instead of a slope, and light behaves completely differently against a line.

Handle it gently from here. More you remove, the more fragile that leaf becomes, and the last hour of a week is a terrible place to put your palm down flat on something.


What the last hour actually changes
| The operation | Which tool | What it does to the panel |
|---|---|---|
| Undercutting the overlaps | The millimetre eleven, laid over on its side | Shadow |
| Carrying every surface out | Flat 2 | The leaf suddenly reads as paper without losing a gram of weight |
| Texturing the board | A 9, or a 7 if that is what is sharp | Depth behind the whole carving, and it costs nothing but an hour |
| Riding the facets off | Flat 3, stropped | A surface straight off the tool with no abrasive near it |

What gives the background its texture?
Run a gouge across it in stripes and leave only the glue spot flat. Take the leaf off, clean its back, pull the paper away, and you will see exactly where the glue soaked in because that patch is darker than everything round it. Then position the carving on the board and pencil round the outside.
Why bother with a background at all?
A leaf on its own ends up in a garage. Said plainly to the room, and it got a laugh, and it is also the truth about small carved panels everywhere. Give the same leaf a textured ground and suddenly it is a thing that hangs on a wall, and that is the difference between an exercise and an object somebody keeps.

My own piece that week was not finished in the details and I said so out loud. Details can wait. The background could not, because the class was ending on Friday and a leaf with nothing behind it goes home in a bag.

What happens to the back before you glue?
Turn the leaf over and clean it. Lift it off the board carefully, because at this thickness an impatient hand snaps a week of work, then work the reverse face right to the edge wherever a curve runs past the outline. A small knife or a flat gouge reaches into the corners that nothing else will.

Any spot you meant to undercut and never got to should be done now while you can still reach it from both faces. Once the carving is glued to its board those undersides are sealed for good, and the paper sandwich that held it all week comes away in one piece.


Texture everything out to those pencil marks and stop. The middle, where the glue will go, stays untouched. Any number 9 works and a 7 or an 8 gives much the same idea, so use whatever is sharp.


Two things matter about direction. Start at the outer edge and travel in, since a tool arriving at an edge from behind catches the grain and tears it. And stay perpendicular to the grain across the board, and that gives a far nicer texture than running along with it.


Where on the board does the leaf sit?
Off centre, with the weight of it toward one side. Move the carving around on the board until the movement looks right, then push the bulk of it closer to where the golden ratio would put it. Dead centre is the one position that makes an ornament look like a specimen on a card.


Why did Grinling Gibbons use oak behind his work?
Contrast. Gibbons backed his limewood carvings with oak all the time, and a darker species behind pale basswood does the same job as the texture does, only with colour. Cherry works. So does anything that reads darker than the leaf.


Texture and a dark board are two answers to one problem, which is that pale carving against a pale board disappears. Pick either. The texture costs an hour and the oak costs money, and I have used both depending on what was in the shop that week.

What takes facets off without sandpaper?
Ride a flat gouge over the top of them. Number 3 is my choice and a number 2 does it too, freshly stropped, held at a shallow angle so it behaves almost like a razor on stubble. The facets disappear one at a time and the surface stays off the tool.


Turn on a raking light first or you will not see what you are chasing. Then check which direction the wood prefers, because one way it shaves and the other way it fights, and inside a hollow the number 11 does the same work using its side or its bottom like two tools in one.


I bought a thousand dollars of rasps one year because other carvers swore by them. They are still in the drawer. Rasps leave a surface I then have to smooth anyway, so they cost me twice the time, and I have gone back to a stropped gouge every single time since.


Why burnish a carved surface?
Presses the fibres flat and leaves them shining. Cut a burnisher from an offcut of the same board, rub it hard along the surface, and the wood comes up looking as though somebody has already put a finish on it. Small facets vanish under it on their own.


Big ones need the gouge. I caught the grain on camera doing exactly this, said no bueno out loud, and carried on from the other direction. Spend another month on a panel this size and it will look sanded without a grain of abrasive ever touching it.


When is it actually finished?
Never, which is why you stop. My leaf came out of that week about as done as a one week class allows, and the last thing I did was add micro separations to one lobe, which meant I then had to add them everywhere else to match. There is no end to what you can do to an acanthus.


Glue it down with Titebond, rub it into place, and leave it half an hour without clamps. Then frame it, or hang it, or it ends up in the garage with everything else that nobody quite finished. I have a shelf of those at home, and so does every carver I have ever met.


Ten lessons carve one leaf, and between them they cover more of the carving world than any other week I teach, inside and outside both. Shall we carve?

How it's done
- Break the big head up. Two more separations, drawn curly, plus a micro eye or two. A large plain area gives a viewer nowhere to look.
- Draw the boundary before dividing. Outline whatever you are about to split, so the pieces inside answer to something instead of wandering past the edge.
- Let the larger lobe pass over. Your eye will insist the taller one belongs on top. Follow the flow line instead, whatever it looks like from where you stand.
- Keep the late hollows shallow. An indication of movement, nothing more. Deep ones turn a leaf into stripes and no amount of cleaning undoes that.
- Slide the millimetre tool under every crossing. Flute rolled over to roughly three. Light stops reaching underneath and the two leaves separate to any eye looking at them.
- Carry every surface to its outline. The flat 2, or a 12 knife when you own one. No shoulder should stand anywhere round the perimeter.
- Texture as far as the pencil marks. Everything except the glue patch sitting in the middle of the board. Start at the outer edge and travel inward, across the grain rather than along it.
- Ride the facets off. A stropped flat 3 held shallow, almost shaving. Raking light first, since facets are invisible under a lamp overhead.
- Burnish what is left. An offcut of the same board, rubbed hard. Fibres press down and the surface shines as though something had been applied.
Frequently asked questions
Which of two acanthus leaves overlaps the other?
Larger passes over smaller, every single time. A lobe that sits higher looks like it should be on top and putting it there breaks the flow of the whole ornament. Trust the drawn line rather than what your eye reports from one angle.
What is the trick to undercutting an overlap?
One millimetre gouge, flute rolled over to roughly three, slid under the upper edge and driven down however deep suits. What remains is joined at the bottom and looks completely parted from above, which is the whole trick.
Why texture the background of a relief carving?
Tool marks hold shadow where a flat board throws glare, so the carving separates from what sits behind it. Grinling Gibbons solved the same problem with oak instead, and either answer works. A pale leaf on a pale board simply vanishes.
What to carve next