

Alexander Grabovetskiy, woodcarver, School of Woodcarving · Published 2022
How do you lay out a carved molding so its lines meet at a miter?
Quick answer: Laying out a carved molding for a miter is leaving the end slightly wider, taking the width with calipers, eyeballing a center line, and running the side lines to one point. On my floral panel the sides then read lower on the pointing machine.
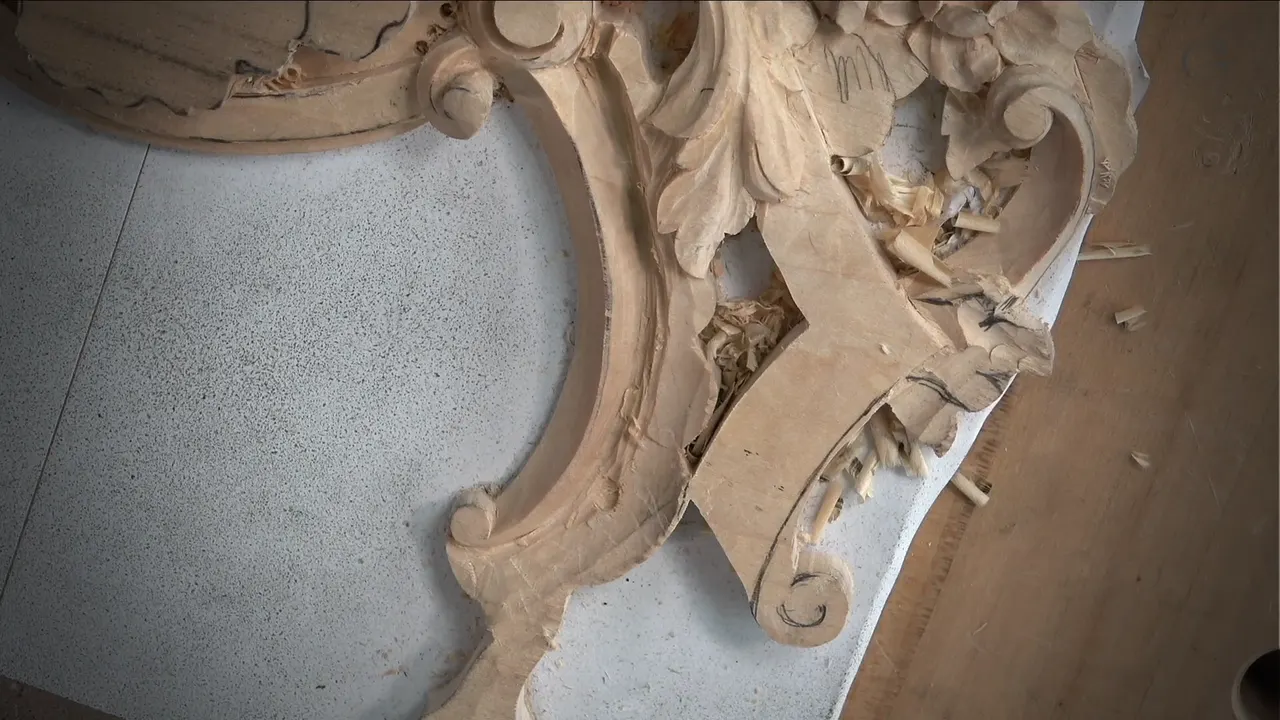
Setting up a carved molding for a miter is measuring the width, drawing the center line by eye, and joining the two side lines at one point. On my floral panel the end of the molding stayed slightly wider, so there was extra wood to work with once the miter came.

Is there a molding in your project that has to turn a corner? Would you like both ends to meet with no gap? Then draw first and keep a little wood at the end, the way I did on this panel. Below are my steps, the numbers I read, and the other lessons where I drew a miter or carved the look of one.
Six lines for the molding layout
- It ended a little wider for the miter.
- Calipers took the width.
- A few spots I already had in the middle made eyeballing a lot easier.
- It starts wider and gets a little more narrow toward the acanthus.
- Both side lines run to one point.
- The pointing machine put the sides about 5 mm (0.2 in) lower, maybe less.
Why leave the end of a molding slightly wider?
I left it wider for the miter, and that gave me room to play. Right at the start of part 8-2 I made that point: yes, I knew I had left it slightly wider at the end for the miter, and that way I had some room for play.
On the existing piece in part 8-1 I left about a millimeter (1/25 in) of material all around, and I called it not my final. My reason was plain. Other moldings still had to be carved, and when it was mitered I wanted room to play around and make it look really nice.

A second reason to watch the wood came in part 8-3. A section of the shell would sit a little below my molding, and shaving some of that extra material off was probably a good idea. Otherwise I would not be able to miter. My next move was to take some of the side out, right there.

How do you find the width and the center line of a molding?
Calipers gave me the width. My eye took care of the rest. Measuring came first in part 8-1, and I called the calipers the best tool for it, I would say. I checked both sides. The first look said a little more than three-quarters of an inch. Then more. Then exactly 3/4 inch (about 19 mm), which I called perfect.
Next in part 8-2 came the middle part. I would do the same, I said, with just the calipers. Then it was eyeballing. I already had a few spots in the middle, and that made it a lot easier for me.

Right at one end it starts wider and gets a little more narrow the closer it comes to my acanthus. I eyeballed that approximately. That was my center line. The opposite side got the same treatment, and it gave me a really good idea.
Venice Room workshop 154 shows the other way. Set small calipers to the distance you need and transfer it. That is also legit, I said. But I don't really need to, because sometimes my eyes work much better than any of those calipers, and I mean just eyeballing it.
Where do the two lines join for the miter?
I joined them in a single spot. Right there in part 8-2 I had a point, and I wanted to make sure it would be my miter. It would look like it's mitered, which meant I really had to connect those lines together, right at that point. After that I didn't need any more calipers.
A second miter point turns up by the volute. While I drew the boundary of the molding there, I noted that the volute would sit lower than this part of the molding. This side I would eyeball, and again there would be a miter point.

In the first lesson of Acanthus over Moldings I took my pencil and showed where the molding would go, and where it would turn. Almost a miter, just looking like one. It runs that way, then right underneath that volute, so I had to lower that section, and all of it had to end at the same level.
Later in that lesson I redrew my pattern and went all the way to the edge. There a miter look would show up. I went in that direction with the same idea, and I would connect.
At the very start of the floral course I showed a separate piece and said I kind of liked it anyway. A molding, a miter, and a molding going down, I said, and the moldings would continue and wrap downhill. A mirror, a picture frame, or a door could take the same kind of carving, especially if you are a furniture maker. That talk is in lesson 1 of this course.
Where else did I draw a miter?
Five lessons of mine have one, and the table gives the time I said it.
| Lesson | Line | Time | After |
|---|---|---|---|
| Floral panel 8 | Two side lines joined at one point | Near 02:54 | Pointing machine on the sides next |
| Acanthus lesson 1 | My molding turns almost like a miter | Around 00:49 | Lower the section by the volute |
| Venice workshop 154 | The old trick, two squares, gave 45 | About 02:46 | I eyeball it from above next |
| Workshop 155 Venice | I replicate what the miter should be | Roughly 01:58 | Extend the line both ways later |
| Venice workshop 101 | My miter feel, not a real miter | Near 02:02 | Two concaves start, then get together |
Venice Room 148 adds a place to look. When I replicate a molding I look at two spots, and I checked from multiple points of view to get an idea of what they had done. One is the bottom, where it touches the floor. The other is the miter, where two pieces meet on a 45 cut, and there I can detect the profile much better.
How low do the sides of the molding go?
The pointing machine said about five millimeters (0.2 in) lower. I measured the height again, not of the middle part but on the sides, and my clamp had to come off for a moment. Maybe five, maybe four and a half millimeters (0.18 in), something like that. Both sides got a mark.

Then a line went in. Five millimeters again, I said, maybe slightly less than five, and it doesn't really matter in this case. The clamp went back on. If the machine is new to you, there is a page on the pointing machine in my tools course, with a short outside note on the idea, and lesson 4 of this panel is about carving down to a depth I measured.
Which gouges clear the wood between the lines?
A number 9 of 1/4 inch (6 mm) went first, to take the wood out between the two lines. Number 11 would work and so would number 8, but I took just the number 9. That was the first job.
The volute would be lower too, so I thought I could take a bigger tool for the beginning. I picked a number 7 of 14 millimeters (0.55 in), half an inch in my words, and removed some of that volute. Care mattered there, because it is somewhat fragile.

The number 9 came out again, this time of 10 millimeters (0.39 in), which I also called 3/8 of an inch, and I carved between the same two lines. I had already done the opposite side, but for some reason I forgot to turn my camera on. That gouge also needed to be buffed.

For the next section a number 11 of about a quarter inch (6 mm) should work, and this part would go pretty low. The other side needed a smaller one, maybe 1/8 inch (3 mm). Right away I went after the space between the curl of the volute and that line, with the very same tool.

I did not want to be too low. There I used just the side of the tool, without digging in. It was so important for me not to dig in.

Next came the macaroni tool, pretty much authentic to Italian carvers, for both sides. Six millimeters (0.24 in) came first, and if that was too big I would switch to four millimeters (0.16 in). If you want to buy one, it would be number 23 in the six millimeters. Mine is Swiss-made. It has two sides and a bottom, which makes three chisels: chisel, chisel, and chisel. A little later I called it a tool made by furniture makers in Italy, so I was okay with using it on this project. As you know, I used no V tools, because they didn't have one, and I didn't think they had the macaroni back then, but I would use it for the sake of showing it to you. In Venice Room 159 I called that tool cheating, and the reason I gave was its date.

What went wrong at the line?
I undercut slightly under my own line. While making the pass right on the side, I went a little beneath it. No bueno, I called it. I would fix it, it was not a big deal, and I should be more careful.

The same warning sits in that first Acanthus lesson. Just be careful, I told you, and don't dig too deep on that line. Dig too deep and you damage the future molding. It won't look natural. Underneath the acanthus movement, which is undercut, the molding continues that way, and I didn't want to see a line going straight down. On the sides there I took a number 9, went down with the first pass, and cleaned it, really, really close to the line.

Near the end of the 8-2 video I checked a distance, and one spot didn't look as nice. Not a big deal, I decided, because it was about the same. I did take the four millimeter tool after all, and I used the side of it.

Is a carved miter the same as a real 45 degree miter?
A real one is a joint. A miter joint is two parts cut across at matching angles, usually 45 degrees each, to make a corner of 90 degrees. A carved one only looks like it, and in workshop 101 of the Venice Room I put it plainly: not really a miter, but the idea of a miter.
I used the real thing once, on a box. The Lily Box course has me saying that what I did was just use miters. I got my stock prepared, sawed it on a compound miter saw, and glued it together to make the box.
In a video about sandpaper I showed a carving for a huge pipe organ, authentic to German Baroque and meant for gold leaf. Two pieces go together on the miter, I explained, and you can see the miter on the backside. You will find it in my sandpaper answer.
The real one I drew on the wood is in Venice Room 154. A miter, a 45-45, was coming. I looked at an adjustable angle tool, then used the old trick of two squares, and 45 was the result. Eyeballed as close as possible from above, there it was, my 45. One line goes this direction, and there's a point.

A marking knife would be a lot more accurate, I said, but it's still hand carved. Any tool will work, pretty much, as long as you are really close to nice and straight lines.
Workshop 155 repeats the move. I knew I had jigsawed that part, so it was not always perfect, and eyeballing would be more accurate for me. A 45 again, to replicate whatever the miter is supposed to be. Try to be perfect with your eyes, I said. My number one went right on the line, and I extended it all the way, in both directions.

One more small case sits in workshop 159. A tiny number 1 went at a little section there, where a miter would sit.
What do you keep safe until the miter is made?
The point where the lines meet. In lesson 9 of this course I had to be careful in a corner, so I took a small number 1, a double bevel on both sides. Damaging that point was out, because I still had to get the miters to that thing. Undercutting was out too, so I went straight down, since I wanted that part sloping outward.
Lesson 9 of that same course carries the worry. The part of the molding that is my high spot had to stay whole. It goes a different direction, the way it does at a miter spot, and right underneath that part. I kept an eye on what the grain of the wood did. Carefully, carefully, carefully, with no pressure.
Where does this video sit in the course?
This is part 2 of lesson 8 in Carving Floral and Molding for the Panel. After it comes lesson 9. Outside pages can help with a word, and there are short ones on the gouge, basswood, the jigsaw and the pencil.

Would you like to watch the two lines meet at that point, one gouge at a time? With Access you get the full videos of all fourteen lessons on this panel.
How it's done
- Leave the end wider. Leave the molding slightly wider at its end, so there is extra wood for the miter.
- Measure and mark the center. Take the width with calipers. Eyeball the center line between a few spots you already have, and repeat on the opposite side.
- Join the lines. Connect the lines in one spot, right where the miter goes, so the molding looks mitered.
- Read the sides. Use a pointing machine to read the height on the sides, not the middle. Mine came out near 5 mm (a fifth of an inch) lower, and I marked both sides.
- Clear between the lines. Take a number 9, 1/4 in (6 mm), between the two lines. Use bigger or smaller tools as the space allows, and keep the side of the tool on the line without digging in.
Frequently asked questions
How wide should the end of a molding be for a miter?
Slightly wider than the rest, I said in part 8-2, and I wanted that extra wood for the miter. The existing piece in part 8-1 had about a millimeter (1/25 in) of material all around, which I called not my final. My reason was space to play around, so the miter looks really nice.
Which tool measures the width of a molding?
Calipers, in my video. I checked both sides and read exactly three-quarters of an inch (about 19 mm). For the middle part in 8-2 I said I would use the calipers again, then I eyeballed it between a few spots I already had in the middle.
How far lower are the sides of the molding?
My pointing machine put them near 5 mm lower (a fifth of an inch), and I allowed maybe four and a half (0.18 in). I marked both sides and drew a line. Slightly less would be fine too, I said, since it doesn't really matter in this case.
What to carve next
- Carving Floral and Molding for the Panel, the course page
- Carving Floral and Molding for the Panel lesson 8
- Carving Floral and Molding for the Panel lesson 1
- Carving Floral and Molding for the Panel lesson 9
- Carving Floral and Molding for the Panel lesson 4
- Acanthus over Moldings lesson 1
- Acanthus over Moldings lesson 9
- Venice Room workshop 154
- Venice Room workshop 155
- Venice Room workshop 101
- Lily Box course
- Pointing machine page