

Alexander Grabovetskiy, woodcarver, School of Woodcarving · Published 2023
How do you control a tiny carving gouge so you do not force the cut?
Quick answer: Controlling a tiny carving gouge is resting it on your middle finger, guiding it with a finger of the other hand, and going little by little. On my Gibbons petal a number 11 took out only 2 mm (about 0.08 in) at a time, and I said pushing too hard would be a big mistake.
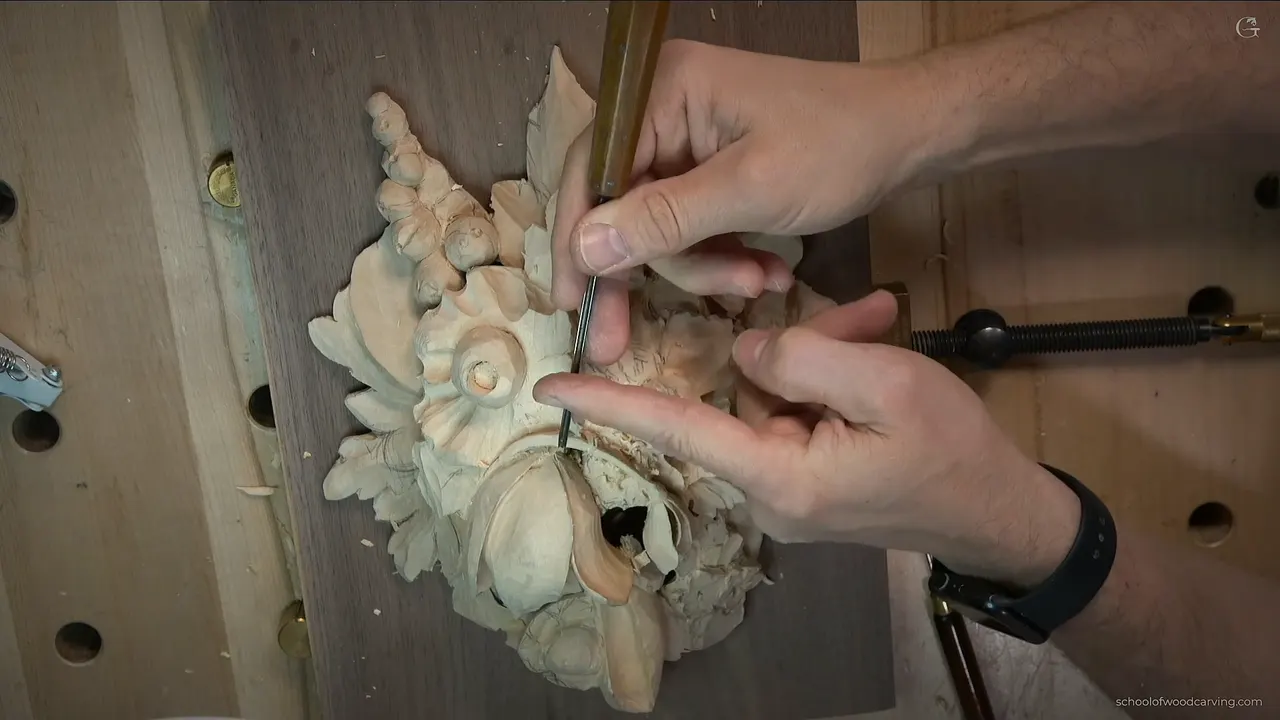
Controlling a small gouge is a matter of where the tool rests and how little wood it takes: it lies on your middle finger, a finger of your other hand guides it, and the wood comes off a bit at a time. In part two of class 13 of my Grinling Gibbons course in Maine I worked a number 11 on a petal, and I warned the class about forcing the cut.
Ever had a tiny tool jump out of its path and chew an edge you liked? Does a thin petal feel like it will snap if you even look at it? Then look at your hands before you look at your tools. On camera I said the tool is not more important than your hands, and this video shows what I meant.

Six habits for steering a small gouge
- The middle finger carries the tool.
- The other hand guides it from the side, with one finger.
- Each pass takes a little.
- Forcing the tool is a mistake.
- A stem that moves under my touch gets left alone.
- Lost tools mean a break, a walk, and then putting every tool in its place.
How to hold a carving gouge when the tool is tiny
You rest it on the middle finger. About a minute into this video I asked everyone to see how I was holding my tool. It lay pretty much on the middle finger, and a finger from my other hand did the guiding. Then I excavated slowly, with no hard push.
Mine was a number 11 of 2 mm (about 0.08 in), and the job was digging deeper beside the petal I was shaping. I know it looks huge on the screen, I said. But it is only two millimeters.

In lesson 18 of my Furniture Panel course I showed the same grip with a number 11 of 1 mm (0.04 in). My controlling finger, I said there, is the middle finger. I place the tool right on it and pinch with the other hand, and that way you gain much more control. Both hands stay solidly on the board. Do not raise them in the air like you are airbrushing, because that does not work in wood carving.
That Furniture Panel lesson has a second rule. You really have to support your hands. With my right hand raised, I still placed my pinky right on the board and supported with it. If I cannot use my pinky, I place two fingers instead. All of it is about controlling your tool, I said, and a solidly placed hand prevents slippage, so I know for sure I will not slip with my tool.
Over in Hashemi Flowers lesson 25 I put a finger on the inside on purpose, and it worked as a stop. Because of that stop I had a lot less chance to slip and cut myself. My hand was right under my blade there, which breaks the rule that your hand should stay out of the way of the blade. So keep an eye on the pressure, I said, and do not force it. You have to feel how much pressure you use and where to stop.

What happens when you push a small gouge too hard?
A mistake. In the first minute I asked for care, to see how it moves, because forcing it would be a mistake. Later, with the excavation going on, the warning came again, this time phrased differently: push too hard, and that will be a big mistake.
An edge on this petal got the same treatment. Taking my time was the plan there, with no need to force it. A thin stem sat in the gap too. See how that stem moves when I am touching it, I said. So I do not touch it.

My teacher gave me a version of this when I was learning. In Venice Room workshop 60 I said it is a mistake when people try to get too much wood at one time, and added that it was my mistake too. My teacher told me not to do that, and I still wanted to be super quick. He laid out two possibilities. You can damage your piece, which is the lesser one, or you can cut yourself badly, because the tools are sharp. Even on a large sculpture, I said, it is better not to dig too deep.

Modern Acanthus lesson 4 adds two more habits. When a pass does not fly out, go back and recreate it, and do it without pushing hard. Cleaning has a rule too: no hard push against the rolling motion, because you will damage the side. Try to feel how deep the cut is supposed to go.
In Greek Acroterion lesson 5 I held a knife a different way, and that one rests the blade on the middle finger too. Two fingers create the pressure, and one blocks the finger, I said. That way I can control it. On a big tulip in class 11 of this course I flipped my back bent gouge to the opposite direction and said I did not want to force anything. Forcing, I said, would be the mistake.
How little wood should one pass take?
Very little. Later in the video a 5 mm number 11 (about 0.2 in) went in, then a 4 mm number 9 (about 5/32 in) that I called my little guy. Its head is really tiny and small, I said. I could work with the grain.

Before any of that came a bigger move. At least this side of the petal could go down to 10 mm (about 3/8 in), I said, and that would give me a really good depth. Careful, I added, and see how it moves.
When the hole went through, I looked at the opposite side. Beautiful shadow, I said. After that I outlined the start of the petal.
Next I began removing some of the mass. A bigger tool, maybe a number 4, would be equal to a number 3, I said, because it is an Ashley Iles number 4. It would make a somewhat cleaner cut.
The depth of every petal matters, I said, and I really want to give it a 3D look. I had some material to play with. So I went back to the same number 11, the 2 mm one, got a somewhat clean-up, and said I would have to undercut much deeper underneath. My undercut got about 5 mm (1/5 in) in, and more than that was possible, I said.

| Where | What I said | Detail |
|---|---|---|
| Dropping one side | I can drop it to 10 mm | 10 mm, 3/8 in |
| Number 11 excavation | I know it looks huge on screen | two millimeters, 0.08 inch |
| Holding the tool | it is laying on my middle finger | guide finger, other hand |
| Pushing too hard | if I push too hard, big mistake | small passes, no force |
| Undercut under petal | I got maybe about five millimeters in | 5 mm, 1/5 in |
| Touching the stem | which is why I won't touch it | it moves when touched |
| Losing a tool | you gotta take a break, walk away | then reorganize and find |
In lesson 16 of Hashemi Flowers I took a number 7 of about 5/16 inch (about 8 mm) for exactly the same slicing movements. Bit by bit, I said, and go on inside.
Tray of Blessing lesson 6 brought a number 7 at 45 degrees on end grain. That area was stubborn, I said. So take small, small, small cuts, small chunks.
Later in the same video I pointed at my middle finger on the left hand side and described it as another way to use that finger. I placed it there to protect the wood itself, in case I slip somewhere. I also said a number 9 would do there, though a number 11 could too, with the same idea of small chunks and small bites.

A small number 5 of 6 mm (about 1/4 in) in lesson 22 removed wood carefully, and I added that the part becomes more fragile with every cut.
And in lesson 40 of the same course a number 7 of about 20 mm (0.8 in) made the preliminary passes. Force makes the part really fragile, I said, and I can easily break it. Better to approach with different tools multiple times.

What did a plug cut and a tiny mallet say about force?
Earlier in class 13 I opened a hole in this same petal, using a number 9 of 6 mm (about 1/4 in) and turning it like a drill. Forcing it was not needed, I said, and a small plug popped out. The outline got a similar remark. I tapped a number 3 of 3 mm (1/8 in) with a tiny mallet, and a big one was not needed, because I did not really need a lot of force.
A small tool, small taps and a light hand had already opened that petal in the part before this one.

Which tiny tool did I pick for each pass?
The choice changed with each pass. After the 2 mm tool came a number 11 at 5 mm, and I called it a winner. I knew I was carving against the grain. Then came the 4 mm tool, the number 9, and a straight tool for the second concave, which I said would probably work better.
After the 4 mm tool I took some paste and stropped again. Don't need too much, I said, and then, here you go, that is plenty. Right then I was pulling toward myself on the strop.

Close to the end of the video I said that sharpness is just a must. What if you do not own tiny tools? A normal spoon gouge could do the job, and micro tools are really good if you have them. I carved a long time without them. Hands matter more than the tool, I said. A lot of tools can be made to work for you.

What do you do when you lose the tool you need?
Stop. Toward the end of the video I had lost a tool, and that is the point to take a break and walk away. Then reorganize and put your tools in the right place. Found it. A number 9, 6 mm (0.24 in).

My last look at the petal came right after. See that edge, I said, that is how it is supposed to look.

What was I carving while I held the tool this way?
One petal of my relief panel, next to a stem that leads to the tulip. The middle of the petal was going to bulge, with a concave on this side and another on the opposite one. A challenging area, I called it, and we like challenges. I also said I was raising that edge, and the wood was taken from two sides.
The petal moved in the opposite direction from the one before it, and that seemed logical to me, since the tulip weaves together with the flower beside it. How clean it looked did not worry me yet. What I wanted first was the overall shape, and I was kind of happy with the bulge.
This is the second of three parts in class 13. Class 12 comes before it, and class 14 follows with the parsley leaf. In class 18 I told everyone to take their time and not rush it, a little by little.

Where else did I warn against forcing it?
In Hashemi Flowers lesson 14 I said I was not going to force an undercut. A really small, tiny number 3 could do it and remove the piece.
Class 7 of this course had me going across the grain, and forcing it, I said, would break it. That was the time to get a spoon gouge, and I picked a number 11. Then class 10 had me starting a number 11 slowly, with no forcing, and I added that a spoon might work better there, because I was attacking from the bottom.
Even the vise got the same advice, back in class 1. Please don't squeeze it too hard, I said. Nothing will jump or walk away, so use just enough pressure and do not overdo it.
The honest part came in Hashemi lesson 25. You will probably cut yourself anyway, I said, multiple times, until you feel the pain and become really careful with that thing.
Where does a slow hand fit in my Maine class?
In class 9 I removed wood in small bits while I kept an eye on whether I was hitting all the way through, and I said I could take more a little later. Class 12 had a line for it too: the material is fragile, and I really cannot force that too much. All of it sits inside the Grinling Gibbons course.
If you want me at the bench while the 2 mm passes happen, the whole thing is there in real time, and Tuition covers it.
How it's done
- Rest the tool. Middle finger first: the tool lay on it, and the other hand guided it from beside, with one finger.
- Take the first drop. A big first drop was the plan for one side, and I stayed careful about how the wood moved.
- Excavate in small passes. A tiny number 11 took out wood with no hard pushing.
- Switch tools for the shape. Three tools shaped the bulge and its two concaves: a 5 mm number 11 (about 0.2 in), a 4 mm number 9 (about 5/32 in) and a straight one.
- Pause when tools go missing. I walked away, reorganized and found the number 9.
Frequently asked questions
How do you hold a tiny gouge so it does not slip?
Lay the tool on the middle finger and steer it with a finger of your other hand. I showed that on a tiny number 11. In another course I added that a pinky on the board can support the hand, and that two fingers work when the pinky cannot.
What happens if you push a small gouge too hard?
A mistake, I said while working this petal, a big one. Back in my Hashemi course I added that forcing makes a part really fragile, so it can break easily, and that it is better to approach with different tools several times.
How deep should a first excavation go on a petal?
One side of this petal could go down to 10 mm (0.4 in), I said, which would give me a really good depth. I stayed careful while dropping it. Later an undercut went about 1/5 inch (5 mm) in, with more possible.
What to carve next