

Alexander Grabovetskiy, woodcarver, School of Woodcarving · Published 2018
How do you avoid cutting yourself when carving toward your hand?
Quick answer: Carving toward your own hand is unavoidable on pierced work, so the defence is a finger placed deliberately in the blade's path to act as a stop. Add very light pressure and passes of a millimetre or two, and a slip travels a short distance into a fingertip that was expecting it.
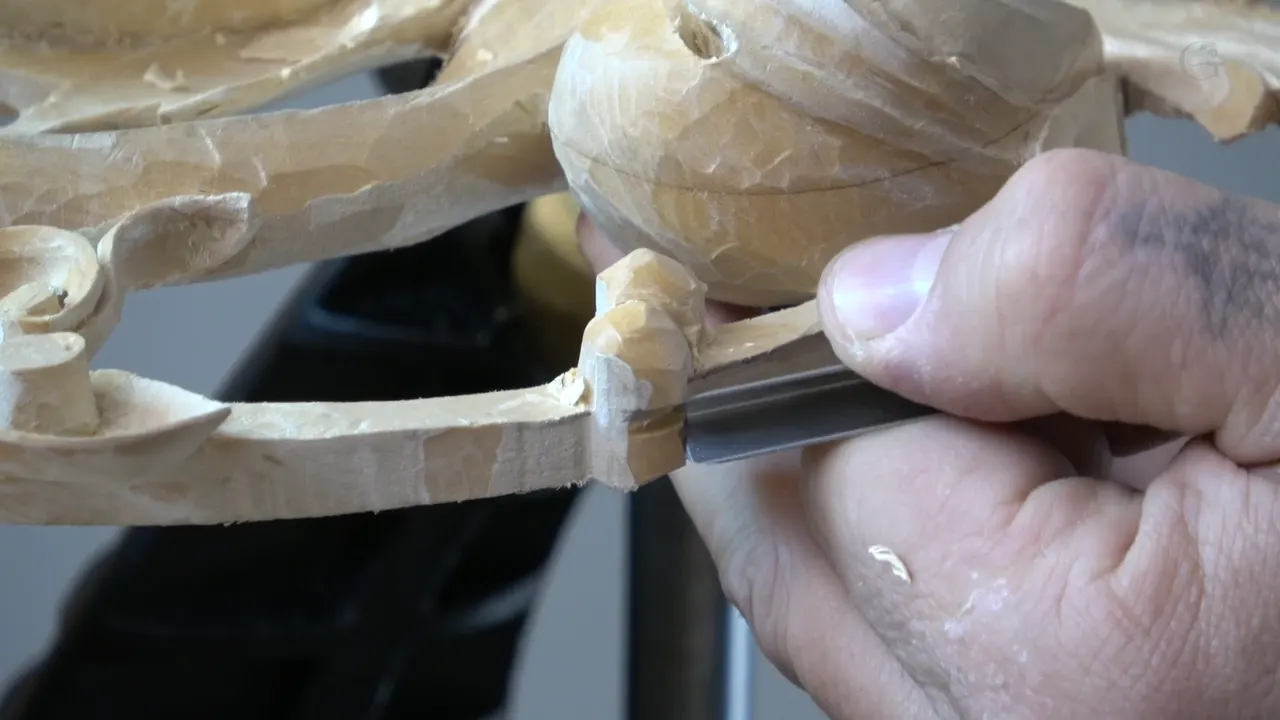
Park a finger where the blade would arrive and let it act as a stop. On small work my holding hand sits directly under the edge, which breaks the first rule anyone teaches, and the thing that keeps me whole is a finger placed on purpose inside the path so the tool has somewhere to halt.
Ever finished a good hour and found blood on the wood? Does your holding hand end up right where the blade is going, no matter how you try to arrange it? On a pierced panel there is nowhere else for it to be.
Workshop 25 of Carving Hashemi Flowers is where I stop and say this out loud, because on this piece I am holding underneath the blade for most of the session and pretending otherwise would help nobody.

What keeps the edge from reaching you
- One finger set on purpose in the path, doing the job of a brake.
- Pressure light enough that the tool stops when you decide rather than when the wood gives way.
- Cuts so small they barely qualify.
- Knowing where the grain runs, because a blade that suddenly follows a split is the one that reaches your thumb.
- Scars.
Which rule are we breaking here?
Every book says your hand must never sit in the path of the blade, and every book is right. On flat work you can obey it perfectly. Clamp the panel, keep both hands well back, and the question never comes up. That is how beginners should work, and I say so without any qualification at all.

Pierced work removes the option. By this stage the panel is a lattice with holes through it, the element being shaped is thinner than a pencil, and nothing supports it except whatever I put underneath. Something has to hold the wood while the edge moves, and the only thing small enough is a finger.
So the rule gets broken knowingly, with a second rule put in its place. The hand is not simply in the way. Where it sits has been chosen, and the choice is doing real work.
How does a finger become a stop?
Place it beyond the end of the intended pass, on the far side, touching the wood. Now the blade has a wall. Push a short stroke and the edge travels until the finger stops the tool body, not the blade itself, so the pass ends exactly where you decided rather than wherever momentum takes it.

That single habit changes the odds enormously. Without it a slip runs the whole length of your reach. With it a slip travels the length of one short stroke and meets a fingertip that was expecting it. I am not claiming the method is safe. It is simply a great deal safer than the alternative on work like this.
| Hand | What stops a slip | When this is the right choice |
|---|---|---|
| Behind the edge | nothing needs to, since the blade travels away from you | flat panels, roughing, anything clamped down |
| Beside the work | the bench | most everyday shaping, and where a beginner should stay for a long time |
| Under the blade | one finger planted in the path, plus passes measured in fractions of a millimetre | pierced and undercut work |

What is a downward cut, and why does it come first?
Straight down at ninety degrees to the surface, right on the line. I fumble for the term on camera and settle for calling it a downward cut. The name matters less than the job. It gives every later stroke a clean wall to stop against, so a gouge coming in sideways lifts its chip and halts rather than running on into the next shape.
Without that wall the chip tears past the boundary and takes a piece of the neighbouring element with it. With it, the same stroke ends in a crisp step. Which is why the V tool and the vertical pass always come before any shaping on a panel like this, and why rushing past them costs an hour later.
How much pressure is the right amount?
Barely any, and the camera cannot show it. Watching the video you will see the tool move and assume some force behind it, when in truth I am pressing almost not at all, because a thin element will break long before my hand would tire. Feel is the instrument here. You have to feel how much pressure and where to stop.

Forcing is the enemy of both safety and the carving. A forced tool goes further than intended, and on an element already reduced to a few millimetres it either breaks the wood or jumps the boundary. Never force it. Small passes, over and over, and let the edge do what it was sharpened to do.
Sharpness is part of the safety argument and gets underrated. A dull tool needs shoving, shoving needs force, and force is what turns a slip into an injury. Sharpening properly is a safety measure before it is anything else.

People ask whether professionals really work like this or whether it is bravado for a camera. Watch any carver finishing a delicate piece and you will see the same arrangement, because the alternative is a clamp that crushes what it holds. Carvers have worked this way for as long as anybody has been cutting undercut foliage.
Will you cut yourself anyway?
Almost certainly, several times. You will probably keep doing it until it hurts enough that your hands learn on their own, and no amount of reading gets you past that stage. Anyone who tells you otherwise has forgotten their own first year.
Two habits shorten the list. Watch the pressure constantly, and never force a stroke, which happen to be the same two habits that protect the carving. Safety and good work point the same direction here, which is not true of every trade.

Hierarchy is being decided at the same time as safety. Two of these berries are going to sit on top as the main detail, so everything around them gets lowered to make room, and a division cut marks that decision before any wood moves. Deciding which element wins is relief carving in one sentence: nothing reads as high unless something else agreed to be low.
Why keep two tools that do the same thing?
Tiredness, honestly. More than one tool will reach the same result on most shapes, and after using the same gouge every day for a week something in you wants a different handle in your hand. Nobody lists boredom in a catalogue, and it is a real reason to own a wider set.

On this session a number 7 at 5/8 of an inch does nearly everything, and I say plainly that it does not have to be that tool, it simply works for me today. Tomorrow a different sweep might feel right for the same passage. Both would be correct. Owning tools is less about coverage than people assume.
Rhythm matters more than technique on a session like this. Slicing, slicing, slicing, and then slicing again, the same short stroke repeated until the shape arrives, with the panel turned whenever the fibres change their mind. Both sides of a berry get worked in turn rather than one side being finished first, because alternating keeps the element supported by whatever has not been carved yet. Small thing. It saves a great deal of wood.
Speed is not the point and never was. A berry the size of a pea can take longer than a whole leaf once took me, and the difference is not slower hands. What changed is knowing what breaks.
What does the V tool do before any of this?
It draws the boundary. Every berry here starts with a number 16 separation cut, not too deep, then a downward pass at ninety degrees to the surface, which gives the gouge a wall to work up to. Cutting that groove first is what makes the later strokes short, and short strokes are what keep your fingers attached.

Depth gets left until later on purpose. The bottom of these shapes does not matter yet, because the whole panel flips over and the underside gets finished from behind, which is both easier and considerably safer. Whatever can be reached from behind gets done from behind.

Everything above applies double once a panel starts flexing. A lattice with openings through it moves under the tool in a way solid stock never does, so the finger underneath does a second job as well, stopping the wood from bending away and then springing back into the edge. That spring is what actually cuts people. Mounting and bent tools both exist to reduce how often you have to hold it that way.
How do you make a stem look like a vine?
Take the corners off until it stops being a plank. Right now this stem has a flat wall on the top and another underneath, which reads as a machined strip, and a vine in a hedge has no walls anywhere on it. Rounding it over changes what your eye calls the thing.

Perfect round would be wrong too. I deliberately do not make it a true cylinder, since nothing that grew is a cylinder, and the slight unevenness is what sells it as a living stem rather than a dowel. A number 12 knife does the whole job faster than any gouge would.

Rough is acceptable here, which surprises people. A little roughness reads as natural growth once the panel is finished, so I do not chase a flawless surface on a vine, and the time saved goes into the parts that need it. Knowing where perfection pays is most of design.
Blending is the step people skip. After the knife has taken the corners off, a light pass ties the new round surface into the flat one beside it so no ridge marks where you stopped, and on a vine that transition is the whole illusion. I refine with the knife, blend a little more, and only then call the shape done.
Tools on the bench for all of this stay few. A number 16 V tool, a number 7 at 5/8 of an inch, a number 5 at a quarter inch and the number 12 knife handle the entire session, and they came from Ashley Iles and Pfeil, with Henry Taylor making equally good ones. Four tools, several hundred cuts, and every one of them made toward my own hand.
Which way does the grain run on a curve?
Downhill, and you have to look before every pass. On this stem the fibres run one way along its length, so working with them means coming from one particular side and travelling down the slope, and approaching from the wrong end tears the surface open.

Some spots leave no choice and have to be worked against the grain. Slicing correctly gets you through them, since a blade travelling sideways severs fibres instead of levering them up, and that is why slicing keeps coming up in every workshop of this course.
Want the hours instead of the summary? All 49 workshops sit inside tuition at the school, and this page is where a beginner starts. Bring basswood and patience.

One more thing about holding underneath. I do it because the work demands it, not because it is clever, and there is a moment in this session where I wonder aloud what I would do if the carving flew off the bench again. That word again is doing a lot of work in the sentence. Everything I know about holding a fragile panel got learned the expensive way, one broken element at a time, and I would rather you learned it from a video.

Two things are worth saying to anyone reading this who has not carved much. First, none of the above is an argument for working carelessly; it is an argument for working deliberately in a situation where the tidy rule has run out. Second, the situation only arrives on pierced and undercut work, which is a long way into the trade. Spend your first years behind the blade with the piece clamped, and let the day you need a finger stop come to you.
What the old carvers did about this we mostly cannot know, because nobody filmed them and their hands are not in the record. Look at the acanthus work by Grinling Gibbons in the V and A, though, and ask yourself where a man's fingers had to be while he cut the underside of those flowers in limewood. Same place as mine. There is a reason the lessons keep returning to pressure.
How it's done
- Clamp it if you can. Work behind the edge whenever the shape allows. Holding underneath is for pieces that leave no other option.
- Set the stop first. Place a finger beyond the end of the intended pass, touching the wood, before the blade moves at all.
- Take the pressure off. Press barely at all. A thin element breaks long before your hand tires, so force buys you nothing anywhere.
- Shorten every pass. A couple of millimetres at a time. A slip can only travel as far as the stroke you were making.
- Read the grain first. Look along the shape and find which direction runs downhill, then approach from that side.
- Flip it and finish behind. Leave the underside until the panel turns over. Anything reachable from the back is safer done from the back.
Frequently asked questions
Should you wear a glove when carving?
A cut resistant glove on the holding hand makes sense while you are learning, and plenty of professionals use one. Feel drops noticeably though, and feel is what tells you when a thin element is about to give.
Why not just clamp everything down?
Clamping works beautifully until the piece becomes a lattice with openings through it. At that point a clamp has nothing solid to grip and would crush what it touched, so your hand becomes the only support left.
Does a sharp tool cut you worse than a blunt one?
A sharp edge makes a cleaner wound that heals faster. Blunt tools cause far more injuries overall, since they need shoving, and a shove that slips carries every bit of that force into whatever it meets.
What to carve next