
Alexander Grabovetskiy, woodcarver, School of Woodcarving · Published 2018
What angle should a V tool be for wood carving?
Quick answer: Ground into every V tool is a fixed angle between its two walls, and catalogues normally offer 90, 60 and 45 degrees. Sharper angles cut a narrower groove, so less wood goes from whatever has to stand beside it. Mine measures 35 degrees, and finding one to buy is the hard part.
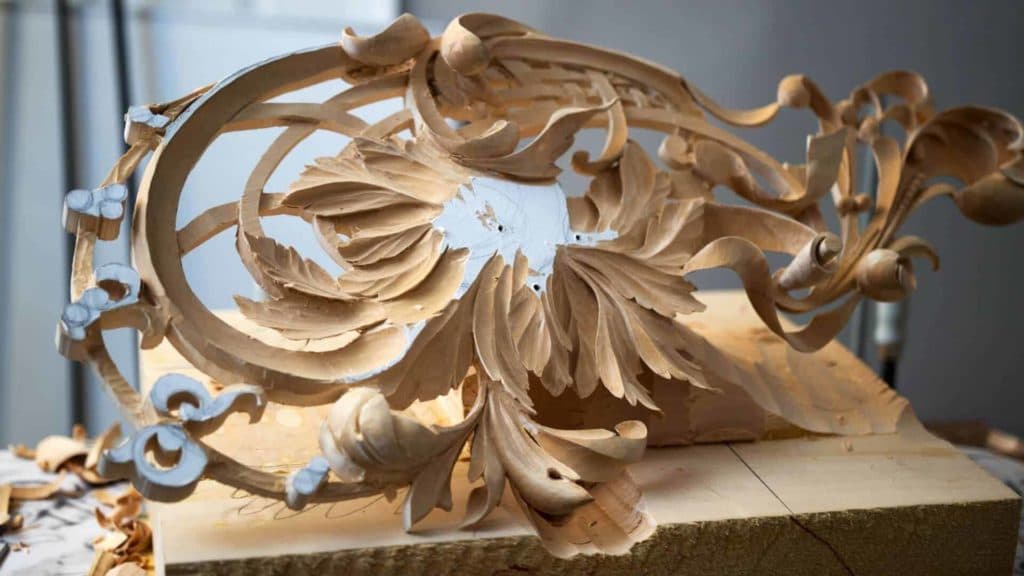
Most V tools sold today open at 90, 60 or 45 degrees. The one I reach for all day is sharper than any of them, a number 16 that opens at 35, and hardly anyone on the shelf of a tool shop stocks it. A narrower V leaves a tighter groove, so the wall beside it stands up instead of crumbling.
Ever cut a separation groove and watched the far wall break away as the tool went past? Does your V cut leave a valley twice as wide as you wanted? The angle between the two walls of the tool decides both, and almost nobody talks about it.
Workshop 22 of Carving Hashemi Flowers is where I stop to say it out loud, in the middle of a fragile pierced panel that would not have survived a wider groove.

What the angle decides
- How wide the groove is.
- How much wood is left holding up the wall on either side of it, which on a pierced panel is the whole question.
- Whether you can get into an inside corner.
- How strong the tool is.
- How easy it will be to sharpen, because a narrow V has a longer keel and a fussier corner.
What angle is a V tool, and which one do I use?
Common tools come at three angles and mine is a fourth. Go through any catalogue and you will find 90 degrees, 60 degrees and 45 degrees offered as standard, with 60 being the one most carvers buy first. My number 16 measures 35, which is sharper than the whole standard range, and I say plainly in the workshop that not every maker produces such a thing.
| Angle | How common | What it gives you in the wood |
|---|---|---|
| Ninety degrees | standard everywhere | a broad shallow valley, easy to sharpen, and very little use on tight ornament |
| Sixty | the usual first V tool for most carvers, and the one in nearly every starter set | a good all rounder |
| Forty five degrees | standard | tighter, and the narrowest angle many catalogues carry |
| Thirty five | rare | a narrow groove that leaves the wall beside it standing, which is why this panel got carved with one |

Sharper is not automatically better, and I would not want a 35 for everything. What it buys on ornament like this is room. Every groove you cut removes wood that was holding something up, and a 35 removes less of it than a 60 doing the same job.
Why does a narrow V matter on pierced work?
The wall beside that groove is often a sliver of basswood with nothing but air behind it. Widen the V by twenty degrees and you have eaten into that wall from both sides at once. On a solid panel nobody would notice. Here, the difference is whether a leaf tip survives the afternoon.

My working rule on this section is stated over and over: do not create too much pressure, because the piece is fragile and it grows more fragile with every cut. Half of that pressure comes from the tool itself. Opening a wide groove takes a harder push, and the push is what breaks things.
The same reasoning sits behind running the V tool before any gouge, and behind the workshop on holding fragile work. One relieves the stress, the other keeps the panel still while you do it.

Which gouge does the heavy work beside it?
Big sweeps come first and they are not subtle. Before any V cut goes near these elements I take a number 7 at one inch, and in the workshop I add the conversion out loud for everyone outside the United States: 25 millimetres. Nothing magic about that width either. A 20 mm tool, a 19, three quarters of an inch, any of them will do the same job.
What the big gouge does is set the levels. One side of the element goes downhill, the middle stays high, and the far side drops again, all in a handful of long strokes that settle the shape before a single detail gets cut. Get the levels wrong and nothing you do afterwards rescues it. That ordering runs through the whole course and it is the subject of the workshop on levels.
What is a V tool actually made of?
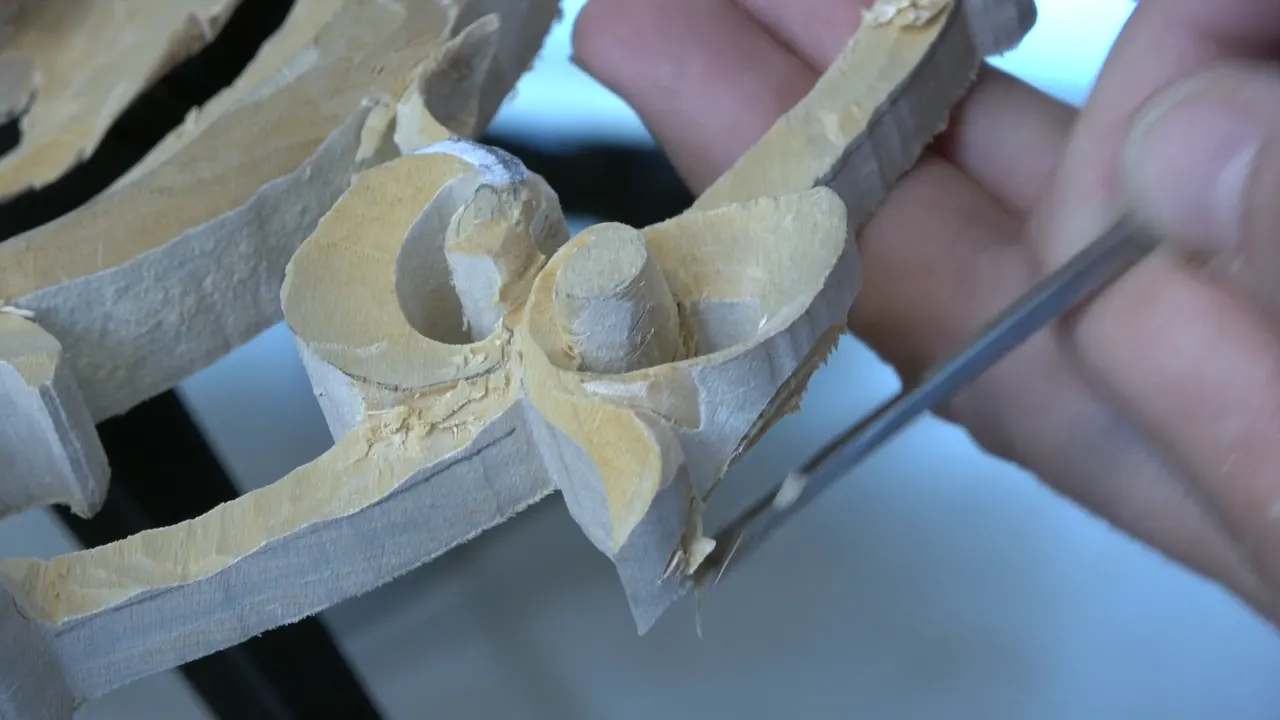
Two small chisels joined by a curved bottom. Look at one end on: a flat wall on the left, a flat wall on the right, and a rounded piece of steel where they meet, which we call the keel. Knowing that changes how you use it, because either wall can be laid flat on the wood and will cut like a small chisel.

That is how the berries in this course get their flat trim. Rather than fetch a second tool I turn the V on its side and let one wall work as a chisel, which is quicker and keeps the number of tools in play down to something my hand can track. Sharpening follows the same anatomy, and the sharpening course treats the keel as a job of its own.
Does the size matter as much as the angle?
Size changes what you can reach, angle changes what you leave behind. I carry the same 35 degree profile in more than one width and swap between them constantly here: 6 mm, a quarter inch, for the main separations, and 3 mm, an eighth of an inch, when the shape tightens up.

Choosing between them takes about a second and is mostly about the smallest curve in the line ahead. Drag a wide V round a tight curl and it cuts a chord instead of an arc, flattening the very movement you meant to carve.
Fixing a line that has gone wrong calls for something smaller. Twice in this workshop I look at a flowing line, decide it is not right, and pick up a number 5 at 6 mm to correct it, then a number 4 at 10 mm, half an inch, to reshape the ground around it. A number 9 spoon at 5 mm goes inside where nothing straight can reach. None of this is planned in advance. You look, you judge, you reach.
How do you find the right sweep for a curve?
Try one, look, and try the next. There is no chart. In this workshop I pick up a number 8, hold it against the shape, decide it is close but wrong, reach for a bigger one and say this one is good, all inside about fifteen seconds.

Matching matters because a mismatched sweep leaves a joint. Press a gouge whose curve is flatter than the line and the two ends bite while the middle floats, and you get a shape assembled out of short straight pieces rather than one that flows. Judging that is its own skill, covered in the workshop on flow lines.
Want the real thing rather than a summary of it? All 49 workshops of this course come with tuition at the school, and this page is where beginners start.

People write asking which one tool they should own if they can only own one, and the honest answer annoys them: not a V tool at all. Buy a number 7 gouge first, learn what it does, then buy the V when a design gives you a reason. Tools bought before the job they solve sit in a drawer growing rust. The 35 sat unused on my shelf until pierced foliage of this kind gave it something to do.
What do the numbers on the handle really tell you?
Less than you would hope. One of my gouges is stamped number 4 and looks to my eye like a number 3, and in the previous workshop another was marked 6 mm when the blade is nearer 5. Makers are not very accurate about this, and once you have owned a tool for a year you stop reading the stamp altogether.

What you trust instead is the edge against the wood. Hold the blade into the line with no pressure and see whether it touches all the way across. Ashley Iles, Pfeil and Henry Taylor all make fine tools, and all of them will hand you a blade a shade different from its label.
How much should you undercut a leaf tip?
Enough to throw a shadow, and not one stroke further. Working on a tip that wants to look like it turns over, I lean the gouge in, take material from underneath, then stop and say I am leaving it because it is too fragile and I have a tendency to overdo things. Knowing that about yourself is worth more than another tool.

Pressure is the reason again. Every cut underneath takes away support from the cut above, so the tenth stroke is far more dangerous than the first. When a section really needs more, it gets it from behind, where the panel is thick and a slip costs nothing. Much, much safer, as I say at the end of this workshop.

My left hand is doing something the camera barely shows through all of this. It sits under or behind whatever is being carved, taking the pressure my right hand cannot avoid making, and that is not optional however careful you feel. No amount of care removes the force at the edge.
What happens where the grain changes direction?
Two grain directions meet at what I call the marriage line, and that is where tearing starts. Carving toward it from one side goes cleanly, and the same stroke carried straight through it lifts a splinter out of the other half. So I stop at the line, turn the work, and come back at it from the other side.

End grain makes all of it harder, and the outside scrolls here are almost nothing else. Basswood forgives more of it than most timbers, which is one more reason this course leans on Tilia and not something showier.
One more honest note about the middle stage. Much of what gets cut here is preliminary, and I say so: the final thickness of these elements is not established yet, and will not be until the back is worked. Carving a pierced panel means leaving yourself material to change your mind with, which is why so much of this session ends with the phrase that I can always come at it from the back later.
Something else I ask the camera in this workshop, and I will ask it here too. Do not judge me too strongly if I forget to name a tool. After forty years my hand goes to the shelf without asking permission from my mouth, and there are stretches where three tools come and go before I remember anyone is watching. Naming them all is a teaching habit, not a carving one. If a cut in the video interests you and I never said what made it, look at the width of the chip.
Where does the V tool not belong?
Anywhere the shape wants a curve. Two flat faces meeting in a point is exactly wrong inside a volute where the movement has to sweep round. So the V opens the boundary, then a number 8 or number 9 goes in and makes the roll.

Not every part of a panel deserves the same attention either. When I reach a small element away from the middle I say out loud that it is not my focal point and I am not going to overcomplicate it, and that judgement belongs to design rather than to tools. A carving where everything shouts says nothing.

So: 35 degrees, a quarter inch and an eighth, laid on its side when a chisel would suit better, and never asked to make a curve. That is the whole of what a V tool does on pierced acanthus. The angle is the part nobody tells you about, and it is the part that saves the leaf.

None of this came from a book, and I would not have looked for a narrower tool if wider ones had not kept costing me walls. Whether the old carvers reasoned it out or simply inherited the tools, their separations are narrow. Stand in front of the foliage by Grinling Gibbons in the V and A and look at the gaps between one leaf and the next. Ask yourself what angle of tool leaves a channel that tight. Whether you carve Byzantine or Roman leaves, the same arithmetic applies: every groove is wood you will never get back.
How it's done
- Pick the angle for the job. Take 60 degrees for general work. Go narrower where a wall beside the groove has to survive being cut on both sides.
- Open the boundary first. Run the V along every separation before a gouge touches the shape, so each later stroke has an open side to lift toward.
- Lay it over for a flat trim. Turn the tool onto one wall and use it as a chisel. Fetching a second tool for that is wasted motion.
- Swap width, not angle. Keep one profile in two widths. Six millimetres for main lines, three where the curl tightens up.
- Stop at the marriage line. Where two grain directions meet, end the stroke, turn the work, and finish from the far side.
- Hand it to a gouge. Let a number 8 or 9 make the roll. Ask a V to carve a curve and it leaves flat faces and a dead movement.
Frequently asked questions
Is a 60 degree V tool a good first buy?
For a first V tool, yes, and most starter sets are built round one. Narrower angles earn their keep later, when ornament gets delicate enough that the groove itself starts costing you wood you needed.
Why is a V tool harder to sharpen than a gouge?
Three surfaces have to meet at one point: two flat walls plus the rounded keel underneath. Get the keel wrong and a notch appears where the walls come together, which no amount of polishing the flats will fix.
Can a V tool cut curves?
Only gentle ones, and badly. Two flat faces meeting in a point will not roll round a tight volute, so the V opens the line and a gouge of the right sweep does the shaping afterwards.
What to carve next