

Alexander Grabovetskiy, woodcarver, School of Woodcarving · Published 2022
How do you know when to stop before your gouge goes through the wood?
Quick answer: Deciding to stop is a call I make the moment one more pass would open a hole. On camera I saw I was almost through and said so out loud. That spot had been dug from behind, so close meant close. I turned the cut around, took small passes, and let any hole I made stay.
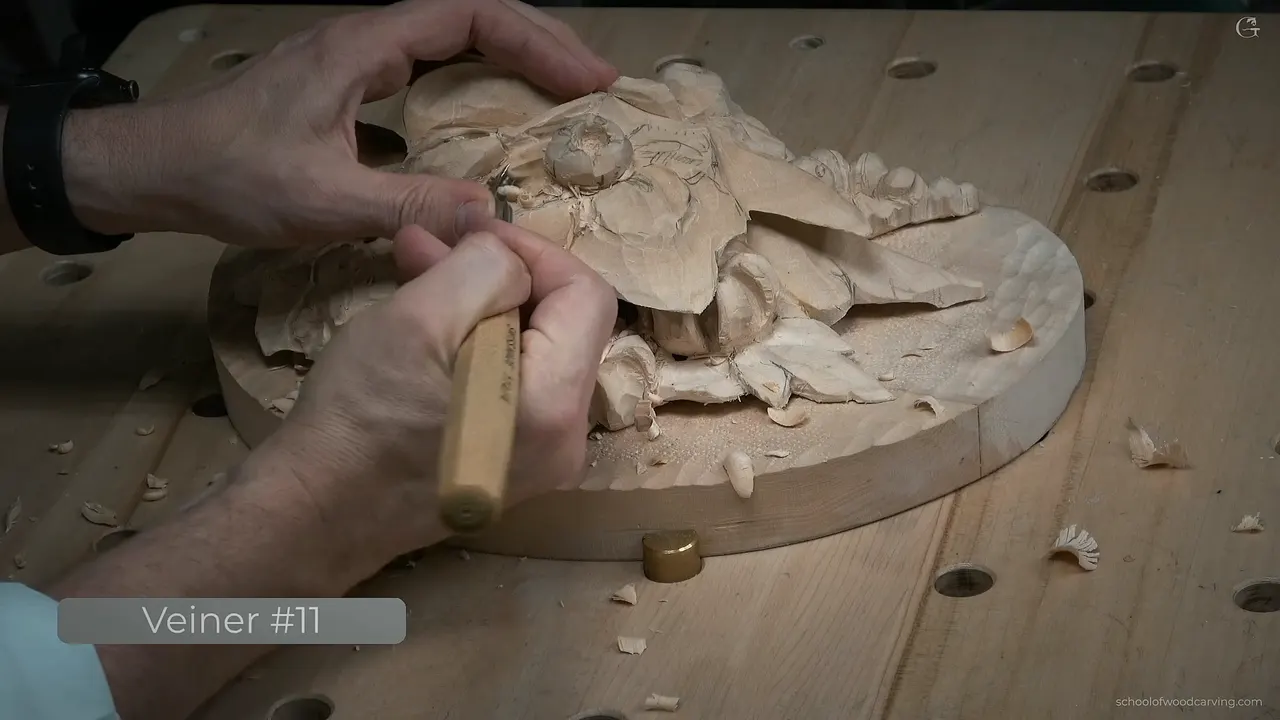
A stopping point is the spot where one more pass would put a hole through your piece, so you set the gouge down before you make it. In class 9 of my Grinling Gibbons course I called mine out loud, with the camera running. Almost through. One more cut would create a hole, and that was it for that spot.
Ever pushed a tool one pass further on a wood carving, just to see if the wood would hold? Then you know how fast a thin wall goes. This is part 2 of that class. Below you get the places I stopped in this video, the small passes I took in place of big ones, and eighteen other recordings where I gave my reason for stopping.

My stopping rules in six lines
- One cut from a hole, so that spot was done.
- I had hollowed it from behind, so close really was close.
- The cut turned around instead of pushing on.
- Beside a hole, small passes only.
- Wood came off a bit at a time, watching for a break through.
- A hole I made anyway stayed, and I worked around it.
How do you know when to stop before your gouge goes through the wood?
The petal belongs to a flower on my Gibbons relief panel, fresh home from Maine. My tool was a number 11, 4 millimeters (about 5/32 inch), a little bigger than 1/8 of an inch, and yes, it is a spoon. I wanted a curl on the inside of that petal, so I excavated right there.
A minute before the stop the surface did not look clean, and I told you I did not worry about it yet. What I wanted was the shape first, nothing too rough, and cleaning was not a big deal for me at that point.
Then came the line. It looks like I am almost all the way through, I told you, and one more cut would be creating a hole. "So that's stopping point."

How did I know the wall was that thin? Both facts came in the same breath. A few seconds after the stop I reminded you that "we excavated it from the back side," and the spot was "somewhere pretty close." The class where we worked on the back is class 6.
What did I do at the stopping point?
I did not push on. The cut could go in another direction, I told you, so I turned it, and seconds later I was describing a really crazy excavation in that petal: up, down, back, then backward, then up. Twice I mentioned that the tool was still the number 11, 4 millimeters.

A couple of minutes on, the shape was good and blending could start. That called for a number 9, 10 mm (about 0.4 inch), the same tools I used when I taught it. Blending was gentle work. It was not going to be crazy movement, I said, but still so nice, and all I had to do, obviously, was check the direction of the grain and follow it. One stop did not end the work, and I kept going.
What if the tool goes through anyway?
It did, and the camera caught it. I was not sure you could see it, but there was a hole, in the spot we had hollowed from behind. Pretty close, I warned, so careful, but the hole stayed. Anyone looking would think I did that on purpose, though I had not.


My answer was short. "I'll just work and live with that."
Later I picked up a number 11 of about 1/8 inch (about 3 mm) and began to undercut, tool on the right-hand side, flute at about three o'clock, taking extra wood out from underneath. Up came a hole, then another, which I called absolutely fine, since I would create some kind of separation. I expected more holes like that, and I had to be careful.
Near the end of the video I was almost through again, so I stopped right there. The tool felt like it needed to be sharpened, so I got another, 6 mm (about 1/4 inch).

Can you take wood off a thin petal in small passes?
Part 3 of class 9 spells it out. I was removing little by little, with an eye out for a break through, since I really wanted none. More could come off a little later, I told you, but not until the last moment.

Early in that part, a big straight tool was doing the work. Tiny spoons would help in a spot like that, I said, since they work with the grain, and I have some. Without them it can still be carved, just as I carved it.
Before that I got almost through again and named it my stopping point. Another pass would be a mistake. So I first reached for a number 8, about five millimeters (about 0.2 inch), and then thought better of it. I needed smaller than that, a 2 mm number 11 (about 0.08 inch), and joined the hole from underneath with small passes. With a hole already open, overdoing it was the last thing I wanted. Those passes were just an indication of the undercut.
Part 1 had the same habit. My first deep pass used a number 5, about half an inch, maybe a little more, and I guessed 14 mm (about 0.55 inch), held upside down. Excavation sat right underneath, and cutting through was possible, so I called it a good point to stop. Even my plug cut ended all the way through, and I hoped I had not messed up. A hand drill or an electric drill would do that job too, I added. Next to that hole I wanted to drop an area for a concave movement, and I wanted no trouble, since I had already broken through there.

In part 3 I was not sure you could see inside one hole, and I did not want to block the view with my hands. Most likely it stays as it is for now, with the inside cleaned a little later, which should not be any problem.
Later in that part I told you not to worry about a hole: a bunch of leaves would sit around it, so it could be just one of the separations. A little later another hole showed up, and I guessed I had overdone it on the backside. That was okay too. Then a small number 8 went to one side, and I said, "That's paper thin."
Nothing in these three videos gives the thickness of that wall. What I did give you was the pair of facts, a spot already hollowed behind it and somewhere close. Openings by design come later, in class 15: "I would like to create the openings."
Do I stop for the same reasons on other pieces?
Yes, and the reason changes. Here they are, each from a lesson where I gave it out loud.

The wall is too thin. A number 11 at half a millimeter (about 0.02 inch) came out in lesson 19 of my Furniture Panel course for a small undercut. Not much, but a small one. My warning: be careful, really, because going through there would leave it too weak, and that would be a bad idea.
A finger on the wood. One of my fingers was the stopping point in an earlier part of that same lesson 19. It sat solid on the work while a number 3 of 6 millimeters (about 1/4 inch) followed my outline in small steps. Controlling the tool that way helped me a lot, I said.
Pressing too hard. Carving along the grain in lesson 15, I could make a big mistake by pressing too hard, and I wanted no part of that. That, I figured, was where I should quit, with no more movement than that. Afterward I called the result awesome, the same depth.
Too far means overdone. My thumb was the leverage point in Acanthus over Moldings lesson 8, which gave me better control of the tool. Right there was probably my stopping point, otherwise I overdo it. I admitted a habit: I try to take a surface to perfection, and then comes the problem, overdone. In lesson 4 of my Lily Box course, a pass ended with "We don't want to overdo it," and a note that I did not need more, since I thought it was plenty.

Nobody will see it. In workshop 69 of the Venice Room I wondered whether a curve should go even deeper or stop right there. Logic said stop: from that side the curve is hardly visible, and from below nobody can detect it. I left it. A mallet came next, since I thought it would help me.
A deep shadow with no hole. I wanted a really deep shadow in workshop 60, with no break through. A plug cut went in, I rotated, and the next one landed right on the side. Multiple cuts like that, cleaned later, making extra plugs along the side as I went.

An undercut with no gap. The lily flower in lesson 11 of the same box needed a part that looks as if it goes underneath, an undercutting effect, without separating. Going through was out, and I said so twice.
Blending, not digging. Working with the flow of the wood in lesson 7 of the Floral and Molding course, I had a way to go through, but all I needed was a blend, with no ridges or facets showing.
Drilling almost through. In lesson 10, a number 9 of 1/8 inch, three millimeters, would drill the spot almost through. When it is done it goes right through, so care came first. Plug cut is what I call it.

I can feel it. I took a number 7 in lesson 8 of the Lily Box and dug in, and I felt it: almost through, and indeed I was. What remained was the cleaning around the hole I had just made.
The tool cannot go deeper. A really big tool in workshop 35 was after an even bigger shadow. Past some depth the tool cannot go further. You cannot see that from the camera, and it is deep.
There is no end. Later in lesson 11 of that box I gave one spot a semi-final form and put it plainly: there is no end, so you decide where to stop. All day on one spot is possible, and I probably should not.

The bills. A different reason came up in lesson 12. Underdoing is possible on purpose. When money depends on speed, you have to decide, and that is already a stopping point, because I need to pay my bills. Justifiable, I called it, for anyone carving for a living. The artist, I said in that lesson, sees the piece as unfinished, honestly.
Because I will wreck it. A tiny, extra short bent gouge went in during my Venetian Flowers Rosette course, lesson 5, and I stopped right there "because otherwise I'm going to destroy." I pointed at the mess. I would attack it from the opposite direction a little later.
The mess on the side. Lots and lots of mess sat on the side in lesson 2 of the Floral and Molding course, and I called it probably the place to stop. I should not push it too hard and should just take out whatever I want to save. "Okay, that's enough."
Two movements are coming. Avoiding a break through, obviously, was the plan in lesson 25 of the Furniture Panel, because two movements still needed establishing. The background there sat somewhat lower, which gave me really good material for the full 3D drop.
The place I cannot reach. Looking at how deep the excavation was in workshop 46, I also checked what kind of shadow it gave. Somewhere ahead, I told you, there is a stopping point where I cannot reach in. I kept watching how I pressed to the edge, and the pressure was barely anything.
Which reason matches which recording?
| Reason | Place | Move |
|---|---|---|
| Thin wall | Furniture Panel lesson 19, part 15 | small undercut |
| Hard pressing | Furniture Panel lesson 15, part 3 | held back |
| Overdoing it | Acanthus over Moldings 8, part 3, and Lily Box 4, part 11 | stopped there |
| Hidden spot | Venice Room workshop 69, part 7 | left it |
| Deep shadow | Venice Room workshop 60, part 2 | plug cuts |
| Felt it | Lily Box lesson 8, part 12 | cleaning followed |
| No end | Lily Box lesson 11, part 12 | made the call |
What does it look like when the stop is a habit?
In these recordings I gave a reason out loud before I moved on. I still made holes, and the camera caught those too.

The Grinling Gibbons course holds the whole panel. Every class of it, class 9 included, comes with Tuition, and the early ones were filmed live in Maine. Watch me stop, and watch me miss the stop.
How it's done
- Say where you are. Before the next pass, I said out loud how close I was. The petal looked almost through.
- Think about the back. We had excavated that spot from the back side, I reminded you, and it was somewhere pretty close.
- Turn the cut around. Instead of pushing on, I said I could make the cut in another direction.
- Take small passes. Beside a hole, small passes with a number 11 of 2 mm (about 5/64 inch) did the work. Only an indication.
- Take the rest later. I removed wood little by little and watched for a break through. More could come off a little later, and I did not want that until the last moment.
- Work with a hole. When the tool went through anyway, I said I would leave it and work with it.
Frequently asked questions
What tells you a thin wall is about to open?
I look at where I am and what sits behind it. Watching the petal, I said it looked like I was nearly through, and that we had hollowed that spot from behind. And on another piece I said I could feel it.
Should you stop one pass before a hole opens in a thin petal?
On that petal I did, at least once. A hole was one cut away, I told you, so I stopped there. Later I went through in a few spots anyway, and I worked with the holes.
Can a smaller tool keep you from breaking through?
Near a hole, I switched to a number 11 two millimeters wide (about 0.08 inch) and took small passes to connect underneath. Overdoing it was the worry, since I already had that hole. Just an indication of the undercut.
What to carve next