

Alexander Grabovetskiy, woodcarver, School of Woodcarving · Published 2022
How do you make a leaf look like it lies on top of a flower in relief?
Quick answer: A leaf set over a flower is a leaf with a thin shadow under its edge and the flower tucked in below it. On my Maine panel the 16 V tool undercut a millimeter, and then a number 11 made the separation. A parsley leaf now covers a flower I drew myself.
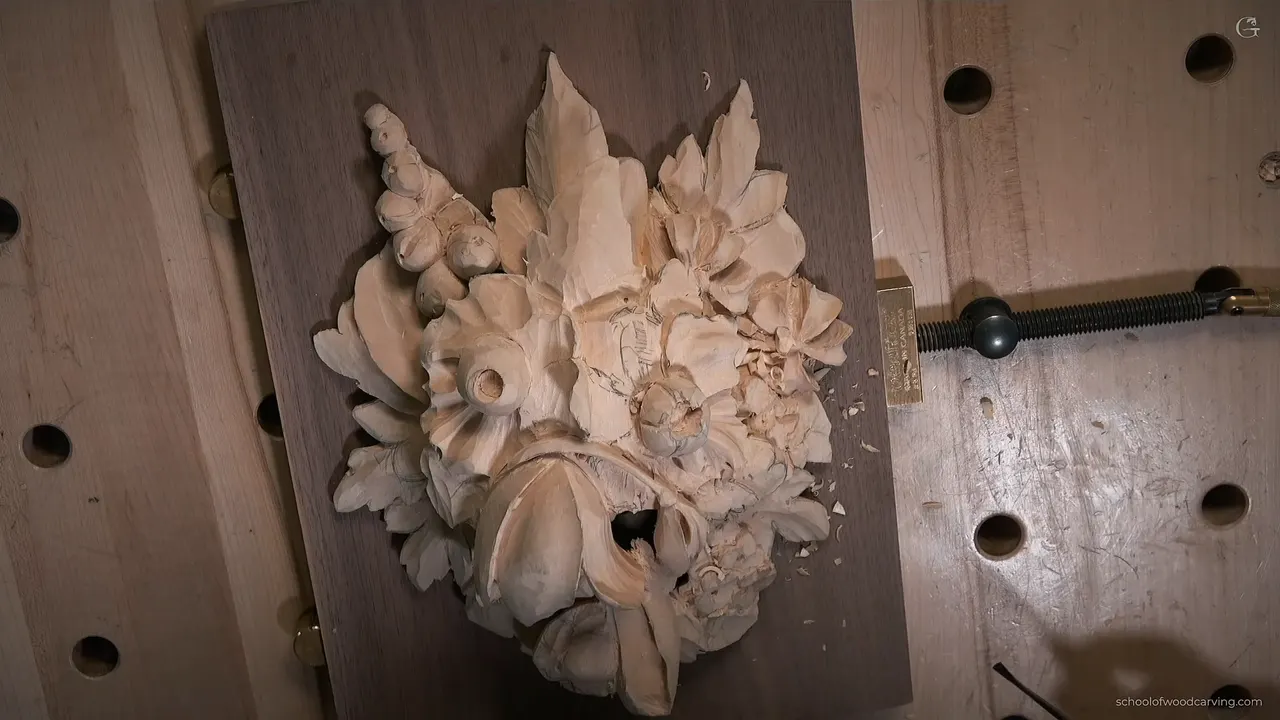
A leaf lies on top of a flower in relief when a thin shadow runs under the leaf's edge and the flower sits tucked in below it. On my Grinling Gibbons panel in Maine a small parsley leaf had to cover part of a filler flower. My undercut could go only a millimeter or so deep, so every pass counted.
Maybe you drew a leaf over a flower once and got two shapes sitting side by side. Part 12-1 of my Maine class shows how I made one rest over the other in relief, with the wood I had left.

Six moves that put the leaf over the flower
- My own drawing of a flower, since the original spot had no wood for one.
- Just one small flower, showing only part of itself.
- A 16 V tool undercuts a millimeter and starts the shadow.
- Then a number 11 separates leaf from flower.
- For the leaf's edge, a number 5, and almost no pressure at all where the grain ran against me.
- Last, a small chisel opens a hole between layer one and layer two.
Why did I draw my own flower under the parsley leaf in the first place?
My block was wider than the original asked for. In the original picture that area is narrow and long, but we used the whole block, and the school in Maine had been able to get some wider stock. I thought it was good.
Looking at the original, I saw a small parsley leaf and right beside it some kind of flower. For the leaf itself I had plenty of wood. The flower was the problem. Thickness was missing, I told the camera, and I had to work with what I had.

So I drew my own, and it was not going to be exactly what he had. Only a couple of petals would stick out, on a flower that was not really complex but still a flower. The material was thin, and I reminded myself to stay mindful of it.
How do you draw a flower that hides under a leaf?
The flower I drew was a bigger filler flower, the same kind as the one just below it, only on an upper level. It sits hidden beneath the leaf. The leaf gets some subdivisions and shows only partly.

Which tool starts the shadow beneath the leaf?
I started with a V tool, number 16, three millimeters (1/8 in) across, with a 35 degree angle. I turned my flute a little to the right and started to undercut.

Little went in. There was no thickness under the leaf, so the undercut ran about a millimeter deep (about 0.04 in), and that is what I did. I blended with the same tool, though not for the final blending. Under the petal I took a little more, maybe slightly deeper than a millimeter, and a deep undercut was out of the question there. Whatever mess was left, I would get a chance to clean later.

How deep can a shadow go when the wood is thin?
A shadow still had to live under there, so I picked up a number 11 with a half millimeter edge (about 0.02 in). It was a Two Cherries gouge from Germany, and the brand does not matter. It just happened to be in my hand.
I went under that line slightly. A deep undercut was not the plan, only a little, enough to make the separation. What I wanted was a parsley leaf that rests on the future flower.

Then came a confession. I kind of regretted removing too much material, since I got a little too close underneath and not much was left. Okay, I said, and went on.
What shapes the flower without taking its wood?
Next I took a number 5 by Ashley Iles and came at the flower from the side for the overall shape. The material was fragile. I upgraded my own words on camera, kind of fragile became fragile, and I really could not force it.
Some shape had to come to the flower without removing much from above. Only the spot where the center would be gave up a little more. From two sides I got inside the separation.

The edge of the parsley came after that. It would not carry a lot of movement, but still something different from the flower. Mine was a number 5, about 11 millimeters wide (about 7/16 in), and I noted it is not really 3/8 of an inch and not half an inch. Any tool will do on an edge like that. It must be sharp. That is the only rule.
What do you do where the grain runs against you?
The tricky part came next, because the grain runs the direction it runs. Strokes had to be almost no pressure, really small ones.
A few minutes later I put it plainly. I was working against the grain, breaking the rule, and I was okay with it. Near the end I said it again: sometimes you really have to. The way class 11 handles a wrong direction is a different lesson.

Which chisel opens a hole between the two layers?
A small double sided chisel. The one I used was three millimeters (1/8 in) wide, an antique Marples, and I really like it. In it went. A hole opened between the first layer and the second.

I like that hole most. It gives the three dimensional look. From above you may not see it, maybe not really, but the hole is there. Next I exposed the first layer, which I could clean and refine later.
Those filler flowers I did not carve again on camera. You had seen them before. Repeating myself was not the plan, and the rest was up to you, so you could be creative.

Out came the number 16 again, a really small one, and I held it upside down. Inside, I made a deeper undercut under the previous flower, and the mess in that section did not worry me. Same tool, upside down once more, in the separations and the triangles.

The texture bothered me, so my number 5 went back in to clean that area, carefully, carefully. Then I found another hole, which does not show, but one more is under there.
What if the flower runs out of wood from underneath?
I turned the panel and looked at the flower from the back. Almost no material was left at the center, and I had some meat on the sides. I said I would probably change the style of that flower. That is what I like about wood carving in general: you can change stuff and nobody is going to know, and it still looks nice.
The new flower got a raised middle that connects all the way around, with an excavation on the side. A slightly different flower, and I thought it would look much better. If it did not please me, I would take it completely off and leave it the way it was supposed to be.

My tool was the number 16 again, the same tiny V tool at 35 degrees. A preliminary pass went first, no more than a millimeter, and I could not go deeper than that. It still gave me the feel of a raised middle. After that, I blended it slightly inward.

What lowers the petals around a raised middle?
Number 4, a tiny detailing tool, about a quarter inch (6 mm) wide. It is an English, London pattern, and it equals a number 3 in the European pattern. I called it a Peter Benson.
I carved the ridge away carefully, breaking the same rule again. My goal was to bring down the surrounding petals, and little material was left, so I stayed mindful. Good, I said. A little more would probably be a mistake for me.

Which shape goes over the other one?
Part 12-2 asks that question about two petals. One is a little higher when you look from the side, I explained, and the other is a little lower. The lower one goes underneath, so a shadow can fall.
Again I picked the number 16. Using a number 11 would work too, and sometimes you have to change tools, because the same one over and over gets boring. The first separation went under right away and already cast some shadow. I also wanted that petal to look like it bulges, so with the same tool I undercut right at its round area.

A full undercut was out of reach there too. All right, I said, as long as I could cast some kind of shadow. Maine class 8 covers which way petals overlap.

Where else have I set a leaf over a part that sits below it?
The same problem comes up in my other courses on wood carving. The tool changes and the wood changes, and each time I watch how much is left below. The table sums it up, and the pages after it tell what I said.
| Lesson | The wood I had in that spot | The tool I used |
|---|---|---|
| Maine 12-1 | A one millimeter undercut under the parsley leaf | First a 16, then an 11 |
| Hashemi 40 | Little wood along the rim and more toward the center | Veiner 11, one millimeter |
| Venice 19 | About 16 mm kept for a detail that comes later | A shallow pass around it |
| Venice 42 | A really thick piece of wood, so I changed things | A 7, then a deeper undercut |
| Lily Box 5 | Crunchy olive wood, so I kept some support | One millimeter 11 gouge, first |
| Floral 14 | A section that the part had to rest on | A 5, then a smaller tool |
| Hazelnuts 4 | About an inch and a half of wood | The husk set over a leaf |
One leaf had to sit over another in Hashemi lesson 40, and I did not have much material at the edge. Closer to the center I had a lot more. I undercut gradually, from almost nothing out at the rim, with a millimeter of difference between the upper part and the lower, and went to about 3 millimeters (an eighth of an inch) on the inside. Number 11, one millimeter wide. I called it a veiner, but for me it works like a V tool.
In Venice Room workshop 19 I carved around a part so it would seem to sit over a future detail. Deep was not needed, since that side shows from the bottom, and a deep one would be hard to clean. Some 16 millimeters (about 5/8 in) stayed for the future detail, and I called the pass preliminary.
Workshop 42 put the main body of a piece on a folded leaf. I made one side tinier, brought it inside, and undercut much deeper. The ridge came down with a number 7. Having a really thick piece of wood is a beautiful thing, I said, because then I can be more creative and change stuff.
Over in workshop 81 a smaller tool gave me a lot more control. Too deep would destroy the movement. It still had to look as if it sat on that movement. In workshop 82 I planned to leave about a quarter inch (6 mm) above my main part, so it would sit on that thing, whatever its proper name is.
The olive wood lily box was crunchy, so I kept some support under a part that rested on another one, and it cast a shadow on both sides. First, a one millimeter number 11 showed the movement, in Lily Box lesson 5.
In Floral and Molding lesson 14 I wanted a part to sit on a section, and a quarter inch number 5 by Ashley Iles went first. Any number 5 will work. Then I decided the tool was a little too big, so I went to an eighth of an inch (3 mm). Small concave cuts came next.
The light matters too. On The Tray of Blessing, lesson 2 one leaf lay on a ridge, and I said we are painting with the shadows and the light. A piece on a wall with the light above can get by with a shallower pass and still cast a shadow. A tray in a dining room gets its light coming in sideways, so I had to excavate somewhat deeper.
The thick version is on a hazelnut panel, in Hazelnuts lesson 4. One leaf rested right on the background, and the husk went over that leaf. Plenty of material was there, about an inch and a half (about 38 mm) already, maybe more, and the nut itself would go lower.
A part sat right over a leaf in Grape Onlay lesson 4. I sloped it to about 45 degrees and made a small concave, not a big one, so the part reads as resting on the leaf. On that side 10 millimeters (about 3/8 in) was left.
Where does this panel go next?
You can follow the same panel in class 12, and more of it is in class 13. The parsley leaf is the subject of class 14, and how two glued layers read as one carving is in class 9. Every class sits on the Maine course page, and the plan that opens them is here: see the tuition.
How it's done
- Draw a flower under the leaf. I drew my own flower, a bigger filler flower on an upper level, with its petals sticking out a little, and gave the parsley some subdivisions.
- Start the shadow. With my flute turned slightly right, my number 16 undercut about a millimeter.
- Separate with a number 11. Half a millimeter wide, it went under the line slightly, not deep, only to make the leaf lie on the future flower.
- Shape the flower. A number 5 gave the overall shape without taking too much material, since the wood was fragile.
- Open a hole between the layers. A double sided chisel went in, and the two layers had a hole between them.
- Change the flower if the wood runs out. I raised the middle, connected it all around, and excavated on the side.
Frequently asked questions
What do I use when I can undercut only a millimeter?
A V tool, number 16, 3 mm (about 0.12 in) across at 35 degrees, went in a millimeter or so. Under that line came a number 11 at half a millimeter (about 0.02 in), just a little, only for the separation. I said I could not make a deep undercut there, and I did not try.
Can I change a flower when the wood under it runs out?
I changed mine. From the back I saw almost no material at the center and some on the sides. The middle became raised. It connected all the way around, with an excavation on the side, and I said that in wood carving you can change stuff and nobody is going to know.
Which tool shapes the edge of a parsley leaf?
I used a number 5, about 11 millimeters wide (about 7/16 in). Any tool will do on an edge, I said, but it must be sharp, and that is the only rule. The grain ran against me there, so my strokes were really small ones.
What to carve next