

Alexander Grabovetskiy, woodcarver, School of Woodcarving · Published 2022
How do you carve movement into a leaf so it matches the flowers beside it?
Quick answer: Carving movement into a leaf is repeating the direction its neighboring flowers already travel, then marking it with a few shallow concave strokes. On my Gibbons panel a 6 mm number 3 (about 1/4 in) started them, a smaller one followed, and a V tool made the long ones.
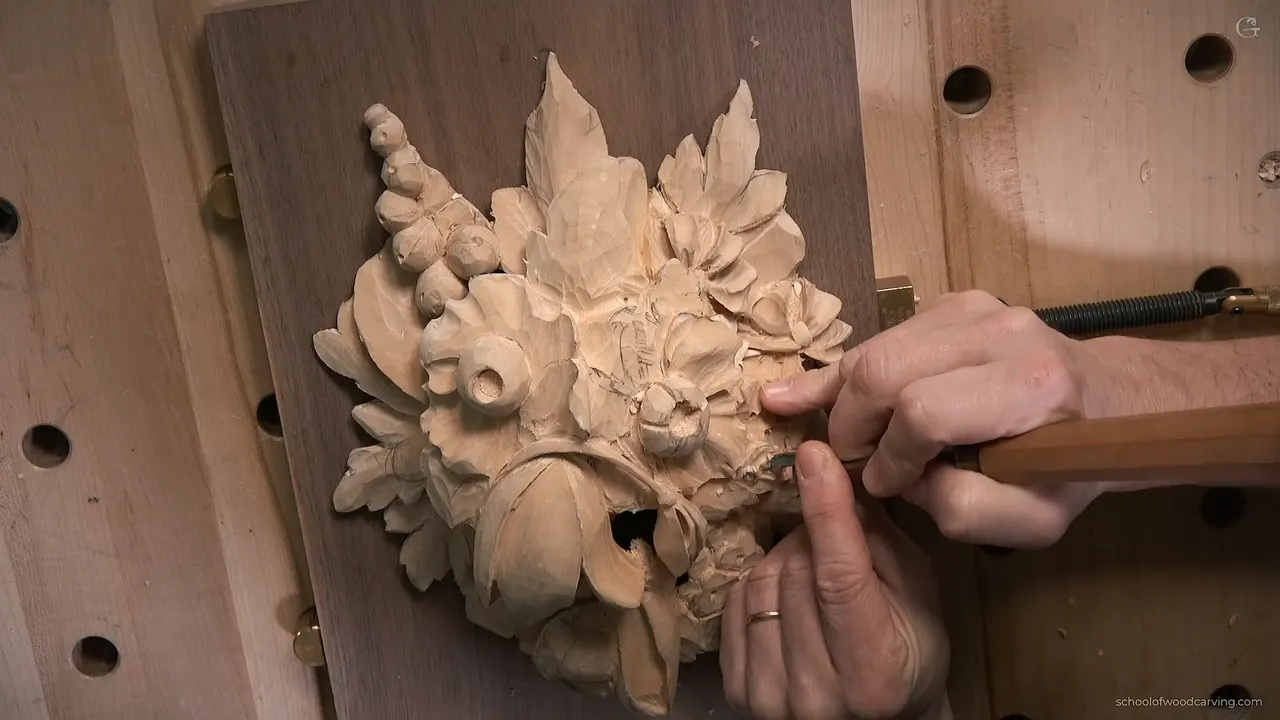
Making a leaf move like its flowers is copying the direction they already travel, then marking it with a few shallow strokes of a gouge. In class 12 of my Grinling Gibbons course in Maine I did that on one leaf beside a flower, with a 6 millimeter (0.24 in) number 3, and later a V tool. That leaf is the whole subject of this page.
Ever carved a leaf, stepped back, and felt it was stuck onto the panel like a stamp? Does the flower beside it lean one way while your leaf sits dead still? Then one leaf in a relief panel is worth watching closely.
Below is what I did on that leaf, in order. After that come twelve spots in my other wood carving courses where I made one part echo another, each linked so you can hear me say it.

The leaf movement in six lines
- The flowers around the leaf move one way, so the leaf does too.
- The strokes stay shallow, just a few hollows that point at the movement without digging for it.
- My first gouge looked wrong, so a smaller one followed.
- Long V tool strokes steer the eye, and a blend goes right under every one of them, so the hollow reads deeper.
- Facets get blended, no sandpaper.
- Cleaning waits for another day, and I tell the class so before the video ends.
What did I do before I touched the leaf?
I blended. What was left, I said, was to blend everything, and a small back bent helps with that. Mine was 6 millimeters across (about 1/4 in). A few strokes with it gave me what I called a somewhat finished look.
Facets were the target. Getting rid of every one was my plan, and I told the class that sandpaper is an option even at that stage. On this piece it made no sense to me, because I thought the carving would look better without sanding. A change in my angle of attack was another maybe. Some mass left over did not worry me, since I was okay with that.

What did the flowers on my panel tell me about the leaf?
They told me which way to go. With the flower left alone for now, I turned to the leaf and wanted to give it movement. Sticking it in like that was not what I had in mind. Overall, I pointed out, the movement runs one direction, and the flowers follow it, even at the micro level inside a single flower. So the leaf should do exactly the same. Then I softened my own wording to approximately, or maybe not that much.

Part two of the class shows the same habit on a petal. That petal had no movement yet, so I had to decide one, and I looked at what the neighbors were doing. Everything ran one way, which made it sensible to follow, and I named it the law of flow.
Part one gave a hint of the same plan. At the edge of the parsley leaf, I said, there would not be a lot of movement, but still something different right there.
For that edge I picked a number 5, about 11 millimeters wide (about 7/16 in). In my words it is not really 3/8 of an inch and not half an inch. Any tool will do on an edge, as long as it is sharp. The grain made that part tricky, so my strokes took almost no pressure, tiny ones, and a little later I said I was working against the grain, breaking the rule, and was okay with it.

Why should a leaf move with the flowers beside it?
Everything is supposed to be connected. By the law of flow, I said, the movements belong together, and for anyone who did not know what I meant I pointed to my design course. I called that really important for wood carving.
That course names a sister rule in lesson 4, the law of repetition: repeat the movement on a different scale. The main arc went one way. I repeated it on the other parts, though it repeats, but not parallel.

Do leaf strokes need to be deep?
The strokes stay shallow. A little later I called a deep cut unnecessary and planned multiple concave strokes, each one lighter. All I needed was a number 3 (6 mm, or 0.24 in), and I called it just an indication.
The first stroke was planned right between those lines. Then my hand was in the way, and I apologized, because I only wanted you to get an idea of what I was trying to do.

At that point I stopped. The look did not make me happy, and I asked what else I could use. Tools numbered 3 or 4 came to mind, but only about 1/8 of an inch (about 3 mm). The one I grabbed was a number 4 by the London pattern, which equals a number 3 by the European pattern.
Against the grain was my plan for that tool. Of the strokes I said plainly that they are just an indication of those movements, and they do not have to be perfect. Later, I explained, I could subdivide a little more, with tiny subdivisions, which is probably what I would do in every small division.

How do long strokes lead the eye across a leaf?
With a V tool. I went back to the number 16 and planned to exaggerate that leaf with prolonged concave cuts in those areas. They would not be as deep. Their job was to direct the eye. About six millimeters (a quarter inch, roughly) was the size I gave for those cuts, in a couple of spots.

Right underneath the strokes came a blend. In my words it gives me that feel, as if the separation is deeper, and it already gave me the overall movement. I told the camera I liked it.

Upside down went the panel next, to refine one division and then another. Don't break it, I said. Between strokes I checked the work, too. Once it is carved, I said, look for areas you could subdivide a little more, and maybe go a little deeper. I had said the same about subdividing earlier in this part.
Soon after, I said, now I'm happy, and I showed how it looks from above.
How clean does the leaf have to be before you stop?
Clean was still ahead. The flower I would probably leave like that, I said, and clean it later, with more facets coming off. Near the end I said that is enough for today. I would spend a little longer and clean everything, but for now it was good.
While we talked about cleaning, I mentioned that I need a magnifier more and more.

Where else did I echo the movement of one part in another?
Furniture Panel lesson 14 starts with a smaller leaf. I wanted it to carry the same movement, I said, and to repeat that line, which meant three divisions on it. Next came my verdict. You can see this detail and that detail, and in my opinion it looks okay. Further along I talked about a couple of leaves from underneath, to fill the space and get the overall movement. A later video in that lesson says it again: I still want the same movement, and I do not want to leave those flowers without the leaves.
A lesson earlier, number 12, I told the class a line would repeat this line, maybe with a third. The small leaf had to go in this direction and take that movement too. In the next video I said the piece looked more unified, and that this same movement had to be repeated somewhere else. The only spot I could see was probably right there.

Panel lesson 8 has the edge of a leaf continuing the movement and sitting in the same flowing. That is going to look more organic, I said. I thought I could even carry the line further. It does not mean connecting those lines, I added, but invisibly I still have to do something like that.
Venice workshop 53 put it as logic: it goes to the same direction, to the same movement. I had a line on one side and a line on the other, and the next line had to fall somewhere between, so it was not stopping nowhere. Let me repeat myself, I said, and that was going to be my point.
In Hashemi Flowers lesson 38 a number 5 made movement inside the leaf, going from the middle outward. What I was making were veins, if I can call them veins. In Roman Acanthus lesson 15 the attitude is the same: even a plain leaf gets exaggerated movements and separations, I said.
Back on the panel, lesson 20 had one spot that did not look good. My movement needed fixing, I said, and I wanted a nice flow for everything. The spot had somewhat of a waviness, and I planned a number 3 that was 1/8 inch wide, three millimeters in my own words. Fixing it was not that easy. A minute later it looked like I was able to fix that.
The Venice Room job, workshop 41, planned columns below the corbels with about the same movement on a smaller scale. Not exactly the same, I said. By the law of design you repeat it. An idea in one part comes back somewhere else, or it is not related to the overall design. Most people will not catch that, I said, but professional people are going to look at that job.

Venice Room 62 had a slope. I planned to go a little deeper, with a more pronounced sloping, and to repeat the movement on the other side, not too much, just roughly.
The next job, workshop 48, moved a part a little so it would repeat that movement right there. It looked too big. A smaller number 11 came out, like four millimeters (about 5/32 in).
On the Tray of Blessing, lesson 3 gave a lobe a central line with a curve. I planned to curve it even more, because I had a curl this way, and I had to do something to indicate the same movement. In lesson 6 I moved slowly for the camera and called what I did an indication, on a much smaller scale. I mentioned the golden ratio, 60 and 40, and said you do not have to explain to people why you did it that way, because it is a lot more pleasing to the human eye.
The tray's lesson 5 talks about a stem. A couple of ways exist, I said, and one lets the stem continue the motion on top of the leaf.
Back in lesson 5 of that course I outlined one side with the V tool, because I did not want to lose the main picture, and I said the whole movement has to go downhill underneath of that leaf.
Last comes lesson 8 there, where the movement on the inside of a leaf had to be repeated from the opposite side, with an undercut.

Here is the list in one place. Each row is a lesson where I said it.
| Where | What I said | Detail |
|---|---|---|
| Furniture Panel 14 | a smaller leaf should repeat that line | three divisions on it |
| Panel 12 Furniture | one small leaf repeats this movement here | maybe a third line |
| Lesson 20 Furniture | everything is supposed to have nice flow | number 3, 1/8 inch |
| Venice Room 41 | same movement, smaller scale, not exactly same | columns below the corbels |
| Workshop 48 Venice | it will repeat that movement right here | number 11, four millimeters |
| Tray 3-2 lobe | curve more to indicate the same movement | central line, more curvature |
| Blessing Tray 6-1 | indication of the same movement, much smaller | golden ratio 60 40 |
| Hashemi Flowers 8 | repeat inside movement from the opposite side | then make an undercut |
| Design course 4 | law of repetition, same movement, different scale | repeats but not parallel |
Most of those I said while I carved on camera, so the wording is loose. The idea holds. A part you carve later looks back at the parts you carved before.

Where does this page sit in my Maine course?
My own lesson for it is Maine class 12. The blend with the back bent goes deeper in Maine class 11, and Maine class 8 is about which way carved petals overlap. When the strokes get tiny, Maine class 13 picks that up. The whole class sits on the Grinling Gibbons course page.
Class 12 goes on from this leaf. Every part of it opens with Tuition, and you can watch me work the strokes, the V tool and the blend in real time.
How it's done
- Blend the flower first. Everything went under a back bent, and I did not sand.
- Read the movement around the leaf. I looked at the direction the flowers go, even inside one flower, and decided to repeat it on the leaf.
- Make shallow strokes. I made several shallow concave strokes with a number 3, and I called them an indication.
- Swap to a smaller tool. When I was not happy, I took a number 3 by the European pattern, about an eighth of an inch (3.2 mm), and I did not try for perfect.
- Direct the eye with a V tool. I made prolonged concave cuts with the number 16, not as deep, and I blended right underneath.
- Look from above, clean later. I turned the panel and looked from above, and I left the cleaning for later.
Frequently asked questions
Must a leaf move the same way as the flowers?
On my panel I wanted it to. The movements of the flowers go in one direction, even inside a single flower, and I wanted the leaf to go the same way. Then I eased it to approximately, or maybe not that much.
How deep do the strokes on the leaf go?
Shallow ones. I called a deep cut unneeded, so I made a series of concave strokes that stayed light. A number 3 went first, and a smaller one, an eighth of an inch wide (about 3 mm), came after.
Which tool made the long strokes?
The number 16, a V tool, made them. Long concave strokes went in, shallower than the first ones, their job was to send the eye along, and I blended right underneath. About six millimeters (a quarter inch, roughly) was the size I gave for those cuts.
What to carve next