
July 28, 2026 · Updated July 29, 2026
By Alexander Grabovetskiy — Master Woodcarver · Founder, School of Wood Carving · 13 min read
How to Lay Out a Carving With Dividers, Not a Ruler
By Alexander Grabovetskiy, School of Woodcarving · Updated July 29, 2026
Quick answer: Proportional layout is a way of sizing a carving by stepping off one repeated unit with dividers instead of measuring inches. You choose a module, then build every part of the design as a whole number of it, like 1:1, 2:3, or 3:5. The eye reads the relationship. It never reads the number.
You traced a pattern onto a basswood panel and the pattern came out a little too big. So you slid it up. Now the border along the bottom is fat, the border along the top is thin, and the panel already looks wrong. You have not made a single cut yet.
That is not a carving problem. You have a layout problem, and the fix is about three thousand years old and costs twelve dollars. A pair of dividers.
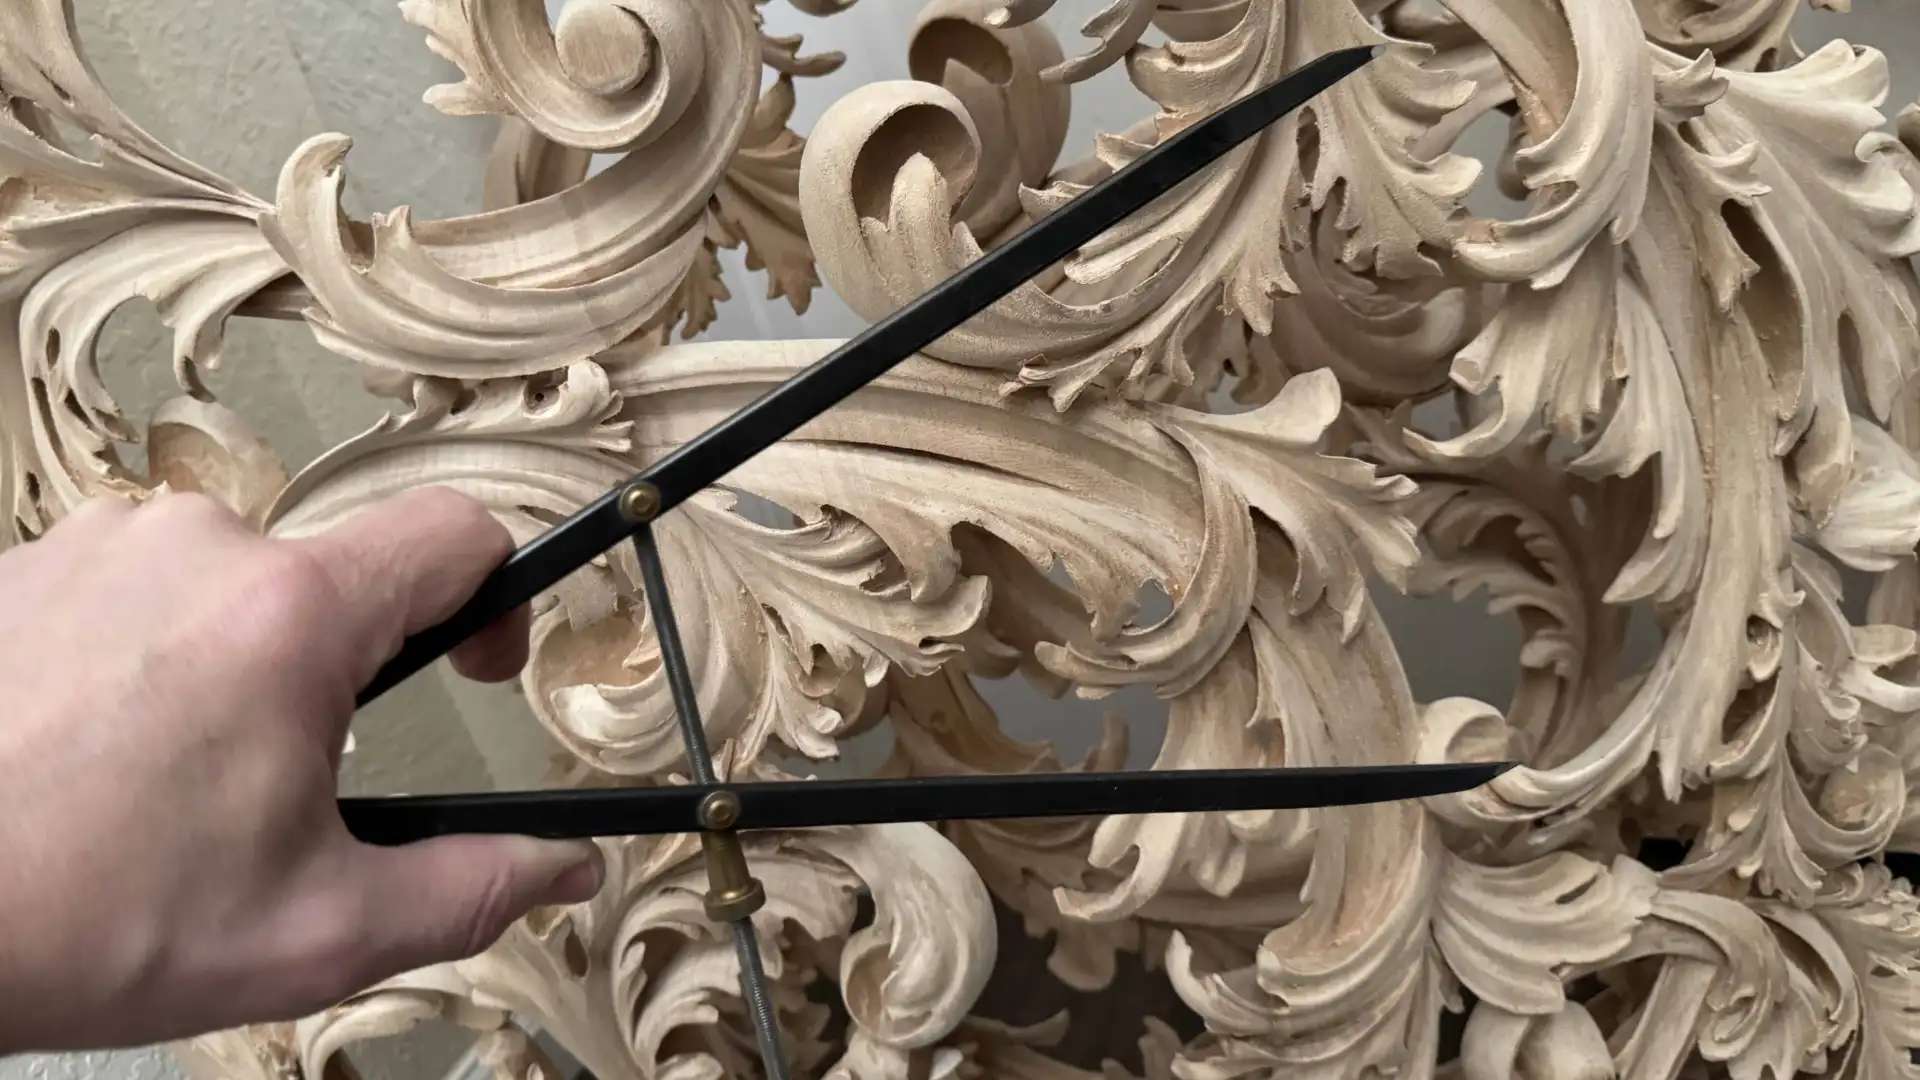
When I was sixteen I was the only apprentice of a fine art master in Russia. He did not hand me a gouge on the first day. Instead he taught me to think like a tool, and he told me that design is not drawing on paper. Design is the laws of space, rhythm, and repetition. Years later I found the same idea written down by two woodworkers, George R. Walker and Jim Tolpin, in a book called By Hand & Eye, and it put a name on what my master had put in my hands.
Below: how to set a module. Seven ratios worth memorizing. Three curves that draw most traditional ornament. And what to buy.
Key takeaways
A module is one unit you step off with dividers. Every other part of the carving is a count of it.
Seven ratios cover almost everything: 1:1, 1:2, 2:3, 3:4, 3:5, 4:5, 4:7.
Three of those ratios are also the intervals of a musical chord. Pythagoras got there first, with string lengths.
Proportion does only three jobs. Symmetry, contrast, punctuation.
Half, quarter, and sixth sections of a circle draw the curves in most historic ornament and moulding.
Change the module and the whole design scales. Nothing needs redrawing.
What is proportional layout in wood carving?
Proportional layout is designing by ratio instead of by dimension, so the size of the wood in front of you sets the size of everything on it. You pick one unit, called the module, and you never write it down. It lives in the dividers.
Say the panel in your vise is a 3:5 rectangle. Set the dividers to one fifth of the width, walk that step across the top, and it lands five times. Walk the same setting down the side, and it lands three times. The step you just walked is the module. From here the rosette in the middle is two modules across, the border is a quarter of one, and the bead at the edge is an eighth.
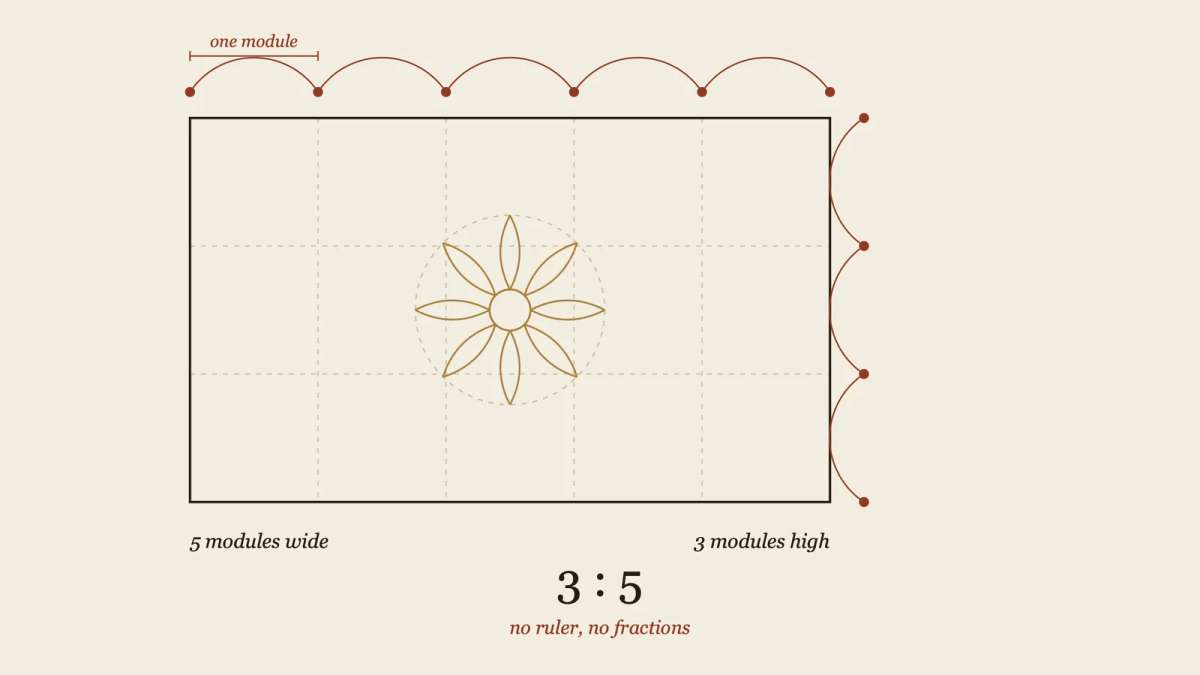
One module, stepped off five times across and three times down. Every part of the carving is now a count of that one setting.
Nothing in that paragraph is a number you could read off a tape. And that is the point.
Why does a ruler make ornament look wrong?
A ruler gives you dimensions, and dimensions do not tell you whether the parts agree with each other. Divide a 39 3/8 inch rail into five bays with a tape and you get 7 7/8 inch bays, a number you now have to hold in your head, mark five times, and get wrong once. Do it with dividers and you get five bays, no arithmetic, and the error spread evenly across all of them instead of piled up at the last one.
There is a second cost, and it is the one that shows in the finished carving. When you work from inches, you decide each part on its own. Work from a module and the parts are related before you draw them, because every one of them comes out of the same step. Old work hangs together for exactly that reason. Plenty of new work does not.
My great-grandfather worked mahogany in the Chippendale style. They called men like him redwooders.
Which ratios did the old carvers actually use?
Pre-industrial shops worked from a short list of whole-number ratios, not from the golden section. Seven of them carry the load. You can see all seven without measuring, which is the whole reason they survived.
Ratio | Shape | Sound, if it were a string | Where a carver meets it |
|---|---|---|---|
1:1 | square | unison | rosette panel, a symmetrical cartouche |
1:2 | double square | octave | a frieze band, a long apron |
2:3 | fifth | drawer front, shield of a cartouche | |
3:4 | fourth | door panel, a raised field | |
3:5 | acanthus panel, most wall plaques | ||
4:5 | a tall panel that still reads calm | ||
4:7 | pilaster, a narrow upright |
The music column is not decoration. Pythagoras found that two plucked strings sound in harmony when their lengths sit in a simple ratio: 1:2 for an octave, 2:3 for a fifth, 3:4 for a fourth. Renaissance designers took that as proof the same ratios would please the eye, and they used them for the built world. You do not have to believe the philosophy. The ratios are easy to step off, and that is enough.
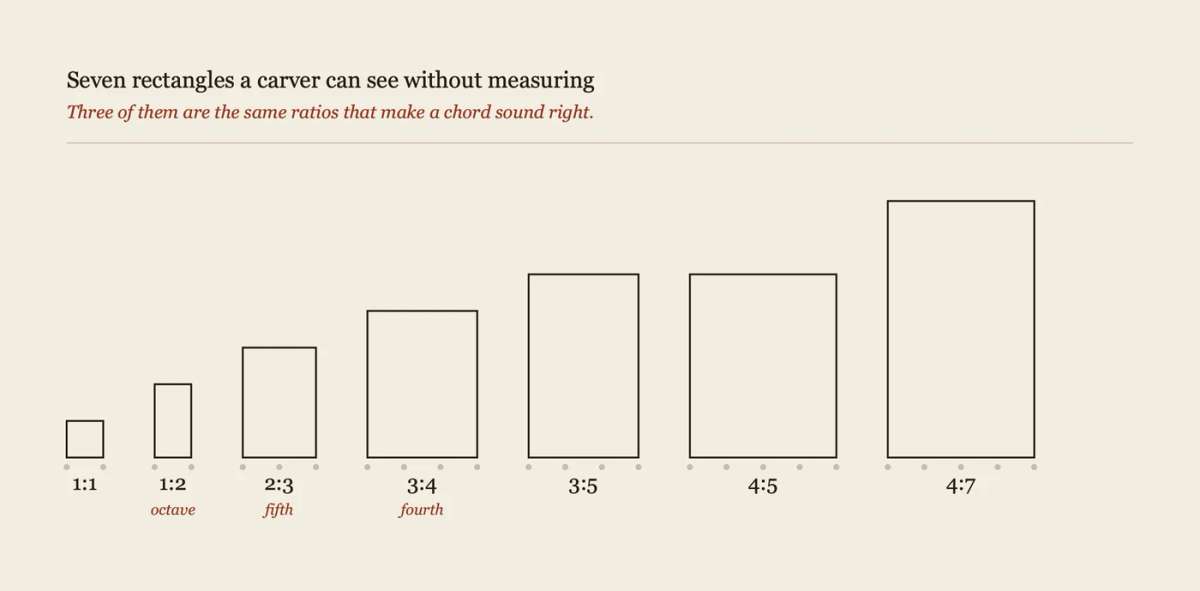
Seven rectangles, one unit apart. Three of them are the intervals of a chord.
People ask about the golden ratio here. Honest answer: you cannot step off 1.618 with dividers, and the old design books lean on whole numbers far more than they lean on phi. Use it if your eye likes it. Do not expect it to do the work.
Ratios also stack. Split a frieze band 2:3:2 and you get contrast in the middle, symmetry across it, and a block of punctuation at each end, all out of one module.
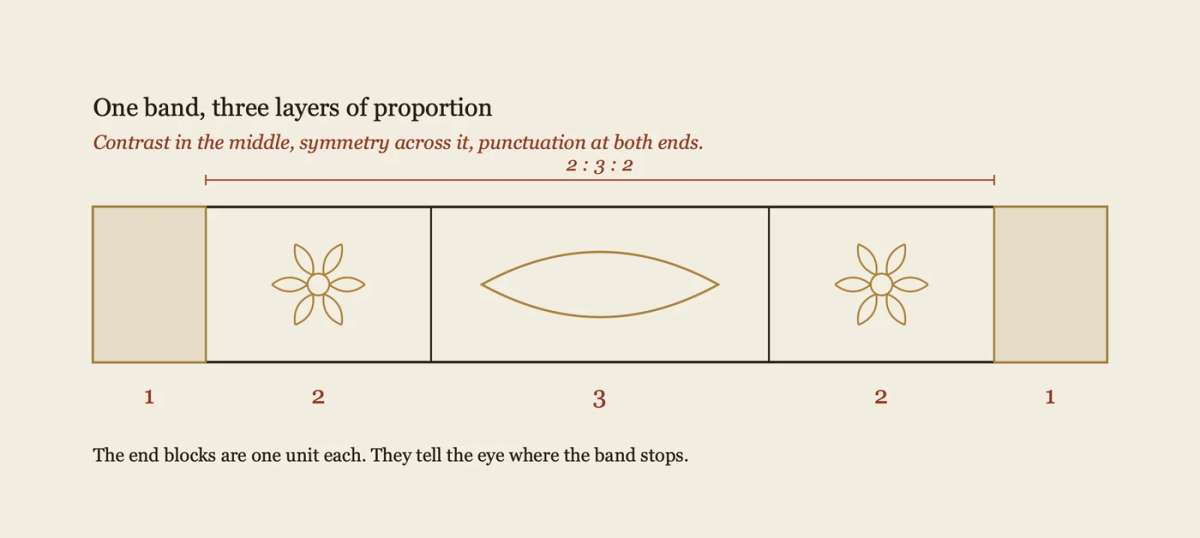
One band, three layers of proportion. The end blocks tell the eye where it stops.
How do you lay out a carved panel with dividers?
Start with the largest division and work down, taking every small part out of a division of the module instead of measuring it. Five steps. Step two is the one nobody teaches.
Step 1. Let the wood pick the ratio
Hold the board up. Decide what it is: a square, a double square, or 3:5. Do not fight the blank you have. If the panel is close to 2:3, call it 2:3 and cut the extra off.
Step 2. Walk out the module and fix the miss
Guess the step by eye and walk it across the width. You will overshoot or fall short. Split that miss by the number of steps you walked, close or open the dividers by that much, and walk it again. Twice usually lands it dead on.
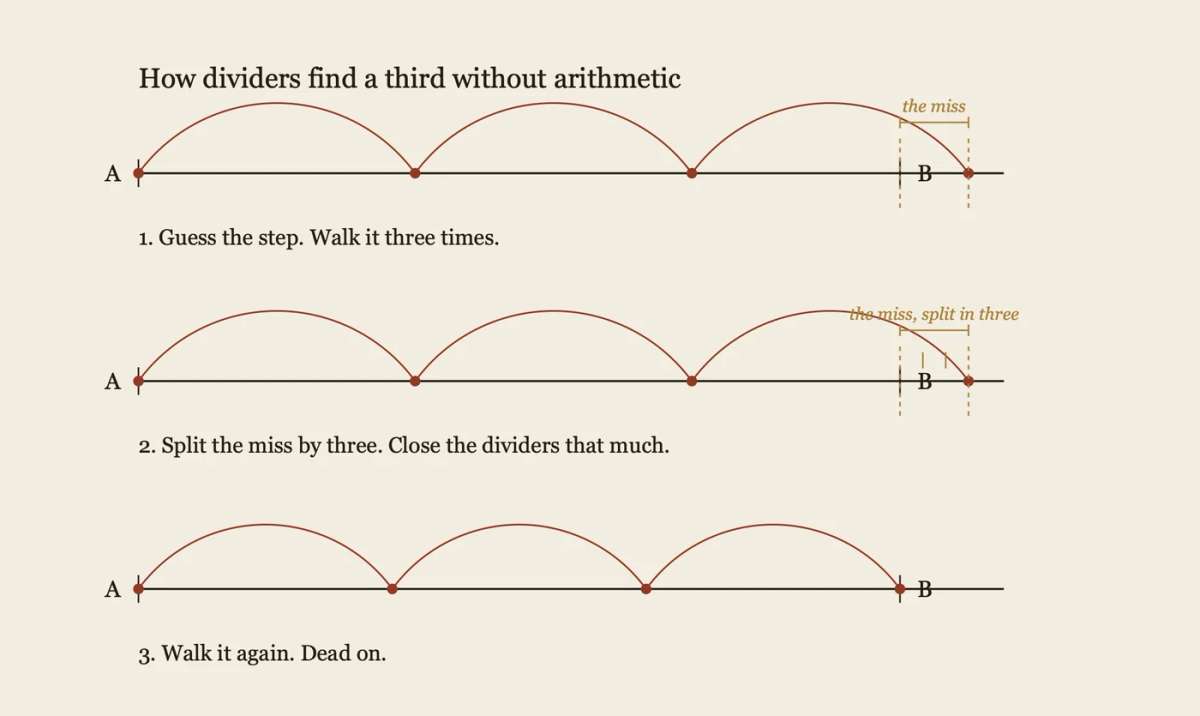
Three steps overshot point B. Split the miss by three, close the dividers, walk again.
Step 3. Big shapes before small ones
Border, field, and the center of the ornament. Nothing small yet. If the center of your rosette is off by a module, everything after it is wrong, and you will not see it until the leaves are half carved.
Step 4. Divide the module for the details
Halves, thirds, quarters, sixths. A petal tip, a fillet, the width of a stem: all of these come out of dividing the module you already have in your hand, not out of a new measurement.
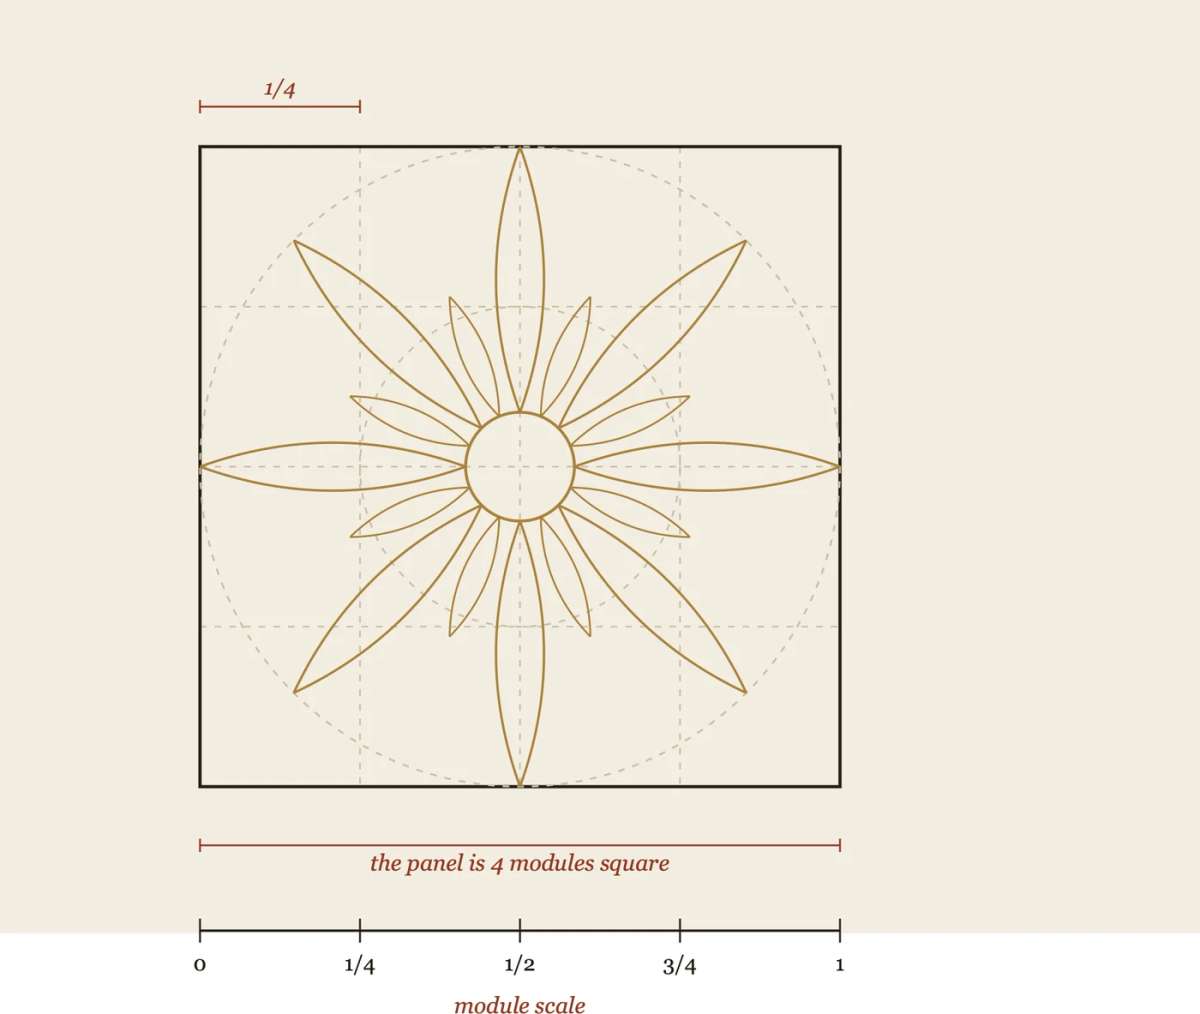
A rosette on a four module square. The petal length is half the side, the eye is a third of a module.
Step 5. Probe the drawing before you cut
Set the dividers to a division you used and walk it around the drawing. You will find relationships you did not plan. Good sign. The carving will read well. If nothing repeats, the layout is a collection of parts and it will look like one.
What are symmetry, contrast, and punctuation?
Proportion only ever does three jobs, and every band of ornament you have ever liked is some mix of them. Break a stick in half and you get symmetry. Divide it into a major piece and a minor one and you get contrast. Snap a small piece off one end and you get punctuation, which is what tells the eye that something begins or ends here.
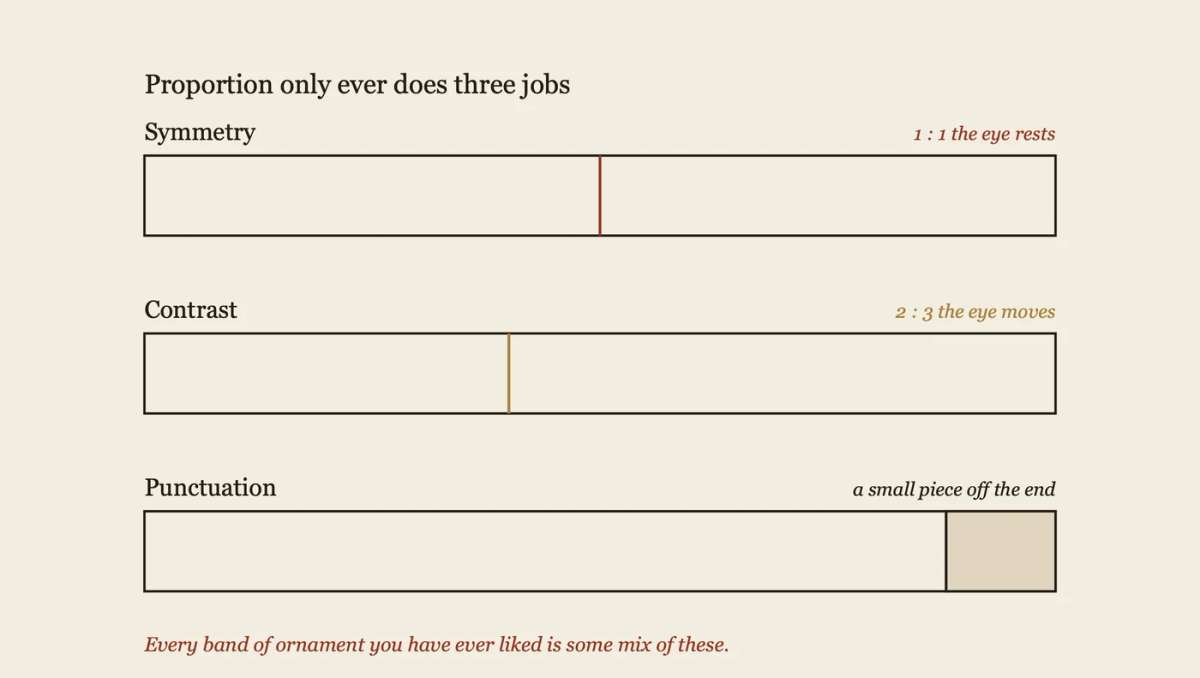
The same band, three ways. A carved frieze usually uses all three at once.
An acanthus panel runs on all three. Symmetry is the centerline. Contrast is the main lobes against the small ones. Punctuation is the little turned tip at the end of a leaf, the one that costs you an hour with a #7 gouge.
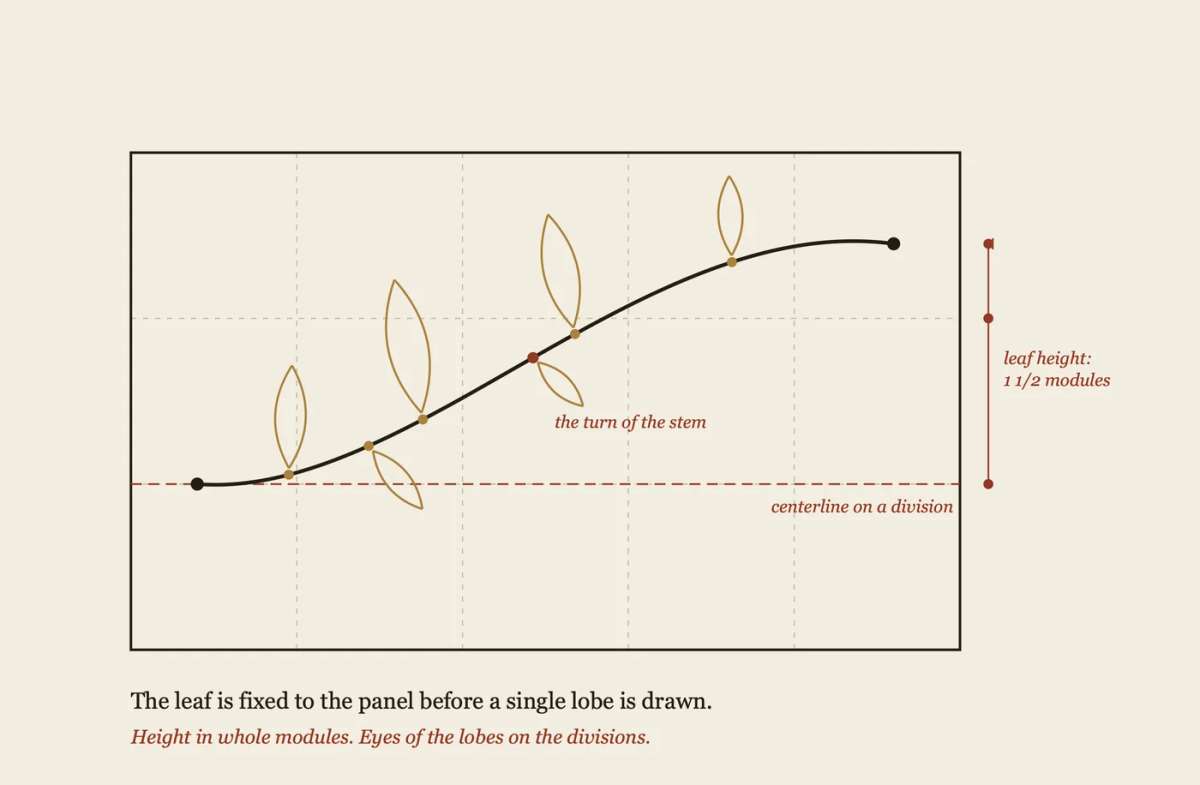
The skeleton first. Its stem turns on a division and the eye of every lobe lands on one, which is why a good leaf looks like it grew in that panel.
How do you draw the curves in ornament with a compass?
Most historic curves are sections of a circle struck off one straight chord, and three sections do almost all of it. Draw the chord first. It fixes where the curve starts and stops, which is the part people get wrong when they sketch freehand.
Curve | Part of a circle | Angle | Rise at the middle | Radius |
|---|---|---|---|---|
Fast | one half | 180 degrees | 0.500 of the chord | half the chord |
Medium | one quarter | 90 degrees | 0.207 of the chord | 0.707 of the chord |
Slow | one sixth | 60 degrees | 0.134 of the chord | one chord |
Those rise numbers are worth taping to the bench. They mean you can lay out any of the three curves without a compass at all: mark the middle of the chord, come up by the fraction, and bend a batten through three points.
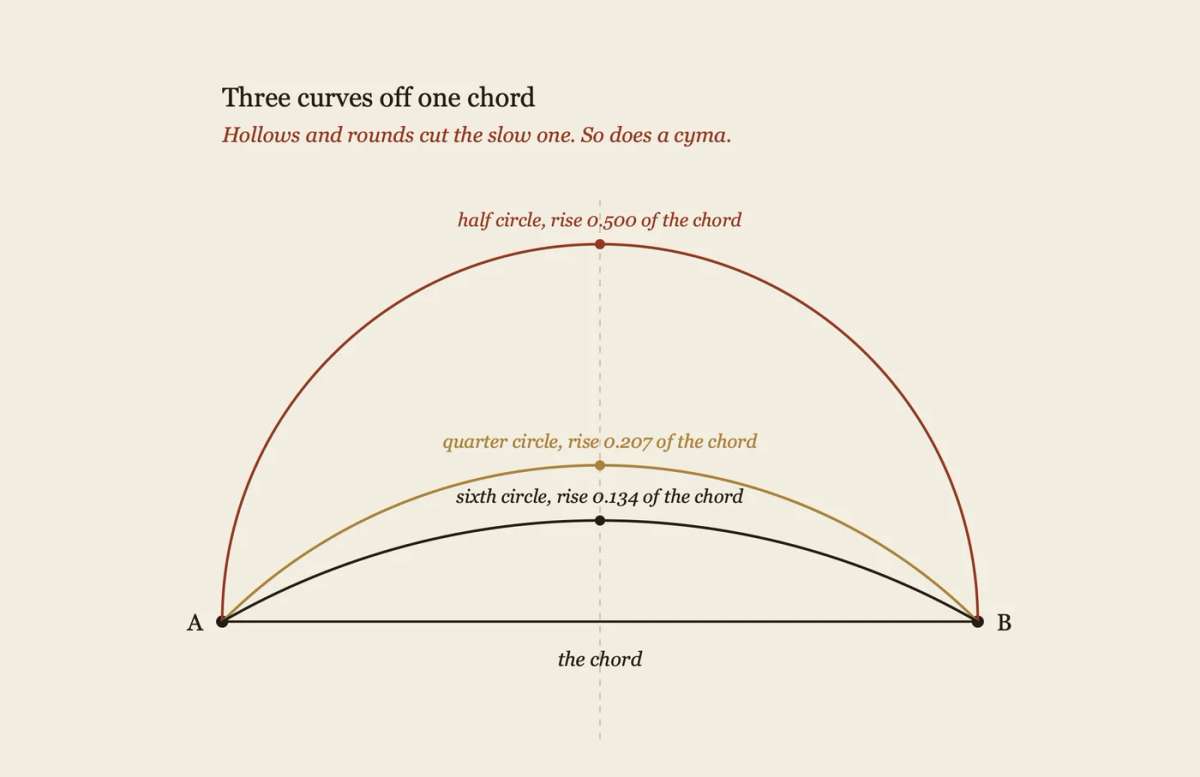
Three curves off one chord. Fast, medium, slow.
One sixth is the important one. Traditional hollows and rounds are all ground to a sixth of a circle, and the moulding-plane maker Don McConnell explains why in Walker and Tolpin's book: much past a sixth and the cutting geometry of the plane starts to fight you. So the tools and the profiles agree with each other. A cyma, the S curve on nearly every crown moulding and every carved ogee, is two sixth-circle arcs meeting in the middle.
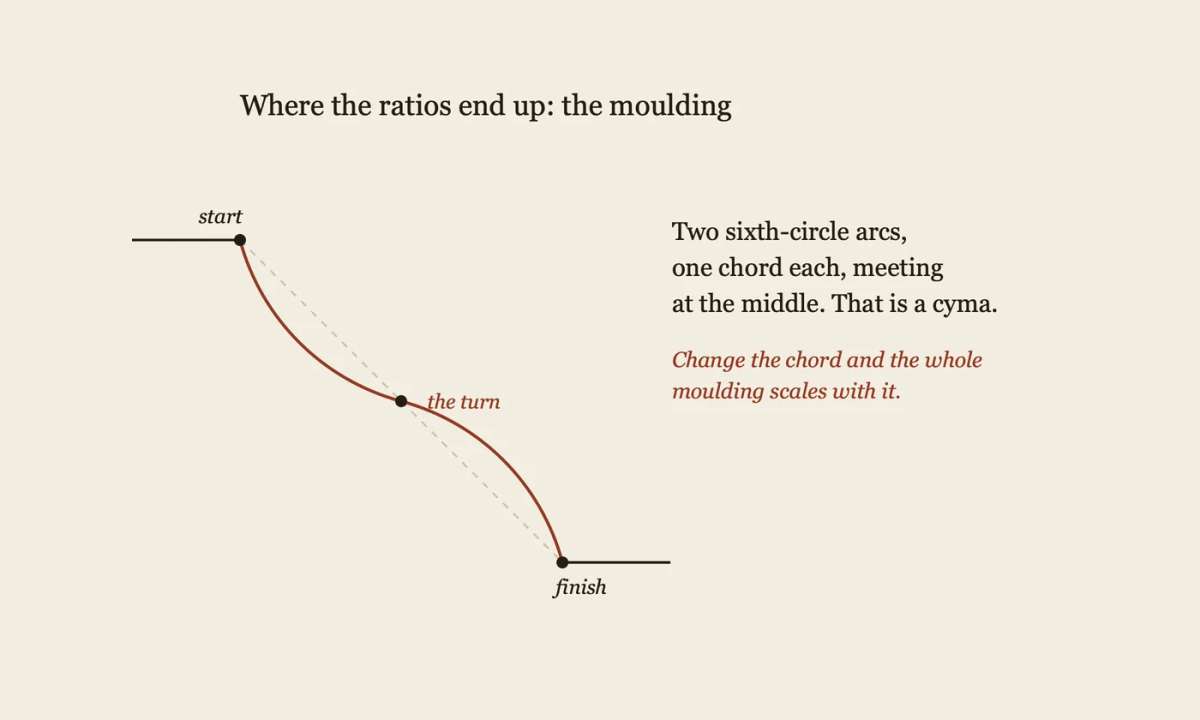
Two sixth-circle arcs, one chord each, meeting in the middle. Change the chord and the whole moulding scales.
What tools do you actually need?
Two pairs of dividers and a straightedge will do everything in this post. Buy the dividers before you buy another gouge.
Tool | What to get | What it does |
|---|---|---|
Dividers | 6 inch and 10 inch wing type, set screw, vernier knob | steps off and transfers the module |
Compass | 8 inch wing type with a pencil grip | strikes the arcs for curves |
Sector | shop made, two hinged sticks, twelve notches | lifts any fraction of twelve as a physical span |
Story stick | scrap of clear stock | takes the layout off the drawing and onto the wood |
Bending batten | straight grain, about 3 feet, bowstring to hold the curve | fairs a curve through your three points |
Trammel points | on any stick | arcs bigger than the compass reaches |
A used pair of wing dividers usually needs ten minutes of work. Tap the pivot pin with a ball peen hammer to take the slop out, check that both points are the same length, and file the tips to a real point. A point that is an eighth of an inch long is a point that lies to you on short steps.
The sector is the one nobody has. Two flat sticks, one hinge, twelve notches on each arm. Because every setting makes a pair of isosceles triangles with the same base angle, a divider span across notch 10 is exactly twice the span across notch 5. Sheraton recommended one in The Cabinet Maker's and Upholsterer's Drawing Book, which you can read for free. You cannot buy one, so make it.
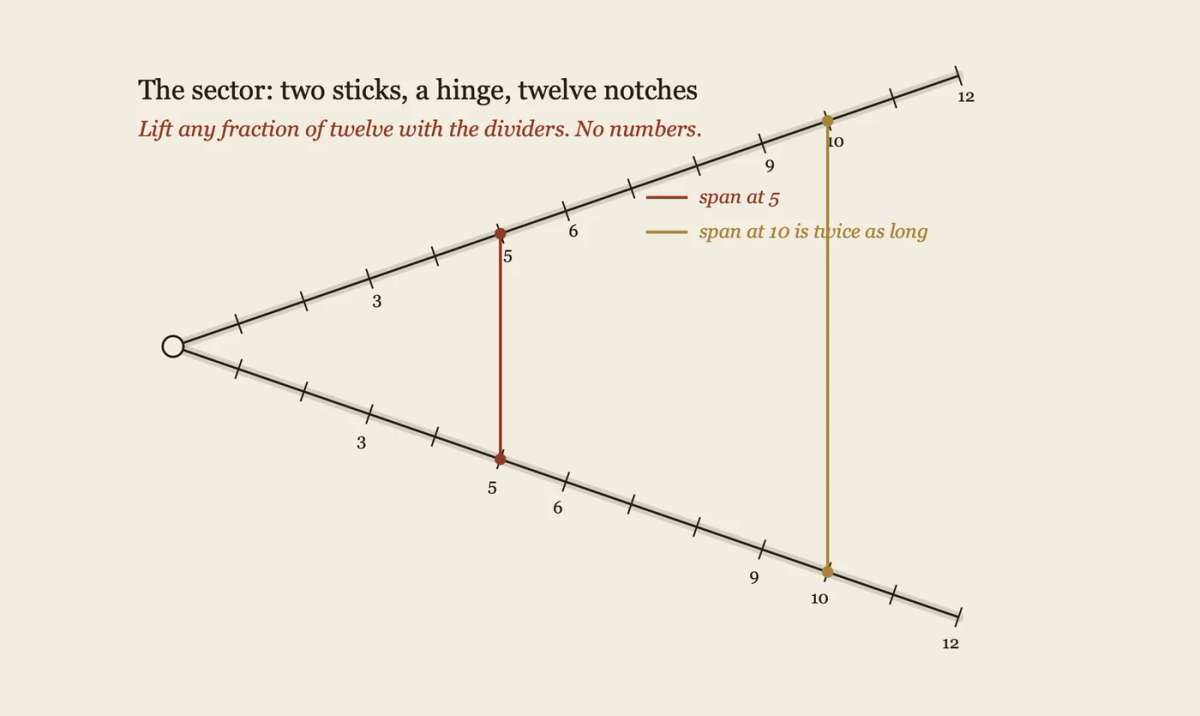
Span at notch 10 is twice the span at notch 5. No fractions, ever.
Does this replace carving by eye?
No, and it was never meant to. It gives the eye something true to argue with. Michelangelo told artists to carry the compass in the eye and not in the hand, and he was right, but nobody starts there.
Who is telling you this
I am Alexander Grabovetskiy, a master wood carver and International Woodcarver of the Year. My school, Schoolofwoodcarving.com, is a 501(c)(3) non-profit, and my studio takes high-end architectural ornament commissions where a panel that is out of proportion is not a lesson, it is a rebuild. I learned this the slow way, from one master, at sixteen. The book that put words to it is By Hand & Eye by George R. Walker and Jim Tolpin, Lost Art Press, 2013, and it belongs on your bench.
For more on the design side, read Principles of Design in Wood Carving, then how to draw the acanthus leaf. If you like the mathematics of it, I reviewed another design book here.
Frequently asked questions
Do I need a sector to work with whole-number ratios? No, dividers alone will get you there. The sector saves time when you need an odd fraction like two sevenths of a width, because it hands you the span physically instead of making you compute it. Start with dividers and build a sector when the fractions start slowing you down.
What size dividers should I buy for carving layout? A 6 inch and a 10 inch wing divider with a set screw and a fine adjustment knob will cover panel work up to about two feet. Spring dividers are for paper. They will not hold a setting when you press a point into basswood.
Is the golden ratio better than a whole-number ratio? For carving layout, no, and mostly because you cannot step off 1.618 with a pair of dividers. Whole-number ratios can be walked out in seconds and they are what the 18th century design books, Batty Langley included, actually use. If a phi rectangle looks right to your eye, use it. Just do not treat it as a law.
Can I still use a tape measure? Yes, for stock thickness, for machine setup, and for anything that has to match a number someone else gave you. Use ratios for anything the eye will judge: ornament, borders, mouldings.
How does this help with an acanthus leaf? It fixes the leaf inside the space before you draw a single lobe. Give the leaf a height in whole modules, put the centerline on a division, and place the eyes of the lobes on divisions of the module. The leaf then fits the panel instead of floating on it, which is the difference you see in Grinling Gibbons work in limewood and miss in a copy.
What wood should I practice this on? American basswood, Tilia americana, in a flat panel about ten inches square. Cheap enough that a wasted layout does not hurt, and it holds a crisp arris, so you can see whether your divisions actually landed.
Shall we carve?
Design comes first, then carving, then sharpening. Most carvers skip the first one because it looks like homework. It is not homework. Two sharp points and a piece of scrap decide whether the thing you spend forty hours on will be worth handing to your grandchildren.
Get a pair of dividers. Walk out a 3:5 panel tonight.
Then, if you want someone to show you how the old shops built ornament on top of that grid, the course is here: Principles of Design in Wood Carving.
Filed under
- Acanthus Leaf
- advanced wood carving methods
- architectural ornament
- basswood carving
- carving tutorial
- classical proportions
- compass and divider
- divider layout
- geometric layout
- historical woodworking
- moulding profiles
- ornamental carving
- panel layout
- proportional layout
- ratio-based design
- symmetry in design
- traditional ornament
- whole-number ratios
- wood carving
- Woodcarving Tools
- woodworking design