

Alexander Grabovetskiy, woodcarver, School of Woodcarving · Published 2020
Is it worth carving an opening all the way through a relief carving?
Quick answer: Carving an opening in a relief is worth it when the light it lets in matters more to you than whatever was meant to fill that spot. Mine came to me on the spot, deep in a shell in workshop 37, and it left the beads planned there almost impossible. I kept the hole only partly open.
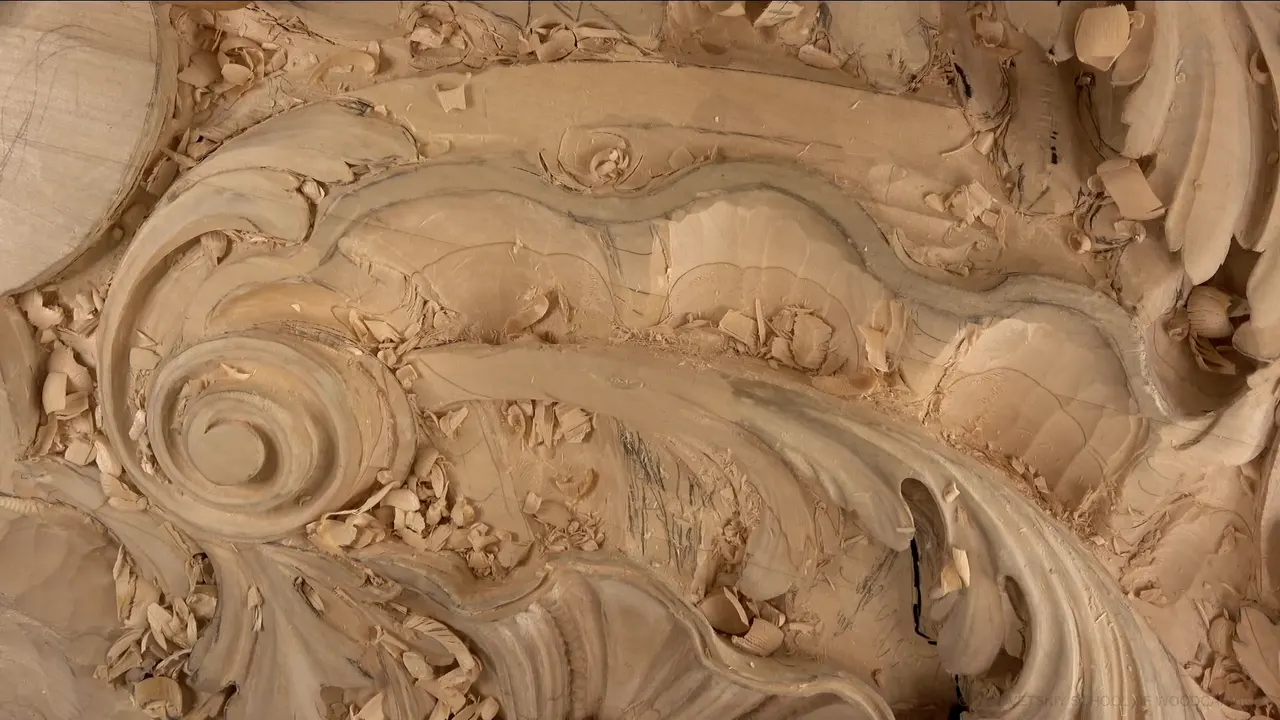
An opening that goes right through the board is worth it when you want light to travel behind the carving, and you have already counted what that hole will cost the details you still have to carve. In workshop 37 I dug one on the spot, in the middle of the shell I had just started. I didn't have to. And I knew my beads would pay for it before the gouge ever went in. That is pierced relief carving at a real bench, a choice you make partway through, while the next detail waits right beside the hole.

Have you ever seen light come through a carving from behind? Did the whole piece look deeper for it? Before your gouge goes through, look hard at what still has to be carved in that same spot.
It is a lovely thing in a relief, and easy to want. I wanted one too, right in the middle of a job that did not need it. I'll tell you what the hole bought me and what it cost, so you can weigh your own.
The hole in workshop 37, in six lines
The opening was my own idea, made up in the middle of the shell work, and I said out loud there was really no reason for it.
It gave the light a path through the board.
It took the spot where my beads were supposed to go and made it almost impossible to carve.
I turned down the patch, a few small pieces hanging down to cover the hole, because I doubted it would look nice.
I dug it from below and from both sides, and the skew set the line first.
Right after, a little piece of the older shell broke off, and from then on I took my time.

What was the shell doing when the idea came?
Getting deeper. Earlier in the lesson I let the shell run right underneath a volute, which meant excavating deeper there, deeper but not too extreme, and I checked it from below because I don't want to make it look stupid. I gave the volute a secondary bevel too, the same idea as the one beside it, and a secondary concave that made a really nice movement. The view from below gets its own page in workshop 29.
Before that I had cleared a concave going underneath the shell's edge, coming at it from two sides and leaving about a quarter inch, 6 mm, of wood. On one side I did not want a straight wall at all. I gave it a little slope, since that side would be visible, and because I used the #11, the slope was already there.
Then a #9 at 20 mm (about 3/4 in) chopped out most of the inside, since a big tool is much quicker when I don't have to spend a lot of time. One curve took a single big cut. It fit perfectly, which is kind of scary, and the knock and the rest of the pass met in a perfect round. Right after that I was working with a #7 three inches (about 76 mm) across. Huge tool, and worth it, because I wanted quicker results.

After that came the inside of the shell. I marked its movements first, all of them running to the center, and then dug the middle much deeper on purpose, because the convex parts still had to look like convex, and that meant digging much deeper around them. One spot in there ran against the grain, so I changed position and came at it from the other direction. I had to be careful not to touch the movement beside it, or everything was in vain. That deep middle is where the idea came.

Why carve an opening you do not need?
For the light, mostly. I was deep in the middle part of the shell, digging a really good concave with a big #11, when I stopped and told you I could do something really nice right there. That something was a hole, a bit of negative space in all that carving. I could go underneath, right through, just to create the opening.
It would only be partly open, and I said so. Even so, it would make a spot for the light to travel, and that is the reason I gave on camera. Something really nice, I called it.
Really no reason for it, I also said, and then I asked why not, if it makes the piece more beautiful and more interesting. When it was open I said wow. Really nice, and three-dimensional.
Small dark openings do a lot to make a carving look complex, a point from my Maine class, and this see-through kind of work has a name of its own, openwork. On this board it is one small window, nothing more.

What did the hole cost the beads?
The spot they were meant for. Before I ever went near the middle, I had reminded myself that beads were coming, just like the ones already on this board, somewhere right there. I even said that spot needed a preliminary concave, ready for them.
So the beads came up together with the idea of the hole. I said it before the first cut, that the opening would create a problem, because I did not know how I would get my beads in there.
Then I dug anyway. Once the wood was open and the chips were blown out, I said I had just made myself an area where my future beads were almost impossible to carve.
Compare that with an eye on the same board. I can always recreate the eye, I said then, it's not a big deal, because I still had the position for it. The beads lost their position.
On this board the light cost me the beads, and I knew the price before I paid it. On a lily box lid the worry is different, since each pierced leaf keeps a little wood tying it to the layer under it.

Could the hole be hidden later?
Small elements sticking down from the carving above could cover it up, and I said so in the same breath. I didn't think it would look nice, so I left that idea alone.
These were the three choices on my bench.
| Choice | Gain | Cost |
|---|---|---|
| Leave it solid | the beads keep the spot meant for them | no path for the light |
| Open it partly | a spot where the light can travel through | beads almost impossible right there |
| Hang pieces down | small elements sticking down that cover the hole | It would not look nice |
I like solving challenges, and I said that too, halfway through the dig. The other half came right after, that I don't like to solve what I don't have to solve. The hole went really deep, but I didn't want it too deep, because there was no sense creating a problem I didn't have to create.

Did I think it was worth it?
I loved it, and I said so twice. Less than a minute earlier I had told you the beads had nowhere easy to go. Both things are true on this board. I could have left the wood solid and kept that spot for the beads. I made a problem on purpose, because a more beautiful, more interesting shell was worth more to me than an easy place for beads.
Whether it is worth it on your board depends on what your hole would take, and only you know what is planned for that spot. Mine took the beads, and I still said wow.
How is a pierced relief carving opened from below?
Little by little. I started underneath with a #11 at 10 mm (3/8 in), and I knew full well I could be making a challenging area for myself.

From the other side a #7 came in. I thought about a #8 and said even a straight one would do, and then a one inch #8 (25 mm) went in and that got really deep. At one point I just said oh and kept going. A big #2, 50 mm (2 in) wide, chopped that part down, and after that the cleaning went much easier because so much was already gone.

Then I found another way to make the same hole. Before any bent tool went under, I finished the movement with the skew, because that line tells you how high the cut is supposed to be. A back bent #7, about half an inch (13 mm), went in after that, first on one side and then the other.

My #11 felt a little too big for the cleaning, so I dropped to one at 7 mm, a hair over 1/4 in, and then to a #7 of about 13 mm (1/2 in). Then it was open. I took a one inch (25 mm) #7 and tidied up anyway, even though it wasn't the final shape, because I like to work with a clean canvas, whatever the right way is to say it.

A plug cut is a different animal. Later in this same room, in part 10, the hole is a plug cut, bored with a #9 twisted in place and met halfway, and an acanthus pierced without a drill has its own lesson too. Here the wood came out from underneath, piece by piece, the way I excavate the rest of this board.

If a back bent is new to you, start here and find the course that fits your bench.
Did anything go wrong after the hole?
A little, and you can see it. The next area was challenging, to be honest with you, and while I was circling with the tool I broke a small part of the shell I had carved before. Got to be more careful, I said. It was not a big deal, I said, and I would lower that spot and take care of it, but it is something I don't like to see.

The space got tight next, and everything was in my way in there, I said. Every cut near the acanthus beside it needed care, and I told myself not to crank too much against that edge. Coming in from the side with a #7 actually worked just fine. I even said my cut on that side maybe came too early, that I should probably have waited a little longer, and that I made it then only to show you what it was supposed to look like.
Both sides of the shell had to match, too, about the same depth on each, and I said it all depends on the sides of the convex. In the next part a big preliminary convex came up inside with a back bent, and I told you I was not afraid of losing the sides, since I can always dig deeper. It looked messy, and it is supposed to look messy at that stage. Soon I could see my convex coming alive.

What has to grow underneath?
A leaf, and logic decides it more than looks do. By the last part of workshop 37 that area needed digging deeper, and I did not want to do much work down there. But I cannot just excavate and leave an undeveloped part, so some kind of acanthus had to grow in there, or it just doesn't make any sense.
By then the gouge felt like a shovel in my hands, and I said a mallet would help. I took a marker so you could understand it better. There is going to be a leaf underneath, I said, and it grows, then twists like that, and then twists back. You don't see it, and it still has to be there, matching the leaf above. A #9 at 13 mm (1/2 in) went around it.
On the back of a pierced panel the reason for carving is light, which shows every underside whether you shaped it or not. Here it was plain logic, the way I said it on camera. I said there is a much easier way to do all that, and I didn't go the easy way.

Before your own board gets a hole
Is there a spot on your board where light could slip in behind a leaf? Will another ornament be carved right next to it? Weigh the two before the first cut, and keep the hole partial if partial is enough.
This lesson closes part 3 of the Venice Room. Workshop 36 comes right before it, part 4 carries the same board on from workshop 38, and the twisted volute from workshop 31 has a page of its own. For shells, the shell in part 1 starts from the layout. If the gouge numbers here are new to you, start with All about tools for Wood Carving.
How it's done
- Mark what the spot still owes. Before any hole goes in, mark every detail still planned for that spot, the way I pointed out where my beads would go.
- Price the patch. Ask how you would hide it, and if that looks nice.
- Go in from underneath. Take a #11 around 10 mm (3/8 in) in under the shell, removing a little each pass.
- Work the far side. Use a #7 or a one inch #8 (25 mm) there, then drop that part with a broad #2.
- Set the height line first. Finish the movement with the skew before any back bent goes under.
- Clean small, stop partial. Clean using a 7 mm (just over 1/4 in) #11 and a half inch (13 mm) #7, then leave the opening partial.
Frequently asked questions
What does pierced mean in wood carving?
Pierced means you can see through the carving in places, because the gouge came out the back of the board. On my Venetian ceiling board the opening in workshop 37 stays partial. Most of the panel is solid relief, and the hole is one small place where light gets through.
Why leave part of a carving rough until later?
The work around that part is not done yet, and detail there would come too early. I left one part really rough until the last moment in workshop 37. Later I held off on the concaves and convexes, because I knew the area was not done and going in early would be a big mistake.
How do you see what you are carving through a hole?
Go round and look from the far side. I almost could not see what I was doing in workshop 37, so I said I had to stick my head round the other side of the board, and I worked the opening from both directions. The camera had trouble too, and I apologized for it.
What to carve next