

Alexander Grabovetskiy, woodcarver, School of Woodcarving · Published 2020
Is there one best way to carve wood?
Quick answer: A good carving method is any one that leaves the shape you planned without damaging the wood. On a Venetian ceiling board I named two or three honest ways for nearly every step of one volute, and said out loud that none of them is the only way. Grain and depth beside a needed wall set the real limits.
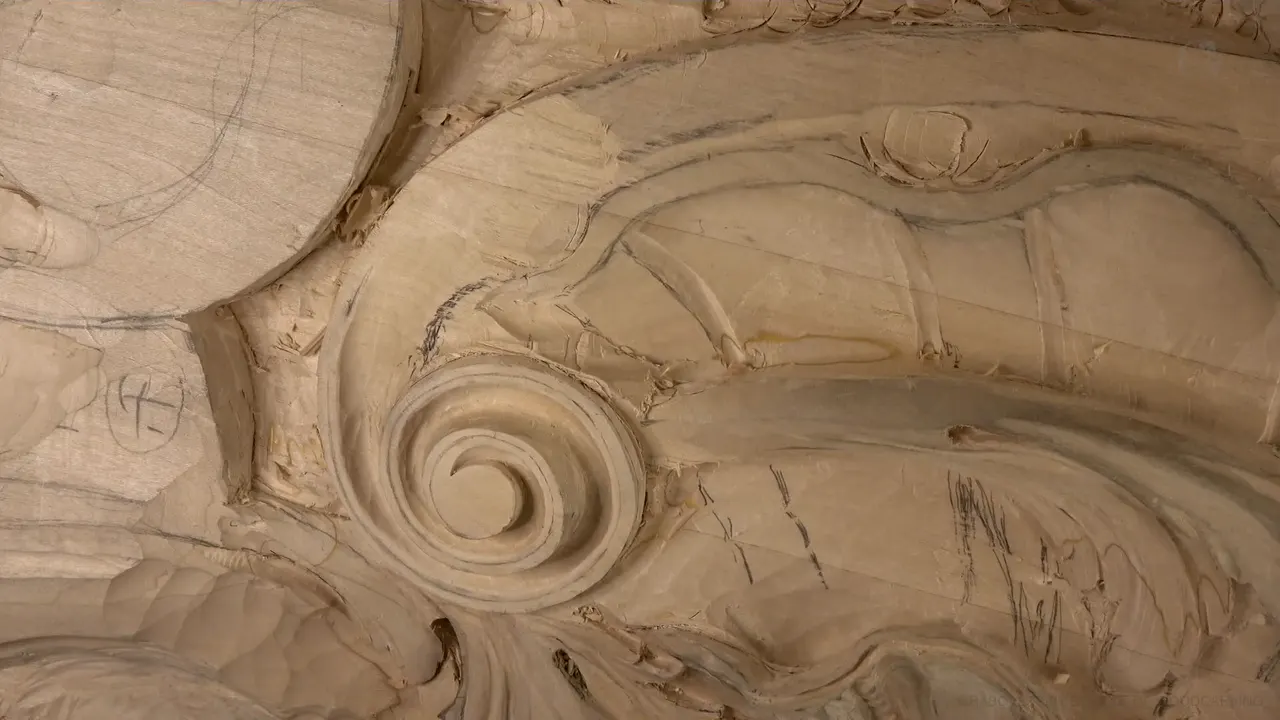
The best way to carve wood is whichever way fits the spot in front of you, and there is almost never just one. In workshop 36 on the Venetian ceiling board I carved a volute and the first outline of a shell, and at almost every step I stopped to name a second way that would work too. Sometimes a third. A few things gave me no choice.
Type that question into a search box and the top answers hand you one recipe. Soft wood such as basswood, sharp tools, carving with the grain, a sketch, then roughing out. Two of those I say myself on camera in this workshop. Sharp tools always help, and I watch the direction of the grain.
What one recipe can't give you is the moment at the bench when two tools would both do the job and you have to pick. Can you peel an apple with a knife? With a peeler, too? Then you already understand most of what workshop 36 has to say about method. You'll see each fork I came to, tool by tool, and the spots where the wood decided for me.

Two ways at almost every step
To take the ground down fast I used a big number 11, about 20 mm (3/4 in) wide.
One number 3 can run the whole line, though changing sweeps follows it more closely.
A band about 2 mm (3/32 in) from the inner edge was too narrow for my finger to guide, so I went by eye.
Either a number 9 or a spoon veiner would carve the same tight hollow.
Sandpaper lost out to a diamond rasp, and the skew did the bulk of the smoothing first.
Undercutting could wait.
The grain and the depth beside a wall I still needed left me no choice.

Why won't I call any method the only one?
I said it out loud halfway through workshop 36, right after cleaning up the middle of the volute. What you just watched is one of the approaches. It isn't the only one, and you should know that. If somebody tells you there's only one way and every other way is wrong, that's not true, and I'm not making it up when I say carvers do tell people exactly that. I've watched them.
A part earlier I'd said the same thing with a 7 mm (a hair over 1/4 in) number 11 in my hand, one side of it butted against the inner wall so the hollow came out deeper there than at the line. That's one way to do it, and there are multiple ways. Both times I went straight back to carving.

Even the order is a choice. Before the eyes inside the acanthus were done, I jumped over to the volute. Staying on one area too long wastes much more of my time, for some reason. Why I leave an area unfinished and move on has a lesson of its own in another course.
One gouge along a curved line, or three?
Either works, and I said so while I chose the second. Chopping down the line around the volute, I found a number 5 was too big of a sweep for it and said I needed a flatter number 4 or 3. A number 3 about 1 in (25 mm) wide chopped the next stretch really well. After that the line asked for a number 5 again, first a smaller one near 5/8 in (16 mm), then a bigger one of roughly 19 mm, three quarters of an inch.

Right there I told you I didn't have to do it this way. The same number 3 could have gone all the way around. Changing profiles just gives me a lot more accuracy, as each one fits a piece of the line a little better. For one edge I said a number 3, 4 or 2 would all work the same, using only the side of the tool.
If you want the test for that, matching a gouge to a drawn curve has a lesson of its own, and so does choosing a gouge size for each job.

How fast can you lower the ground?
As fast as a big gouge will let you, when nothing you want to keep is in the way. Around the volute I had to take the wood down a lot. The quickest way was a bigger tool, so I picked up a number 11 about 20 millimeters across, close to three quarters of an inch. There was nothing there I could lose. I still watched the grain, and when the next stroke was going to damage the surface I stopped and came at it from the other direction.
I took it nearly down to the acanthus below and left about 10 mm (3/8 in) above it. I kept that same 10 mm between the highest point and the ridge still to come, so the whole drop looks organic. A smaller gouge would get there too. It just takes longer.

Gauge, finger or eye for a narrow band?
Any of the three can work, and the width of the band decides which. On the border of the volute I left about 5 mm (3/16 in). There are tools made for marking that, but I like to butt my finger against the edge and use it as a reference, and I said I could just as well draw it and eyeball it. Three honest ways for one line.

When I added a side detail to match one elsewhere on the board, the band sat only about two millimeters, 3/32 of an inch, from the inner edge. My finger was too thick there to get real support on the side, so I eyeballed it all around. If it comes out slightly off, that's no big deal, as long as it doesn't go too wavy.
Your eye improves with use. Drawing the inside line, I told you I look at the lines and not at the wood, and try to catch the right distance, which is not always easy. The more you do it, the sooner you catch a line that's off.
The finger still wins one job. Slide it along an edge and it will feel a bump as thin as paper, one your eye walks right past.

Chamfer first, or straight into the hollow?
Both work, and I laid them out side by side before picking. One way was to take a number 1 and carve a 45 degree chamfer first, then turn it into the concave. The other was to go straight in with the concave, as long as I knew how deep I meant to go, since it had to be consistent all around. I said about an eighth of an inch (3 mm), then settled on 2 mm (3/32 in) as even better.

That secondary line shows from below, and if it isn't consistent it won't look nice. Then I added a step that felt safer. A number 5 about a quarter inch (6 mm) wide took a little out first, and the number 11 worked its way in after it, less concave near one line and more near the other. For a moment I was carving against the grain there. Logically I should come at it from the opposite direction, so I changed position and did.

A spoon veiner, or a number 9?
Either one would have done it in that spot. The secondary concave on the side of the volute goes much deeper than the first concave beside it, and I carved it in with a 3 mm (1/8 in) number 11. Next I went looking for a spoon veiner, a number 11 of the same 3 mm. Or a number 9, I said, would give pretty much the same result right there.

Up near the top of the volute's middle, a number 7 did what the number 11 had been doing. Its sides got whichever gouge matched the curve closest, a number 6 that time. Whether you need your teacher's exact gouges is a question from part 2 of this room.

Sandpaper, a rasp or the skew?
I used two of the three, and the skew did most of the work. Held in one position, a skew chisel takes every high spot off and leaves a gradual movement, and that's why I love using it. Only after that did a rasp touch the volute, and only its edge. Running the rasp along that edge made sure nothing high was left, and not much came off. The skew had already done a really good job.

Later I was about to hit what I'd left with sandpaper. I stopped, picked up a flat diamond rasp instead, and it smoothed the spot just fine. In part 11 I started a little rasp work, then quit. The surface already looked clean without it. Landscapers were working outside that day, and I apologized for the noise and kept going.
There's a whole lesson on cleaning up a carving without sandpaper, too.

Undercut now, later, or not at all?
Later, maybe never, and I said both. Where the acanthus passes under the volute, I stopped short. I left some preliminary mess there so I wouldn't put in marks I'd only spend time cleaning, and said I'd undercut it later on. Then I took that back a little. Undercutting it now would be too early, there are a few different ways this could develop, and maybe I won't undercut it at all but do something different.
The border got the same treatment. Giving it a little slope is a technique that adds dimension, and since I wasn't sure I'd use it, I left it as it was. One small part of the leaf I added by the shell could sit below a line or above it, and either would look nice, I said. Below would give more dimension from underneath. After a double think, I put it above.
A carving pattern bends once you are on the wood, and that has its own lesson in part 1.

Every fork from workshop 36 fits in one small table.
| Step | Options | Mine |
|---|---|---|
| Lowering the ground | A 20 mm (3/4 in) #11, or smaller | The big one, it's faster |
| Chopping a curve | One #3 all the way, or several sweeps | Several, for a tighter fit |
| Marking a band | A gauge, my finger, or just my eye | By eye, at that width |
| Starting the hollow | Chamfer with a #1 first, or straight in | A #5 first, then #11 |
| Deepening a hollow | 3 mm (1/8 in) spoon veiner, or #9 | Either one, same result here |
| Smoothing an edge | Sandpaper, a flat diamond rasp, or the skew | Skew first, rasp on edges |
Where do wood carving techniques stop being a matter of taste?
At the grain, at any wall you still need, and at the laws of the design. The grain comes first. In part 2 I stopped a stroke because going on would have damaged the surface, and I turned around. Later, in part 10, the grain changed direction partway along, and that time it worked in my favor. Keeping the grain from tearing is a question answered in part 11.
Depth next to a wall you still need is the second limit. Taking out the inside of the volute, I kept it shallow, as going too deep there would damage the wall I still had to carve, and that would be a mistake.
The third is the design of the relief itself. The movement I was following runs right around and ends in one spot, and I could have put an acanthus head there, but it would have been a mistake. It had to be a volute. The side corbels I still have to carve carry a volute with multiple line work, so it made sense to repeat that here. And when this volute lacked the side detail another spot on the board already had, it got one, because it has to be the law of repetition.

Pressure isn't a choice either. I let the tool do the work with almost no pressure, and that only works while the edge is really sharp. Mine got a buffing off camera in part 6 once it started leaving marks.
Try two ways on a scrap first
Can you draw one curved line on a scrap of wood? Then you have a practice board. Chop the line once with a single gouge, then again beside it while changing between two or three sweeps, and look at both from a few points of view, the way I kept checking the volute. Keep the depth modest next to any wall you want to keep. When you are ready for a real project, this page helps you choose where to begin.
If you would rather start with the basics of wood carving, look at the techniques course or First Cuts for Beginners.
This volute was carved in workshop 36 of part 3, between workshop 35 and workshop 37 on the same board. The twisted volute of workshop 31 rises from under a leaf, a different job. Part 2 holds workshops 13 through 25, and part 4 carries the board on through workshops 38 through 49.
I kept apologizing on camera for covering the work with my hands. That's where they have to be. Pick one line, carve it two ways, and tell me which one you liked.
How it's done
- Name the job. Say what the pass has to leave, a crisp wall or a smooth hollow, before you reach for anything.
- Try the tool you hold. Hold it against the line. One number 3 can follow a whole line alone.
- Read the fibers. Stop the moment a stroke starts to damage the surface, then change position and come in from the other side.
- Stay shallow by walls. Keep hollows shallow next to any wall that has yet to be carved.
- Feel before you trust your eye. Slide one finger along the edge.
- Walk around it. Check the line from a few different points of view before calling it done.
Frequently asked questions
What are some common mistakes when you carve wood?
Three show up in workshop 36 alone. Digging too deep beside a wall you plan to keep can ruin it, carrying a stroke on when the grain runs the wrong way damages the surface, and a hollow can come out choppy inside. I fixed that last one with the same tool, carefully, with almost no pressure.
Do you need a spoon gouge for a deep, narrow hollow?
A spoon veiner is one good choice, and a number 9 is another. For a hollow about 3 millimeters wide, an eighth of an inch, I said either one would do the job right there. Start with whichever one you can get.
How can you tell if a carved edge is smooth?
Run a fingertip slowly along it. A finger feels a movement as thin as a sheet of paper, which the eye just won't catch. On the volute in workshop 36, my finger found one more spot after the rasp had been over the edge, and I went back to it.
What to carve next