

Alexander Grabovetskiy, woodcarver, School of Woodcarving · Published 2023
How far apart should two concave cuts in a petal be?
Quick answer: The gap between a pair of concave cuts is a strip of wood about 1/16 inch wide (about 1.6 mm), left on purpose so the hollows do not run together in one sharp ridge. On my Gibbons petal I then blended that strip with a 3 mm chisel held upside down, slicing at about 45 degrees.
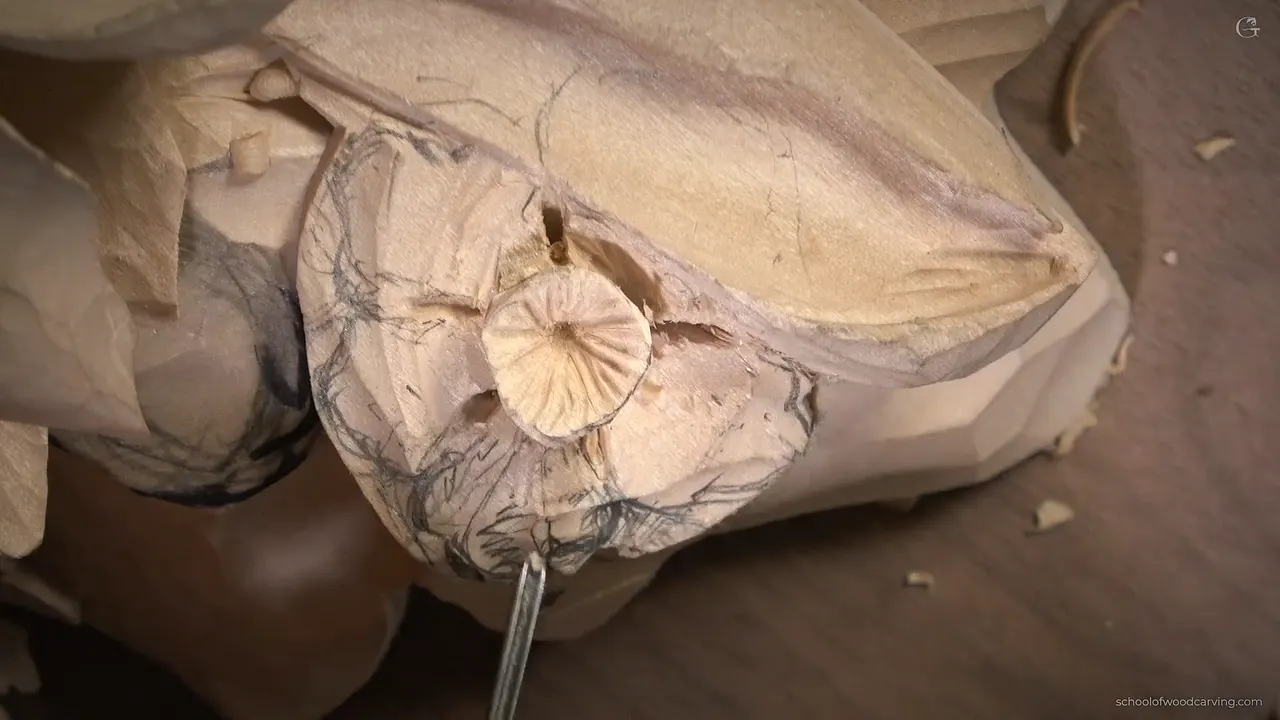
On my Gibbons petal, two hollows sit about 1/16 inch (about 1.6 mm) apart, and the strip of wood between them gets blended afterward. In the third video of class 15 of my Grinling Gibbons course in Maine, I dropped one concave down, stepped over, and dropped the next. Really important, I told you, to leave that space. A chisel then did the blending, slowly.
Ever carved two hollows side by side and watched them meet in a sharp line you can't take back? Did you wonder how much wood to leave in the middle? Below is what I did on one petal of a relief flower, in order, and then eight places in my other courses where I talked about the same ridge.

How far apart do you leave two concave cuts?
A 16th of an inch. Two and a half minutes into the video I said I would leave some space between those concaves. My reason was plain: I don't want to see a really sharp ridge. So I stepped away approximately a 16th of an inch from the first concave, what I called a millimeter and a half. That first one became my concave on the left side, and the next became the one on the right.
The first hollow was in. The same on those two, I told you. Almost a minute later the gap came up again, and I kept clear of the ridge.
Why does that small gap matter so much? My answer came right then. We are going to blend that movement, I said, so no sharp ridges. Those sharp edges are what I called facets, or whatever you call them. A facet is a small flat face, and it is the thing a sharp ridge turns into on a petal.

The petal in six lines
- Concave one went in with no spooning.
- Next came the second, a small step away, and the same shape.
- Chisel number 3, upside down, blended the strip between them.
- Slicing, not pushing, on the angle.
- A small tool took over once the wood grew fragile.
- Where two petals touch, I watched the point.
Why is a spoon shape the wrong shape for this hollow?
Just before that gap I told you how the first hollow should go. I don't like the spooning effect. That concave gets dropped all the way down, and from the edge it runs just like that. Then two words: no spoons. It is not a spoon carving.
Class 2 of the same course covers a gouge held too high. Hold it high and travel inside, and you make a really deep spooning, which I called a big problem later on. That was class 2, but the point carries over. A scooped hollow is deep in the middle and has no clean edge to work from.

What is the best way to blend the strip between two concaves?
Use a back bent if you have one, and a flatter tool if you don't. After both hollows were in, I told you what we would do with those two guys: blend them. A back bent would make that easier. Even without one, you can use the knife, or the flatter gouge, upside down, or just a chisel.
Mine was a number 3, which I called 3 millimeters, 1/8 of an inch. Upside down, on the angle. More slicing than pushing, I told you, 45 degrees or so, and then the blending began, little by little.

A chisel is a flat blade for paring, and a gouge is the curved version.
About a minute and a half of the video is just blending. Even without a back bent it was going to be good. A magnifier glass would have helped. I had one close by. In front of the camera, though, you would not be able to see anything.

Soon after, I reached for the number 8 again. Approximately the shape, I said, a concave in the center. It would be exactly the same on the next one, and the next, and the one you can't see. Now, I said, we had to start the main shape.
What if you have no back bent gouge?
Use what you have. Three other ways came out on camera: a knife, a flatter gouge turned over, and a plain chisel. I took the chisel, a number 3 of 3 millimeters (1/8 in). In class 11 the same blend was done with a back bent, working with the grain from above, and that class has its own row in the table below.

Why did I switch to a smaller tool?
The petal got more fragile with every pass. About seven minutes in I told it to myself, almost: be careful, it becomes more fragile the more material you remove. Only one petal for now, I said, and the rest of them probably off camera.
The same small tool went in again, and I showed you the pressure. See how much pressure I create, it just moves. So I grabbed the small tool. Next I named the number 1 double bevel, which I really like, because it is so thin and I can dig inside of the fibers without creating a lot of stress.

A bevel is the slanted face that makes the edge. A double bevel has one on each side. What I liked about this number 1, I said, was that it is so thin. A skew works too. I did not take any petal right up to the line, and left, I don't know, approximately half a millimeter (about 0.02 in) of wood short of it.
Why not a leaf tool and a number 11 for the triangle, like I usually do? It was how fragile the part was. I can create the pressure down there, so I had to be really careful.

How do you keep two petals from making a sharp triangle?
Let them touch, and keep the point soft. Around ten minutes in, the two petals were going to touch each other at one point. If you look from above, that is what I'm after. The other side gets exactly the same treatment, again with real care.
Then came the warning. Don't create a sharp triangle point right here. To lose it, I said, I can get a number 9 or a number 8 and make a cut right there. My aim was a really gradual movement, nice and gradual.

Did the wood have to drop lower? Maybe not. With some material left, the same tool could undercut it, not really upside down, but turned partway over. Then my number 1 came back. Don't worry about a perfect detail at this point, I said. Get really close and you can clean it a little later.

Pretty simple, I called the result, and this flower was going to look really nice. After that I stopped with it and jumped to the development of the other two. Those two also bugged me.
Where have I said the same about ridges in my other courses?
In seven other lessons, plus this one, each with a different tool in my hand. Hashemi Flowers lesson 47 has my meaning of blending: when there are too many ridges, facets and tool marks, you can try blending cuts. A micro knife did it there, for smoother transitions, and then I picked a number 7 that was marked number 6.
Lesson 9 of that course runs the other way. With a number 8 of about 5/16 of an inch (about 8 mm) I made a concave and saw I had just created a ridge. That ridge separated one movement from the main one. Then it was all about cleaning, with a bigger number 8, 5/8 of an inch (about 16 mm), and an even smaller one, half an inch (about 13 mm), as lesson 9 shows.

Lesson 15 has a number 7, probably an inch (about 25 mm) wide, making a really smooth pass. That takes care of all of those ridges, I said, with almost none left whatsoever.
Lesson 14 shows a spot where a normal gouge cannot go. The facets on a ribbon needed cleaning, so I took a spoon gouge, a number 3, and attacked from there, since the normal gouge would not reach that area at all. It was in my way. A V tool then cleaned between the leaf and the ribbon. In lesson 12 I was ready to get those facets cleaned out with the same tool, and then a V tool, a #16 of 6 millimeters (about 1/4 in), went under for some undercutting.
Inside the Maine class, class 8 has the planning side. A number 9 of 10 millimeters (about 3/8 in) made the first concave, and then a bigger tool, three quarters of an inch (about 19 mm), made another cut. Bigger is a lot easier to blend later, and the neighbor could be blended using a number 2 to remove the facets.

Because we undercut, I said in class 11, we got a big ridge, and I did not want that ridge. It is almost impossible to see on the camera. My goal was to make it smooth, so I grabbed the back bent and attacked with the grain, from above down. Class 12 tells it with its own petal. The shadow looked good, the ridge it left did not, and I reached for a tiny skew chisel. One of the tiniest skews you can get, and good for tiny detail work.
The Venice Room says it with a bigger tool. In workshop 82 the bottom of my concave came down to about a quarter inch (about 6 mm) above the surface, and I needed to get rid of those ridges. A flat number 3 handled one side, then the second side, the same thing, and I blended that in.

In workshop 75 a bigger number 2, about 50 millimeters (2 in), rode on top of the ridges. The step isn't really necessary, I said, but I like it, because I like to design on a clean canvas, and a line comes out nicer on a clean surface. Workshop 69 adds a line about not needing that sharp ridge, and smoothing it out, or the piece would not look nice.
The furniture panel design lesson points out that carving shows you all the chisel marks and true movements. They make different ridges, and those ridges create the main movement. And the Chamomile and Bow Rosette course says it is all about blending, with a flatter tool to remove the facets.
What the eight lines share
The lines below come from other wood carving lessons, each tied to the lesson that has it.
| Where | What I said | Detail |
|---|---|---|
| Hashemi 47.4 video | blend when there are too many ridges | a micro knife smooths |
| Hashemi Flowers 9.3 | this ridge separates this movement, then cleaning | a bigger number eight |
| Flowers course 15.4 | number seven takes care of those ridges | about one inch wide |
| Class 8, Maine | bigger tools are easier to blend later | number two removes facets |
| Gibbons Maine 11 | just because we undercut, a big ridge | back bent blends it |
| Maine class 12 | I don't like the ridge it left | a tiny skew chisel |
| Venice Room 82.9 | get rid of those ridges, then blend | a flat number three |
| Venice Room 75.3 | kind of ride on top of ridges | a bigger number two |
Every row is a ridge or a facet that I wanted blended or cleaned.

Does the grain change how you blend?
In class 11 a back bent made the blend, working along the grain. The grain doesn't come up in this video, so I have nothing to add about it here.

The panel has two glued layers, and class 15 has a line about that. At home, I would highly recommend finishing the first layer completely, then applying the second layer, working it, and blending the two together.
The flower itself began in the first video of class 15. One flower in the Gibbons original was too childish for me, I said, so I changed it. I planned about five petals of different widths, with dark openings between them, and the pair of concaves on this page belongs to that plan. The center and the openings are in the other videos of the class, and the parsley leaf is in class 14.
Ridges and tool marks have one more job. Hashemi lesson 24 puts it in a bigger frame: if you are after only form and shape, I said, a 3D printer will work for you. If you are after art and movement, with all the ridges and tool marks, it will not. That's the big difference.

What did the petal look like when I stopped?
Pretty simple. A pair of hollows with a thin strip between them, blended with a chisel, a smaller tool in the last passes, and the petal touching its neighbor from above. Then I moved on to the two next to it.
The whole class sits on the Grinling Gibbons course page, and every part of it opens with Tuition. To watch the chisel slice in real time, that is the place.
How it's done
- Carve the first concave, no spooning. Number 8 followed the number 11, and the hollow went down with no spoon shape.
- Step over a small distance. Leave 1.5 mm (1/16 in) of wood between the hollows. I called it really important, so the ridge between them stays soft.
- Carve the second concave. Make it the same as the first, so that one sits on the left side and one on the right.
- Blend the strip with a chisel. Take the number 3, 3 mm (about 1/8 inch), turn it upside down, and slice on the angle at 45 degrees or so. Go slowly, because the petal gets more fragile with every pass.
- Switch tools. When the petal moves under pressure, pick a thin double bevel. Stop about 0.5 mm short of the line.
- Keep touching petals soft. Where two petals meet, avoid a sharp point. One pass of a number 9 or 8 gives a gradual movement.
Frequently asked questions
How much wood sits between a pair of concave cuts?
Close to 1/16 in (1.5 mm). I called that really important, because I wanted no really sharp ridge in the middle. I stepped away from my first concave, carved the second hollow there, and blended the strip afterward.
Can you blend a ridge without a back bent gouge?
A knife, a flatter gouge turned upside down, or a chisel will do it. A back bent makes it easier, I said. I took a number 3 chisel, 3 millimeters wide (about 1/8 inch), and sliced on the angle, a little at a time.
Why use a small tool on a fragile petal?
Pressure moves the petal. I showed that on camera and said it is why I grabbed the small tool. My pick was a number 1 double bevel, because it is so thin that it digs inside the fibers without a lot of stress on the wood.
What to carve next