

Alexander Grabovetskiy, woodcarver, School of Woodcarving · Published 2018
How do you hold a carving that is too fragile for a vise?
Quick answer: Holding fragile pierced work means clamping it down onto a board drilled on a grid. Quick release clamps drop into the holes wherever pressure is wanted, and the board itself goes in the vise so rotation survives. Unclamping takes a second, which is what glue and paper cannot offer.
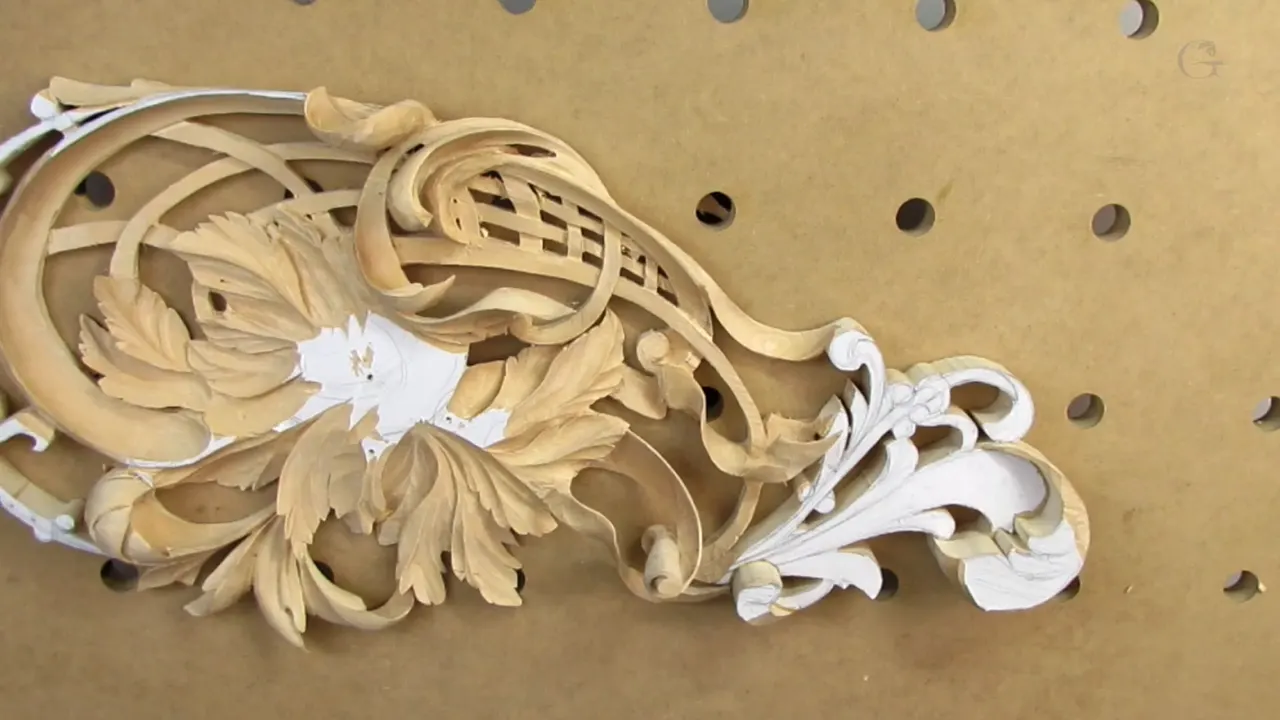
A pierced panel outgrows the vise, and then it gets clamped onto a drilled board. Mine is MDF with 20 millimetre holes on a four inch grid. That board goes into the vise, the panel goes onto the board, and everything still rotates together. Unclamp, flip, carve the back, clamp again.
There comes a session where your work is stronger than it looks and weaker than your grip.
By workshop 15 this panel hangs in the air. Once it is on a wall it will be stable and there will be no problem at all, which is exactly what I say on the recording. On a bench, with a one inch gouge coming at it, the same piece is a set of thin bridges waiting for somebody to lean on the wrong one.

Two ways to hold work that cannot be gripped
- Glue it down to plywood with a sheet of paper in the joint.
- Screw through waste.
- Clamp it down onto a board drilled on a grid, which is what I do here.
- Rest it in a shaped cradle.
- Or stop excavating, which is the option nobody ever admits to choosing.
Why does the vise stop working?
A vise grips two edges and trusts the middle to look after itself. That is a fair bargain on a solid blank. Once the middle has holes in it, the grip at the edges no longer reaches the part you are carving, and every push you make travels through a span of wood a sixteenth of an inch thick.
A break never happens at the point you are touching. It breaks somewhere behind, at whichever bridge happened to be thinnest, and you hear it before you see it.

Did you plan to hit this problem on camera?
I did, and I want to be straight about it. I worked this panel from the middle outward rather than the usual way round, which guaranteed I would arrive at workshop 15 with a piece too fragile to hold. Every carver meets this problem eventually, and I would rather meet it with a camera running than alone on a Tuesday afternoon.
Carving inside out is not how I normally sequence a panel. The order I actually recommend is closer to what I described in moving around a design, and you can see the cost of my choice in how carefully I have to move for the rest of the session.

The glue and paper method
You spray both faces, wait for tack, and press the carving onto a sheet of paper laid over a backing board. The paper is the joint. When the work is finished a wide chisel splits the paper layer and the piece comes free undamaged, and it holds through weeks of carving before that.
It is an old method and a good one. A pair of lions nearly four feet tall were held by nothing else. There are full accounts of holding a blank with paper and of gluing a small carving down elsewhere in the school, and if you have never tried it, try it on something small first.

So why not use it here?
One reason only: I need the back. On this panel I flip the work several times an hour to clear waste from behind, and a glued sandwich makes each of those flips a procedure. You have to split the joint, scrape the paper, re-spray, re-press and wait. Do that several times in an afternoon and the afternoon is mostly gone.
Clamps come off in a second. That is the entire argument, and on a panel where the back matters as much as the back of a pierced panel suggests, a second against ten minutes decides it.

Everything on my own board, hole by hole
| What it is | Mine | Why | Alternatives |
|---|---|---|---|
| Material | MDF, and not thick | Flat, cheap, and it will not dull an edge you drop on it | Plywood, or solid pine |
| Holes | 20 mm | My clamps want that diameter | Or the imperial size, when your kit already runs on it |
| Spacing | Four inches | Something always lands near the work | A hundred millimetres |
| Clamps | Festool quick release | One hand, one second, and they let go as fast | Any clamp with a 20 mm post |
| Mounting | Gripped by the vise jaws | Rotation survives | Bolt it to the bench top |
One of my students built his from yellow pine after watching an earlier course, and it works exactly the same. Nothing clever lives in the board itself. The holes are the idea, and the spacing matters more than the diameter, because a hole four inches from the last one is always within reach of wherever the work needs pressure.
Why 20 millimetres and not the imperial size?
My other clamps. I own several Festool accessories whose posts drop into a 20 mm hole and grip, and the imperial size is close enough to be useless and far enough to rattle. Pick the diameter your hardware already wants and drill everything to it.
If you own nothing yet, then three quarters of an inch is a perfectly sensible choice and bench dogs are easy to find in it. What nobody should do is drill half a board one size and half the other, which turns a good jig into a puzzle you solve again every single time you clamp something.

Why does the board go in the vise rather than on the bench?
Rotation, and nothing else. A carving vise turns on two axes, and the moment anything gets bolted straight onto a bench top that freedom goes, which on ornament costs more than it sounds. Plenty of cuts in this workshop come from a direction I could not reach without swinging the whole panel toward me first.

So the board becomes an extension of the vise rather than a replacement for it. Panel onto board, board into jaws, and I keep the freedom to attack a shape from whichever side the grain allows on that particular pass.
That freedom is how you avoid tearing. Carving uphill because the geometry trapped you is a choice you make when you cannot turn the work, and every hour I spend not making it is an hour of cleaner surfaces. It also keeps my shoulder out of the positions that make a long session hurt.
Does hitting the board damage your tools?
Barely, and that is why the material matters. MDF is compressed fibre with glue in it, and my own word for it on the recording is paper. Carving into the stuff on purpose would dull an edge, certainly. Clipping it will not, which is more than I would say for a knot in oak.
I still avoid it. In workshop 15 I choose a shallower angle specifically so the edge stops short of the board, because a habit of hitting your jig is a habit of not knowing where your edge is. sharpening is expensive in time and I would rather spend it elsewhere.

Does the clamped board change how you carve?
It gives you back the thing you had lost, which is permission to push. The panel is flat and held in four places, so a one inch number 5 can go into it and take real waste off. For the first time in three workshops I am not making air carving movements with my hands floating above the work.
At one point I pick up a three inch gouge. Three inches. On a panel I was afraid to touch an hour earlier, and that is what proper support buys you. A three inch sweep in high relief moves more wood in one pass than twenty careful cuts with a half inch tool.

Bigger tools are quicker and they leave less to clean. The moment the holding is solved, that rule comes straight back into play.
Where do you put the clamps?
Above solid wood, never above a bridge. I look for the parts of the panel that still have full thickness beneath them, usually near the border, and the clamp feet go there. A clamp foot landing on a bridge is the one arrangement that turns a support into a breaking tool.
I also reclamped twice in this session for the camera, which is not a reason that applies to you. What does apply is that anything sitting in the path of your stroke will get hit, so plan the next twenty minutes of carving before tightening a thing.

What about keeping the panel clean while it is clamped?
Gloves, and I keep two kinds on the bench. White cotton ones from a bulk bag, which wash and come back, and rubber dotted work gloves from the hardware store when I want grip for heavy waste. Neither will save your hands. Both save the surface.
The full reasoning sits in keeping the wood clean, including why a clean hand is not a clean hand. Clamping actually makes it easier, because your hands are on the board rather than on the carving.

What is a carver's cut?
Slicing instead of pushing. I move the edge sideways through the fibre as it advances, so the blade shears rather than wedges, and the surface behind it comes off glassy. I do this even when a straight push would work, and even when the wood would forgive me.
The reason is consistency. A pushed cut sometimes looks as good, and sometimes crushes, and I have no way of telling which in advance. the slicing cut is the same move under its other name, and on basswood end grain it is the only thing that gives a clean face.

Big tool or small tool for an inside hollow?
Small, and this is the one place I reverse my own rule. A small gouge takes less material per pass, which means less stress arriving at an area that may only be two millimetres thick, and on end grain the difference is obvious after a single cut.
The rule about bigger being better applies to open ground where you are removing mass. Inside a hollow you are not removing mass, you are shaping a surface, and those want different tools. A spoon gouge at 7 mm did most of this session's inside work.

Why undercut something a church carver would leave alone?
We are not carving a screen for a building nobody can get close to. Church screen work is commonly left at the point where the flip reads correctly from the floor of a nave, and that is a sound professional decision for a piece nobody can approach.
This panel will be looked at closely. So the wall behind the flip gets excavated, the side gets undercut, and the movement becomes true rather than suggested. undercutting work nobody sees has the long version of that argument, and acanthus ornament has been judged this way since the Greeks.

That white is paper, not paint
Paper. The pattern is still glued to the face and I read every height off it the whole way through. When I say on camera that the paper is my high point, the words are literal. Anywhere still showing white has not been carved yet.
There is a pencil mark I drew for the camera and then cleaned off with a spoon gouge. Small thing. It is also how I mark a level I am about to commit to, and reading a flow line explains why I keep redrawing lines I have already carved.

What to try on your own bench
Drill a board. Any flat offcut of plywood thick enough to stay rigid, a grid of holes at whatever diameter your clamps use, four inches apart, and a couple of hours with a drill press or a guide block. Mine took one morning and has been in use ever since.
You will use it for the rest of your carving life, and it costs less than one good gouge. All 49 workshops of Carving Hashemi Flowers are inside the school, and the jig arrives in this one.

One more thing about that board. My own board is far from pristine and never will be. A flat jig with a few tool marks in it still reads perfectly level under a clamp, and resurfacing would be an afternoon spent on nothing.
Go and look at Grinling Gibbons work, or the panels in the Getty rooms and the V and A sculpture collection. Every one of them was held down somehow, by something, on a bench that had its own scars and its own awkward morning when the holding had to be solved before any carving could happen.

Next workshop the second layer begins, and the panel goes back into territory where the board earns its keep several times an hour.
How it's done
- Find a flat offcut. Any rigid sheet will serve. Mine is MDF, though plywood or solid pine behave the same way.
- Match the holes to your clamps. Drill whatever diameter your hardware already wants, and keep every hole on the board identical.
- Space them four inches. Close enough that some hole always lands near wherever the work needs pressure applied.
- Put the board in the vise. Gripping the board rather than bolting it down preserves the rotation the whole method depends on.
- Clamp over solid wood. Choose spots with full thickness underneath, never a thin bridge and never an opening.
- Plan the next stretch. Look at where your strokes will travel before tightening, since anything in the path gets hit.
- Unclamp to reach behind. Release, turn the piece over, clear the waste from the back, and clamp again.
- Keep the edge off the board. Choose a shallower angle so the tool stops short, even though fibreboard will not dull it.
Frequently asked questions
Will hitting the board dull your gouge?
Barely. Fibreboard is compressed paper with glue in it, and clipping the surface costs almost nothing compared with a knot in oak. Carving into it deliberately would be another matter.
Why not glue the carving down instead?
Spray adhesive over a paper joint holds beautifully and releases cleanly, and I use that method often. What it cannot do is let you flip a piece four times in an afternoon without splitting the joint each time.
What size should the holes be?
Whatever your clamps use. Mine are 20 mm because several Festool accessories drop straight into that, and the imperial size works just as well for anyone whose kit already runs on it.
What to carve next