

Alexander Grabovetskiy, woodcarver, School of Woodcarving · Published 2018
Should you finish one area of a carving before moving on?
Quick answer: Working a corner until it is done tends to lose you the piece. Depth and height are relationships, and a relationship cannot be judged from one end of it, so the panel gets worked in patches with deliberate gaps between them. Come back to an area and you see it again.
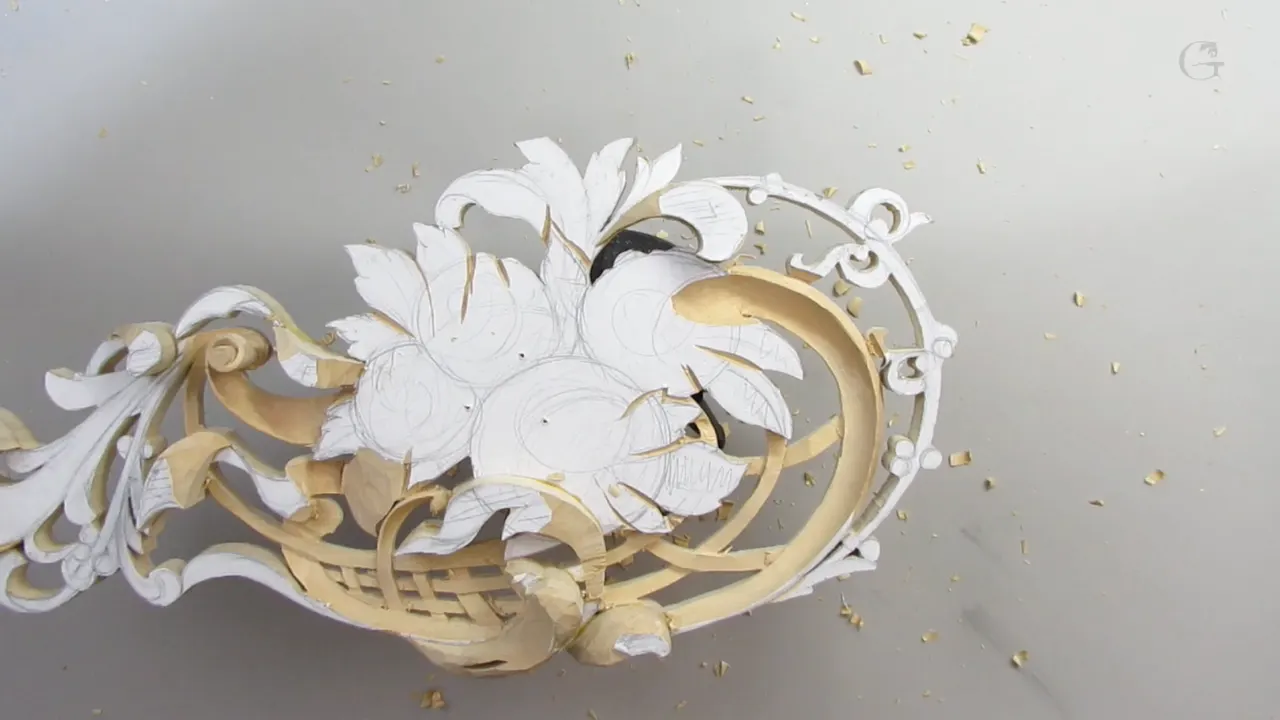
Work one corner of a carving until it is finished and you will lose the piece. I move around a panel on purpose, an hour here and an hour somewhere else, because the only way to keep the whole design in view is to keep making decisions about all of it at once.
Finish a corner in isolation and it comes out perfect and wrong.
The reason is not discipline or patience. A carving is a set of relationships, and a relationship cannot be judged from one end of it. How high this leaf sits only means something against the one behind it. Which strap of the basket passes over and which goes under is a decision about both straps. So the panel gets worked in patches, deliberately, and on this session the patch is the woven basket and the leaves lying across it.
How the session actually runs
- Pencil first. Decide over and under before any tool moves.
- A V tool outline, three sixteenths of an inch deep and no deeper.
- Main forms only. Undercuts wait until the leaves above exist.
- Mallet while the wood is still strong, hands once it is not.
- Leave it, come back, take in the whole board, change your mind where it needs changing.


Why jump around the design?
Concentrate on one area long enough and you stop seeing the panel. Your eye adapts to that square of wood, every comparison you make is local, and the depth you settle on there drifts away from the depth everywhere else.

Jumping breaks the adaptation. Work the basket, then go and do something at the far end, then come back, and the basket you return to is something you are looking at, no longer something you are inside. Half the design changes I make on a panel get made in the first thirty seconds after coming back to an area, which is not a coincidence.
It also protects you from the worst failure in relief work: a beautifully finished element sitting at completely the wrong depth. Nothing recovers that except carving everything else down to meet it, and the beginner course starts with that habit for a reason, and by then the panel has lost half its thickness. I do this on every piece and I recommend it in the design course for the same reason.
Over or under?
That is the whole basket, and it gets settled with a pencil before a tool touches anything. This strap goes above that one, that one passes below, and the pattern has to stay consistent all the way across or the eye catches it instantly.

Real basketry alternates. Over, under, over, under, the rows staggered so no two crossings line up. Carve it without that logic and you get a lattice, which only decorates, where you wanted a weave, which is a thing in itself. The difference is not subtle when the panel is on a wall.
So I mark it out, look at it, change two of them, and look again. This costs five minutes and it is the only part of the basket that cannot be fixed later. Even the way a bunch of grapes gets blocked in runs on the same idea, decided before any tool moves.
| Stage | Tool | Depth or intent |
|---|---|---|
| Marking the weave | Pencil | Which strap rides over and which drops under, all of it settled before a single cut |
| Outlining | A 16 at 3mm, then at 6mm | Three sixteenths deep |
| Main movements | A half inch number 3 | Which end of each strap is high |
| Inside corners | A micro number 3 at an eighth | Slow, controlled, more tool marks |
| Flattening | Number 1 back bent at 10mm, a three quarter inch back bent | Surfaces that curve away from a straight blade |
| Leaves over the basket | A wide 7, or a wide 8 | Broad sweeps, and ideally a single pass carries a whole leaf |

Three sixteenths is the floor, and the ceiling
Go any deeper than that and the surface turns bumpy on you, which nobody wants on a weave. The straps sit close together here, and once each groove between them goes past about three sixteenths of an inch the surface reads as a field of humps instead of a flat weave with shadows in it.

An eighth of an inch is enough in the tighter spots. What you are buying with that depth is a shadow line, not a hole, and a shadow line reaches its full effect long before the cut gets deep. Grain direction changes how much you dare take, too, and on a weave it changes at every crossing. Past that point you are only removing strength.
The V tool does the cutting for a specific reason. A straight tool driven down to make that groove is a wedge going into wood that has very little supporting it, and on a weave, where each strap sits as a narrow island, that wedge splits things. A V tool takes a shaving out instead of forcing its way in, so it works as a relief cut and the strap survives.
When do you put the mallet down?
When the wood gets weak, which on this panel happens gradually and then all at once.

Early on a mallet is actually the safer choice, and that surprises people. A measured blow delivers a known amount of energy and then stops; hand pressure keeps pushing after the wood gives. So while the section is thick I use one, and it saves real time.
But every pass takes material away, and material is what was holding everything together. There comes a point on a pierced panel where no mallet blow is safe anywhere near the fragile parts, and from then on it is hand pressure and sharp steel only. Knowing where that line falls is experience, and crossing it is how people lose work at the last stage.
Reach for the biggest tool that fits
Nearly everywhere, this rule holds. Number 7 or number 8, a full inch wide, shapes a whole leaf in a few passes and leaves a surface that needs nothing doing to it.

Small tools have their place and their price. A micro 3, an eighth wide, gets inside a corner nothing else enters, and it gives you real control. The work slows right down, though, since each pass takes almost nothing. Worse, a narrow sweep leaves a facet every time, so ridges end up all over the surface. Two costs for one benefit.

The rule, then, is to start with the biggest tool the space allows and go down only when the wood refuses. Reaching for the small one first is the commonest habit I have to break in a workshop, and the tools course spends a while on why.
You do not need my tools
I change tools mid job fairly often and say so out loud, and the reason is not indecision. The point is to show that two different gouges did the same work on neighbouring leaves and neither result is better.

One of them was shaped by a 7 an inch across. Its neighbour got an 8 of the very same width. Anybody watching could use a 6 or a 9 and arrive at the same leaf, because what decides the shape is where you put the edge and how you turn it, not which sweep is stamped on the shank.
This matters because tool lists frighten people out of starting. You do not need my rack. You need a handful of profiles that cover the curves in your design, and you will collect the rest over twenty years without noticing. I have also caught myself failing to name a tool on camera, and I would rather apologise for that than pretend a project like this hangs on owning a particular gouge.
Slicing, even with a chisel
One of the tools doing most of the flattening here is a back bent number 1, ten millimetres, which is to say a flat edge on a curved blade. There is no sweep in it at all.

I still slice with it. The edge goes in at an angle and travels sideways as it cuts, exactly as a gouge would, because a flat blade pushed straight ahead is a wedge and a wedge splits limewood ahead of itself. Turn the same tool through its own cut and it shears the fibres cleanly.
The back bent is really a spoon gouge with the bevel on the upper face, which is what lets it flatten a surface that sits below the wood around it. On a woven basket, where every strap is a low island between two grooves, only that shape reaches the middle of a strap without the handle fouling its neighbour.
The law of movement
Each leaf here has a direction, and once you can read it you know which end stands high.

A movement starts somewhere, and that end is the summit. From there the surface runs downhill along the length of the leaf, and where two leaves meet, whichever movement arrives first sits above. Nothing gets measured. Read the design, work out where the growth comes from, and the heights follow.
It sounds vague and it is the opposite of vague. Follow it consistently and a finished panel looks organic, which is the word people reach for when they cannot say what is right about something. Carvers have been arranging shapes this way since long before anybody wrote the reasons down. Ignore it and you get a set of leaves at arbitrary heights, each one competently carved, and the whole thing looks like a catalogue. Rhythm and movement belong to ornament the way they belong to music.

I add a twist at the tip of most of them, so one leaf points into the next and the eye gets handed along. That is the cheapest trick in this entire trade and it works every time. You will find the same handoff running through the lesson on levels, where it is the background doing it rather than the leaves.
Why leave the undercuts?
The leaves that will sit over the basket are not carved yet, and undercutting the basket now means undercutting round shapes that do not exist.

The order is main forms first, everywhere, then final cuts everywhere. Once the leaves have their shapes I go back to the basket, undercut the straps where the leaves cross them, and the weave suddenly reads as passing behind something solid. Do it the other way round and you undercut twice, the second time on wood that has become far too thin to take it.
This is the same reasoning that keeps me from finishing the corner in the lesson before this one, and it is why a panel like this looks unfinished for a very long time and then finishes quite suddenly.
The slip that did not cost anything, and the one that would
Early in this session I ran a cut the wrong way. Dumb was my word at the time. It cost nothing at all.

At this stage a wrong cut is forgivable because there is still material above it, and the pass that follows takes the mistake away with it. Sweeping movements rather than forced ones keep it that way, and when a cut starts to fight, the honest move is to stop, outline it again and come back. That will not be true in three weeks. Make the same error on a finished surface with nothing left underneath and the piece is done, and no amount of skill afterwards changes that.

Stakes climb as the work goes on, which runs exactly backwards from how most people carve. Careful at the start when nothing much matters. Confident at the end when everything does. I rush as well, on camera, and knowing about it has never cured it. Putting the mallet down earlier than feels necessary is what actually helps.
One small habit worth stealing
Every tool on my bench lies with its blade pointing toward me. Not one of them the other way round.

The reason is that I can read the sweep and the size at a glance without picking anything up. Looking down at forty handles tells you nothing. Looking down at forty edges tells you exactly which gouge is where, and over a day that saves a surprising amount of time and a great deal of irritation.

It also means I grab a tool by the handle with the edge already facing away from my hand, every time, without thinking. Small habit, learned from somebody else decades ago, and I have never gone back.
The rest of this basket, the leaves over it and the undercuts that make the weave read, run on through this course inside the school. It began with a board seven eighths of an inch thick and some glued offcuts, which is still the part people find hardest to believe.

How it's done
- Mark every crossing in pencil before you start. Over here, under there, alternating the way real basketry does. Settle every crossing before a tool moves, since this is the part of a weave nobody can repair later.
- Outline with a V tool. A number 16 at three millimetres to begin with, six where the run is longer. The tool lifts a shaving out instead of wedging its way in, so a narrow strap survives.
- Keep the grooves at three sixteenths. An eighth does in the tighter spots. Past that the surface stops reading as a weave and starts looking like a field of humps.
- Use the mallet while you still can. A measured tap delivers known energy and stops. Later, when the straps are narrow islands, no blow anywhere near them is safe and it is hand pressure only.
- Shape the leaves with the widest tool that fits. Number 7 or number 8, a full inch wide, does a whole leaf in a few passes and leaves a surface wanting nothing.
- Put each summit where the movement starts. Read where the growth comes from, set the high end there, run everything else downhill. Where two leaves meet, the one whose movement arrives first sits above.
- Leave every undercut for later. The leaves crossing the basket are not carved yet, so undercutting now means cutting round shapes that do not exist. Main forms everywhere first, final cuts everywhere second.
- Go and work somewhere else. Then return, and take in the patch again before touching it. Most of my design changes happen in the first thirty seconds after coming back.
Frequently asked questions
Is it not more efficient to finish one area at a time?
Faster it certainly is, and it produces beautifully finished elements at the wrong depth. Your eye adapts to a patch you stare at, every comparison becomes local, and the depth you settle there drifts away from the rest of the board.
How do I decide which strap goes over?
Alternate them the way woven cane alternates, the rows staggered so no two crossings line up. Break that pattern and the eye catches it at once, because what you have carved is a lattice rather than a weave.
Why a V tool rather than cutting straight down?
A straight blade driven in acts as a wedge, and on a weave every strap is a narrow island with little holding it. The V tool takes a shaving out and leaves the strap intact.
What to carve next