

Alexander Grabovetskiy, woodcarver, School of Woodcarving · Published 2020
What does movement mean in wood carving?
Quick answer: Movement in wood carving is the direction a shape seems to travel, like a lobe sliding downhill or a part that grows from underneath and flips over. A carver keeps it or loses it one tool at a time, and a gouge a little too curved can be enough to stop it.
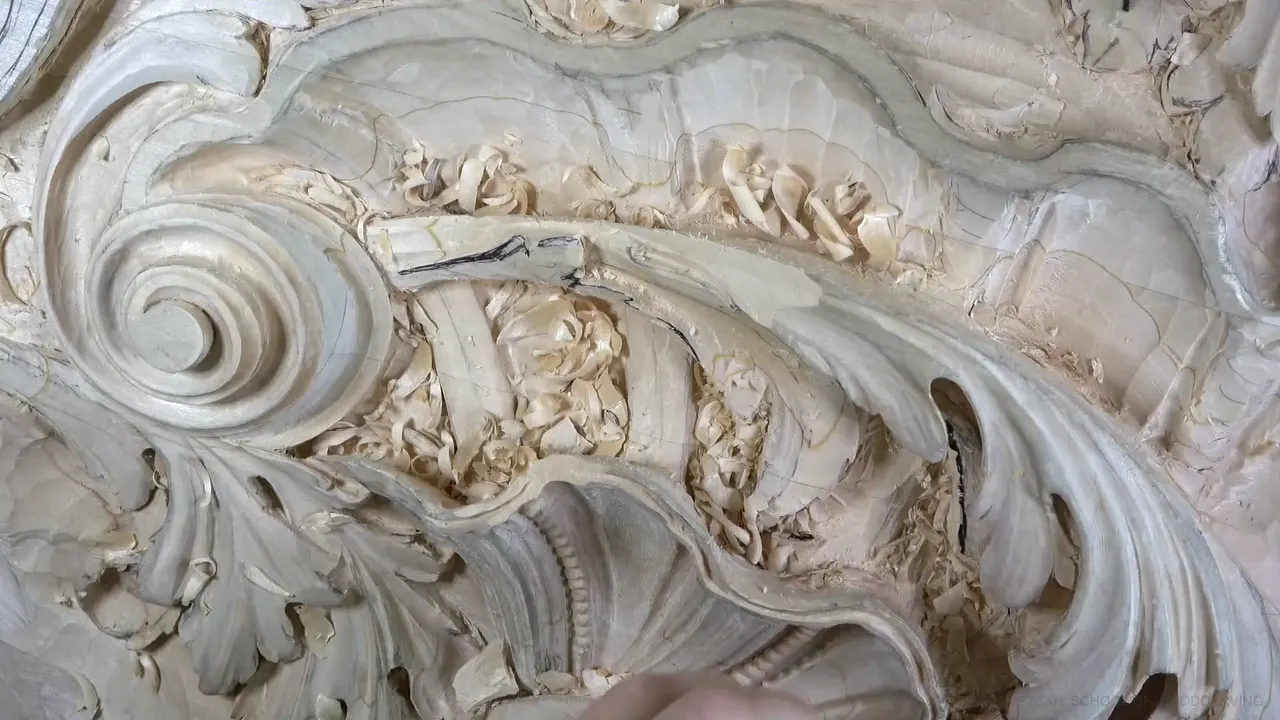
Movement is the way a carved shape seems to go somewhere. A lobe slides downhill. A small part rises from under the leaf, turns, and flips over its neighbor. Most of what you read about movement in sculpture is about a body twisting at the hips or cloth caught in the wind, and that fits a statue. On a leaf carved in relief, the question gets smaller and a lot stricter, because every pass of a gouge either keeps that travel going or stops it, and you often can't tell which until you step back and look.
Carvers say a leaf has good movement all the time, and it's fair to ask what they are looking at. I use that word more than twenty times in workshop 38 alone, working an acanthus section beside the shell on a ceiling board for a client. I'll tell you what I mean by it, what stops it, and about the gouge I picked up that was one sweep too round.
Six things workshop 38 shows about movement
A shape has movement when it looks like it travels, down a slope, up from under a neighbor, or over the top.
The main movement goes in first. Clean comes later.
A gouge rounder than the shape scoops it, and I call that oversweep.
A single hump is enough to stall a curve.
Inside pipes only need a shadow point.
A detail can make perfect sense and still come out, when it fights the design around it.

Is movement in art the same thing on a carved leaf?
Close to it, with one difference you only notice at the bench. Art teachers count movement among the principles of design, the thing that walks your eye through a picture. Sculpture books like to show it with contrapposto, a standing figure with its weight on one leg, so the hips and shoulders tilt against each other.
A leaf in a board can't shift its weight. It lies on its back in the wood, and it still has to look like it's going somewhere.
So by movement I mean a direction your eye can feel. While a spoon gouge took one slope down in the first part of this workshop, I said it has to feel like it's going gradually downhill, and that was the whole reason I was doing it that way. Later a small round part had to feel like it was growing from underneath and flipping over, and I shaped its side for exactly that.
Movement lives in the whole leaf at once, too. See how nice it looks in the overall, I said, right after one small detail went in.
Movement also sits among the ten laws in my design course, drawn out on paper. This page stays in my hands.


What goes in first, the movement or the detail?
The movement, and the detail waits for it. Halfway through, I could have stopped and cleaned everything to perfection, and I said as much on camera. For me the main idea comes first, the main goal, I should say, and that goal is to establish the main movement.
Earlier I had worked with only the smaller tools for a while, and I said why. To figure out the right movements. Part 1 went the same way. One area had to go down even more, substantially, because it just did not look right.
Part 4 brought me back to a section of the leaf I had left alone until the area around it was done. Now it could take a new movement, a small piece brought up from almost nothing, rotating, going right underneath its neighbor, with an eye. See how important it is to keep extra material for later, I told the camera. Details like that can always come a little later.
Carrying a convex over to another side is the same test. I had a really good one on the first side, beautiful, and my only worry was losing the movement on the far side. First, though, I cleaned the surface, because there were too many marks to see clearly and I didn't want to make the mistake of the moment.
Depth fools the eye along the way. At the start, one hollow in the middle looked really deep to me. Once I began developing the convexes beside it, it didn't look deep at all.
The stage where every movement gets its first shape has a name, boasting, and the page on boasting covers it in full.

What is oversweep, and how does it break a curve?
Oversweep is my word for a gouge that is more curved than the shape it's working on. Late in workshop 38 I chopped one spot with a number 3, carefully, because of the way the grain ran there. One side came out good. The other was a little too big, I said, oversweep. I probably should have used a number 2, maybe even bigger, so I wouldn't lose the overall movement.
A round shape sounds like a job for a round tool. I kept reaching for flat ones on this leaf. I shaped the main convex with a 10 mm (3/8 in) number 3. When another part needed its roundness, I asked for something flatter, a number 3 again. And to reach the bottom of one rounded part, I took a number 1 back bent, absolutely flat like a chisel.
Rounding can also go too far. On one lobe I stopped and said I didn't want to lose the overall feel, that it is possible to lose it, so I would not round it too much in that direction. For the excess on that spot I used just the side of a number 11, as if it were a 3 or a 2.
A hollow that looks flat and throws no dark line calls for the opposite move, a deeper sweep, and that lesson from part 1 is about exactly that.

Every one of these came up in workshop 38.
| The movement problem | How the board looked to me that day | The tool or move after |
|---|---|---|
| Too much sweep | My number 3 was too round for it | A number 2 next time |
| A leftover hump | A little hump sat on the inside there | 16 mm (5/8 in) gouge |
| A stiff line | One line just looked a little too straight | Moved it over that way |
| A loud pipe | The inside pipe only needed a shadow point | A spoon, barely touching it |
| A misfit detail | It made sense but not in this design | Gone, with an extra eye |
| Too much rounding | Round it further and the overall feel goes | Stopped rounding in that direction |

Which sweep keeps a rounded line flowing?
The one that fits, and on this board I found it by trying. Near the end of the workshop one movement needed fixing with a bigger tool. I tried a number 2. Too big. Number 5 would not work either. The number 3 did. Earlier, on the main convex, one tool was a little too small, so I went a little bigger to make it look nicer. That is actually wonderful, I said.
What I was after, I said, was a nice line, like a tangent line, and in three dimensions it has to be tangent too. Tangent means one curve leaves another with no kink where they meet. You can't see that very well through a camera, and I said so.
Judging a flow line by turning the work is its own skill, and this lesson goes through it. For a long curve begun with almost no depth, see workshop 17.

Can one small hump stop a whole curve?
One did, on this board. Near the end of part 8 I needed something to clean the inside with, and a bigger gouge, 16 mm (5/8 in), took out a little hump. When I looked again there was none, and the line went really nicely, flowing all the way. Then I could take that concave the whole length.
A line can go wrong the other way too. Early on, one line didn't look too nice to me, so I moved it over a little. Otherwise it looked a little too straight.
Some fixes are barely fixes at all. I told the camera I was almost just shaving, and that it still made a big difference. One lobe had a concave showing right at the edge. I blended it out. You probably couldn't see what I had just done, I said, but it gave me more shadow, deeper shadow.


Should the inside pipes move as loudly as the main one?
Quieter, on this leaf, and on purpose. I wanted another pipe on the inside, and I said it would not pop out like the first. Distinguishable, but not extreme.
Making that pipe left a ridge I didn't need. I said so, and said it was the only way to do it anyway, because I needed that side of the pipe. The ridge came off with a number 1 back bent, one with no curve across its edge, like a back bent chisel.
All I was making, I told you, was the idea of the pipe. I blended it to almost nothing. You almost don't see it, but I think that detail makes sense.
For the concave beside it I switched to a spoon and barely touched the wood. All I needed was the shadow point. I didn't need to exaggerate those pipes in this case, and I said it twice.
On another lobe I gave the movement a letter S, and I talked about slight ridges to carry that movement to the eye. A slight concave next to one pipe made the pipe easier to read. The letter S, I mean. I know the way I say it sometimes sounds bad.


When does a detail that makes sense still have to go?
When it fights the design around it. In part 4 I looked at one piece of a movement, didn't like what I saw, and said I would change it that same day, take it out, and give an extra eye there instead.
When I did take it out, I stopped myself halfway through the sentence. It does make sense, don't get me wrong. I just didn't like it in this context, in the overall design. It also opened a spot for the shell. On the new piece, though, I kept a third separation. Two would have got by, I said, but I still like to see three, and it's more accurate.
Extra details can tempt you the other way. Later I wondered out loud about giving one section another eye. Sometimes those extra details make sense, I said, but in this case it didn't make much sense, so I only chopped a little off and made the section narrower. In part 12 I thought about raising one flipping piece a little. It already flipped all the way over, which made sense. I didn't think I should.
Two movements that argue make a leaf look wrong, and workshop 26 is about that. Right angles stop the eye, a problem with its own page. Divisions have a rhythm of their own too, widest first and each next one a little narrower, and workshop 34 spends its whole time on that.


How do you start seeing movement in your own carving?
Pick one lobe and one direction, and carve only that until it reads. The detail can wait, the way I let it wait in part 6.
Clear the marks before you judge anything. I blew the chips off with a blower in the first part, cleaned my canvas in the second, and in the final part I took the marker lines away because they threw me off. I really need to see the edge.
When a gouge scoops something you meant to keep gentle, go one number flatter. When a line looks stiff, move it. And stop before you take too much. At one point I told myself my goal was not to take too much, because that would be a mistake.
Where the grain caught, I turned the tool and came at it from the other side, slicing carefully until the line where two passes met was gone. With a really sharp tool, I said, you can even go against the grain.
In the last part I chipped too deep, called it a mistake, and took it back half a minute later. There was no mistake, I said. Actually, it was good.
The client probably won't understand how hard some of this is, and I'm fine with that. It makes me happy to have a spot like that, one I know is really hard, and to be able to do it.

If you'd like to watch me make each of these calls as they happen, the tuition opens the whole room. Workshop 37 comes before this one and workshop 39 after it, the rest of part 4 runs through workshop 49, and part 3 covers workshops 26 through 37 in the same room.
How it's done
- Pick a direction for the lobe. Downhill, rising from under a neighbor, or rolling over the top, and rough in only that before anything else gets touched.
- Blow off the chips and clear away heavy marker lines. You need to see the edge.
- Round convex parts with flat sweeps. My main convex took a number 3, and a flat back bent reached the bottom of another rounded part.
- Go flatter the moment a gouge scoops. That scoop is oversweep. Trade the number 3 for a 2, and look again.
- Take out any hump. A wider gouge lifts it off, and then you look along the whole line one more time.
- Keep inside pipes to a shadow. Barely touch them. A spoon worked for me on this leaf.
Frequently asked questions
How do you create movement in a carving?
Give each shape one direction to travel, then protect it with every pass. Set the main movement before any detail, round convex parts with flatter sweeps, take out humps, and keep the small inside pipes quiet. On this board I caught a number 3 that should have been a number 2.
What does oversweep mean in carving?
Oversweep means the sweep of a gouge is too round for the surface in front of it. I used the word in workshop 38 after a number 3 came out a little too big on one spot, and I said a number 2 would have kept the overall movement.
Can a carving have movement before it is finished?
Plenty of it, and it should. The main movement belongs there while the surface is still rough, and detail follows. Partway through workshop 38 I said I could clean everything to perfection, but the first goal was to establish the main movement.
What to carve next