

Alexander Grabovetskiy, woodcarver, School of Woodcarving · Published 2022
Do you draw the motion line on a petal before you carve it?
Quick answer: Yes. On screen, in class 8 of my Maine course, I drew a movement line through the middle of a petal and warned the class it would not show on the carving. The number 9, 10 mm wide (about 0.4 in), cut the first concave there. It only indicates the overall movement, and then it disappears.
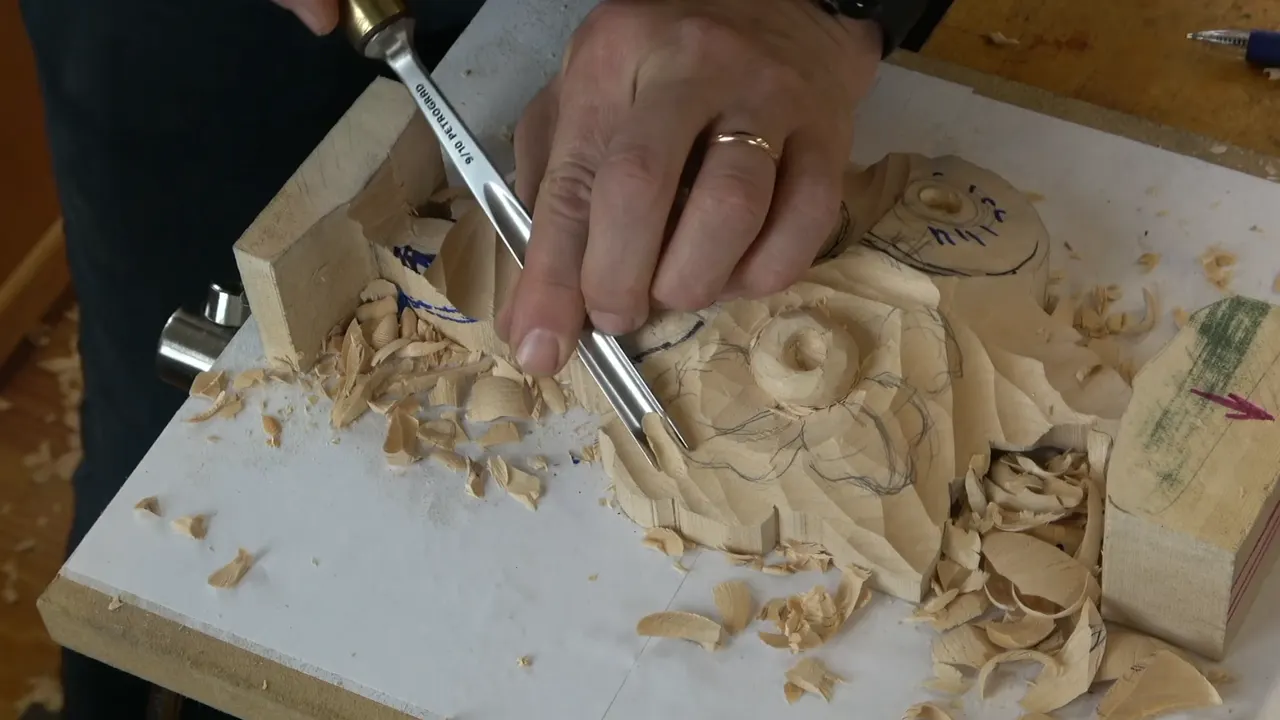
Yes, I put the motion line down before I carve a petal, and then I carve it away. In class 8 of my Grinling Gibbons class in Maine, I drew a line down the middle of one petal on screen. I told the class they would not see it on the carving. I cut my first concave right along it, and that line is going to disappear.

Have you ever carved a petal with clean edges and a good outline, and still felt it was stiff? Maybe the cut was fine, and your eye just had nowhere to travel. This page follows one petal in relief, starting with the drawing and ending at the first cuts. It shows what I do with a line that has to disappear.
Inside you get my words about the center part, which tool made the first concave, and why I picked a bigger gouge for the blend. Later comes the same line as it turns up in my other courses. Short on time? Read the list below, then the table. All of it is wood carving that has to look like it is moving.
The motion line in six lines
- I draw one bent line on the petal that shows the overall movement.
- The line is for me, and it disappears.
- A straight line looks bad, so the movement must travel.
- Ten millimeters wide (0.39 in), my number 9 starts with a concave along it.
- I overdo the movement on purpose, and a bigger gouge blends it afterward.
- Redrawing is easy, so I redraw.
Do you draw the motion line on a petal before you carve it?
I do. In class 8 I stopped carving, asked the class if they could see my screen, and explained how the petal is supposed to look. That drawing is where the line lives.
The cut after the drawing was a number 9, the same tool I had used before. Its width is 10 millimeters (about 0.4 in). I made the first concave along my motion, and I asked the class to look at this motion line.

Next I explained what becomes of it. That motion line will disappear, I said, but I really want to exaggerate that motion right there. So the line is a plan for one cut, and then it is gone.
What does a motion line mean on a carved petal?
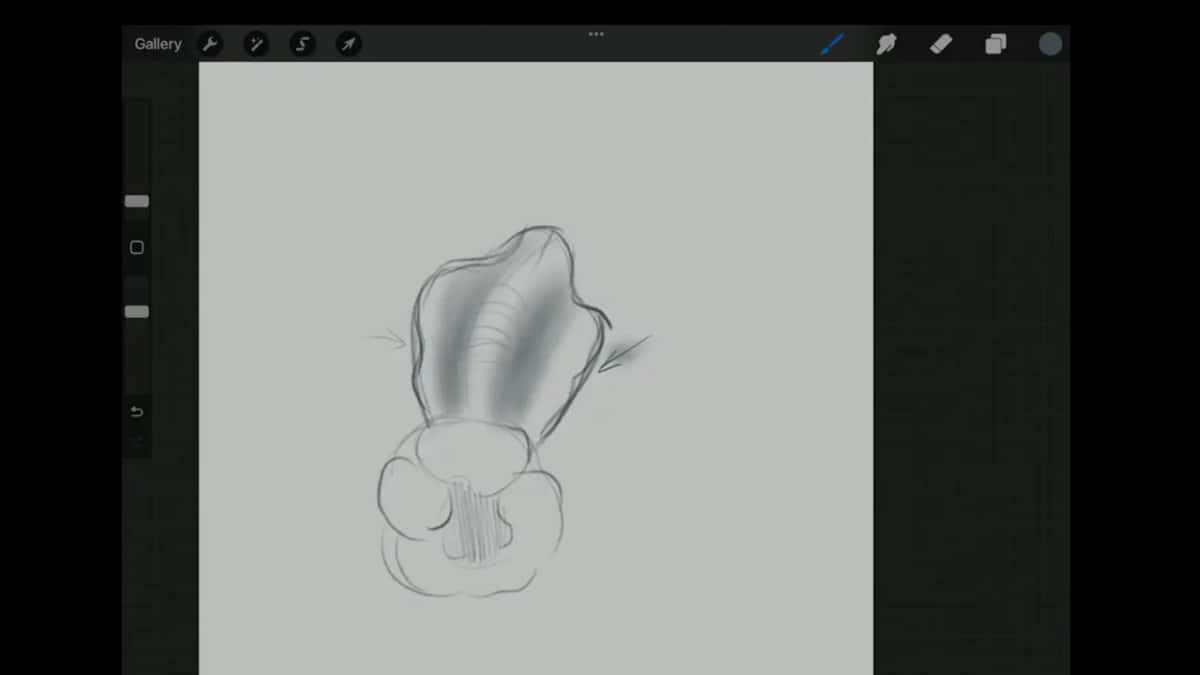
A center line drawn through the petal that nobody sees once the carving is done. Up on the screen I explained that the movement on the inside has to be some kind of motion, and not a straight line. That is the center line, I said, which you are not going to see, and I am only giving you an indication of the overall movement.
Notice the word I used. An indication, in my own words, and not an outline.

I added that the petal is supposed to curl, but it is more than a curl. The whole motion should feel like it travels in a direction. Draw that line straight, I warned, and it will not look nice.
Why not run the middle of a petal straight?
A straight middle does not look nice. Both videos say so. In part 8-2 the center part, I said, is not supposed to be all straight. Understanding how the petal will look is really important, first of all, and waviness is really encouraged.
Near the end of part 8-1, I came at it from the other side. Childish petals are out, I said, and so is a middle line that is straight like that. I wanted movement, and I really don't want to see that.

Earlier in part 8-1 I had warned that petals are not supposed to be just an arc, so they have to be wavy. Then they look nice. I also mentioned a 60 40 rule, the golden ratio, and said the next petal can move together with this one.
Each petal gets its own wave, then, and the five on one flower do not have to match. Waving creates a more beautiful look, I said, even when they differ. The class 8 page tells how the overlaps run, and this page stays with the line.
How do you show a bulging petal on a drawing?
With shading, and with a second color when the first one is hard to read. At one point I chose a different color, then a darker color, just so the class could understand what I meant. A little later I told them they should see that better.

The drawing had to show the edge and the middle. The edge of the petal is slightly raised up, I explained, while the middle part bulges. Inside that bulge sits another slight concave, right in the middle of that center part.
The center part of the flower follows the same idea. I divided it in five, like five petals together, and called it bulge and bulge. Was the picture helping? I asked, as it is easier to understand that way.

Which cuts follow the line?
Two concaves first, then a bigger tool. The first concave follows the motion line, cut with that same number 9. Number one cut, number two cut, I counted.
After those I took a bigger gouge, three quarters of an inch (about 19 mm) wide, and made another cut this way. My reason was simple. A bigger tool makes it a lot easier for me to blend later.
Blending came next. I did it quickly with my number 2, only to show the bulging part, and I wanted to get rid of those facets. That tool turns the first cuts into a surface.
When does the line go on, before or after the first cuts?
Both, and more than once. Part 8-1 did not start with petals at all. I made the plug cut in the center of the flower first, about a quarter inch deep (about 6 mm), then excavated around it and rounded the center. Only after that did I pick up my pencil.

I sharpened that pencil on camera. Now I would redevelop my petals, I announced. Roundness came first, I told them, and only then did the petal lines follow.
Before that pencil came out, the center got its shape from a number 7 held upside down, at about 45 degrees, and not 90 degrees to the cut. That gives a much cleaner cut, I explained, and I worked cut by cut, with no long passes. A flat donut was out there, since the center has to be full 3D.
Redrawing was no worry. Plenty of material was left, I said, so I can always redraw the stuff. I have absolutely no problem redrawing the movement.

Does a petal that rolls backward keep the line?
It keeps its waviness. In part 8-3 I wanted one petal on the second flower to flip backwards, and straight was not what I wanted. The roll gave it motion.
The petal that rolled over was still the same petal. Waviness had to repeat on it, and I wanted to make sure of that.
The flower's own center asks for the same thing. For that center I held a number 11, 3 mm (about 1/8 in) wide, upside down, and said it creates a really waving look. My aim, I said, was exactly the same shape that I see on the outside, or approximately the same.
| Where | What I called the line there | What came next |
|---|---|---|
| Gibbons class 8 | a motion line, also a center line | first concave along it |
| Corinthian lesson 3 | a main movement, called the flow line | all lines go there |
| Roman lesson 1 | my flow lines, and my main points | all go to center |
| Cutting board 4 | flow line, spelled F-L-O-W, flowing all together | same line for everything |
| Lily Box 4 | I call it a flow line here | kept tangent to edges |
| Venice workshop 32 | a nice flow line, an invisible one | placed the eye there |
| Venice workshop 50 | a main center line, plus a second | drawn with a marker |
| Hashemi lesson 14 | just the flow line, which I fixed | fixed it, looks better |
Is the same line called something else in other courses?
Mostly the name there is flow line. The Gibbons class in Maine uses motion line and center line, but the habit is the same. You draw an invisible line first, and you let every cut answer to it.

Early in one video of the Corinthian leaf, lesson 3, I redrew my main movements and main divisions. That main movement gets a name, the main flow line. Every other line across the leaf leads back to that one center, which I called the center flow line.
Does every line of a leaf have to reach the center line?
On that leaf I called it a law. Everything runs to the center line, and the law applies beyond the acanthus leaf, to most of the foliage carving. Of one spot on the drawing I said that is a T-stop, and it should not go like that.
The Roman acanthus course puts it differently. To work symmetrically, I explained, I have to establish my flow lines and the main points of my leaves. Every flow line heads for the center, meaning one line and one movement.
Beginners got the same rule in the cutting board course. When I say flowing, almost every line should end on the same line. I called it one of the really important rules in wood carving, especially ornamental.

Why do I call it a flow line?
The name comes from everything flowing together. In the beginner cutting board I stopped at one spot on a line that should flow continuously and was not that nice. Later I would check everything and recut with a single pass, until the whole thing was one continuous flow line.
Then I spelled it for the class: flow, F-L-O-W, because it is like flowing all together. Everything heads for the same line.
What do you do when a cut breaks the flow line?
I stop and fix it. On a Hashemi flower, in lesson 10, all I had to do was fix that flow line. Later in that video I was still not happy with the movement, and I said the flow line had to be really straightened now.
A ribbon got the same check in lesson 14. Back then I did not like the flow line. Soon it looked better. So the flow line is good, I said.
Lesson 15 of the cutting board course shows the same eye at work. I saw a little bubbly area that was not really flowing, since it did not belong to the main flow line. I said I would recut it, and added that it takes fresh eyes.
Lesson 7 of the Roman acanthus leaf has a spot where my flowing line was not that nice. My plan was a back bent gouge, since it is just easier to reach.
Some of this work stays out of sight. At the floral panel I cleaned under a detail with a small number 3 spoon while I established the overall flow line. There is no way I can show that with the camera, I said, so I just made a really smooth transition downhill.

Can the line stay invisible and still guide you?
It can. In workshop 32 of the Venice Room I described a really nice flow line, an invisible one. The position of the eye has to flow together, and I placed it somewhere right there. Then I stopped to draw the right movements, because the main movement, a big chunk, did not look right to me yet. I wanted much better development, and I thought I might widen it.
By workshop 50 I had picked up a marker to draw an idea. That would be my main center line of the movement, I said, with another center line beside it. I did not want to lose the overall feel and the dimensions of a big chunk of wood.

A Hashemi flower, in lesson 3, asked for it too. That spot also needed a flowing line, so it was not just straight down. At the Lily Box I cut a concave and made sure I was not losing the line.
That flow line had to stay tangent to the edges on both sides. The first layer of that box, in lesson 3, talked about a flow line in the middle of the leaves.
Where does this line fit in the Gibbons panel?
Back in class 7 I carved the tulip as the highest spot of the panel. Class 8 is where I worked on two flower centers and their petals, drawing the movement on screen and on the wood.

The whole Grinling Gibbons course goes cut by cut through this panel, and the next parts of class 8 keep working these petals. You can start the class with tuition whenever you are ready.
How it's done
- Show the movement. A bent line across the petal shows the overall movement, and it is not straight.
- Make the middle bulge. I plan the middle part as a bulge, with the edge slightly raised and a slight concave inside it.
- Cut along the line. Next comes a concave right on the motion line, cut with the number 9.
- Cut again with a bigger tool. A 3/4 in (19 mm) gouge takes the next cut, which blends more easily.
- Blend the facets. A number 2 gets rid of the facets, and the line quietly disappears into the surface.
- Redraw when needed. I sharpen my pencil and redevelop the petals, since I can always redraw the movement.
Frequently asked questions
Is it worth sketching a petal's line if it vanishes?
I think so, on a screen or in pencil, and the class hears up front that it will disappear. My number 9 at just over 3/8 in (10 mm) cuts the opening concave right on it, and the motion gets pushed further on purpose.
What is the center line of a petal for?
Where the petal travels is what the line shows. Nobody sees it once the carving is done, and it keeps my middle from running straight, which I do not like.
Why use a bigger gouge to blend the cuts?
Blending later is a lot easier with a bigger tool. For the next cut I used one 3/4 in (19 mm) across, and a number 2 removed the facets.
What to carve next