

Alexander Grabovetskiy, woodcarver, School of Woodcarving · Published 2020
What does a wood carver mean by "at night"?
Quick answer: The phrase at night comes from my Venice Room 90.1 video. I used it over a ridge you almost cannot see in a floodlight, and I said a big difference shows up at night. In the same video I said I have two lights, pointing from two positions.
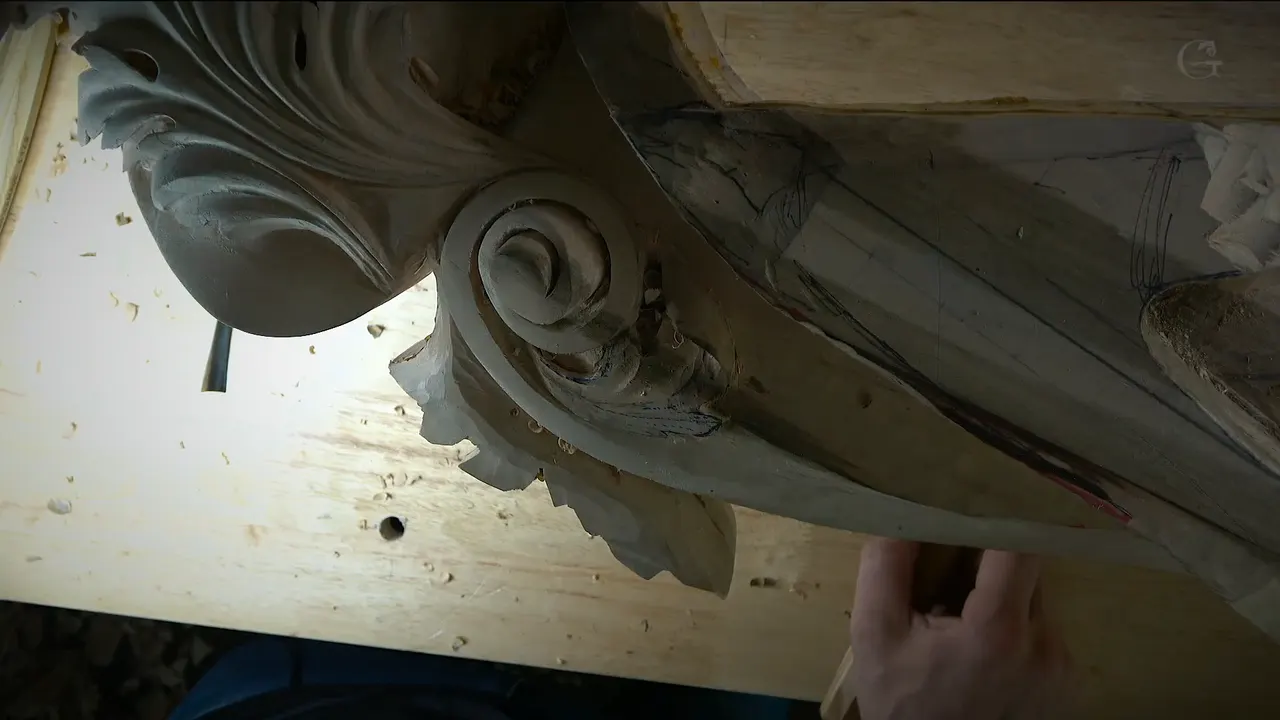

At night is what I said in Venice Room 90.1, over a small ridge that is almost invisible under a floodlight. I told you the difference will be big. Further into the video I talked about my lights, which have two temperatures and can be dimmed down.
Have you ever carved a line in a bright shop and then pictured it in a dim room? Did you ever move a lamp around just to see one cut? Then you know the spot where I said it. Below is that moment in workshop 90, and then my night lines from other wood carving lessons, each with its own link.
What the night lines cover
- A small ridge that hides under a bright light.
- A tool for another concave cut, and a bigger one for a separation, with the size said out loud.
- Ridges for the triangles, and none in the middle.
- Two lamps that warm up, turn to daylight or dim down.
- A room that I said will be most visible at night, and lights installed behind it.
- Ceiling, side, window and top light in my other lessons, plus the lamps from my livestream.
What did I say about the ridge in this part?
The part opens on a ridge. "Just that you don't probably see, but I just created a small ridge." Then came "Let me play with the light, and you can see that," and "You should be able to catch it right there."

I called it "almost invisible when you just shoot the floodlight," that little ridge. That brings up the line this page is named for. "But at night, it's going to make a big difference."
Next I planned another concave cut on that side, with a tool of 10 millimeters (3/8 inch). The separation needed "a little bigger one," I said. The frame below comes from that stretch of the part.

Another ridge showed up, and I said it was "also like a micropipe in every separation." And then "Like I said, that is the separation." That's what I'm referring to, I said. Attacking that spot from the opposite side, then blending, was the plan.

This part, how it turned, I really liked. A couple more spots were left, but they would take almost nothing. Careful, I said.
Which ridges did I keep?
Only the ones at the triangles and the separations. In my words, those are "the only areas I want to see ridges."
Right in the middle sat a ridge I did not want showing, and I said it would be blended. I named the middle lines too, "this one, that one, and that one." None of them should show. All of it had to be blended.

Near the end I said "That is my acanthus," and that it looks good. The middle ridge still needed to come down a little, to be cleaned and blended. An extra concave right inside that one was possible too, I said, "if I wanted to," but "I don't really need it."
The last lines are about sharpness. "Maybe that little too sharp," I said, about the ridge. Sharp ridges were not what I wanted in this case.

How did I talk about my lights?
Light came up next. "I've got too much light," I said, and then "Let me lower that down a little bit."
A longer line came next, with a reason in it. I really love those lights, I said, and I was talking about them "because it has two different temperatures." One look is "really warm" when I work at night, another is "completely like a daylight," and I can also get dimmed light, so almost no light but still able to see.

Not like that you have to buy it, I said, "but it would be really good investment." I have two of those, "pointing from two different positions."
Two more lines on the light followed. I need to dim it a little bit more, I said. I don't need that light too close. I wanted to check whatever position gives me better shadow, so I can see where to go with my tool. Here you go, I said. "And now I can start blending."

Where did I say night in Venice Room Part 1?
My early lessons on the room say it plainly. They sit in the first course of the series, and each one gives a reason.
In workshop 5, video 10, I worked with a number 11 veiner at 3 millimeters (about 0.12 inch), and said a number nine would work too. I'm not limited to one, I said. The depth, I said, is "all about the shadows." The whole room will be a bedroom, and at night lights will sit installed behind, dimmed down, and everything will cast a beautiful shadow.

Workshop 8, video 8, begins with a design note. I had to keep in mind that the room will be "most visible at night." A back bend, I said, is probably a good idea for undercutting. "With the back bend, I can go really deep and nothing is in my way." Still, I said, I have to keep it strong.

Over in workshop 4, video 9, I said I wanted to go "exactly the same, about an inch and a quarter, inch and a half on inside" (about 32 to 38 mm). That will give me a beautiful shadow, I said, especially as it's inside of the room. Next came a correction. "At night, not at night, but at evening, it's going to cast so much depth."

Checking is what workshop 6, video 4, is about. Right before that came a remark that I did not like how something bumps out right there. Sometimes I have to check under different lights, I said, because a shadow can hide what is going on. "So very often I just go back and just check that under a different light condition, like at night, and I just turn one side, and I turn another side, and I can see exactly what is going on."

How did I place the light in the Part 2 lessons?
Over the second Venice Room course the light comes from different places. I made a concave in workshop 15, video 1, and said "that's about the shadows." I knew the position of the room and the light source, hitting from one side. The source, I said, was "exactly like I placed my lamp." So the concave would throw extra shadow in that direction, and that way, I said, it is going to look really nice. If you ask me why I make that concave, I think it is going to be really good.

I weighed a deeper concave next. Maybe I should do more with the smaller number eight, I said, and make it even bigger.
The reason I was making something a little lower, I said in workshop 16, video 7, was that I really wanted to see this future pipe. If the light at night goes from the ceiling, "I really want to see that exaggeration, that shadow right here," I said. Probably I would exaggerate that pipe even more, and I was not sure if I should get even deeper.

Workshop 17, video 4, has the same thought from the other side. The shadow there would be visible from the bottom, and the light would hit at night from the top. Exaggerating it with the 1 millimeter (about 0.04 inch) was possible, I said.

Where else did the light come from?
I planned to excavate kind of deep in workshop 41, video 5, for a shadow line, because the light source would come from the side. My bigger number 11 was 18 millimeters, "almost three-quarter of an inch" (about 0.71 inch). From the far part of the room you see the overall movement, I said, but lying on a bed you would not see this part. It still creates some shadow.

Moving the lamp is the subject of workshop 54, video 11. The deeper the excavation, I said, the darker the spot. Plenty of people carve without deep excavation, and it looks fine, but the deeper you get, "a much more dimension you're going to show." Then "let me, for example, change the light source just to move little bit." Those spots cast really deep shadows, and where you put the light changes the look of it.

The basic stuff, I said in workshop 64, video 12, is to understand, before I start drawing, the light source and what shadow it will cast. How the light travels, and how many sources I have. The places I listed were from above, from the window, from the side, from the door opening, interior light, and a light at night. "So I have to consider all of those lights." A little later an opening ran all the way through, a beautiful effect. I did not want to lose the detail underneath. It still had to be outlined. I would use a number 11 veiner at 3 mm (about 0.12 inch).

Daytime shows up in workshop 97, video 7. Early in that video I said the light would strike from above, cast a shadow and be visible, of course, from the bottom, and that I have to be careful how deep I go. A number 11 at 5 millimeters (about 0.2 inch) was my plan for outlining. Later I said people might look at the piece not just at night but in the daytime, with the windows as the source, shooting straight at it. It would still cast some shadow, but "during the day, not at night." Then "Does it matter? I think every little bit matters." I could create a much deeper area, I said, maybe all the way half an inch (12.7 mm) or so.
What I was doing in workshop 101, video 3, I said, is "a light and shadow game or light and shadow play." By day, the source is windows and open areas. Our ceiling is the only source at night. The shadow by day is "not as deep as at night." I added "At night, it should be more dramatic, I should say."

Which lamp did I show in my livestream?
In my April 2020 livestream on lighting a wood carving bench, I talked about a carved pipe just before the lamps. A pipe, I said, is a raised, convex part where the leaf folds, and I made it exaggerated for the shadow I wanted. The light hits from a source above, I said, and when you change the source it casts a different shadow.
Next, the lamps. I use magnifier lamps and have two of them. From any point on my workbench, I said, I can place them and cast any type of shadow. Natural light, especially light from above, keeps you from seeing all the cuts and facets. So the best idea is at least one light, and I encouraged you to get two if you can afford them.

The lamp changes color, and I said I can make it yellow and get rid of white completely, "and I can work at night without getting tired." The brain comes into it too. During daylight, I would say, you concentrate better with a blue light. When night comes, I said, your brain is "switching to night brain work, I guess," and you react more to the orange. You get tired quicker because of the hormone melatonin, "but your eyes, you're not going to get really tired."

Light is something I can dial, I said, even really bright if I want to. Up close, those lights let me work on micro details, and I can see a lot better, almost like you see on the camera.
Which of my videos carries which night line?
| Where I said it | What I said |
|---|---|
| Over a small ridge, 90.1, in a floodlight | a big difference |
| My lights, also in 90.1, with two temperatures | warm look, daylight, dimmed |
| Cutting deep in 5.10 with a number 11 | lights behind, dimmed down |
| A design note on the room, 8.8 | seen mostly at night |
| Going deep on the inside, a design for the room, workshop 4, video 9 | at evening, so much depth |
| Checking my carving under different lights, workshop 6, video 4 | just turn one side |
| The future pipe I wanted to see, 16.7 | from the ceiling |
| A shadow I could exaggerate, 17.4 | hit at night from the top |
| Before any drawing, with every light source in mind, 64.12 | window, side, door opening, interior light |
| A deeper area seen from below, in workshop 97, video 7 | light from the windows, not from above |
| Ceiling light as a shadow game, from workshop 101, video 3 | more dramatic |
| My lamps, in the livestream | without getting tired |
Do you have a light that you can move, even a little? Does a ridge show when you turn the light? Then you already have what I kept adjusting in 90.1. Shall we carve?
How it's done
- Catch a small ridge in the light. "Let me play with the light, and you can see that," came in 90.1, and "You should be able to catch it right there." The ridge was small, and I said it was almost invisible in a floodlight.
- Decide which ridges stay. Ridges belong only from those triangles, I said, and wherever I had separations. The ridge in the middle would be blended, and so would the middle lines.
- Lower a light that is too strong. Too much light, I said in 90.1, and I wanted to lower it. Later I said I needed to dim it a little bit more, and that I did not need that light too close.
- Check another light position for shadow. Checking whatever position gives me better shadow, I said, lets me see where to go with my tool. After that I said I could start blending.
- Look at the ridge once more. In the last lines I said maybe the ridge was a bit too sharp, and that, in this case, sharp ridges were not wanted. The middle ridge was to be lowered a bit, and I wanted to clean it and blend it.
Frequently asked questions
Can a ridge hide under a floodlight?
A little ridge, in my words in 90.1, is almost invisible when you just shoot the floodlight. Then I said the difference at night would be big. I had just made it, and I asked you to catch it.
Which ridges did I keep in 90.1?
The ones at the triangles, which sit wherever I had separations on the part. Those, I said, are the only areas where ridges should show. None were wanted in the middle lines, so I said all of that has to be blended.
Which lights did I love in 90.1?
Lamps with two different temperatures. One gives a really warm look when I'm working at night, another gives daylight, and I can also dim them to almost no light but still able to see. A really good investment, I said, and I have two.
What to carve next