
Alexander Grabovetskiy, woodcarver, School of Woodcarving · Published 2021
What does a wood carver mean by "doable"?
Quick answer: In part 1 of workshop 105 the word follows my plan for taking wood off a sloping shield with a hand and a rotation motion, and my line about preferring a mallet. Lessons from my other courses set it beside a challenging grain, a second way to work and a way that is not my preference.

In part 1 of workshop 105 the word "doable" turns up while I talk through taking wood off a sloping shield, and my line about preferring a mallet. The same word turns up in lessons from my other courses, and I read each one with the lines around it.
Ever stood over a carving and wondered whether one spot was even possible? Or if your tool was wrong for it? This page starts at the Venice Room, in workshop 105 of my Part 9 course. Parts 2 and 3 of that lesson sit beside it. The rest come from other Venice Room workshops and from my Floral and Molding, Grape Onlay, Furniture Panel, Lily Box, Dining Table Apron and Chamomile courses. Every size is in millimeters and inches, my own figure first.
Where in workshop 105, part 1, does "doable" come in?
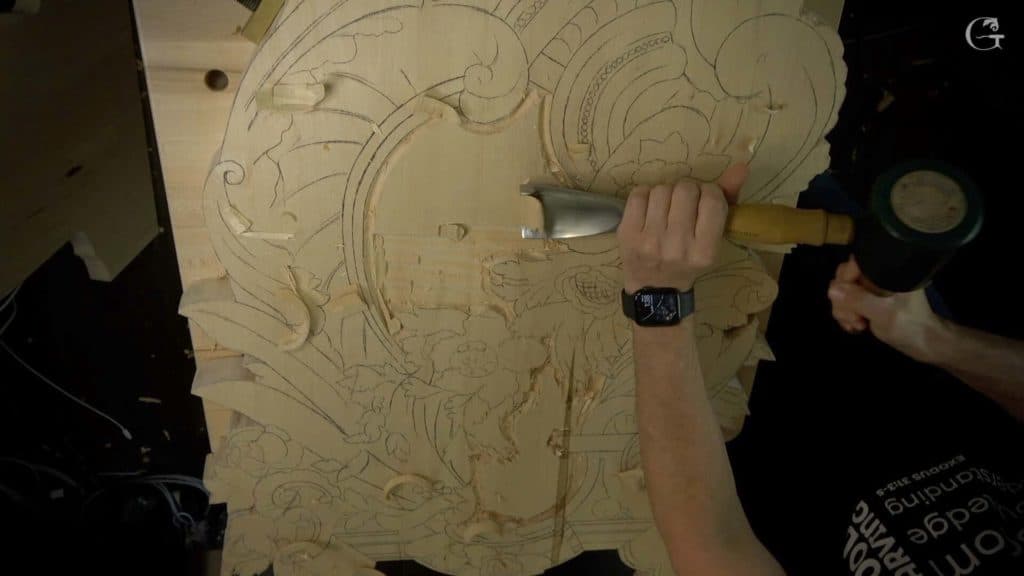
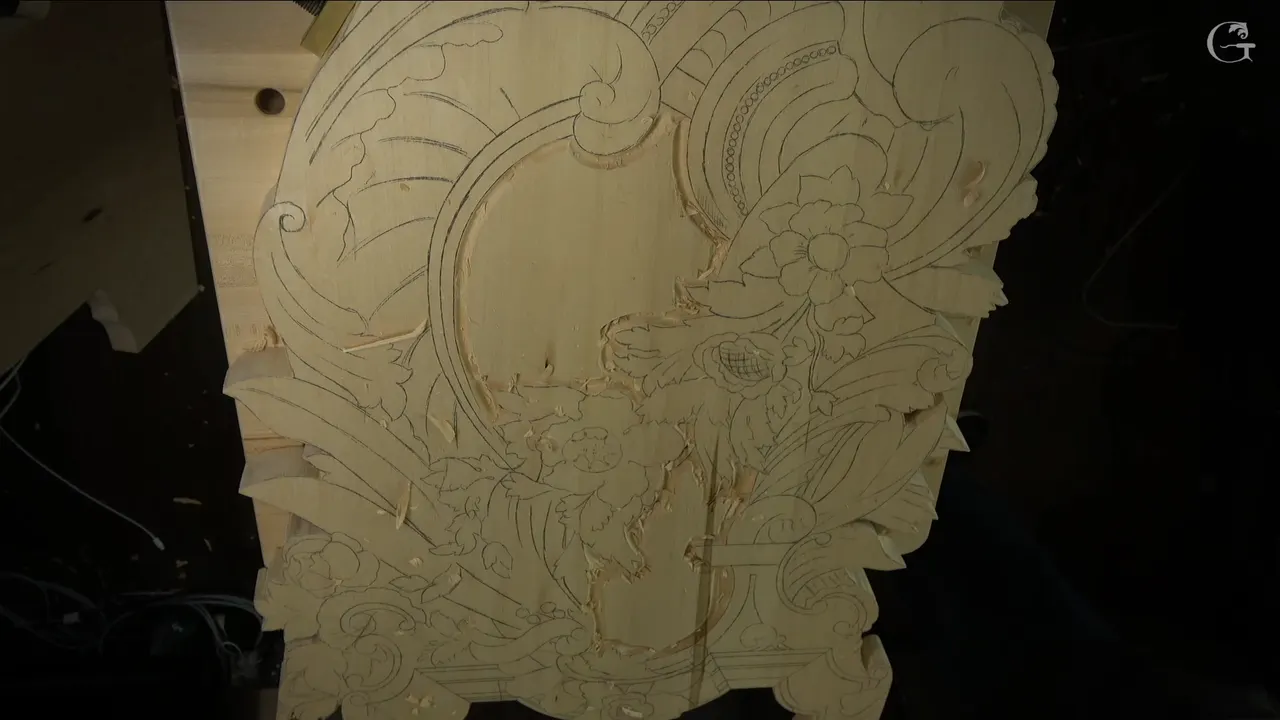
Here it sits inside the slope work on the shield, and the part opens on that work: "Okay, so I outlined everything, what I wanted to pretty much actually just the center of my shield. And now I need to take care, the sloping thing."
The shape comes next. My high spot is "right in the middle, somewhere right here" and the wood slopes downhill from it in two directions. On one side the flowers hide it: "I've got the flowers going on." The other side goes "downhill, but not as much."

Which tool did I name for the wood on the shield?
A number 9 comes first. "The easiest way to do that operation to remove that material, for me, would be just probably a number nine. Number nine and about 20 millimeters, I'd say" (0.79 in). The list grows right away. "But you don't have to use number nine," I say, and "okay to use pretty much number eight or even number seven."
A number 7 of 5/8 in (16 mm) is on the table for a moment. Then: "Or maybe actually, you know what? I'll use number eight" and "that would be about seven-eighths of an inch, almost like an inch or so" (22 mm).
The grain sets the direction. "And I always like the idea of removing the material across the grain." If the grain "runs that direction," I would "just probably attack that" across it.

What do I say about doing it by hand?
The mallet comes in here. "And again, so I can do that with the hand and make a rotation motion just like that, but it's going to take just a little too long. Okay? That's okay if you don't have a mallet, but I would prefer probably a mallet."
Then: "That way I can go right away pretty much whatever the depth I need." I am fine with going a little deeper at one spot, "because anyway it's going to be much deeper." And then: "But even by hand, it's still doable."

Next come my reasons for the mallet. "But I kind of like a mallet because it gives me much more control, I would say. I can control my tool, and I think it's much quicker. At least for me."
It does not have to be exactly the same tool I use, I say: "Whatever you have, you can do with any type of tool, with the number nine or whatever, number 10 if you have." I do like big ones, though: "probably I'm going to use just my huge number seven. Number seven and three inches. Three and one-eighths, to be exact" (76 mm and 79 mm).

How deep is the shield by the end of part 1?
The background is 3/8 in deep now (9.5 mm), measured "from this point to the background," or "about 10 millimeters" (0.39 in). I touched an edge: "I was too aggressive and touched that." To me it is not a big deal, because that part will be lower, and still "I should be a little more careful."

The opposite side has to go deeper. "I'll get 10 millimeters more, so which going to make me about three-quarters of an inch, about 20 millimeters or so" and then "I'll see how it feels." That is a plan, and so is the tool: "number 11, and 10 millimeters" (about 0.4 in), with the "same mallet," about 30 ounces (850 g). For the pass itself I say "I'll go much, much deeper."
The last lines are about the edge: "Now, I am staying away from the edge a little bit, maybe about three millimeters, two millimeters, or so" (0.12 in and 0.08 in). My reason comes next: refining a little later will be "a lot easier."

What do parts 2 and 3 of this lesson add?
Part 2 opens with a doubt: "I think I've got approximately 20 millimeters to the lowest spot, but I'm not sure if I like it or not, if it's enough or not." Part 3 gives another size: "All the way 30 millimeters, I think" (1.18 in). Neither of them has the word "doable."
When does "doable" sit beside a spot against the grain?
Workshop 24, part 12, has a warning about the grain. I mention "the grain direction" and then "Yes, I could attack that from that side." The word comes later in the part: "It is not too convenient, but it's okay. It's still doable."

Workshop 5, part 5, calls the area challenging, though that "doesn't mean it's impossible to do." The grain is why, and I still call the spot "doable." Afterward I plan to come back and clean it better.

The spot in workshop 9, part 4, gets the words "a little tough area because of the grain." Then: "But it's okay, still doable." Next: "But see, it's catching right there." My words after that are "I have to change the direction" and later "Let me push those fibers in."

Workshop 22 gives the word to a small detail. "It's a little challenging area, but it's not undoable, okay? It is doable, and that's it." I add that I am not going to do too much to this small detail, just clean little better movements, and I name a number 7.

Over in Venice Room 20, part 11, I name a number 9 at 3/4 in (19 mm). Then: "Now it's a little more challenging." The word follows, with "I'm still able to get my cut." The pass goes against the grain, and sharpness is my answer: "if I got my tools really sharp, it should not be a problem."

When does it sit beside an awkward place?
Workshop 35, part 2, has a tool that is wrong for the job: "this tool is not going to fly, so I have to use something different. Maybe number three and really blend that in." A position matters too: attack it "from the right position." The spot is not convenient, I say, but the job is doable, and sizes come next: one millimeter or even two (0.04 in and 0.08 in).

Lesson 72, part 2, puts me on the side of a pipe, which is "not a convenient spot." My hands are the trouble, in "a really weird position." Then: "It's not undoable, but still." After that I say I should probably give "some more roundness" to this area before I create that concave.

When is it one of two ways?
Workshop 37, part 2, lays out two plans side by side. The lines are "I could leave this as a part of this movement, which is also doable, or I can take this movement down and get this one below." A hedged lean follows: "maybe I could just leave it like that."

Two pieces come together in Venice Room 127, part 2. "And yes, I could do either a pipe, or I can actually bring this piece a little bit underneath of that piece. It's also doable." Then comes a plan: "And let me do a main separation just right there."

Floral and Molding 1, part 3, asks: "So how do I approach it? There's a couple ways I can approach it." One way is attacking from the side, but "my grain, or the grain of the wood, runs that direction." The other way is to "start from above and create straight down cuts until I get really close to the line, and that's also going to be doable."

My pick there is the side first. "In my case, what I can do," is "take a side cut first" then "clean straight down." The tool is a number nine of 10 millimeters (about 0.4 in), and I warn myself not to create an undercut.
When is a doable way not the one I choose?
In workshop 30, part 4, the lines before the word are about "the mess I just created." Then: "And yes, I am using number 11, but it doesn't have to be number 11. It could be number nine, number eight, number seven. That's absolutely doable." My reason for the 11 is "really nice smooth transition" and I add "in some spots, I really don't care about that transition. All I care about is just the deep shadow."

Grape Onlay 7, part 1, calls a stabbing stroke with a flat gouge doable, in the same breath as "I'm not the biggest fan." The trouble is "spreading the fibers to the sides." My preference is number 11, and "sometimes it's all right to use it."

In Furniture Panel 21, part 5, the doable way is pressing a tool in without relief first, where "the metal is really thick" and the wood fibers get pushed both ways. My line is "I think it's doable, but it's not my preference." What I would do is "create preliminary relief cut" and I could go with probably 3 millimeters and then number 11 (about an eighth of an inch).

A saw is another way in Lily Box 13, part 1: "I could take it to the scroll saw and cut those spots. That would be also doable." My plan after it is "to do a rough shape," about a 16th of an inch down to a green line (1.6 mm), with a number eight gouge of 1/8 in (3.2 mm).

What else is doable?
Wood is the topic in workshop 8 of the apron course, where limewood, oak and chisels appear. The first line is "a little different when you're carving basswood or limewood." Oak is different too. Then: "Of course, oak is a little harder on tools, but it's doable."

Color gets the word in part 5 of that olive workshop, with tinting as the subject. "Universal tinting is actually better than any acrylics because it doesn't cover the grain of the wood." Then: "It's possible to do with just children's paints, like water-based paints. So it's also doable." Acrylics are in that talk too (acrylic paints).

A whole piece can be doable too. In Chamomile and Bow Rosette 1, part 1, I hold up a detail and call it "small, doable, and you could utilize some elements in furniture."

Where do the frames come from?
Every picture here is a frame from a lesson named on this page. Most of the shield pictures are from workshop 105, on the Part 9 course page. The rest sit beside the lesson they match.
All the lessons side by side
| Lesson and part (all Venice Room unless a course is named) | What the word sits beside |
|---|---|
| Lesson 105, part 1 | Slope work, by hand or with a mallet |
| Workshop 24, part 12 | A side where the grain calls for care |
| Workshop 5, part 5 | A spot with difficult grain, and a plan to come back and clean it |
| Workshop 9, part 4 | A tough spot from the grain, with fibers to push in |
| Workshop 22, part 12 | Small detail, not undoable, with a 7 |
| Workshop 20, part 11 | Three-quarters of an inch (19 mm), and sharp tools |
| Workshop 35, part 2 | A tool that will not fly, so maybe a number 3 |
| Lesson 72, part 2 | Hands held in a weird position beside a pipe |
| Workshop 37, part 2 | One movement that could stay as it is, or come down |
| Workshop 127, part 2 | A pipe, or a piece that could go underneath another |
| Floral course 1, part 3 | The side first, or straight down from above |
| Workshop 30, part 4 | An 11, or a 9, 8 or 7, for a mess to hook out |
| Grape Onlay 7, part 1 | Stabbing stroke, a flat gouge, and an 11 I prefer |
| Furniture Panel 21, part 5 | A tool pressed in without relief, and an 11 at 3 mm (about 1/8 in) |
| Lily Box, workshop 13, part 1 | Scroll saw for some spots, and a 1/8 inch (3.2 mm) gouge |
| Apron course, workshop 8 | Oak, a little harder on tools, and a different feel |
| Lily Box, workshop 13, part 5 | Water-based paints as another way to color, in a talk about grain |
| Chamomile Rosette 1, part 1 | Small detail with elements for furniture |
Is there a spot at your own bench that you have not tried, because the tool or the angle is not the one you prefer? Everything in these lessons sits inside one tuition plan, and workshop 105 is the place to start. For a gentler first step, try the rosette course, Furniture Panel or Lily Box.
How it's done
- Find the high spot. At the middle of the shield sits my high spot, with the wood sloping downhill from it.
- Pick a tool. My easiest way is a 9 at around 20 mm (about 0.8 in), and an 8 or even a 7 is okay too.
- Mind the grain direction. "I always like the idea of removing the material across the grain."
- Reach for a mallet. Working it by hand is still doable. I like a mallet for the control.
- Stay off the edge. Staying away from the edge, maybe three millimeters or two (about 0.1 in), makes refining later easier.
Frequently asked questions
Where is the word in the shield lesson?
It comes in the work on the slope of a shield. By hand, a rotation motion takes a little too long, and a mallet is my pick. Even so, working by hand is doable.
Which tools do I name for the shield?
First comes a 9, about 20 mm (0.79 in),, with an 8 or a 7 as other choices. Then I say "I'll use number eight," about 7/8 in (22 mm). Later I say I will probably use my huge number 7 of three and one-eighths inches (79 mm), and I plan a number 11 of 10 millimeters (0.39 in).
Do I need a mallet?
A mallet is what I like, because it gives me much more control and I think it is much quicker. Having none is okay.
What to carve next