

Alexander Grabovetskiy, woodcarver, School of Woodcarving · Published 2020
What does a wood carver mean by "miter point"?
Quick answer: A miter point is the phrase I use in workshop 86, part 4, for an intersection on my corbel, "like a miter point from two sides." Elsewhere in my lessons the word miter turns up on molding corners and on a 45-45 joint.
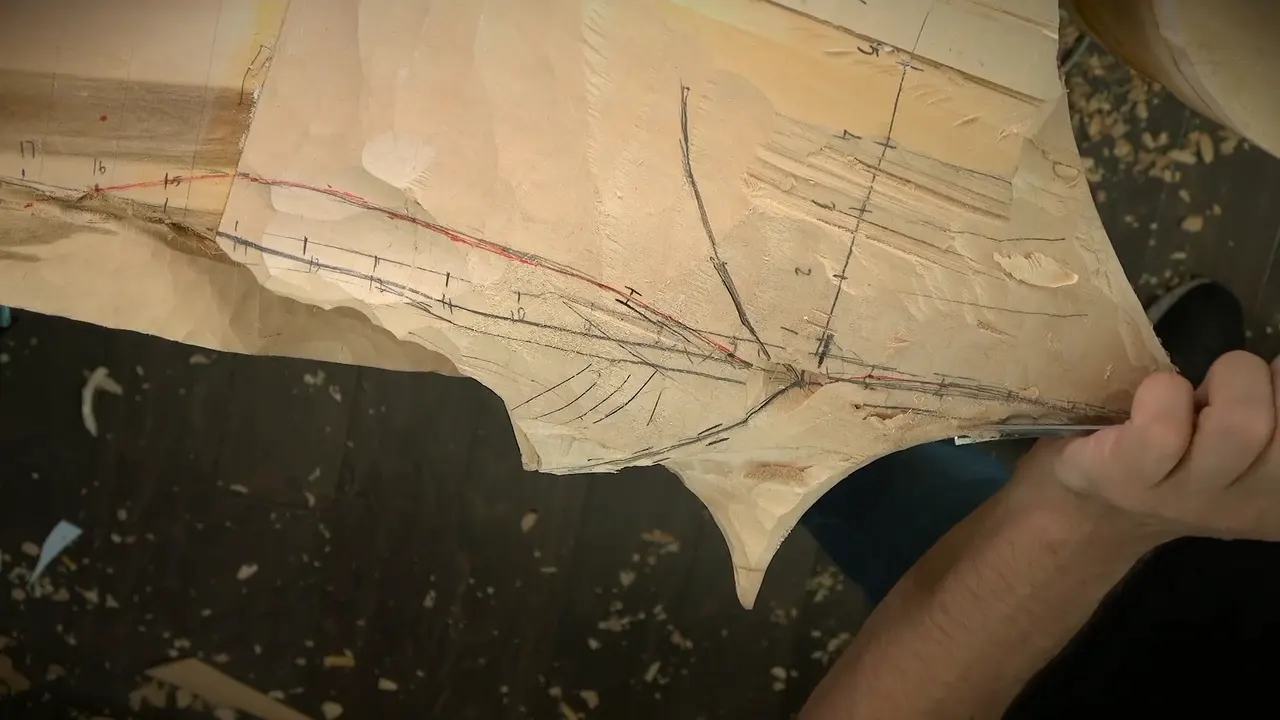

A miter point is, in part 4 of Venice Room workshop 86, my name for an intersection where "this side also" gets "a concave going in." Other lessons of mine use the word miter too, mostly for molding corners.
Have you ever looked at the corner of a picture frame and wondered how a carver gets two hollows to meet there? Would you like to hear how I plan one in wood? Then come through workshop 86 with me. Each lesson I borrow from is linked as we go.
Notes from this part
- Number seven for the shape, with a reason attached.
- Concave first on this area.
- The intersection waits until later on, and a concave is due on both sides.
- Beautiful movement already.
- A big gouge for the next slope, maybe three inches (76 mm).
- A gap kept from the red line.
- A preliminary movement, with a measure to take first.
- Miters, from other lessons.
What is a miter point in part 4 of workshop 86?
Two plans open the passage. "So let me concentrate right now on this area, because it has to be concave also." And right after: "And later on, I'll work on this intersection."
The word comes next. The line ends with "like a miter point from two sides, which means this side also going to have a concave going in just like this."

Two warnings sit in the part, along with one change of plan. "Yeah. Got to be careful how I'm working." And "I will change the direction." Earlier comes "Again, I have to be careful and change the position."
Further on the point returns, with a plan: "And yes, I will have to make it really smooth transition." The corner is named once more: "that point and miters again and goes backward."

A short count follows: "So that's one part, second part, and the third part. So that's how we create 3D." The next piece "has to slope this way, but also with the concave." Of that one, "I'm going to do exactly the same."
Why did a number seven carry this shape?
The tool is named early. "And I'm using, by the way, just number seven." And again, "Just a number seven." Then comes "You know what? I need to fasten a little better my vice."

A reason comes with an "if you would ask me." Here it is: "I can't overdo it, and number seven gives me just enough ability to manipulate the shape, just chip by chip."
Next, a line about faces. "So that is one of the favorite tools, actually, when I'm working with figure, if you want to carve a face of a human." And one about speed: "so you can actually change the shape quickly enough, but without removing too much at once." The shape itself took "a couple of minutes, pretty much."

What does the part say about architectural carving?
One label sits on the work: "So this part is actually true architectural part." It comes with an invitation, "So if you're interested in architectural carving, that's pretty much the way it's done."
Old times come up as well. "Back then, they did a lot of twisted moldings, crown moldings, cornices, if you wish to call that way." The words crown molding and cornices have pages of their own. For the United States: "But in the United States, that part called crown."
The thought stops here: "Here you go. That is enough. So it already gives me beautiful movement."

Which gouge does the part name next?
A bigger tool comes up: "I think I could use a big gouge, like three inches." Three inches comes to 76 mm, and then comes "No, just 3 1/8, 80 millimeters."
A gap from the red line stays. "Again, I stay in a way approximately eighth of an inch, about three millimeters or so, from my red line, because it's not the final depth yet." An eighth of an inch is about 3 mm.

Measuring has to come first, with "Okay, so I have to measure it first." The movement is a "preliminary movement." About doing it by hand: "And I can do it probably by hand right now." The result reads "You see? Pretty much couple moves and I'm already there."

Which lines in part 5 set number 11 and the height?
Part 5 opens with a plan: "So let me clean that little bit, this area with the number 11." Then "And any number 11 will work, but I'll take 10 millimeters," about 3/8 in.
A limit rides along with it: "It cannot be too deep in this section." Next comes the picture, "like a cloth drop has to lie right on top of it, okay?" And "So cannot overdo it."
The next plan is to "get with the number seven and 14 millimeters, like half an inch, and remove some more this way." One need is stated plainly: "But now I need to find the height."
Where do I say miter about a panel molding?
The Floral and Molding for the Panel course uses the word as well. Over in lesson 1 the molding turns on a panel, and "That's what you see, like miters, and it's going to go down." A reader can use it too: "You can do mirror, you can do picture frame, you can do a lot of stuff with that type of carving." See picture frame.
For furniture makers the picture is a door, with "raised panel, not raised panel, and small details, you can just apply with the different configurations." The wood is "the same basswood, limewood, linden wood." Linden is the tree behind it.

Lesson 8 comes with calipers, and its first part looks at the molding from above. "But if you look from above, so it's going to have a miter going this direction." Next, "a piece, and then another miter, and go that direction." Of the wood left on: "I left about maybe about a millimeter or so, some material all around," a little under 1/16 in.

The reason for the extra wood is plain: "I have to carve other moldings. I have to make those moldings." And then "I have some room to play around and make it look really nice."
That lesson's part 2 has the end of a molding. "Yes, I know I left it slightly wider at the end for the miter. Now that way I know I have some room for play."
A point comes next. "So now I do have a point right here." The line goes on with "which means I really have to connect those lines together right there, that point." One more mention comes near the volute, with the words "miter point."

A section has to go lower: "So now I have to lower down this section." For that, "I'll take number 11. Number 11, and maybe about 1/4 inch should work," which is about 6 mm.
A shell gets in the way in part 3. "Maybe I have to shave little of this shell. That's probably a good idea just to remove some of that extra material. Otherwise, I'm not going to be able to miter."

Over in lesson 9 the point needs protecting: "I don't want to damage this point because I still have to get the miters to that thing. Moldings I have to attach."

Which corner on a panel carries a miter look in the acanthus course?
The Acanthus over Moldings course starts with four pieces for one panel, and lesson 1 gives me places for the word. First comes a section that will be connected "also like a mitered molding."

Next, the previous piece shows the way, with the molding going "like that, and then turn this way." From there the molding goes "right underneath of that volute," and "which means I have to lower down that section right here." And "So all that has to be the same level."
Last comes the pattern, "grab my pattern and reestablish my drawing," and then "So I'm going all the way to the edge." For the corner itself, the words run "a miter look. Go that direction, exactly the same idea. And I'm going to connect."

How do I make the idea of a miter with gouges?
Venice Room 101 has the plainest line. "I want to create the feel like that is some kind of miter." The way: "So which means my concave can start somewhere right here, and they're going to just get together."
Of the seam: "you're not going to see the line right there, but it's still going to create that feel like those two parts, this part and that part, is mitered together." Later, "I really want to make it subtle, but still detectable."

Later comes a hope: "I hope you can detect that miter. Not really miter, but the idea of miter." So a miter, for me, may be a feel and not a joint. The miter joint has its own page.

A smaller moment sits in Venice Room 159. A concave "starts a little above the highest part of the convex," and "let me also use number one and hit this section, this little section." Right after, the next line brings a miter, and then "I'll take just a really tiny one. Number one."
Which way finds a 45 for a miter?
Next stop, Venice Room 155, with a leaf and a molding. "a line somewhere right there. And again, I need to do a 45." Then comes a line on eyeballing: "just try to eyeball it, just space and hold it pretty much higher."

Venice Room 154 gives a method, "a miter, a 45-45." A tool is considered: "I'll be able to use this tool. I doubt." Then "But I can always use adjustable one."
The easiest way has a name, "old trick, two squares," and the next line adds "Just like that, and that's going to be 45." A set square has a page of its own.

One more place, Venice Room 148, has a way to read a molding from a picture. "When I'm trying to replicate moldings, I'm looking at the two spots. The best spot if you look at the bottom, right when it touches floor, if it's going all the way to the floor, or you look at the miter."
On the miter: "when the two pieces just get on a 45 cut and they meet together. You can detect much better the profile." Of what shows there: "close to the Roman ogee, but it's not pure Roman ogee." The ogee has a page of its own.
Which miter comes from a saw?
The Lily Box course, lesson 1, says it plainly. A woodworker can do it alone: "If you like a hand-cut dovetails, go ahead and do it." For this box, "What I did, I just used miters. So I just got my stock prepared and cut that on a compound miter saw and glued that together and created that box." The miter saw and dovetails each have a page of their own.

A carving for a pipe organ is in the sandpaper lesson. "Two pieces gonna go together, you know, on the miter, you can see the miter on the backside, and it's gonna be mitered together. That is how it's supposed to go together." The carving there is for a huge pipe organ, German Baroque in style, with gold leaf, and there are not a lot of details on it.
My April 2020 livestream on the first million dollars lists what master wood carvers can do: "install the doors, get the crown together, cut the crown, miters put together, and so on." See the April 2020 livestreams.
Which of my lines came from which lesson?
| Where I said it | What came with it |
|---|---|
| Corner on my corbel, Venice Room 86.4 | two sides |
| Molding turning down a panel, flower course 1-1 | like miters |
| Calipers and a point, flower course 8-2 | room for play |
| Shell shaved back, flower course 8-3 | able to miter |
| Corner I did not want to damage, flower course 9-2 | miters to that thing |
| Molding turning under a volute, Acanthus over Moldings, lesson 1 | miter look |
| Little section beside a concave, Venice Room 159 | a really tiny one |
| Concave that starts and gets together, workshop 101, part 4 | the idea of miter |
| Leaf and molding lines, Venice Room 155 | a 45 |
| Angle from two squares, Venice Room 154 | an old trick |
| Old profile read from a picture, Venice Room 148 | when they meet together |
| Box with mitered corners, Lily Box, lesson 1 | a compound miter saw |
| Pipe organ carving, in the sandpaper lesson | on the backside |
Is there a corner in your own work where two hollows must arrive? Would you like to see a number seven work on a shape, and a gouge stop at a miter point? You'll find workshop 86 inside one tuition plan, with the rest of Part 8 of the Venice Room.
How it's done
- A number seven for the shape. With a number seven I have just enough ability to manipulate the shape.
- This area concave. The plan was to concentrate on this area, which needs a concave also.
- The intersection later. The plan was to work on the intersection later on.
- About 3 mm off the red line. I stay approximately 1/8 in (3 mm) from my red line.
- A big gouge, maybe. I think I could use a big gouge, like three inches (76 mm), then "just 3 1/8, 80 millimeters."
Frequently asked questions
What did I mean by a miter point on the Venice Room corbel?
An intersection still ahead of me, with a concave coming to it, left for later on.
Why was a number seven the tool for that shape?
Number seven lets me change the shape quickly enough, but without removing too much at once. A favorite tool for figures too.
How wide is the end of a molding left for a miter?
Lesson 8 of the flower panel course has the end of one molding left slightly wider for the miter. That leaves space for play.
Does a carved miter use a saw?
What to carve next
- Venice Room 86
- Venice Room Part 8
- Floral and Molding for the Panel
- Floral and Molding, lesson 1
- Floral and Molding, lesson 8
- Floral and Molding, lesson 9
- Acanthus over Moldings
- Acanthus over Moldings, lesson 1
- Venice Room 101
- Venice Room 148
- Venice Room 154
- Venice Room 155
- Venice Room 159
- Lily Box course
- Lily Box, lesson 1
- Should I use sandpaper in wood carving
- April 2020 livestream