
Alexander Grabovetskiy, woodcarver, School of Woodcarving · Published 2021
What does a wood carver mean by "too many details"?
Quick answer: Part 1 of Venice Room 108 has my line about the parts of the panel that sit around the flowers: I keep the details light there. My other lessons say the same about a leaf, feathers, a drawing and a small flower, and I give a reason where I have one.
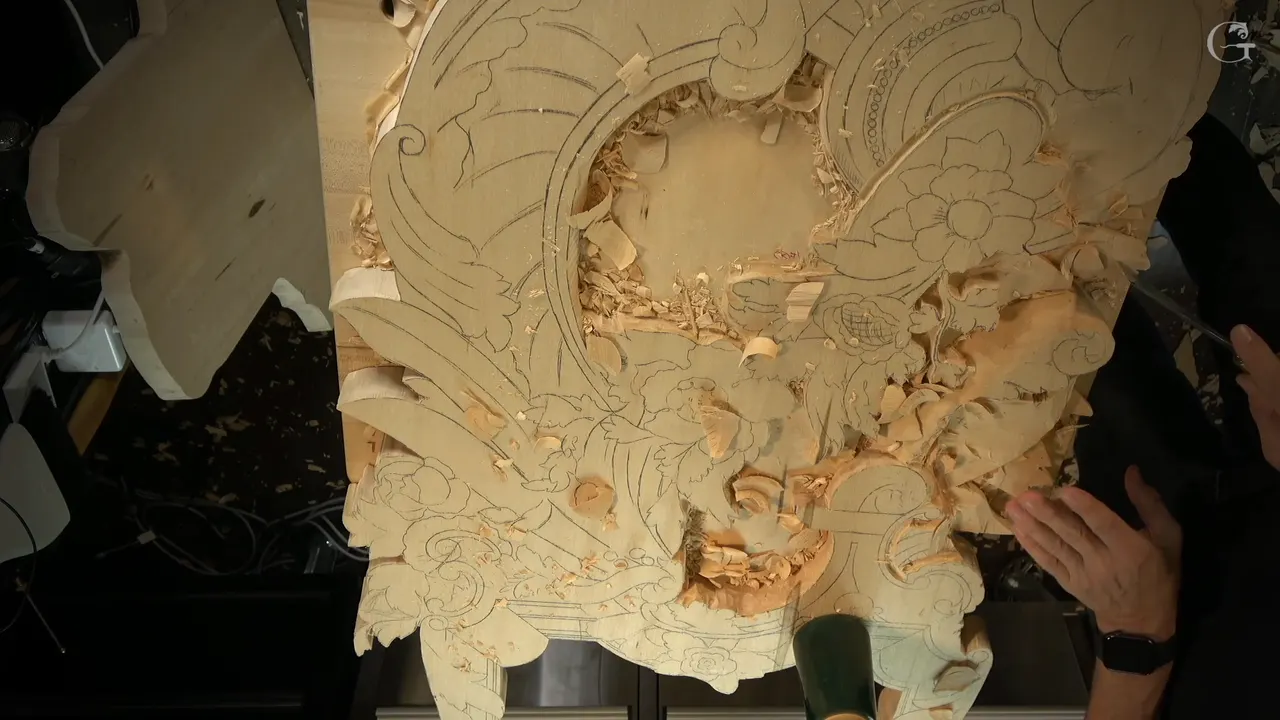

In part 1 of Venice Room workshop 108 I say I don't want to put a lot of details on the parts of the panel that are not the flowers. My other lessons say the same about a leaf, some feathers, a drawing and a small flower, and I give my reasons where I have one.
Ever looked at a carving and wondered how much work each part deserves? Does the part you can hardly see need the same care as the part in the middle? This page starts in workshop 108 of my Part 9 course, then follows the words through my Venice Room, Floral and Molding, Furniture Panel, Lily Box, Hashemi, Byzantine and beginner lessons. Every size is in millimeters and inches, my own figure first.
What was on the board when I said it?
Rays. Those shapes on one side of the panel are where part 1 starts. "And if you just wonder what are those, I've got multiple on this side, and I do have on another side also." Then I spell it: "So those are just like a ray, okay? R-A-Y." The idea of those rays also comes from original Venetian style designs.
The tool in my hand is a number 1, "and this one is a double bevel." For the next job a number 11 is planned, with the words "let me try 10 millimeters first" then "chop straight down like this." The clean-up of that area is for off-camera, so you do not have to watch it. I add that I do not want to take it to the extreme.

Lowering one shape comes next. I plan a number 11 of 10 mm (about 0.39 in) again for the "initial cut" and like I said, that part would be "about 16 millimeters down, 5/8 of an inch." After it, "let me take just straight number one, and I'll go all the way, just like that." Then: "Gradual, okay? Gradual from approximately this point."

"Just because I outlined that, I've got my waviness already established, so I don't really need to redraw anything." I add "I mean, I still have to redraw, but not as much." A need follows, "about three millimeters deeper," about 1/8 inch, and after "And here you go" I expect "a 3D look, overall 3D look" with "a really beautiful shadow casting."

"I've done this area, pretty much just to flatten that. And I placed some lines back." One section "has to be lower, so that would be six millimeters above the surface," about 0.24 in. Then: "This little section is also part of this ray, so I need to work on it."
Why did I say the flowers are the main idea?
A reason follows the words. "I don't want to put too many details. The reason why, if you know a little bit about design art, so you know you really have to concentrate on the main idea." Looking at the piece, I say the main idea is "pretty much the flowers in this section, which those flowers fall in exactly on the golden ratio."
I'm not going to explain that placement again, "but this is the main idea." Those parts are secondary, so I "really don't need to put" many details on them.

There will still be details, only "bigger details." The most detail waits at one spot, "visible right here." As an example, one shape gets a plan I call a flip, and "this part's going to go underneath."
Next I outline another section. The first cut will go "right on the line" and the second about an eighth of an inch (3 mm) away. I used 7 mm before, and now a 10 mm tool is planned, "which is 3/8 of an inch." And again, "it's number 11, of course. A lots of number 11s in this project."

In part 2 of that workshop a reason for timing shows up. I can actually do 2 mm, number 11, and "get even deeper right here" (about 0.08 in). I ask "Why I'm doing it now?" The answer is that I know I'm not going to do many details to that part anyway.

Which parts do I leave plain because something will cover them?
A plain reason sits in workshop 42, part 10. Much detail is not what I want to develop right there, because the flowers will cover the majority of it. Cleaning "that mess because it just bugs my eyes" is on my list, with "just too many pencil marks." Then: "it's much better I'd say."

Another spot shows up in workshop 62, part 8. I still plan to work "a little bit right here," off camera, and a flower will cover most of it. Then the line itself: "I don't really need to get too much details." Anyway, it will be covered forever. Just before it, I point out that the shadow is "actually popping this piece out."

How do I know a secondary part has enough?
Workshop 74, part 1, has me looking at the overall look, to see whether it is "going to be too much details or not." My verdict is short, "It looks like it's okay" and "it should be fine."
The shadow there will not be deep, since a deep one would distract a little too much, so a deeper one is skipped.

In workshop 66, part 2, "that's probably enough for now in this area" and next I need to attack "that side" and establish "the main movements and the main idea before I do too much detailing."
Over in workshop 13, part 2, one part will not get many details, since I do not need them, and I plan "back bent again" to "make it little bit rounding." Then: "I do have a main idea established." The next pass is "just a preliminary" and "just a small detail."

Workshop 112, part 3, leaves a part nearly as it stands. I could "probably leave it just like that without doing too much to it" and "I think I like that middle ridge." I do not need many details for "those two parts." My plan is "just create the cut right underneath" and should it be too fragile, "I can always reinforce it."

In Furniture Panel 32, part 3, I say the leaf is not the focal point, I call it an indication, and it gets little detail from me. Just before that I mention "undercut right away underneath of this leaf."

Does a paint job change how much I carve?
It did in workshop 91, part 9. The plan is to "just rasp everything and clean it" and rasps "can make it a lot nicer, smoother transitions." I will not create any more concave-convexes there: "It's exactly what you see." My next words give the cause. I do not worry about creating many details in this case, because a paint job is coming.
I say I'm pretty much done with this section, then "I'm going to add a couple more details probably," "just maybe just a couple more. Not more than that."
Feathers come into workshop 148, part 1. "I did not do really detailed feathers." There is a way to do them, and "you can just take it to the extreme." The project will be painted, and "they're going to paint that." I also say I really did not want many details for the feathers. Still, "the feathers itself, it's a really nice, interesting detail."
How little can a part get and still look right?
In the Floral and Molding course, lesson 9 shows it on a shape I blend. A number 1, "double beveled," can "get the triangle removed" and in this section I want to keep the details few. "There is no reason for me. All I have to do, just the blending and make it really look nice."
About the overall shape, "that is what I want to leave." Taking many facets out is not the plan, "as much as I really like to make it clean." In this case "those facets, they actually working for me" and they will make "some kind of interesting shadow casting."
Cleaning waits in lesson 11, part 3. An acanthus movement goes "right on top of the shell" and "that is the main idea." Many details wait as of now, and cleaning up waits until I work on that shell. For the undercut I need "a small, tiny tool" in fact "only 1 millimeter tool" (about 0.04 in), "but I really like it."

Lesson 13, part 3, goes toward the center. I plan to excavate some parts there "with the small tool, what I used previously" at 1.5 mm (about 0.06 in), for "a somewhat deeper cut." "I want to create some shadow." The movement of the petals "is up to you." On a previous piece I did not put many details or movements, "but you can see right in the middle" and there is "extra shadow."
The drawing stage of Furniture Panel 13, part 1, is where I avoid spending "too much time, like I said, just putting" many details "at the beginning of the stage." Then: "I'm just doing the drawings."
Lily Box 8, part 13, adds a small one. Much detail is not needed, "but I still think I should give some concave to this movement right here." It will not make a lot of difference, I say, but it will give some shadow.

When do I want as many details as I can get?
In Furniture Panel 4, part 2, I say "I would love to get as many details as possible" and it would be "almost micro carving." I would carve it "not as deep" and still want them, "the tiniest," probably with micro tools.
A focal point asks for it too. In Lily Box 8, part 5, comes "if you would ask me why I'm putting so many details on those leaves" and my answer is "a law in design." The flower is the focal point, and in real life it is bigger, much bigger. All I have is maybe about three inches (76 mm), and I want it to look much bigger.
So I "surround all around with the smaller items" and "the bigger item going to pop out a lot more." My words: "That's why I'm putting a lot of subdivisions, a lot of notches, and so on."
Customers change the answer. In Hashemi Flowers 40, part 1, you can take the piece "to the extreme," but "there are certain rules I have to apply to different types of projects." With the customer "we agreed" that I will not go all the way to the details, which I find "also justified by the time frame I have to spend and what they expect." The plan is a "semi-rough look. Not rough-rough, but semi-rough look." And "I think it's already a lot of details I added."

Small flowers got a long answer in Lily Box 12, part 2. Of tiny flowers I say wood carvers "don't really give a detail to it" and I call that "a common mistake what wood carvers do." Still, "there's a logic why you don't need to give it too much detail to flowers like this." If it were really high above, "there's no reason." Then comes Grinling Gibbons in England, with "a lot of his work really high above." Even so, "he still worked the details, at least at the front" and "he actually left it really rough" on the backside.
What did the old carvers do about details?
In Byzantine Acanthus 5, part 2, I talk about gold leaf on clay. "Red clay is really thick" and "they would carve it without" many details, "but a really beautiful shape." Before the gesso, they used the red clay, and then they burnish it, the clay itself, like "taking all the facets out."
In beginner workshop 17, the Curly Kitchen Cutting Board, you could work on the piece as much as you want, "there is no end" and you always find something to refine or to add as detail. Then: "thousands of years ago, people would carve in this style without adding" many details, "and I think it's just absolutely fine just like it is."
Where else did I say it?
The table lists the other lessons and parts, with what stood next to the words in each.
| Where I said it | What stood beside the words |
|---|---|
| Rays on the panel, workshop 108, part 2 | A 2 mm number 11 offered for a deeper cut, with my reason for doing it then |
| Round part, workshop 13, part 2 | Rounded a bit |
| Flower cover, workshop 42, part 10 | Wood the flowers were going to cover, and too many pencil marks |
| Under a flower, workshop 62, part 8 | Covered forever |
| Order of work, workshop 66, part 2 | The main movements and the main idea come before detailing |
| Whole look, workshop 74, part 1 | A shallow shadow |
| Paint job, workshop 91, part 9 | A section to rasp smooth, with a couple more details maybe |
| Middle ridge, workshop 112, part 3 | A middle ridge I like, which I could leave nearly as it is, with a cut underneath planned |
| Feathers, workshop 148, part 1 | Feathers, with paint coming, and still a nice detail |
| Facets, Floral 9, part 3 | Facets that work for me, with interesting shadow casting |
| Cleaning later, Floral 11, part 3 | Cleaning kept for the shell, and a 1 mm tool for one undercut that I like |
| Center cuts, Floral 13, part 3 | A deeper cut |
| Drawing stage, Furniture Panel 13, part 1 | Drawings only, with no time spent on many details at the beginning of the stage |
| One leaf, Furniture Panel 32, part 3 | Not the focal point |
| Extra shadow, Lily Box lesson 8, part 13 | A movement with one concave, small in effect |
Between workshop 107 and workshop 109 sits workshop 108, in the Part 9 course. Access opens all of them, along with the lessons I quoted above.
How it's done
- Find the main idea. If you know a little bit about design art, you really have to concentrate on the main idea. On the Venice Room panel the main idea is the flowers in one section.
- Call the parts around it secondary. Those parts are secondary, so many details are not needed there. Lesson 66 has the main idea come before much detailing.
- Make the details there bigger. It is not like there are no details. They are bigger details, and the most detail is visible in one spot.
- Check the look of the whole. The check in workshop 74 is how a section would look overall. A deep shadow in that area would distract.
- Know what hides the part. Flowers cover wood in workshops 42 and 62. A paint job is coming in workshops 91 and 148, and I did not worry about many details there.
Frequently asked questions
What are the rays on my Venice Room panel?
Workshop 108 spells it out, R-A-Y, and I add that the idea of those rays also comes from original Venetian style designs. There are multiple on one side of the panel, and I do have rays on another side also.
Do the secondary parts of that panel get any detail?
They keep some, only bigger. I say it is not like there are no details, and they are bigger ones. The most detail shows at one spot of the panel.
How do I check that a section has not gone too far?
Lesson 74 has me look at how the section will look overall, to see if it is too much. It looked okay, and I said it should be fine. A deep shadow there would distract.
What to carve next