

Alexander Grabovetskiy, woodcarver, School of Woodcarving · Published 2020
When does a wood carving look too empty?
Quick answer: Too empty is how one spot on my Venice Room ceiling board would look, I said in part 28.11, if its bare space stayed as it was. My first question there was whether I needed to fill that space at all. My plan was a movement repeating the one beside it, not an exact copy.
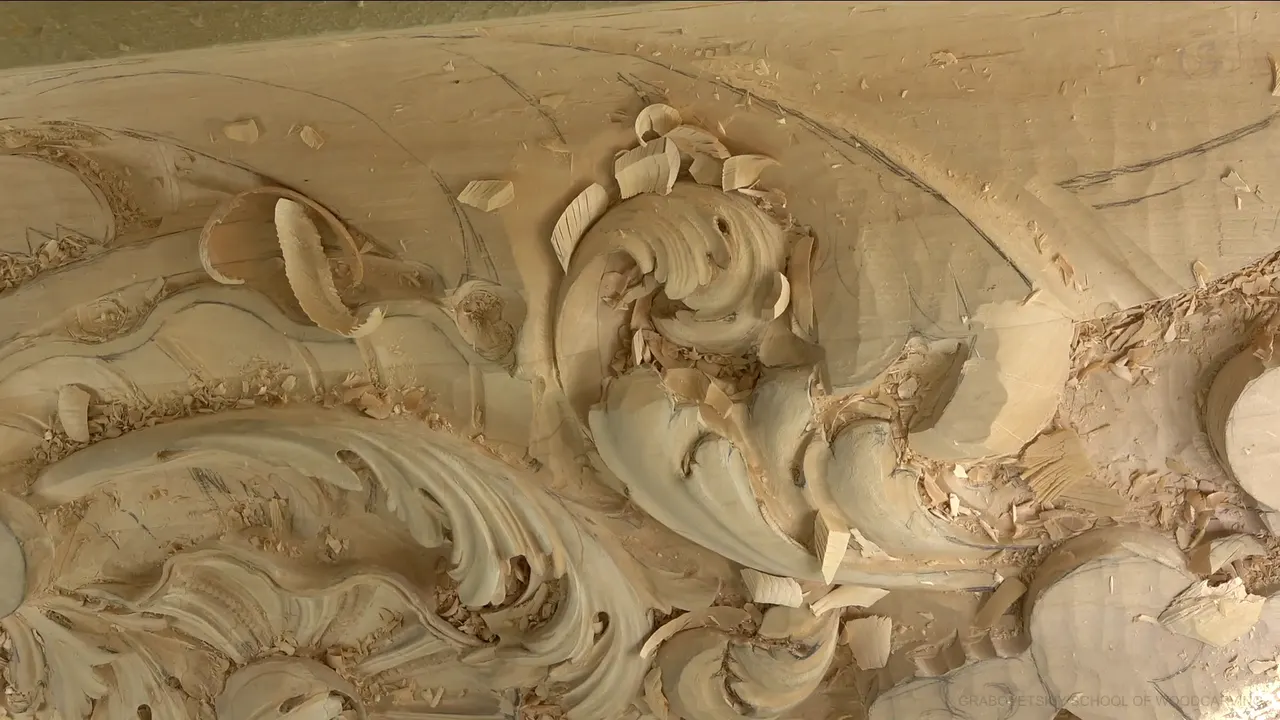
Too empty is how one spot on my ceiling board was going to look if I left its bare space alone, and the first question about that space was whether to fill it at all. In part 11 of Venice Room workshop 28 I had been undercutting a leaf and then shaping a big round part beside it. Then I stopped and looked inside the board. I said the inside of the board had a big empty area, and I needed to decide how that space should look.
Have you ever stepped back from your board and found one spot that looks bare? Did you wonder whether it needs anything there at all? Then come with me through this one spot, in the order I took it on camera.
Part 11 runs under eight minutes. So the rest of this page comes from other lessons where I talked about empty spots, on this Venice Room ceiling and in three other courses, and each passage says where it comes from.
What part 11 shows about one empty spot
- Before I cleaned it, I asked myself if I really wanted that space left open.
- To fill it, I said, I first had to clean the area a little better, and a number 7 went around it in both directions.
- There are multiple ways to fill a space like that. Whether to fill it at all was the first question I had to answer.
- I planned a movement that would repeat its neighbor on that side.
- Where it would stop was still open.
- A few spots left empty is sometimes a good idea, I said in workshop 31, even while that area seemed to want something.

What was on the board before the empty spot?
An acanthus leaf I was undercutting. I could take it to the extreme, I said at the very start, and bring everything to the edge, which I probably should, and undercut all the way to the line my number 11 had carved. That would give it a beautiful, beautiful look, and still it would be strong. And maybe I should do that.
Then came "Okay, wonderful." Time to take my tools back where they belong, I said, and I turned to something else, a big, round element right there. Starting there let me work my way in toward the shell, and I already knew exactly where that shell would end. I felt like moving that direction no matter what.

That round part goes underneath the movement beside it. Two minutes later I corrected myself. Not really underneath, I said, but kind of underneath.

Which tools carved the round part next to it?
Big ones. For the side I said I need to excavate a really deep concave, and I talked myself through the tool out loud. Should I? Could not. Well, I could, no problem. I could use 30 millimeters (about 1 3/16 in), a number 9 or a number 11, and that's what I'm going to do. The gouge you see going in at 02:19 has 11/30 stamped on its yellow handle.

The reason came a few seconds later. I really need to give a round shape that has to go like that, I said, and this has to go underneath. Knocking a little off the side came up next, because it would be a lot easier to get deeper, and I need to go all the way down.
"Okay, that is good. Let me leave it like that." For the round shape on the next one I said I could use a number 7 at 80 millimeters, three inches, and give it that shape. Not bad, I said at 04:40, but this side needs to be kind of knocked down a little bit too. At 05:03 I said that is enough with the big tool, so I have plenty of movement.

A skew came up next, maybe, to refine a little bit. The thought about the empty space took over with a "Well, actually, you know what?" Wikipedia's page on the chisel covers the skew and the gouges I had been using, if the names are new to you.
How do you decide whether an empty space needs filling?
You ask before you carve it. By 05:28 I really wanted to move down like that, and then the question came. I do have a lot of empty space on inside right here. Do I really want to see that empty space or not? Or I could fill it somehow.

A minute later I said it again. There are multiple ways I could fill that space, and the question is, do I need to fill it or not? I called that the first question I have to answer. I asked it over a relief board that will go up on a ceiling, and in part 12 I said one deep excavation would be really visible from the bottom.
Artists have a name for the room around a shape, negative space. My design lesson 3 takes on the law of space, and it uses a picture of flowers to show it.
Why clean the area before you fill it?
Cleaning first lets me see whether something will work there. To fill it, I said, I need to clean a little better, okay? And then I can just see if something going to work out or not. Number seven. I just went around and cleaned it a little bit, both directions.

What goes into an empty space when you do fill it?
On this board, a movement. I think it would make a lot of sense for me, I said at 06:57, to create some kind of movement which would repeat this movement on that side. Not exactly like that, I added, and I meant the detail right there.

Then the open part. I need to figure out where I can stop it. Maybe a couple of spots. Maybe I can get one of the details going this way, maybe actually more than one, just to give a better overall shape. Otherwise, it's going to look too empty. Most of those lines carry a maybe, so on this page it stays a plan.
Part 12 picks up the same spot. Plenty of material was left, and I can develop something really interesting, I said. An extra separation right here. An eye. This movement would repeat that line. Convex or concave was still open. Let me excavate around first, I said, and then I'll decide, and I thought that would be better. Nicer, I should say.

For that excavation I said a number 11 or a number 9 would do, it doesn't matter, and then: I'll use number 11, and excavate on inside a little more, and around, and around.
My furniture panel design lesson 12 says it in the same order. Definitely, I need to repeat this movement, I said over the drawing, maybe a small one. Then, now I need to fill this space, because there was too much empty space right there. For that panel I said I needed smaller leaves and maybe what I call filler flowers, really small, tiny flowers.

Two lessons later, in furniture panel design lesson 14, I was drawing small volutes when one spot still bothered me. I still kind of don't like how empty that spot is, I said, and maybe I can just create another twist, go in that direction and hit that line.
Over in workshop 77 I set a separate piece in place to see how it looks. Right now it just looks a little too empty in this spot, I said, and this piece would work like a filler.
Is it ever right to leave a spot empty?
Leaving one is fine sometimes, and I said so on this same ceiling. Part 12 of workshop 31 had me giving an area a little cleanup and still did not know what would go there. I don't want to leave it empty, I said. Although, sometimes it's a good idea to leave some spots empty, okay? But I think I should do something right there.

On the furniture panel drawing I went the other way once. One element just didn't look right to me, so I got rid of it, let the movement show, and said I would leave it empty like that. And let me also do exactly the same on that opposite side, I said next.
Some empty spots were okay in workshop 48 too, because the brackets on the side would have empty spots as well.
My design lesson 2 goes further. Looking at one picture, I said the empty spot is also part of the design, and that the emptiness works as a support. Space around makes a big difference. A minute later came this: it's an empty spot, but it's not an empty spot.
In that same lesson I said I have been in the most expensive houses in the world, and less is more is no such thing in those houses. Wikipedia's page on minimalism says the architect Ludwig Mies van der Rohe took up that motto to describe his work. Art historians have a Latin name for the opposite habit, filling every bit of a surface with ornament, horror vacui, which means fear of empty space.
Is a deep spot the same as an empty one?
In workshop 48 I corrected myself on exactly that. A lot of empty space, I said first, which I'm not too happy about. About a minute later I named one place the empty spot, then fixed the word right away. Not empty, but deep spot, okay, I should say.

During workshop 29 I held back while cleaning one area, because I planned to bring another movement downhill there too. Otherwise, I said, I have too much space to just empty spot, and if I excavate that empty spot, it won't look nice.
I was unsure in workshop 30. I'm not sure if I should connect this opening together, I said, and not sure how it would look, whether the inside would end up too empty. Maybe yes, maybe no. Maybe it would actually give extra depth.
Workshop 70 had me wanting both. I don't want an empty spot, I said, yet I still wanted to be able to excavate there and create deep shadow. I needed some shadow in this area.
Empty spots I talked through, lesson by lesson
Six of them, with the minute you can find each one in its video.
| Lesson and part | What I said about the empty spot | Time cue | What I did or planned next |
|---|---|---|---|
| This video, 28.11 | Fill it or not, my first question | At 6:46 | Repeat the movement beside it, maybe |
| Venice Room 31.12 | Sometimes good to leave some spots empty | Cue 2:34 | I think I should do something |
| Workshop 29.8 video | Excavate it, and it won't look nice | Mark 6:25 | Another movement was coming down there |
| Ceiling board 48.6 | Not empty, but deep spot, I corrected | Time 7:28 | Going to be a deep spot |
| Furniture Panel 14.6 | Removed an element and left it empty | Clip 8:52 | Same on the opposite side too |
| Design course 4.3 | Empty space, also golden ratio, I said | Point 1:12 | How you fill the space, also |
What does the camera miss about empty space?
A part of it, on my ceiling, and I said so while I worked. During part 9 of that same workshop 70 I said there is some empty space, which you don't see on a camera, but I do. And I think it's exactly what I should do, I said. A big concave right here was the plan, and an undercut underneath of this line. Then, let me think twice. There is nothing to think twice, actually.
One part in workshop 46 looked good to me, but I held off doing too much right now, I said, because I still have to fill this spot later on somehow. A movement was needed there, because you don't want to see just empty spot right there. After that I looked from the bottom at how gradual my movement was.

Going down was the answer in workshop 41. Because I had taken one part right down, I said, it gave me a chance to create even more three-dimensional movement. That solved the problem, since too many empty spots was what I did not want.
And in workshop 97 I counted leaves. One, two, three, four, five, six leaves, and that is not good, I said. So the plan became another eye, with a leaf underneath. The only empty spot I would have was this one, I said, and that would be more logical. Yes, I do change on the fly, which I think it's okay.

Does the golden ratio decide where the empty space goes?
In my design course it does. Empty space, also golden ratio, I said in design lesson 4. How you fill the space, also. In lesson 3 I showed the part of the flower picture I call the antagonist. It's empty, I said, and the supporting part is even emptier.

If I put a bunch of flowers right there, I said, it would be off. I acknowledged it's a busy design. You have to create that busyness in the right spot, and you have to fill space based on the golden ratio. Wikipedia files ideas like this under composition in the visual arts.
Does a beginner run into empty spots too?
Right away. Lesson 2 of my first cuts course adds a small leaf, maybe with small details inside. Now we do have empty spot here, I said, so we would fill it, and maybe turn those leaves this way. Just a knife, the same block of wood, and the same technique I showed on the other side of that piece.
The same question came up on that small piece of wood and on this ceiling.

Would you like to watch me decide on that spot, one question at a time? Every workshop of this ceiling opens with Tuition, part 11 included.
How it's done
- Ask the first question. Before I cleaned it, I asked myself if I really wanted that space left open.
- Clean the spot a little better. A number 7 cleaned it both ways, so I could see whether something would work out.
- Look at the neighbor movement. I said it would make a lot of sense to repeat that movement on that side, not exactly like it.
- Figure out where it stops. Maybe at a couple of spots, maybe with more than one detail going this way. Figuring that out was still ahead of me.
- Excavate around first. A number 11 went around the spot in part 12, inside and around, and the shape question waited for later.
- Allow an empty spot. An empty spot can sometimes be a good idea, as I said in workshop 31.
Frequently asked questions
Should every empty spot in a carving be filled?
Leaving some is fine. Back in workshop 31 I said it can be a good idea to leave a spot empty, even while I felt that area needed something. On my furniture panel drawing I removed one element and left that space open on purpose.
What do you put into an empty space on an acanthus board?
On this ceiling I planned a movement that repeats its neighbor, not an exact copy. The next video adds an extra separation and an eye, both still a plan, and I excavated around first with a number 11 before deciding the shape.
Why clean around a bare spot before deciding how to fill it?
Cleaning first lets me see if something is going to work out or not. Those were my words in part 11, and then I went around the spot with a number 7, both directions, before I came back to the bigger question of filling it.
What to carve next
- Advanced carving venice room 28
- Advanced carving venice room part 3 workshops 26 37
- Design principles for wood carving 3
- Carving furniture panel 12
- Carving furniture panel woodcarving course lesson online 14
- Advanced carving venice room 77
- Advanced carving venice room 31
- Design principles for wood carving 2
- Advanced carving venice room 48
- Advanced carving venice room 29
- Advanced carving venice room 30
- Advanced carving venice room 70
- Advanced carving venice room 46
- Advanced carving venice room 41
- Advanced carving venice room 97