

Alexander Grabovetskiy, woodcarver, School of Woodcarving · Published 2020
What does "big question" mean when a wood carver says it?
Quick answer: Big question is the name I give an open choice on a carving, said out loud before I know the answer. On a Venice Room acanthus head, mine was how its big chunk would grow. Much of it had to drop low and rise from below, and I planned to develop that part.
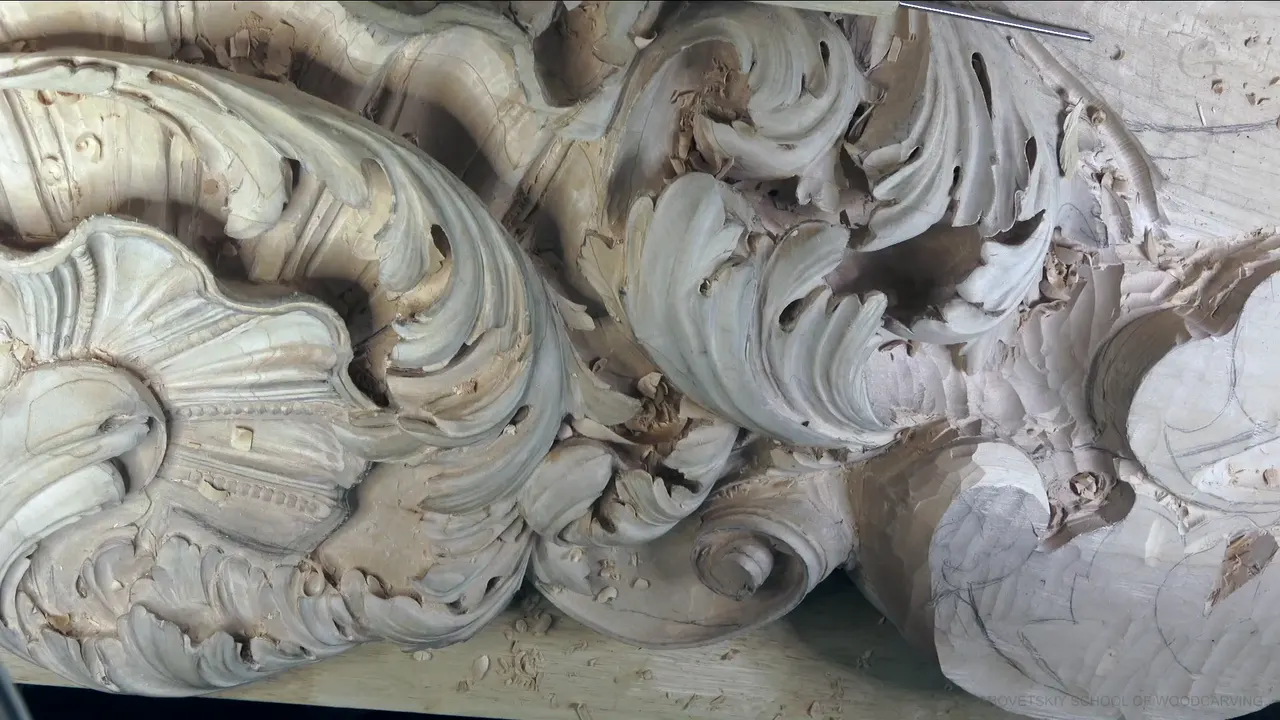

Big question is my phrase for a choice in the carving that I name out loud before I know the answer. In Venice Room 48, part 3, it was how the big chunk of an acanthus head would grow. I didn't have a final decision. But I knew a lot of it had to go down and grow from underneath upward, so I said I'd develop that part and leave some of the material untouched yet.
Have you looked at a half-done carving and wondered how the maker knew where each part goes? Would it help to hear those questions said at the bench, while the tool is still in the wood? This page puts the ones I named on camera side by side, from this video and from other lessons, with what came after each.
Part 3 runs about seven minutes. That's short, which is why other lessons sit beside it here, the ones where I said big question while I worked, and each one links to its own page.
Seven kinds of big question I've named on camera
- On this head, the way a big chunk grows.
- Depth at one deep spot, and how much wood stays under it.
- Over a line or under it, on a part nobody would see.
- Where an eye goes.
- Time, and how much one spot gets before I stop.
- Why one small detail takes me so long.
- What people ask me, like how a design like that is even possible to carve.
What was the big question on the acanthus head?

How that chunk would grow. It came about three minutes into part 3, and the minutes before it lead up to it.
The part opens on a spot I wanted cleaner, one I said I need to attack, and I could do that a little later. Next I said let me also do another concave, one that would go all the way underneath and give the feel that it has grown from below. Those couple concaves will do, I said a few seconds after.

Before I work on details, I need to attack this one. Those were my words. It was really important for me, because I had a big chunk there and I needed to develop it somehow the right way. It has to go gradually downhill, I said, and some of it is going to grow above. Then, let me work on this head.

A breath later I said it plainly. There is no final decision on my end how it's going to look. Still, I knew the big part of it was headed down, then up from underneath. My words were that I'd leave some of it untouched yet, like this part, and that part I'd develop.

For that I said I probably need one big cut right at this line, and I named the tool, a 30 mm (about 1 3/16 in) number 11. Because like I said, it has to grow gradually like this. But how it's going to grow was a question too, and I called it a big one. Right after, I said I'd use just a skew to develop farther.
Why did I say this is not the only approach?

Other ways exist to develop the head of an acanthus, and that came up a little over three minutes in, right after the skew. There are different approaches, actually, and this is not the only one.
One of them is a double layer. My plan was to do that in another lesson, on a smaller scale acanthus, Byzantine style. The true Byzantine, I said, not just what people think is Byzantine.
On camera I said the early Byzantine style was designed for the gold leaf, so it uses a different technique, and the true Byzantine acanthus is not done in one piece. It's actually a double layer. The site has a Byzantine acanthus course of its own.
Where was the bottom of the head going?

Upward, more gradually. About four and a half minutes in I said I think chop this out also, and a few seconds later, I think that is good. More gradual movement upward came next.

Then came the bottom. Maybe I'm going to do something else right here on the bottom, I said. Maybe I actually should. It would still be in the same position, but on another side I have points from flowers, and maybe I should also do that right here. Which means I need to bring my line somewhere closer, toward that way.

You probably don't see what I'm doing on this side, I said, because the camera is a little bit off. I did that on purpose. I want my head out of the way, and sometimes it's hard not to get inside the frame of the camera.
The part ends on one more need. Before I do that, I need to make sure I'm not making the mistake. So when part 3 stops, the bottom of the head is still a maybe.
It carries into part 4. About making one part a little bigger, I said it's a question, if I do want it.
Which big questions stay open for a while?

A few do. Workshop 66 of the Venice Room is where I wanted to keep a connection point somewhere, if, and there's a big if, I'd be able to. A big question yet, I said. Right then I dropped my mallet. Next came a 2 mm (about 0.08 in) number 11 veiner, and I wanted the point kept but almost invisible, somewhere the human eye can't get to.
Later in that part I asked another one out loud. Should I create a deeper cut, a deeper shadow in this area, or should I bring this separation all the way? I'd like to know what you would do, I said.

Others get settled on the spot. In workshop 67 the choice was whether one part goes underneath a line, or the opposite. I said that is a big question, then right away, not too big. It wasn't going to be visible at all, but it's a question I have to answer no matter what. I thought it would probably look better below that line, with a better twist inside, and I used just a spoon gouge.
In workshop 59, it was how developed I wanted one area, with a middle line through it. That was a big question for me, and I have to make the decision. It was a somewhat challenging area without too much room. Maybe I can just do acanthus growing from underneath of here, which is going to be probably sufficient. That's exactly what I'm going to do.
One more came up in workshop 66. The location of an eye was my big question there. I thought I'd just go way down, right here. A second one followed, which part overlaps which, and both of those ways are legit, I said. After that I said I need a bigger number 11, because I want a movement a little uphill, and I'll take 12 millimeters, about half an inch.
How deep should a hollow go when you can't decide?

On one deep spot in workshop 71, how deep to go was also a big question, and I said maybe I have to improvise a little bit. At least three millimeters, like 1/8 of an inch, is the thickness I said I'd leave at the bottom. Maybe even more than that. Maybe about 5 mm (about 3/16 in) is what I'll leave.
Let me go this way, I said, and that's against the grain. It's a little dangerous, I said, but it's okay. It's still possible. If the tool is sharp I shouldn't have any problem, and in my case the tool is really sharp.

On my furniture panel, in lesson 39, depth was the first decision of the video. Should I follow this depth, or should I get much deeper, like in the center? So that is a big question. I could do it at the same level as this other section. But if I'd like to exaggerate the area, I should probably go as deep as the center, which is pretty deep.
Right now it's about a quarter of an inch (about 6 mm), I said, a little less. I didn't measure it. Then my calipers came out, and they read a little less than a quarter of an inch, approximately 0.2 (about 5.1 mm). The first tool, I said, would be a 2.5 mm (about 0.1 in) number 11 veiner. It does not have to be two and a half millimeters, but it just happens, and I really like it.
Can a big question be about where a point goes?

On the board in workshop 117, that was the one. I needed to make the decision where my point would be, and I called that the big question. The movement was going this way, and maybe I can actually do my point something like that. I could also excavate a bunch of material from there and get a really deep shadow, like I did before, but I wasn't sure if I wanted to.
In my design course, in the lesson on the law of arabesque, the big question was why. It's important to understand and answer it, I said. Then I showed where the eyes of a leaf fall, on the golden ratio, sixty forty, to be exact 62 and 38, and the middle line never in a center, I said.
Is time a big question too?

For me it is, and workshop 78 is where I said so. I can take a spot to the extreme, I said, but it's all about the time I want to invest. And that's a big question, how much time do I have? A lot of stuff for that project was still ahead of me. At some point, I just have to stop.
Then I wasn't sure what I should do, or if I should take it more. I was carving against the grain right then, which is not always the best.
Lesson 19 of the furniture panel course turned it around. Some of you probably have a big question why I'm spending so much time on just a small detail, I said. First of all, I don't have a deadline. That panel was not for a client, so I really didn't have to rush it, and without a rush I can probably create a much nicer project.
What big questions do people ask me?

How this kind of carving is even possible. In my Hashemi flowers course I said some people look at the designs and have a big question inside the head. How in the world is that even possible to carve? If you know the techniques, it's not as complicated as it looks, because this type of carving is all about the techniques. Soon after, I said I'd left about half an inch (13 mm) from the backside to the top.
Another one, a lot of people ask, is how to leave the surface smoother. Not smooth like sandpaper, which I don't really like, though if you like sandpaper I'm absolutely okay with that. That was in lesson 10 of the Byzantine course. The year before, I spent $1,000 on rasps just to try them out, after I saw other carvers use them with no problem.
I still don't use them. A rasp is not saving me time. It leaves a really rough surface, and I have to make it a lot smoother after, so it's twice as long for me. I still love an out of the chisel finish, and for the facets I take a flatter gouge, number three or number two.
One I put to myself in my sharpening course. How do you create the inner bevel inside really small micro tools, say half a millimeter (about 0.02 in)? I called it a big question, and there are no slip stones that can do it. The solution is just sandpaper. I showed 3,000 grit, but you can use just 220, wrapped around a chip from my carving the day before.
How did each big question end?
Each one is in this table, with the lesson it came from and what I did or said next.
| Lesson | The big question | What I did or said next |
|---|---|---|
| Venice 48.3 | Which way the head's big chunk grows | A 30 mm (1.18 in) eleven, one part to stay untouched yet |
| Workshop 66 | Whether a connection point could stay | Still open, then a 2 mm (0.08 in) veiner |
| Room 67 | Under the line or the opposite, on a part nobody would see | Probably below, with a better twist |
| Lesson 59 | How developed the area by the middle line should be | Acanthus growing from underneath, probably sufficient |
| Room 71 | How deep to go at one spot | Three millimeters (1/8 in) or more left, maybe five, near 3/16 of an inch |
| Panel 39 | Follow this depth, or go as deep as the center | Calipers read about 0.2 in (5 mm) |
| Venice 78 | Time for one spot | I just have to stop, at some point |
Where can you watch part 3?
In the Venice Room Part 4 course, inside workshop 48. Part 3 is one of its twelve parts.
Can you see the place on your own board where you're sure, and the place where you're not? On this head I said I'd leave one part untouched and develop the other. If you want to watch every pass, the tuition opens every workshop of the Venice Room.
How it's done
- Name the part you know. On the Venice Room head, a lot of the chunk would sink first and then grow upward.
- Leave the rest alone. Some of the wood waits, untouched yet, as I said before the first big cut.
- Pick a tool for the known part. My plan was one big cut right at this line, with a 30 mm (1.18 in) number 11.
- Go farther with a skew. Next came my plan for just a skew, to develop farther.
- Look at the other side. Flower points were already on another side, so this side might get them too, which means bringing my line closer.
- Check before the next cut. Part 3 closes on it, my words being that I need to make sure I'm not making the mistake before I do that.
Frequently asked questions
Do you need to know how a carving will look before you start?
On my bench, not all of it. There was no final decision on my end how that Venice Room head would look, but I knew a lot of it had to sink low and rise from underneath. That part I'd develop, I said. One part would wait.
Is a big question the same as a decision?
Close, but the question comes first. On one board I said how developed one area should be was a big question for me, and right after that I had to decide. A few stay open for a while, like a connection point I wanted to keep if I'd be able to.
What do you leave under a deep hollow?
In one Venice Room workshop I said at least three millimeters, like 1/8 of an inch, and maybe about five millimeters, close to 3/16 of an inch. That depth counted as a big question. On a furniture panel my calipers read approximately 0.2 in, a little under a quarter inch, about 5 mm.
What to carve next