

Alexander Grabovetskiy, woodcarver, School of Woodcarving · Published 2020
What does "I'm okay with that" mean when a wood carver says it?
Quick answer: The line is my way of accepting a cost I can see. In Venice Room 48, part 10, a slightly exaggerated concave was the cost, and a nicely raised part beside it was the gain for people looking from below. Elsewhere it covers a rough surface, a slower tool or the grain.
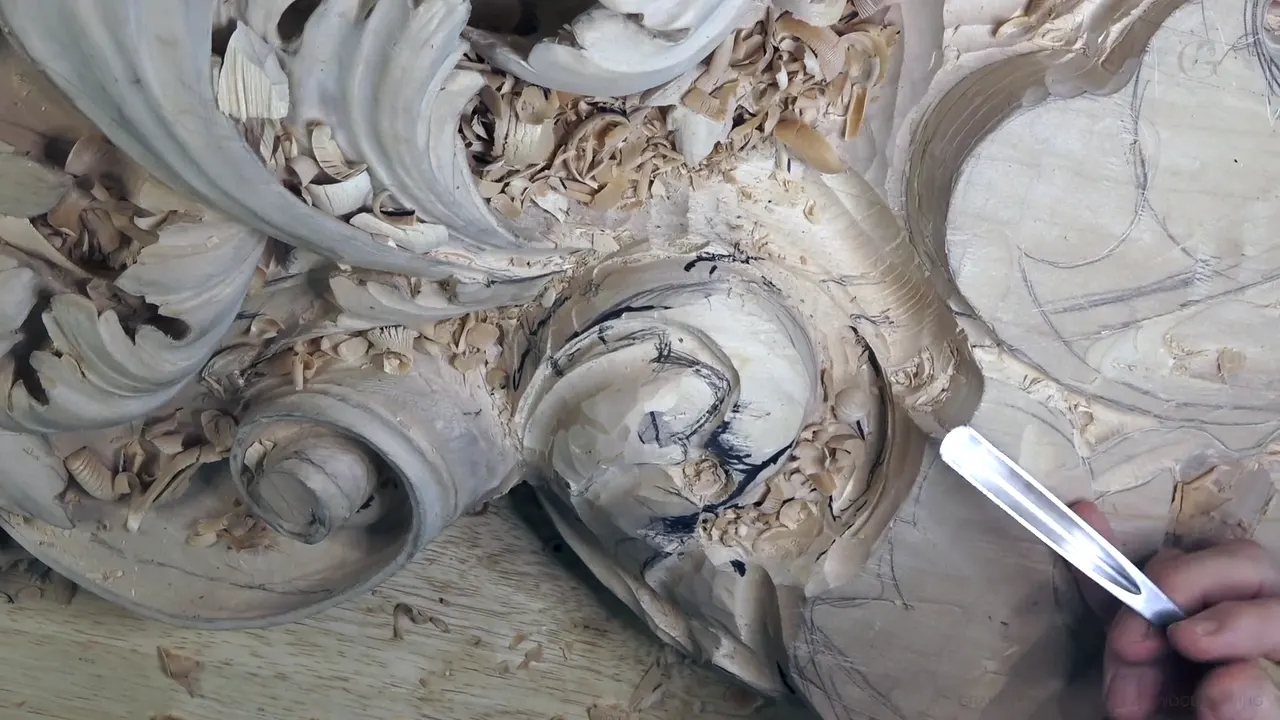

When I say I am okay with something, I have looked at what a choice costs, and I want what it keeps. In Venice Room 48, part 10, the choice was a concave that was maybe a little exaggerated. I told you I was fine with that, if I had a really nicely raised up part, because people will see the piece from below.
Have you stopped in the middle of a pass and seen a ridge you did not plan, a mark from a dull edge, or a grain running against you? Did you quit, or did you weigh it? I weigh it out loud, and these are the words that come out.
This part runs about seven and a half minutes, so I set it beside lessons from my other courses where I said the same thing. Each one is named below with a link to its own page.
Which cost did I accept in part 10?

The part opened with a number five, a little different one, maybe smaller. I wanted to blend, and I did not want to carve too deep inside of the concave. After that I could probably start creating my divisions.
Next came the eyes. I needed to create an eye, and I didn't like how it looked right now. Maybe an even closer eye, and it had to blend to the pipe. A second division followed, with another eye beside it.

The view from below came into it. It still raises up, I said, but it goes closer to this one, because if you look from the bottom, it will be visible. I told you the other choice was not going to look as nice.
Next the ridge had to come inward, inside. A different tool could do it, maybe number seven, which would be no big deal, but let's see if I'll be able to, I said. But I lost pronounced concave. All right, I said, I need to use something else, because I really want to get that concave pronounced.

I said I was going to create a little more concave. A little more of a concave. Then came the line I opened with. Maybe it's going to be a little exaggerated, I said, but I'm okay with that, as long as I have that really nicely raised up part. Again, because it's going to be seen from the bottom. The division was nice and somewhat big by then, and it made me happy.
More separations were possible if I wished, and my plan was to excavate around this separation.

Movement number one, I said, and this movement makes me happy. That's really good movement. Not detailed yet, but that is somewhat what I want to see, and a little nicer division was my plan.

The last lines were about staying safe. Straight down like that, I said, and nothing was going to hurt me. I have a big chunk of material, I said, so I should be safe. At least I would see much better where I was heading.
The parts on either side say the same kind of thing. Next door in part 11 it just doesn't look too appealing yet, I told you, but it will be. In part 9 it's not the final form, as you understand.
A somewhat deep excavation was coming in part 11, because I really wanted to show it. A shadow point, I said. My tool there was a number 11 at 4 millimeters (about 5/32 in), and a deep shadow spot was the plan, I said. Before that, in part 9, I planned to use 30 millimeters again, number 11 (about 1 3/16 in), and make a part low right away. I also said I needed to carve upward, uphill. That would need a spoon, maybe 15 millimeters (roughly 0.6 in), I'd say.
Does the word cover a mark I did not plan?

Venice Room workshop 85 had a trail on the wood. Maybe you don't see it, I said, but it means my tool became dull, so I needed to sharpen it first or just buff it. To that point I accepted the trail mark. I had no problem with it, and I would take care of sharpness a little later. Again, I was leaving approximately 6 millimeters (about 1/4 in) from the line.
On lesson 6 of Acanthus over Moldings, I said I didn't worry about the left hand side of the tool, and you can see it's really rough there. That was okay by me, because there's gonna be some petals. The right side was another story. I really wanted to make sure it was clean, and I did not want to undercut underneath.
A short one came in part 1 of workshop 71. My tool was really sharp, I said. That is enough, and a part raised up a little bit is okay, and my plan was to blend that nicer.

A convex in workshop 72, part 3, would not be full on one side. Okay with me. Nobody's going to know it except you, I said. You're the only one.

I asked you in Modern Acanthus 4 not to destroy the high spot, because that ridge has to be high before we establish the convex. Even if I have to drop that slightly more, I said, that is fine. Next on my list was number seven, 14 millimeters (about 0.55 in), a little bigger than half an inch, to start my rolling motion.
Does the word cover a bad grain direction?

The grain can win the argument. A piece in workshop 67 was in my way, and I couldn't attack from that side, because the grain runs that direction. Every project like that has areas which are really inconvenient. I'll survive, I said. I'll do my work. I actually like those challenges, because finding the right angle makes the work really interesting.

In Hashemi Flowers 37 I was working in a direction I'm not supposed to work just because of the grain. Fine by me, as long as my tools are sharp. I would take a knife to pre-establish my main form, then a number nine.

The same thing came up in workshop 26, part 8, where a flatter gouge was my plan for a first movement. And yes, I am carving against the grain, actually upward. If my tool is sharp, I said, I am okay with the direction. You could see it go really nice and smooth.
The tray in Cabernet Sauvignon 6 had it too. Actually, I was carving against the grain right there, but my tool was sharp, and that was okay by me. Again, I said, 45 degrees, and kind of round that thing.
What about the slower way?

The slower way is in workshop 70, part 10, where I said it was maybe a good idea to use the smaller tools first and then clean it with the big tools. A smaller tool is a lot easier to control, though it takes much longer, and I was okay with the extra time if it gave me much better control. A number nine came next in my plan, 10 millimeters (about 0.4 in), with careful excavating little by little.

On my plate in Butterflies 11, something was not helping. I had to find the right angle, and it looked like it would be a lot easier to start right there at the line. That's a slow process, and I had no complaint. Just go around.

A chunk was in my way in workshop 63, part 2, and I was just looking at the piece from one position, and I really needed to see a ridge. I planned to take a number three and get rid of it. If I need to recreate an even deeper concave, I will, I said, and I'd be fine with that. But I need to see this ridge.
And in workshop 64, part 3, I was still creating those rotation movements, and I had to be mindful not to dig too deep in one direction on the side, because otherwise it won't make too much sense. Although it's okay, I said, so long as I get my proper shadow.
What about another carver's way?
Another carver's way gets the line too. In Byzantine Acanthus 10, I told you a lot of people ask how to leave the surface smoother, not smooth like sandpaper, which I don't really like. If you like to use sandpaper, I'm absolutely okay with it, and with rasps and so on. Last year I spent $1,000 just to buy rasps, just to try out. I saw other carvers use them, and I always felt it was something bad, not allowed.

The floral panel, lesson 6, had a line for sandpaper too. Feel free, I said. I know furniture makers especially really like to sand that stuff, and that sits well with me. You can make it to the perfection with small rasps and so on, I said, and I don't need to.
Lily Box 11 had a word for people who judge my technique. Don't judge if you just don't like it. A different technique that works for you is fine with me too.
The same goes for design. On furniture panel 13, I wanted one flower bigger, so I could hide a detail underneath. It does look good to me, I said. Anyone who does not agree with me gets no problem from me. But that is my design, my approach. A curl in lesson 10 meant I had to add a movement somewhere else, so I made my design more complicated for just myself. No problem at all, I said, so long as it is not drawing too much attention to that point.
Even sharpening got the line. I never saw a perfect tool after sharpening by hand, I said in the Maine Coast sharpening class. When you look at the bevel, it's almost like always you can see it's arching. You're able to carve with it, no doubt, and that suits me.
Glue got it too. About to place a small, tiny flower on Lily Box 12, I said that if the glue squeezes a little bit, I am absolutely okay with this squeeze-out. I have no problem whatsoever.
What did I say about a side I did not like?
I split my verdict in workshop 57, part 3. The design was good with me, but with that side I'm not so okay. How it develops still doesn't make too much sense to me. My point was where my middle line goes.

Two pieces in workshop 65, part 9, were kind of tiny originally, talking about how wide they are, and I said I'm not 100% like it. Maybe I could move this section all the way. Yes, it would be a three-dimensional movement, but I think it would give me a lot better movement overall. Well, this one is okay. The overall movement would be more gradual, with one section a little more expanded.

Workshop 45, part 6, had a miss. Not what I was planning, and I was probably too fast. I used a number seven, which is not always the best idea to get really close to detail. It hits with the corner and breaks away. That's why it is better to use proper tools, I said, but that's okay. It's not like the end of the world. It actually created a beautiful movement and insight. Then I planned a little division, because logically it didn't look too appealing.
Where else did I say it, and what stayed?
Seven lessons sit in the table below. Every row is a different lesson, and the first one is part 10.
| Lesson | What I accepted in that lesson | What stayed |
|---|---|---|
| Venice 48.10 | A concave that might be a little exaggerated | A raised part seen from below |
| Lesson 85 | A trail mark from a tool that had gone dull | Sharpening a little later |
| Room 72 | A convex that would not be full on that side | Only you would know |
| Lesson 67 | A grain direction that blocked one side | A challenge I like |
| Venice 70 | A longer job with a smaller tool | Better control |
| Butterflies 11 | A slow start from the line | That slow process, and no complaint |
| Floral panel 6 | Furniture makers who like sandpaper | Feel free |
Where can you watch part 10?
You can watch part 10 in workshop 48 of the Part 4 course. The workshop 48 page covers the whole lesson, and part 11 comes right after this one. If you want to carve along with me, start here.
What is the one thing on your own board you could live with if it kept what you want? Pick up your gouge and give it one more pass of wood carving.
How it's done
- Name the cost. One concave looked a little exaggerated to me.
- Name what the choice keeps. The raised part had to stay high.
- Check your sharp tools. On a hard grain direction, my condition was sharp tools.
- Try a smaller tool first. Workshop 70 had the smaller tools first, then the big tools to clean it.
- Say what you are not okay with. Workshop 57 had one side to question.
- Keep looking. I wanted to see much better where I was heading.
Frequently asked questions
What should you do when a concave comes out a little exaggerated?
In workshop 48 I called one concave a little exaggerated and told you it was fine with me. The raised part next to it had to stay nicely raised, with the bottom view in mind.
What if the grain runs the wrong way for your cut?
Several lessons had it. In Hashemi Flowers 37 I worked in a direction I'm not supposed to, and sharp tools were my condition. Workshop 26 went upward, with the same condition.
Is sandpaper allowed on a carving?
My Byzantine acanthus lesson says sandpaper is fine for those who like it. The floral panel adds that furniture makers really like to sand, and that sits well with me.
What to carve next