

Alexander Grabovetskiy, woodcarver, School of Woodcarving · Published 2020
What does a wood carver mean by "development"?
Quick answer: The first words of Venice Room 63.6 are about this development. A planned undercut, a deeper eye and my number nine come after them. Elsewhere I asked whether you could see it, called one the main development and named the place where a development ended.
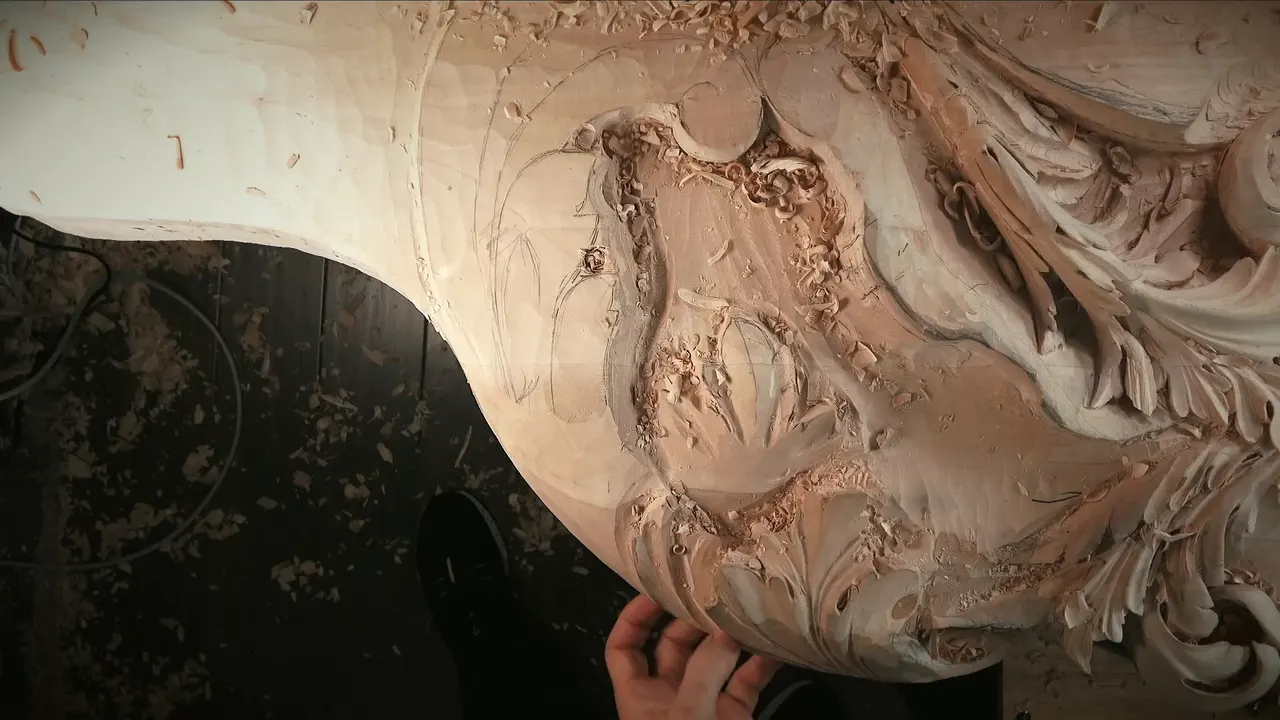

In part 6 of Venice Room 63, the first words I said were about this development. I planned an undercut, a deeper eye and a number nine next. In other lessons I asked if you could see it, called one the main development and said where one ended.
Have you ever stopped at a half-carved wood carving job and wondered just how far along it really was? Maybe a carver said "the development" and left you guessing. Here is where I said it first in this course, and then each lesson where the word came back.
How did part 6 of workshop 63 begin?
The part opens with it: "I'm still working on this development." I had done some of it "just in the livestream for the sake of livestream, of course, because I really want to make sure people know about the school." My view on that: "I believe it's a good idea just to show some of it, at least, to the outside world."

A plan followed: "I'm going to undercut a little bit this section." Right there, the thickness needed care, I said. The tool: a number 11 of 7 millimeters (0.28 in), "a little over quarter inch." A moment later I put it another way: "A little bigger than a quarter inch."
Why did I talk about livestreams before the undercut?
I paused to ask the people in my school something. "Do you think it's a good idea to do those livestreams also when you can ask me pretty much any question right on livestream?" I told you what I had in mind. I might, "in the future, not now," do "livestream only for members" and "special livestreams only for the members."
There was a limit on that idea. It had to be "logical for me, too," I said, and also "make sense without getting myself to be too busy that I can't handle it." And: "So I have to be really wise about it." Right after, I said that one again.

An April 2020 livestream of mine has a line from the same family. There I said, "I'm not going to do on the live stream all of the development, but I can do some of the development." After that: "if you want to see the full development, you have to probably just log in on my school site and just watch." Find it in the April 2020 livestreams.
The April 5 livestream shows the same habit. I said, "I just turned a different camera view so you can see the overall development," and "on Instagram, you don't see the full picture." Then I planned "a four millimeters number 11 veiner" (about 0.16 in) to go "even deeper on inside." In the Creating Shadows livestream I was "using number five," I said, and then I asked whether you could see how it was "already popping out."
Which sizes did I name for the deeper eye?
"I'm using a tool and trying to get my shape," I said. It was "almost impossible to see," I said, yet "a pipe which I really want to show" was there. Then "much deeper excavation." That, with the eye, would "probably" be the next step. And: "I need to create a much deeper shadow on inside," which I repeated.

"I also have to make sure it's really accurate because it's going to be visible," I said. Then: "really close to a face. Not too close, but still." And so: "it has to be 100% beautifully done."
My next plan: "it probably makes sense to create more shadow and excavate." The eye needed "little deeper shadow." My tool would be number 11, "but a smaller version of number 11," at 3 millimeters (about 1/8 in), "like one-eighth of an inch." And "carefully, little by little," I would take out material.

A limit showed up too: "I'm limited by this part of eye." So I said I needed to "use probably even smaller, like one and a half millimeters" (about 0.06 in) "and excavate somehow that way." Then, on whether I had to: "I really don't have to. It's still going to look beautiful. I want to, okay? And it makes a big difference for me."
Then a back bend: "going to take back bend, which in this case would be 6 millimeters" (about 0.24 in), with the sweep "two. Almost nothing." And: "carefully going to create that shadow. I really need that shadow."

I gave my reason and said I might be repeating myself: "it's the most important thing in wood carving, shadows. Lights and shadows." Wikipedia has short pages on shadow and light and dark if you want more. My next words were "Get a little deeper this way." And: "yes, now I can see."
The part ends on a plan. How deep I could go depended on the thickness of my material, I said. My last line called it "a good idea for me to get my number nine and excavate on inside that way, that direction, to give even more pop."

What do the other parts of workshop 63 add?
Over in part 5, I said, "I can show you complete picture." I was sorry you did not see when I was in "this area," because I forgot to turn the other camera. Then: "let me also show you in overall development how it looks. And it doesn't look too bad at all." The same part has a skew gouge, a number seven, that gave me "absolutely beautiful, clean cut."

A pipe comes up again in part 7. "Now I need to exaggerate that pipe," I said, because "that pipe has to be rounded, and now it is not." Number seven was my plan for the roundness. You can see where each part sits in the whole workshop 63 lesson.
Part 7 starts with "I've got plug out." Then: "it just gives me beautiful shadow. Really deep shadow." I would do the same on the other side, "inside that direction," and about depth: "And again, I don't want to overdo it." My words included "attack that from all the positions, and even undercut uphill like that to make it really deep and nice." The size: "Quarter inch, number nine" (about 6 mm). A little later, I called it "Really good excavation," and I was "really happy about that."
Which other Venice Room workshops say it?
Workshop 62 sits just before this one. Part 5 of it had lines "just to indicate the movement." They were "preliminary," and I would do them "later like a clean cut." Then: "Now it's not." And: "But you should be able to see the overall development." Also: "it should look good."
Part 11 of that workshop asks: "can you see the development?" I could show it "in overall," and I said it "looks really organic. It starts right there, moves like this."

Part 3 of workshop 51 has this: "create a clean canvas. See the development? It's beautiful. This goes above that movement." I was using a number 3, "one inch right now" (about 25 mm), "just to create preliminary clean canvas before I can further develop it." You can open workshop 51 to watch it.
Part 2 of that workshop has a point. I did not have to get its exact place, I said, "but it was somewhere right here." And: "that is going to be my boundary for this development."

In workshop 53, part 1, I said I wanted "to do something different in every area." The flow would stay, but the development would be "a little different." Later in that part, I said this about it: "For me, it is more important overall look, overall development."
In workshop 54, part 11, I said, "I shouldn't say ancient or antique. It is 15th, 16th century design authentic to Venice." And of that: "that is what I'm working on." Part 3 of that workshop adds, "I'm going to excavate the hole underneath of this development, the main development." Wikipedia has a short page on Venice.
Workshop 56, part 10, talks about going "right in the middle between those two movements" and "like a front of a fisher boat." Then: "it's always like that, my starting point for the development of foliage. It doesn't matter if it's acanthus leaf or not, even if it's grapes."

Part 2 of workshop 58 has a groove "on inside," a shell on one side and a shell "also on another side." About it all: "that is pretty much the result or the idea of this development, okay? And those details, they make a big difference."
Workshop 57 uses the word for a shell. Part 4: "the development of shell or shell development, I should say, on this side," and it would be "exactly the same in different areas."

Venice Room 16, part 9, has me saying I still had "to probably take a little more from the side and create a little thicker chunk." It says why I was working that way: it would be "visible from the bottom." And: "I would approach absolutely differently to this development if it would not be looked from the bottom." Then: "for me, it makes sense to create something nice" that is "accessible and visible."

Workshop 45, part 8, has a place where one ended. I could "give little notches like this, create more interesting look," and then: "that is probably the end of this development." The words came a second time. I did not know where to go next: "I'm not sure if I should move this way or I should jump on another side." "I'm probably going to jump on another side and work on that side a little later," I said.

Workshop 52 uses the word in another sense. Part 7, about design: "people who do understand design and do understand the development of acanthus and studied that, actually, the history of development of acanthus, they can see." I went on, "in different cultures, there's a different concaves and different convexes." Of the Greek culture (see Greece), I said, "it's one of the most ancient cultures as far as the development of art and acanthuses." For the botany, here is the acanthus plant.
Which other courses say it?
The design part of my Furniture Panel course shows a mixed view in lesson 9. "I kind of don't like this development right here. Well, I shouldn't say I don't like it. I like it, but I don't think it's just detailed enough." Then: "I'll make a little different movement right here."

Lesson 14 of the same course has the other side: "what I don't like, I don't like this development right here. Well, I like overall movement, but I don't want to see empty space."

The first livestream I quoted mentions pens too: "One way you could develop that idea, you could use actually pretty much just whatever the pen you have and develop the movement," I said. And later, about a middle line "going to go underneath of this development."
Lesson 8 of the Lily Box course, part 13, goes the other way: "I'm really happy with the overall development, how it looks. So really, really happy." A little later: "we need to undercut it from this side and clean little bit this movement."

And in Venetian Flowers Rosette 5, part 3: "here you go, wonderful people. That is the result of the main development." I had tried a little bit of sandpaper there, and I said, "I kind of like the result."
How do the nine lessons line up?
The table holds nine lessons, with this one first. Its second column gives the gist of what I said, and the third gives the context. Where I gave a figure in millimeters, the other unit, the inch, is in parentheses. Some rows name no tool, so that cell says what was there.
| Lesson | What I said about the development | Context |
|---|---|---|
| This lesson | My first line of the part, before the undercut | 7 mm, number 11 (0.28 in) |
| Workshop 62 | A look at the overall shape, even on a camera | Preliminary lines |
| Workshop 51 | Asking you to look, then calling it beautiful | Number 3, one inch (about 25 mm) |
| Workshop 54 | The hole underneath of the main development | An excavation |
| Workshop 58 | The idea of this one, with a groove and a shell | Small details |
| Workshop 16 | Working differently if nobody saw it from below | A thicker chunk |
| Workshop 45 | The end of it, then probably another side | Little notches |
| Furniture Panel 9 | Liking it, but not finding it detailed enough | Another movement |
| Lily Box 8 | Really, really happy about the overall look | Glue to clean |
Where can you watch the full video of each lesson?
Every lesson named above lives inside one of my courses. This lesson holds all of workshop 63, and workshops 62 to 73 are in Venice Room Part 6. The sculpture, relief and furniture pages linked here are for reading. To watch the full videos, start here.
How it's done
- The undercut. My plan was to undercut a little bit of the section with a 7 millimeter number 11, a little over a quarter inch, and I had to watch the thickness there.
- The deeper eye. I needed a much deeper shadow on the inside, so I planned a smaller number 11, 3 millimeters, like one-eighth of an inch.
- The back bend. I named a back bend with a sweep of two, almost nothing, and then that shadow, carefully.
- The number nine. My last plan in the part was a number nine for the inside, in that direction, to give even more pop.
Frequently asked questions
What was the first thing I said in part 6?
That I was still working on the development, and that part of it had been in the livestream. Then came a planned undercut with a number 11, 7 millimeters, which I called a little over a quarter inch.
Which sizes did I name for the eye in part 6?
I planned a smaller number 11, 3 millimeters (about 1/8 in), and probably 1.5 mm (about 0.06 in) after it. I also named a back bend of 6 mm (about 0.24 in), with a sweep of two, and a number nine for the inside.
Why did I want the eye deeper?
The shadow was something I really needed, I said, and shadows, lights and shadows, are the most important thing in wood carving. Going deeper was not something I had to do, but I wanted to, and it makes a big difference for me.
What to carve next
- Workshop 63 lesson
- Workshop 62 to 73 course
- Workshop 62 lesson
- Workshop 51 lesson
- Workshop 53 lesson
- Workshop 54 lesson
- Workshop 56 lesson
- Workshop 58 lesson
- Workshop 57 lesson
- Workshop 16 lesson
- Workshop 45 lesson
- Furniture Panel lesson 9
- Furniture Panel lesson 14
- Lily Box lesson 8
- Venetian Flowers Rosette lesson 5
- April 2020 livestreams