
Alexander Grabovetskiy, woodcarver, School of Woodcarving · Published 2018
How many petals should a carved flower have?
Quick answer: The petal count of a carved flower is yours to choose, and on my Hashemi panel I divided this flower into approximately five. Seven would do too, I said, or eight. When I split one petal near the close of the lesson it made six, and because I like the Fibonacci numbers, I looked for spots to reach eight.
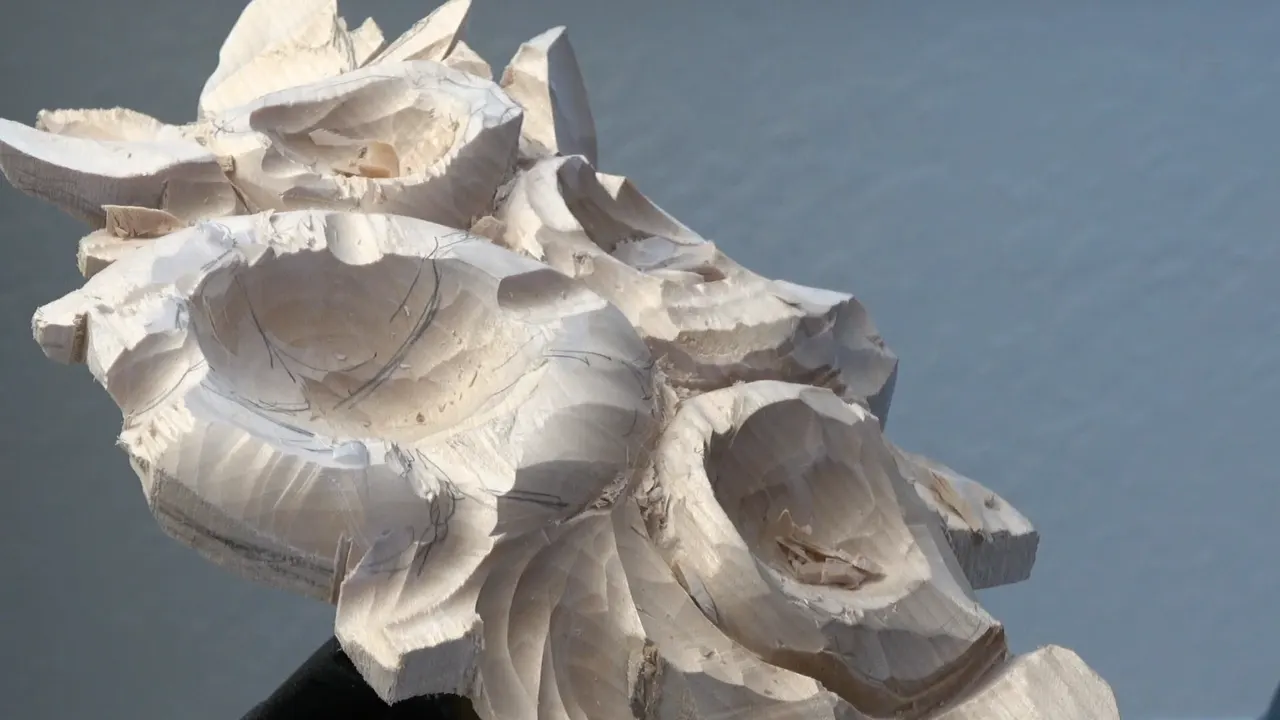
The number of petals on a carved flower is your choice, and on this flower of my limewood Hashemi panel I chose approximately five. You can divide in seven if you wish, or eight, I said as lesson 30 of Carving Hashemi Flowers began. Near its close I split one petal into two smaller ones, to show you how. That made six. I like to follow the Fibonacci number, and after five it will be eight, so I had to find a couple more spots.
Have you ever drawn a flower on a piece of paper? Did each petal come out a little different from the one beside it? Then you already know the look I wanted here. Below is how I counted the petals, marked them, chose which one tucks under, and dug them out.

Counting and carving the petals, in seven lines
Five petals, approximately.
Pencil goes on first, freehand, and every petal is only semi same as the next one, the way I wanted it.
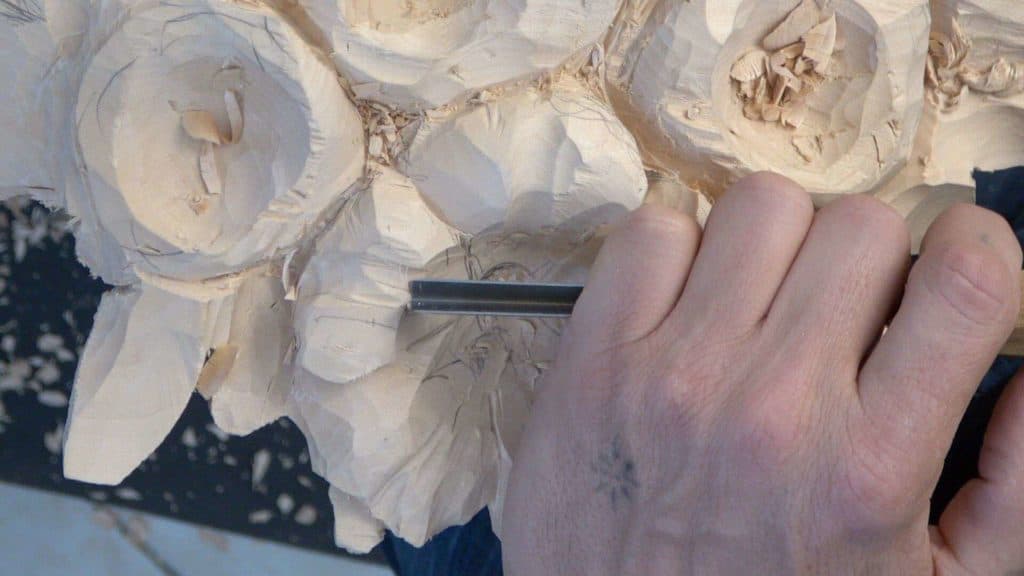
A couple of straight passes with a V tool.
Usually one petal lies on top of another, so I choose which one gets tucked underneath.
Concaves and convexes run out from the middle.
Hollowed petals, never a true perfect round.
Split one of the five and the count climbs on to eight, the next Fibonacci number.

How many petals did I give this flower?
Approximately five. I said five petals first and then approximately five, all in the first minute of lesson 30. They're supposed to grow from inside out. Get a different pencil, I said. The idea is to make it look like you're drawing a flower on a piece of paper.
You make those petals just semi same. They're not the same, but approximately. After the pencil came the plan for all the waviness and stuff like this.
When I drew four flowers in lesson 42, circles got the same advice. I encourage you not to use just any compass or anything else to make a perfect round. Hand-draw it. And it's actually better if it's not perfect, because it has to have some kind of waviness, and those four were all a little different in size anyway.

Why skip six and go on to eight petals?
I like to follow the Fibonacci number. That came at the close of lesson 30, while I fixed the overall movement of the flower. I divided it in five, I said, but you don't have to divide in five, and some sections can become smaller petals if you wish.
I did it on one of them, to show you. But if I do that, I have to repeat that, so that has to be divided in eight. Right now it's six, five main petals and this new one, and I have to find a couple more spots to do the same.
What is that number? In lesson 2 of my furniture panel design course I spelled it out while I set a margin. One plus one equals two, two plus one equals three, and three plus two equals five, and on and on. On that board 10 millimeters (3/8 in) was my one, and 10 plus 10 is 20, which is 3/4 of an inch, so I left about 3/4 of an inch. I think it's going to be a more appealing look to the eye. I don't know how it works.
The numbers carry the name of Fibonacci, an Italian mathematician from Pisa, and Wikipedia gives the list as 0, 1, 1, 2, 3, 5, 8, 13 and on. Six is not on it.

Do I count by Fibonacci on other carvings?
On several, and I said so on camera. In lesson 35 of this course I answered why I subdivide the first ring in five. As many parts as you wish, I said, five or more, and eight works too. My reason is that I like to be really close to nature, and in my opinion a flower closer to nature with Fibonacci numbers is going to look better. And if you don't like the idea of Fibonacci numbers, feel free, I said, and create whatever you feel looks better.
The leaves of my furniture panel design went the same way in lesson 14. One, two, three, four, and it was not good. A little leaf made five, and with three flowers I said we need at least eight. If we follow Fibonacci numbers, it's got to be either five or eight, and I went with eight, the last one a small volute made even smaller. On the same drawing I made five filler flowers. It's got to be either three, five, or eight, I said, or whatever the next number is.
Grapes count too. On my Tray of Blessing the question came up of how many grapes to put. In this case I got three, I said, and I would put a couple more right there if I had the thickness, but I don't have a thickness. A lot of people have no idea about Fibonacci, but it's going to make you happy, so you'll know.
| Where I counted | What I said about the number there | Count |
|---|---|---|
| This flower, lesson 30 | Approximately five, though seven would do | Five |
| The split petal | Six for now, and the count had to climb | Eight |
| Hashemi lesson 35 | As many parts as you like, five or more | Five |
| Furniture panel leaves | Three flowers needed at least eight | Eight |
| Its filler flowers | Picked to land on a Fibonacci number | Five |
| The grape bunch | Three, with no thickness for any more | Three |
What do real plants do? Wikipedia's page on the petal says flowers of eudicots, the largest group of dicots, most often have four or five petals, while monocots have three or six, with many exceptions. The sequence page says field daisies most often have petals in counts of Fibonacci numbers, and that the numbers show up in the arrangement of leaves on a stem, though not in all species. Six petals grow in nature too. Eight, on this flower, was my choice, and the Fibonacci numbers are the ones I follow.

Do the petals have to match each other?
Only approximately. Lesson 30 opens on that idea, since before a single petal went in I said there is no such thing as perfection in nature.
In part three, after I refined the concaves and the convex movements, I talked about all the flowers. Sometimes they look about the same on all the different flowers, I said. Even if we do about the same on all of those, they're still going to come out a little different from each other.

How do you mark where one petal ends?
With a V tool, in a couple of passes, so I could see exactly where those petals divide. Each pass went straight down. Any V tool will work, but I really like this number 16. It is 35 degrees, and that can go really far inside.
Its angle has a page of its own in lesson 22, and lesson 17 asks why carvers start with the V tool.

Which petal goes underneath which?
The one that looks better, and part two made me think about it more than once. The first one, back in part one, was a little thing that is supposed to grow from underneath. With the same V tool I made a semi undercut, just carefully, because I left a small, tiny piece there and it is kind of fragile. Then I rotated the panel, since it was easier to attack from the other side.
They're not really separated in real life, I said. Usually one leaf goes on top of another, so let's decide which is going to go where. Hope I make sense. I know it doesn't make sense sometimes, but just watch what I'm doing and you'll understand exactly what I'm trying to get.
For an undercut I am just laying the V tool on one of its sides. And sometimes it's a good idea to go a little extreme. I know lots of that is going to be hidden by the upper layer. But sometimes when people look from the side, they can catch little tiny details, and that's a good idea to take care of.

Part two had me going back and forth on two petals. Should this one go underneath that one, or the other way? I picked one, and it's okay, but it doesn't look too good, I said. Let me finish all and think which way is better.
I don't want to see two petals on the same level. One of them has to go underneath, or a little below the other one. A little leaf can look really small, but once you undercut it, it looks a little bigger from the side.

Where is the middle of a carved flower?
Off to one side, on this one. My concaves and convexes all go from inside out, which means all my rays run in toward the middle. Somewhere right there, I said first, not right in the center. Then I changed my mind. Oh, no, it's not, I said, and chose another direction, because this flower is going to grow on an angle a little bit. Every ray has to go from that point out.
On a leaf in lesson 38 I put a number on it. Usually I go about six parts out of ten, which is by the Fibonacci sequence, by the golden ratio rule. I just eyeball it, I don't measure it. If it's just slightly off-center, usually that means it's good, I said.

Why should a carved petal look like a boat?
Those are petals, and petals have to look like a boat. That came in part three, while I dug more concaves with a number seven about half an inch (13 mm) wide. Round all over is what I didn't want. What's the best word to describe? It cannot be just a true perfect round, which means I have to dig out some more areas on the inside.
Part two opened with a number nine for the concaves. I made them in some spots, not everywhere, some bigger and some smaller.

The edge of the flower also has to be kind of wavy, in my case, because I want to do a complicated flower. Exactly the same number nine dug some spots out of it. Later on you can always refine that waviness with smaller tools. I'm not sure if I even can say waviness, if that is the appropriate word.
Near the end of part three the number seven came back. At the end I want to make it look like it's wavy, I said, and the way to do that is to use it upside down and undercut.

How careful should you be near a thin petal?
Very, and I said it more than once. I do have to be careful, because I don't have much material right here. Later in part three I was already all the way, so I couldn't do any more in that spot, and I had to be really careful of the whole area.
The last undercut of part three came after a V tool pass, with the number five, a quarter inch, but really carefully. Right now this piece is really fragile, I said, and I kind of don't want to break it.

Which tools finished the petals?
The number five came up again and again. A small gouge, number five, a quarter inch (6 mm), removed some of the wall of a future petal, used upside down.
Part four is all about making it look more or less finished, because you can see some rough spots, and they're not too appealing. It doesn't have to be really smooth. With the number five I made different movements, and maybe a smaller number nine, a quarter inch, gave some more concaves. That's all about how creative you are, how nicely you want it to look. In some spots you could use an even smaller number nine or number eight, just to create more shadow lines, so be creative with that.

Upside down, the number five made a convex. Maybe some straight, I said, and out came a number one, eight millimeters (5/16 in). You even could use a carving knife and create some movements. This carving knife is actually an excellent tool, and mine is a number 12.

Do I leave tool marks on a carved flower?
On mine they stay. I am leaving all my tool marks right on the piece, because depending how you look at it, they create beautiful shadows. Every facet, every tool mark makes a beautiful look, at least in my opinion. You don't have to agree with me.
Sandpaper is something I don't like to use, because it just doesn't look the same. And if you want to use sandpaper, it's okay with me, 100% okay. Up to you. It's just going to look a little different.

Late in this course, in lesson 47, I said it again. If you want it to look smoother, you can always use sandpaper, but I'd rather not, because I think it looks really good without it. Like I said, you could. Lesson 24 has the longer version, with tool marks set against trade and art.

Why do mistakes come when you rush the detail?
For me they come when I try to get as much as possible in one day. Say I set in, the boasting, and then try to get the final detail the same day. I have a tendency to make a little more mistakes, because with the big tools you're trying to rush everything, quick movements and so on. Then you take tiny tools in your hands, but your hands already did the big stuff.
Whether carving is about speed at all is the question of lesson 18.

Where lesson 30 leaves the flower
Five petals, one split in two, and a count on its way to eight, with all the tool marks left on. The first rings came from lesson 29, and the next lesson is lesson 31.
The panel itself is a beautiful piece of limewood with some kind of darker color, and I have had that piece for a long time, over 10 years, I believe, as I said in lesson 1. Wikipedia says the wood of the lime tree is fairly soft with minimal grain, and that makes it popular for wood carving.

All 49 lessons of this panel are behind tuition at the school.
How it's done
- Pencil about five petals. Sketch them freehand and only semi same, each one growing outward.
- Mark the divisions. A V tool goes straight down a couple of times, showing exactly where those petals divide.
- Choose which petal goes under. Pick the one that looks better underneath, then tip the V tool onto one side for a semi undercut, carefully where the piece is small and fragile.
- Set the middle. Find where this flower grows from, off to one side, and run each concave and convex from there.
- Dig the hollows. A number nine opens concaves in some spots. A half inch number seven deepens them into boat shapes.
- Make the edge wavy. Dig spots out of the edge with that same nine, and refine the waviness later with smaller tools.
- Subdivide to eight. Split one of the five and you have six, so keep finding spots until the count reaches eight.
Frequently asked questions
Can a carved flower have six petals?
Six grow in nature, and Wikipedia's page on the petal says monocots often have three or six. On my Hashemi flower six came when I subdivided one of five to show how, and because I like Fibonacci numbers, I looked for more places to split on the way to eight.
Do all the petals need to be the same size?
Semi same is what I drew here, close to each other but never exact, the way a hand draws petals on paper. Even with similar work on all the flowers, each one will still end up looking a bit unlike the rest, as I said in part three.
What V tool separates the petals?
Any V tool will work, I said in lesson 30, but the one I really like is the number 16 at 35 degrees, because it reaches really far inside. A couple of straight down passes showed where the petals divide, and tipped onto one side, the same tool made my undercuts.
What to carve next