
Alexander Grabovetskiy, woodcarver, School of Woodcarving · Published 2018
Why does a carved flower start out as a donut?
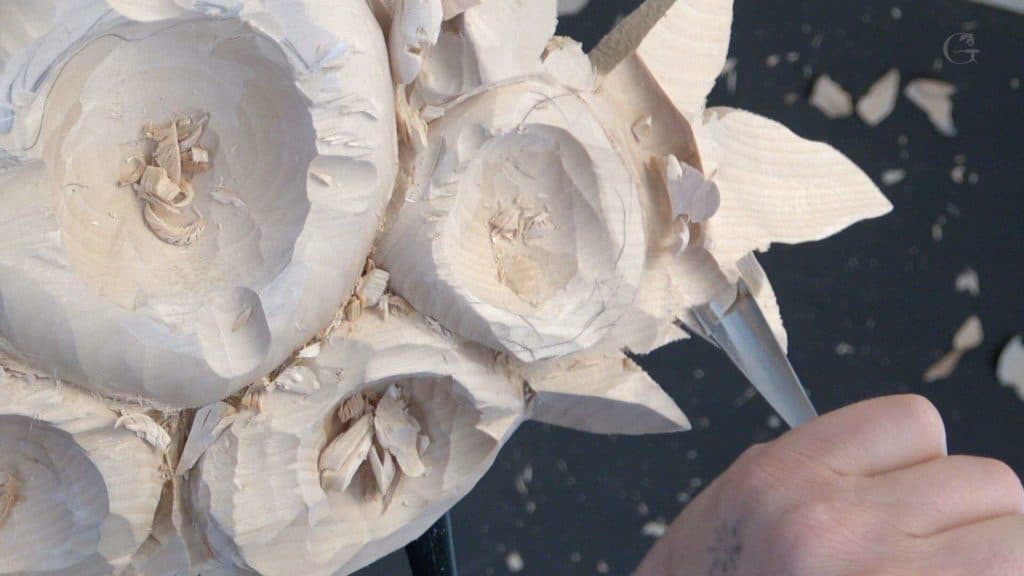
Quick answer: The donut on a carved flower is its first ring, the flower's first layer, roughed around a hollow middle before any petal exists. I shaped it outward in lesson 29, gradually, using a number 5 gouge 25 mm (one inch) wide, and kept it a semi donut, higher in some spots and lower in others.
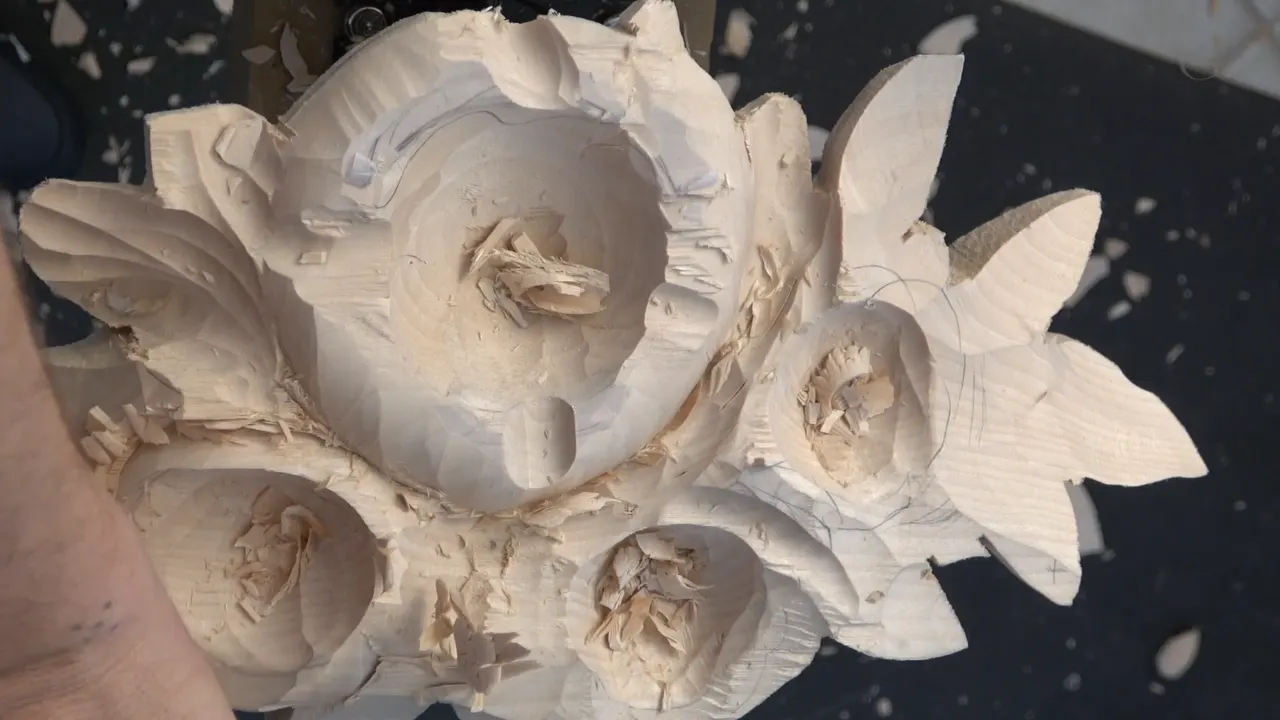
A carved flower starts out as a donut because its first ring, the first layer of the flower, goes around a hollow in the middle. That is lesson 29 of Carving Hashemi Flowers, on my limewood panel. My first ring came off a number 5, and at first it was a donut. Semi donut, okay. Not like a real donut.
Would you like to know where the first pass on a carved flower goes? And which tools I picked for it, with every size I said out loud, in the order I picked them? Then start where I started, with the separation cut and the ring.

What I did to the four flowers in lesson 29
Separation cuts came first, made by a number 9 gouge and a 12 ounce mallet.
The flowers can't be on the same level, so I was not afraid to take a lot at once.
I worked the ring outward, gradually.
The 9 came back for a few passes that gave the inside its waviness.
A V tool outlined the flowers without the mallet.
Nothing got measured. I wanted it close to nature.
What does a donut mean on a carved flower?
It means the first ring, a round band of wood with a hollow in its middle. In the lesson I explained the word ring. It's the first layer of the flower, which means going from inside out. Gradually.
The 5 went in first. That is actually the first step to make that flower look like a donut, I said, and right away I fixed my own word. Semi donut, not like a real donut, because some spots are going to be higher and some spots lower. But still, it's preliminary.

All I did with that gouge was remove excess material. Half a minute later, in my opinion, it was a donut. Wikipedia gives that ring shape a math name, a torus, but on the bench donut is the word I use.
Why separate the flowers before the ring?
They can't be on the same level. By separation I mean exactly that, and the lesson opens with it. Let's separate those flowers, I said. Let me make a separation cut, and the main one, the biggest one, goes first.
I said I could probably use just a V tool for the beginning, or even a gouge, and it's actually the same result. So I picked up a number 9, about 5/8 of an inch, which is 16 millimeters, with a little smaller mallet. Twelve ounces, about 340 grams. Preliminary, just around, because it has to go around.

That's why I'm kind of not afraid to take a lot of material at once, I said. The flowers have to sit at different heights anyway.
On the Venetian flowers rosette, before I shaped two parts of the rosette that meet, the first thing I wanted was a separation cut between them. One part goes underneath the other, and I wanted to make sure the other one looks like it is just raising up. I took a number 11, about 4 mm (5/32 in), and then went straight down to relieve that separation.

Every tool I named in this lesson
Here they are in the order I first picked each one, with the sizes I said. Any V tool will work, I said, and the sizes below are simply the ones I had in my hand.
| Tool I named and its size | What it did on the four flowers | Stage |
|---|---|---|
| Number 9, about 5/8 inch (16 mm), with a 12 ounce mallet | Separation around the biggest flower | Separating |
| A one inch number 5 (25 mm) | Roughed the first ring into a semi donut, removing excess material | Ring |
| The 9 again | A few passes in separate spots, so the inside got its waviness | Waviness |
| V tool number 16, 6 mm (1/4 in) | Parted and outlined the flowers, and in part three needed no mallet | Outline |
| Number 8, one inch (25 mm) | Made the socket, or bowl, a little bigger | Socket |
| The big number 7 | Bigger passes so it would look much cleaner, until one went wrong | Cleanup |
| That same 5, after the break | A little safer | Finish |

Why does the middle of the flower stay hollow?
Another layer goes in there later. Late in part two I said I need to make this socket, or this bowl, a little bigger, and I took the number 8 again for it.
In lesson 32, when the first ring was finished, I told you I don't worry if it's a little rough on the inside, because another layer gets glued on inside. Well, in my opinion, it looked good.

I made the same kind of socket in workshop 74 of the Venice Room, with a big number 9, 3/4 of an inch (19 mm). There, I had to be really mindful how deep I was going, because there was not too much material left. I needed some space for my second layer, because it was going to be doweled down on inside.
Then I wanted a smooth transition from inside out. That ridge doesn't look too appealing, doesn't look too good. I do have back bends, and in that case they helped me a lot, so I just knocked the ridge down. And I said there that it's the same process as how I create the flowers in Hashemi flowers. It looks almost like a donut shape, and it is not a donut, you know.

Which way does the first ring grow?
Downhill. In lesson 43 I stopped to find the best way to explain it, and this is what came out. The first ring of the flower grows from inside and curls downhill, and most of the peony petals grow uphill.
But it would be unnatural if only one ring went downhill. So some other areas can grow downhill somewhat too, and I excavate around them on the inside. Hopefully you will see exactly what I mean when you watch it.

Why should the donut be wavy?
It cannot be just the same level, I said, so it has to have some kind of waviness, an imperfection in it. So I used the 9 and made a few passes here and there.
It doesn't really matter where you're planning to do that. I lowered one spot down. After that I worked on details, well, not the real details, semi kind of details, and this leaf can be higher than that one, for example.

On the Venice Room flower I said it another way. I don't want to create a perfect shape, because it never happens in nature, and it's not going to look good if you create it too perfect.
Rounding the petals on the chamomile rosette, I pushed it further. It doesn't have to be perfect. Quite the opposite. I highly encourage you not to be perfect with those movements, because in nature those chamomile flowers look perfect, but if you look closer, they're really not. It will be more organic if it's not perfect-ish.
And lesson 30 of this course opens with the same idea. There's no such thing as perfection in nature.

Can a donut be too flat?
It can, and I told my students so in Maine. In class 8 of that Maine course, the one named for Grinling Gibbons, I was cleaning the center of a flower with a number 7. It does not have to be perfect, I said. Matter of fact, it's better if it's not perfect.
But it is not supposed to be a donut, I said, and I don't want to see a flat donut. It's got to be the full 3D, okay, full 3D, please. I know you all love donuts, but it's not the place to express your love.

There is a dome underneath, and going too deep there is a problem, I told them, and I should remind myself of that too. A minute later I called that center a donut anyway. Donut is all right, but it's not a donut.
So the two lessons agree. Here on the Hashemi panel the donut is only the rough first step of the ring, a semi donut that already climbs and dips. In Maine the center had to be fully round, never a flat ring.
What does the grain have to do with a donut?
I use a donut to teach grain as well. On a chalkboard in front of students, for the class you can watch as Carving with the Grain, I drew a piece of wood with lines for its grain. Not migraine, but grain of the wood.
Picture number one came next. A donut. Can you see a donut? There are multiple points where we can start carving a donut, and you always start with the short grain and follow to the long grain.

Short is this part, short is that part, and a long part is right there. But what about inside? You can't find where's the short and where is the long. So that terminology probably won't work anymore, and the second idea kicks in, which that page goes through in full.
Is the ring the slow part of the panel?
Far from it. Hopefully, you can see four flowers, I said halfway through part two. I know it doesn't look appealing yet, but that is just the boasting stage, the quickest stage, which doesn't take too long to do. Then we're going to work on details, and that's the longest.

In part three I took the V tool again to outline, and I didn't even have to use my mallet. Some wood carvers would call this the setting in stage. We set the main movement in the second layer.
And I'm not measuring anything right now with the flowers, and my goal is to make it look as close as possible to nature and still be more or less accurate to my design. But if I'm off a little bit, I'm okay.
How thin can the edge get?
About 1/16 of an inch (1.5 mm) on one edge of my panel. Let me think how much material I have, I said. There was a lot of material in one spot, so I could lower that section down somewhat, but without hitting the edge.

The same number 9 went around, the 16 millimeter one, and I actually can go inward and inside, just like that.
The V tool needed the same care in the second part. I was going to kind of undercut with it. Just keep an eye. I don't have too much thickness in this area, so I wanted to make sure I'm not going too crazy with this side. Then, well, actually, that side looked really, really thick. I could take it down all the way, so I made that flower more like from the sideway and took a big gouge again to remove some more.
What happens when you rush the ring?
Wood breaks where you did not want it to. I took the big number 7 again to make bigger passes, so it would look much cleaner. Oh, that's not what I wanted to do. It's okay.

But like I said before, if it's broke, that means it's meant to be. I just removed that edge and kept it like that. Exactly that happens when I am trying to be really quick, when I'm rushing. Too many mistakes on this project, I know.
After that I picked the 5 again, because I think it's a little safer. Lesson 11 has more of those mistakes and how I fixed each one, and lesson 18 asks if carving is about speed at all.

Will the four flowers end up the same?
They can look about the same at this stage. This doesn't look like the flower I imagine, I said in part three of lesson 30, but it is just the first rings of the flowers. Sometimes they look about the same on all different flowers, and still at the end they are going to look a little different from each other.
And in lesson 33 I said the first ring will be semi-similar in my case. There are many different types in nature, but on this carving I wanted just a few varieties, not too many. Here in lesson 29 I made one flower a little wider and a little bigger, and later I lowered one a little more.

All 49 lessons of this panel are behind tuition at the school. Lesson 1 starts with the board itself, about 12 inches wide and 24 inches long (30 by 61 cm), and that board is my first layer. Would you like to watch every pass of the ring, with the sizes said out loud? Then come to the bench with me.
How it's done
- Separate the flowers. Go around each flower with the number 9 and a smaller mallet, so no two of them stay on the same level.
- Rough the first ring. Take the number 5 and work outward, gradually, until the ring turns into a donut.
- Break the level. Make a few passes with the 9 here and there, so the inside gets its waviness.
- Outline with a V tool. Run a V tool around each flower; mine was the number 16, and I needed no mallet for it.
- Open the socket. Make the bowl in the middle a little bigger using the number 8.
- Mind the thin edge. Lower a section only where there is material to spare, since one edge of mine was already about 1/16 of an inch (1.5 mm).
Frequently asked questions
What is the first ring of a carved flower?
On my Hashemi panel the first ring is the band of wood around the hollow in its middle, the flower's first layer. I shaped mine using a number 5 gouge an inch (25 mm) wide, working outward a little at a time until it was a semi donut. Later on it gets divided into petals.
Should the first ring be even all the way around?
An even ring is what I avoid. Some spots go higher and some go lower, and a few passes with the 9 in separate spots give the inside its waviness. Where those passes land doesn't really matter, as long as the ring never sits at one level.
Which mallet did you use for the separation cuts on the flowers?
For the separation cuts in lesson 29 I picked a little smaller mallet, 12 ounces, or about 340 grams, and a number 9 gouge, 5/8 of an inch (16 mm) wide. Later, outlining with a V tool, I said I didn't even have to use my mallet.
What to carve next