

Alexander Grabovetskiy, woodcarver, School of Woodcarving · Published 2018
Does a carved flower have to look realistic?
Quick answer: Realism on a carved flower is optional, and it comes from shadow. Anything carved by hand is already authentic. For the small leaf in this lesson I undercut beneath it and dug under the petals, because every little shadow helps the three-dimensional look, and you decide how far to go.
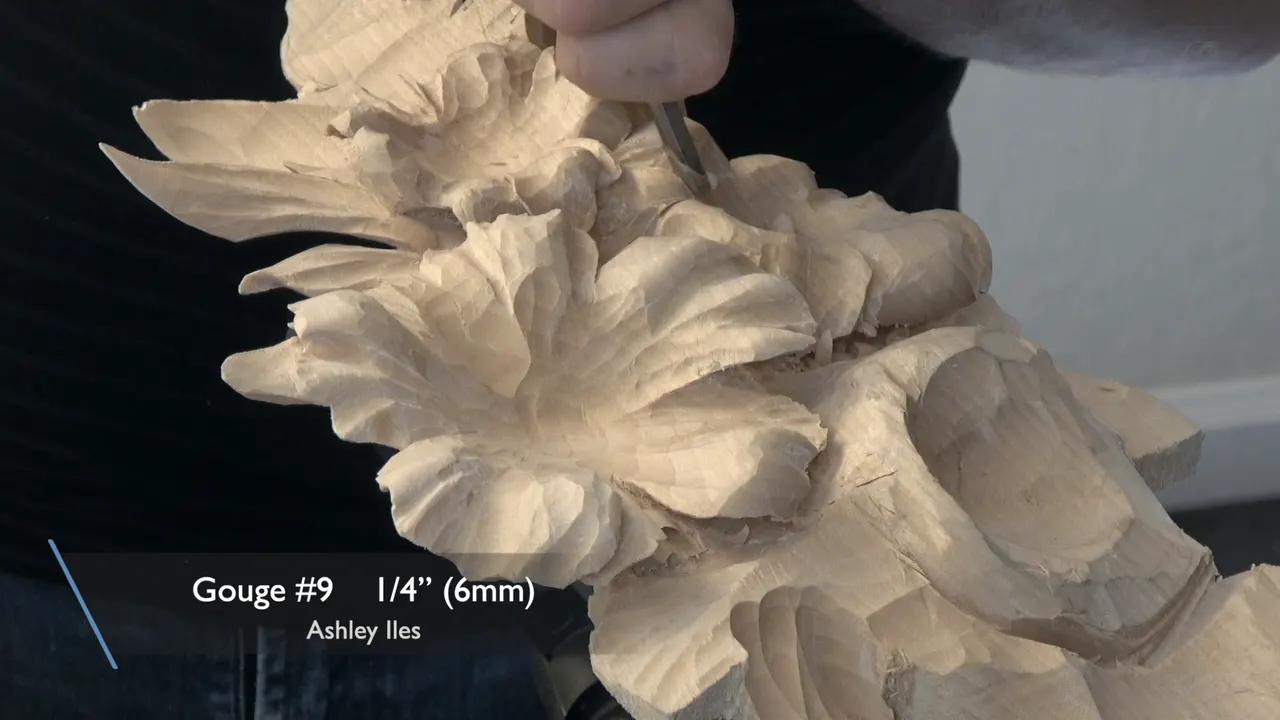
A realistic look on a carved flower is something I add with undercuts and shadow, and I said so in lesson 36 of the Hashemi flowers panel while carving one small leaf. Authentic it already was, because hands made it.
You have looked at a real flower up close, right? And you know a block of wood will never bend in the wind the way a petal does? Then the carving needs something else, and on this panel it gets shadow.
Lesson 36 picks up a chunk of wood from lesson 35, where I saved it for a small leaf. Here that leaf grows from inside of the flower out. Four parts, a lot of undercutting, and two words I had to take back on camera.

Six things lesson 36 settles about realism
Whatever you carve by hand is authentic, and looking realistic is the extra part.
The extra part, on this leaf, came from undercuts that make shadow.
The choice of how far to go is yours, and I go far, because I like flowers that look realistic.
A leaf grows downhill.
From a distance a real flower seems flawless, and up close it is not.
Grain rules get broken in this kind of carving, because you work in a lot of different directions.
Does a carved flower have to look realistic?
That part is up to you. A spot I was refining in lesson 6 of this course got weak, and I said it's up to you how extreme you want to go. And I go extreme, because I really like to make those flowers and leaves look realistic.
I also encourage you to go that way, and in lesson 47 I gave my reason. If you'll be able to do a complicated flower like that, all other carving projects will be really, really easy. So I really encourage you to try to do the realistic flower.
The other side is in lesson 45. Not every flower is complicated. You can do one the easy way, without too much undercutting, and the more realistic-looking one was the goal I was talking about there.

What is the difference between authentic and realistic?
Authentic is what your hands give the wood, and realistic is how it looks.
I mixed the two words up about a minute into the first part. The leaf had its semi-final form from a number seven, and I said I wanted to make it more authentic and looking more realistic. I caught myself right there. I shouldn't even say the word, I said. It doesn't matter what you do, it's still going to be authentic, because you've done it with your hands. What I meant was more realistic looking.
For that look I have to undercut underneath of the leaf and create the shadow. A V tool like I always do, or a small number nine, about 4 millimeters, a little bigger than 1/8 inch.

The word authentic means something else on the furniture panel bouquet. There I drew long movements running from the center of one flower, and I said I never saw any flowers in life like that. That one is more stylized, and we wanted to be authentic to the period, so I followed what they did. On that panel authentic meant true to the period, and on this leaf it means made by hand.
How do you make a carved flower look more realistic?
You dig for shadow.
In part one I took a 4 millimeter number nine and excavated even deeper underneath one petal. I know you're not going to see those really extreme excavations from underneath, I said, but they do create a shadow when the light hits. And every little shadow helps. It creates a beautiful three-dimensional look, which honestly, it is three-dimensional anyway. It just exaggerates that.

Over a lily on the Lily Box I needed an undercut at a separation point, so it looks more realistic. Every little thing helps me to create the shadow point, I said there. It's all about the shadows.
On the Venetian Flowers Rosette, lesson 3, I carved a couple of concaves on the side for even deeper shadows. If you look at the real flower, it always has some kind of folding motion closer to the center, and that gives me extra shadow, extra play.

Why undercut a spot nobody will see?
Light gets in there even where your eye won't.
Under one flower in lesson 45 I went through to the other side, and I was really happy about it, even if it won't be visible. Well, maybe it will be. I could easily place my gouge or veiner on the inside, and the light is going to travel there.
This lesson has a smaller case of the same thing. During the third part I smoothed one petal in one direction and said I liked its overall movement. It won't be too much visible anyway, because the upper part is going to cover a lot of it. But still.

Do real flowers look perfect?
From a distance they do, and up close they don't.
Carving the Chamomile and Bow Rosette, I said it doesn't have to be perfect. Quite the opposite. I highly encourage you not to be perfect with those movements, because in nature those flowers look perfect, but if you try to look closer, they're really not. It's going to be more organic if it's not perfect-ish.
Starting a flower in workshop 74 of the Venice Room, I told you it was the same process I used for the flowers in this Hashemi course. I don't want to create a perfect shape, I said, because it never happens in nature. The main divisions could be five or eight if you follow the Fibonacci sequence, but I made it just five.

Straight lines get the same treatment. In workshop 115 I went around the edges for waviness, because otherwise it won't look realistic. There is nothing in real life, almost nothing, that is a really straight line.
You can see it here in a small way. Toward the end of the last part I went to put a concave cut right in the middle of a petal, then caught it. Not right in the middle, I said, but probably to the left side from the center. A small one with an eighth of an inch (3 mm) going downhill, then bigger with the same tool, just to make some interesting movement.

Can a stylized flower still look realistic?
It can, without being true to life.
Working on the Venetian Flowers Rosette, lesson 2, I carved really tiny grooves to the center with a gouge of less than a sixteenth of an inch, pretty much 1 millimeter. That gives me a more realistic look, I said. That flower had absolutely different curves from the one I showed before, and that is also what gives a more realistic look. Inside I used some texturing with a texturing punch. In the overall composition of that rosette, the flowers look almost the same, but they are not.
Even if it's a stylized composition, I said, it's not really true to life flowers. But still, you can play with that and work with that.

Let me tell you a story I told while carving a Byzantine acanthus leaf, in that course's lesson 3. I was reading a book about old masters of the 16th and 17th century, and one part of it I really love. Two men talked about the artists carving stone and wood, and one asked, is it like you're trying to be as good as nature, to replicate the nature? And the master said no, they were trying to be even more than nature. In nature, not everything connects to the same line, I explained, so it's actually an exaggeration process of nature.
Back in lesson 6 I gave a name to some deep cuts inside leaves. Exaggeration cuts, that's how I call them. For some reason they make leaves more realistic, and the veins inside of those leaves more distinguishable.
Why does the leaf grow downhill and not go downhill?
Leaves grow, and I caught that word too.
At the very start of the first part I took the number seven to give some shape to the leaf, and I said this leaf is going to go downhill, then fixed it. Grow downhill, I should say, not go, grow.
When I came back to it in the second part, the natural tendency had movement going upward, so I could turn it a little bit this way and make it more round on one side. I hope you can see the main movement. The idea is the one I gave in lesson 47, just look at what is naturally going to look good.

What sizes did lesson 36 take?
These, in the order they came.
| Tool and size | What it did in lesson 36 | Part |
|---|---|---|
| Number seven | Gave the saved chunk some shape, a semi-final leaf form | 36.1 |
| V tool, number 16 | Undercut underneath the leaf, with an eye on how deep | 36.1 |
| Number four, 10 mm (3/8 in) | Went downhill underneath this flower, then a smoother upward movement | 36.1 |
| Small 4 mm number nine | Excavated even deeper under one petal, for a shadow | 36.1 |
| Number seven, 20 mm | Three quarter of an inch, to do more of that movement | 36.1 |
| A nine at 5/8 inch | Picked up for the saw wall, then judged maybe too big | 36.2 |
| Quarter-inch number nine | Brought the rough wall out to the edge | 36.2 |
| Small number four | Made the separation where it had happened by itself | 36.2 |
| Spoon gouge | Grabbed from the bench, whatever naturally came to my mind | 36.2 |
| Number five | Cleaned the flower a little, only to see what movements could go | 36.3 |
| Big nine, 5/8 inch | Concave cuts along the whole petal | 36.3 |
| Number four again | Blended those cuts together | 36.4 |

Which gouge takes a saw wall off a small leaf?
A smaller one than my first pick, and from the back.
After the leaf there was a wall left, the rough wall from the cut I made with just a jigsaw. I had to remove it, but carefully, because this small leaf grows from underneath. I went at it from a different position, the backside, and picked up a number nine, 5/8 of an inch, approximately 16 millimeters.

Maybe it's too big of a tool for this job, I said. A good idea is probably to use a smaller number nine at the beginning. It will be safer. So the quarter-inch number nine, 6 mm, brought it all the way to the edge.

What do you do when the wood separates by itself?
I let it make my next movement, on this leaf.
Bringing the wall to the edge, I saw it had already formed my next movement, just because it was so fragile there. I took a small gouge, a number four, and made my separation where it had naturally happened. I am absolutely okay with that, I said. And there was another one.
After that came the mess underneath, and the smaller V tool, only an eighth, 3 millimeters, number 16, made one spot a kind of undercut. Under another petal a 4 millimeter number nine took out the whole mess. It doesn't have to be 4 millimeters, I said. It could be an eighth of an inch, it could be 3/16 (about 5 mm), but something small.

What makes a small leaf look bigger?
Lowering one piece so the other grows from underneath it.
Near the end of part one I wanted to separate a little piece. Maybe I can make this one lower a little bit, I said, and just grow from underneath of this one. The V tool went first, then an undercut in one direction. This little leaf is going to look actually bigger, I said, and again, it depends from what angle you look at it.
Can you carve a flower against the grain?
With this type of carving you have to, and I said why in the fourth part.
I have to break some rules, I'm talking about grain rules, because you're working in a lot of different directions. So the tools just must be really sharp.
Earlier, in the first part, undercutting that little piece, the grain didn't help either, because I was working completely against the grain. But it's okay. I can always fix the edge, it is not a big deal.

I said the same about the tool in lesson 6, where I was carving against it too, and it's really important to have your tool really sharp, and I barely create any pressure. And if you want it to look like a realistic flower, I said in lesson 49, make sure the carved edge is a really sharp point. Don't leave any wall.
Why clean a petal before you decide its shape?
To see what is possible.
Number five first, making the flower a little cleaner. I don't have to, I said. I'm cleaning just because I want to see what type of movements I can do. And then I decided. The big number nine put in concave cuts all the way, and a smaller number nine made even more concave.
Some petals got less on purpose. One looked really nice already, so I didn't want to create too many movements on it, only maybe a small concave going downhill, to create some interest. Another one was too small, and I just made it a little smoother with a number seven.

Where lesson 36 leaves the panel
The chunk I saved is a leaf now, growing out of the flower, with shadow dug underneath and a separation the wood made by itself. The fourth part ended on the last petal, a number four blending those cuts together, and I said I'm happy with this one. Definitely, I could just clean it.
The panel itself is a beautiful piece of limewood, as I said back in lesson 1. If you only want form and shape, I said in lesson 24, a 3D printer will work for you, and if you are after art and beautiful movements, it won't. A photograph and a fine art canvas of the same scene are two different outcomes.
You have seen a shadow under a leaf on a sunny day, right? That dark line is what I dug for.
All 49 lessons of the Hashemi panel are open with tuition at the school.
How it's done
- Shape the saved chunk into a leaf. A number seven gives it a semi-final form, and the leaf grows downhill, from inside of the flower out.
- Undercut beneath the leaf. Use a V tool, number 16, and keep an eye on how deep you can go. You can't go too deep.
- Dig deep for shadow. Reach underneath with the small number nine. You won't see those excavations, but they are there for the shadow when the light hits.
- Take the saw wall off from the backside. Remove the rough jigsaw wall carefully, since the small leaf comes up from underneath it. Begin with the quarter-inch nine, which is safer than the bigger 16 mm one.
- Clean, then lay in the concaves. A number five cleans a little, only so you can see what movements you can do. Then a big number nine puts in concave cuts along the petal.
- Blend and keep the tools sharp. Finish with a number four, blending the last cuts together.
Frequently asked questions
Is a hand-carved flower authentic even if it looks rough?
Whatever you carve with your own hands is authentic, as I told you in lesson 36 of the Hashemi panel. Looking realistic is a separate thing. On that small leaf I got it by undercutting underneath and creating the shadow, with a V tool or a 4 mm number nine.
How far should you take realism on a carved flower?
As far as you want, since you decide that part. I go extreme myself, because I really like flowers and leaves that look realistic. That was in lesson 6. Lesson 45 adds that you can also do a flower the easy way, without too much undercutting.
Why carve deep excavations under petals nobody sees?
Shadow comes out of those places. In lesson 36 I admitted you're not going to see those excavations, but light hitting them makes a shadow. The carving is three-dimensional anyway, and the digging just exaggerates that look. On a lily in another course I put it shorter. It's all about the shadows.
What to carve next