
Alexander Grabovetskiy, woodcarver, School of Woodcarving · Published 2018
What angle should a V tool be for wood carving?
Quick answer: A V tool angle is the opening between the two sides of the V at its edge. Ninety, sixty and forty-five degrees are the usual ones. The 60 is the one most carvers use, and for small, tight work a 45 or a 35 is what I like. My number 16 is a 35.
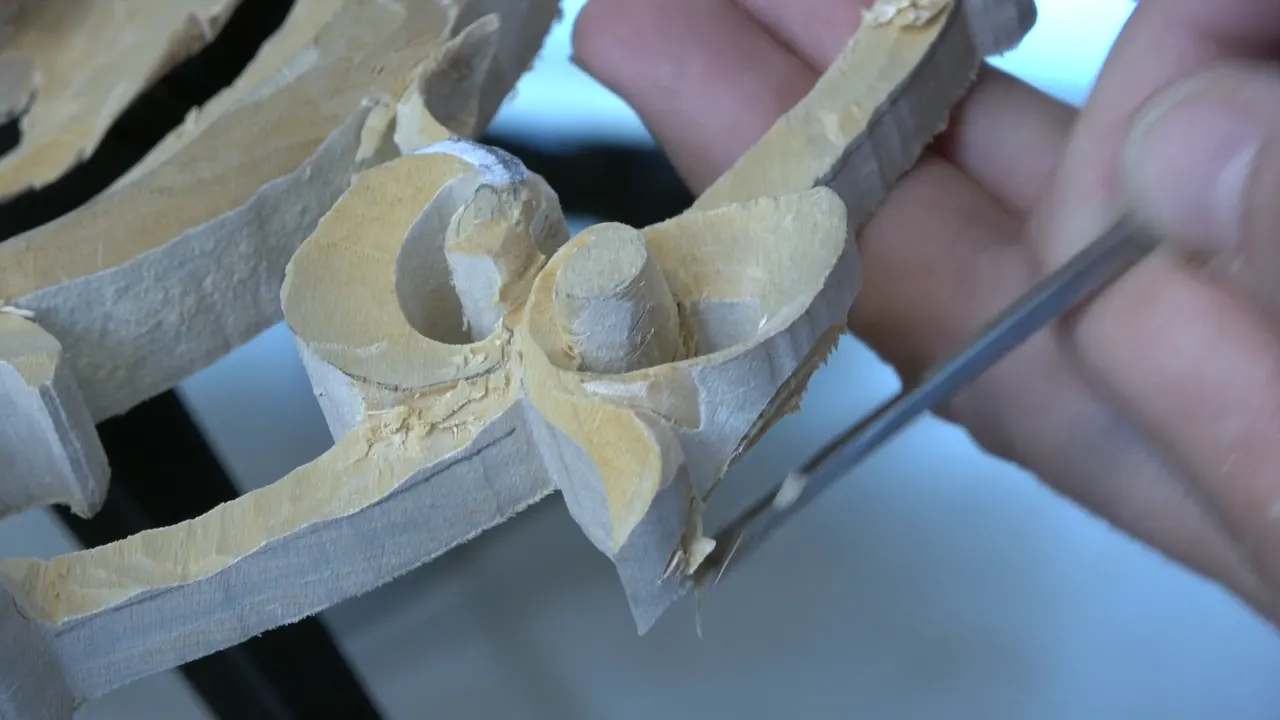
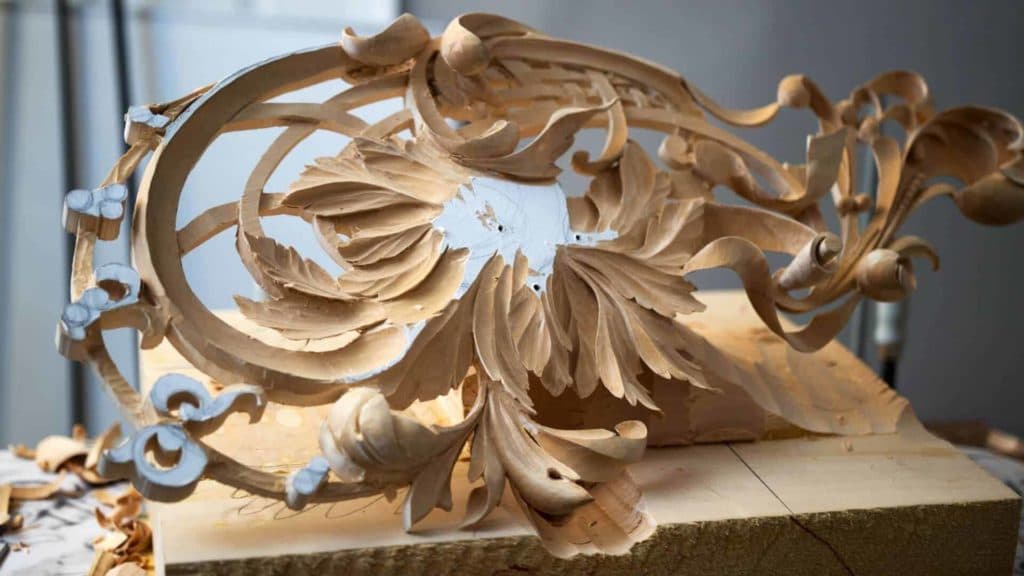
A V tool angle is how wide the V at the edge of the tool opens, and the common ones are 90 degrees, 60 degrees and 45. My number 16 is not one of them. It's 35 degrees, a really sharp angle, and I said so in lesson 22 of my Carving Hashemi Flowers course, while I worked on small volutes on the pierced limewood panel from the first lesson.
Do you want a clean V groove beside a thin wall? Do you want that wall still standing when you finish? Then the angle is worth knowing. Any V tool will work, and I have said that in more than one course. What the angle changes is how much wood comes out at once, and how close you can get to a wall without hurting it. Below are my own words on each angle from my other courses, and the tools I used around the 35 on this panel.
The short answer, angle by angle
- The usual three are 90, 60 and 45, and my 16 is a sharp 35.
- For most of you, the 60 is the one you will use the most.
- For the tiniest spots I prefer a 45, or the 35, because it gets in there without damaging the sides.
- A 60 takes much more wood out at once, from both sides.
- Whatever V you own will do the job, and a 90 has a look of its own.
- Not all makers do a 35. The small one on this panel is a Pfeil.

What did I say about the number 16 in lesson 22?
I had just blended two passes together with a smaller number 7, the 14 mm one (about 9/16 in), and I was happy with what I saw. Now I need a V tool, I said, a small one, and I took the three millimeters, number 16. And then, by the way, I told you this one is not 45 degrees but 35. A really sharp angle. I kind of like that number 16.

The card on the screen at that moment names the maker, Pfeil, and the size, 3 mm. Not all manufacturers do sharp 35 degree V tools, I said next, and the common ones are 90 degrees, 60 degrees and 45. But this one is a really good one.
That was all of it, less than a minute, and then the 14 mm number 7 came back to refine the movement. In lesson 19 I gave my reason in more words, and lesson 12 shows how the numbers on a V tool go with the angles.

Which angle do most carvers use?
The 60. In my sharpening course I start the V tool lessons with the tool itself, before any sharpening. V tools come in many different angles, I said, and the most common one is a 60 degree V. That's probably what you're going to use the most. For most of you, 90% of the use of the V tool is a 60.
There is also a 90, and there is such a thing as a 45. And they don't only come straight. Some have a short bend, like a spoon, and some have a really long bend.

Why do I like a 45 or a 35 for tight spots?
On the Greek acanthus leaf, lesson 6, I said it plainly. I like 45 degree V tools. Well, 60 will work also, but with 45 I can get really to the tiniest spots without damaging the sides. With 60 degrees I would remove much more material at once, from both sides. The 45 lets me manage micro cuts.
The Corinthian leaf, lesson 5, was about undercutting. If you have a low angle, like a 45, it would be the best probably, I said, and I showed you a 60 and then a 45 so you could see the difference in the profile of the two. A few minutes later I was using the 60, and you can see it gives about the same result. But with the 45 I have more flexibility to go in even at the lowest points, really close to the background.

Be careful with undercutting, I told you on that leaf. Tools break easily if you do extreme undercutting like I do. And I've done it. Even that first pass made a shadow line, and carving is actually all about the light and the shadow.
Back on this Hashemi panel, in lesson 38, I took the same number 16 to undercut. The reason why I like it, I mentioned many times before, is 35 degrees instead of 45. Even so, I kept an eye on how much material I had left underneath.

Then there was a set of Schaaf tools I carved with on camera. Their V tool was a 60, and I said I would change it, probably to a 45, or even a 35. I use that sharp 35 a lot for undercutting. But that's only my opinion, and overall I said they're really good.
Does a beginner need the 35?
No. Whatever you have will work. During lesson 2 of the Roman acanthus I listed them as I took one: a 60, a 45, any V tool which you have. Two lessons on, in lesson 4, my number 12 was a 60, and I said you could use a 45 if you have one. Even 90 works, I said.

On the Greek leaf, lesson 8, I had a small 45 in my hand, only 3 mm (1/8 in), bringing the center line all the way through. It doesn't have to be 45 degrees, I said then. It could be 60, it could be 90, and it's still going to be the same.
Is a 90 good for anything?
For a look, yes. In lesson 9 of the Roman acanthus I wanted a V cut in the middle of a part, a movement on the inside. For that I took a 90, approximately 6 mm or a quarter inch. It doesn't have to be 90 degrees, I said, but I think it's going to look really nice with 90. With a 60 it would be nice too, I added.
On my furniture panel, in lesson 20, someone asked me why I didn't use a 90 for some walls. I answered that different brands mark V tools from number 12 all the way to number 17, even 18, with different angles. A 90 degrees V tool exists too, and you could use it. Nothing wrong with that.

What is a V tool, besides its angle?
Two chisels and a small gouge. I teach it this way in the sharpening lessons. Look at the V tool as two chisels joined together, and a small gouge at the edge. Chisel number one, flip it, chisel number two. Once you understand those three main parts, sharpening a V tool will be much, much easier.
Lesson 16 of the Roman acanthus course went through the tool numbers. From number 12 till approximately number 16, those are V tools, I said, and they come in different angles, 60, 45, 35. I really like that 35 degree angle, which is number 16, Swiss made. You have to understand there's no such thing as a really, really sharp edge V tool. It's just a chisel, a chisel, and a tiny gouge in the bottom.

One of those chisel parts went flat on the background when I undercut the Corinthian leaf, and little by little I started removing. The angle does not change the trouble at the stone either. My V-tool problem lesson says it doesn't matter what kind of V tool you get, 60 degrees, 35, 45 or 90. The problem will still be there, and most of the time it's near the keel side.

Where did the V tool go in lesson 22?
After a gouge, not first. Before any V cut goes near these elements I take a number 7 at one inch, and in the workshop I add the conversion out loud for everyone outside the United States, 25 millimeters. I imagined this part going downhill, lower than the middle. A 20 mm tool, a 19, three quarters of an inch, any of them will do the same job.
A few minutes in came the first V cut. Although I don't have a cut there, it's a good idea just to make a V cut, I said. It could be more complicated, but that is not my focal point, so I don't have to overcomplicate it. So I took number 16 at 6 mm, a quarter inch, and made my separation cut.

The next separation went between a movement and part of a leaf, with the same quarter inch. I could use a smaller one, I said, just an eighth of an inch. Then came a flip. For that I needed a number 8 or a number 9, but before either one could go in, I had to open that line with the V tool. Maybe I should use a smaller one, I said. But it's okay.
From the third video on, the small one did the work, number 16 at 3 mm, an eighth of an inch, on the micro volutes, the volutes of the leaves. It is a volute, so it has to have a movement on the inside. Even deeper is possible if I wish, I said, and that volute could go higher than my highest point. Why the V cut goes in before the gouge is the whole question of lesson 17.

How much pressure can a pierced panel take?
Very little. With the same setup like mine, no support on the bottom, just be careful, I said right in the first minutes. Don't press too hard. You can easily break it, so make many light passes instead, which is much safer.
I'm going to repeat myself, I said a few minutes later. I'm not creating too much pressure, because it's fragile, and we are working right on the end. Carving like this, in the air, trains your hands, both hands, to feel how fragile the pierced piece is and what kind of pressure you should apply. For really complicated pieces later on there will be a lot of fragile parts, so it's good practice. Lesson 12 has a page of its own on air carving.

In the fourth video I said it becomes more fragile with every pass. And you can see what I'm doing with my hand. I'm supporting this, because it doesn't matter how careful I am, I still create some pressure. A bigger tool? Too dangerous, I said. I can always come from the backside and clean it, which is going to be much, much safer. Why I carve the back of a pierced panel is lesson 4.
Which tools went around the V tool on this panel?
The rest of lesson 22 went like this, tool by tool, in the order they first came up.
| Tool and size | What the tool did for me in lesson 22 | When |
|---|---|---|
| Number 7, one inch (25 mm) | Swept this part downhill, lower than the middle | Video one |
| The #16 V, 1/4 inch (6 mm) | Separation cuts, with very little pressure right on the end | First video |
| Gouge #9, 6 mm (1/4 in) | Attacked the flip from two sides, then undercut it | Videos one and two |
| A #5 at 6 mm (1/4 in) | Fixed my flowing line, then cleared waste in the end grain | From video two on |
| Number 4, 10 mm, or half an inch as I said | Took out waste, though to me it looks more like a 3 | Videos two to five |
| Spoon #9, 5 mm (3/16 in) | Cleaned inside from one side, then the other, for the marriage line | Second video |
| The 14 mm #7 (9/16 in) | Gave the volute its shape and blended two passes | Second to fourth video |
| A small #8 of 3 mm, or 1/8 inch | Cleaned inside the little volute | Third video |
| Pfeil #16 V, 3 mm or 1/8 inch | Made the separations on the micro volutes | Videos three to five |
| A #8 at 3/32 in (2.4 mm) | Removed wood underneath the second flip | Video five |

How do you find the right sweep after the V cut?
By trying. Now it's all about making the final form look nice, I said in part three, and I just have to find the right sweep. I tried the number 8. Pretty close, but too big or too small. I got the bigger ones, and this one was good. A minute later I needed the smaller number 8, and the one that fit perfectly was about 10 mm (3/8 in), I'd say, approximately.
One of my gouges is stamped number 4 and looks to my eye like a number 3. I was using it at 10 mm on those micro volutes, and like I said before, some manufacturers are not really accurate about how they mark the tools. But that's okay.

Then I connected one pass with another, with the number 8 already in my hand, without forcing, and made sure I was not going to destroy my flow line. Two times in lesson 22 a flowing line didn't look right to me. The first one I fixed with about a number 5, the 6 mm one. How you tell if a line flows is lesson 9.
When do you stop and leave it alone?
When it gets too fragile. The first flip needed an undercut to make it look like it flips. Later I went inside it with a spoon gouge, a number 9 at 5 mm, from one side and then from the opposite side, because of my grain marriage line. I'm not too happy with that, I said. That's what I didn't want to do. But it's okay.

Less than a minute later I said I'm going to leave it like that, because it's too fragile and I don't want to overdo it, and I do have a tendency to overdo stuff. Then, half a minute after that, maybe I need to remove a lot more on the inside, I said. It just doesn't look right. The waste beside the end grain got a short warning of its own in the fourth video. Just don't force it.
I took a V tool again during the fifth video and called it preliminary, because I still have to establish the final thickness of this later on. The rest I can remove from the back.
And please, don't judge me too strong if I forget to name the tool I'm using, okay? I hope you will understand me. That was part three. And in the fifth I called one small gouge 1/8 of an inch, then corrected myself. It's actually less than 1/8 of an inch. It's a 3/32, I would say.
Hopefully you can see that on the camera, I said about another volute in the fifth video. It's actually a really nice movement. In the second video there was still a little paper left on top of one part. You can see that will be my high point, I said then.

Would you like to watch the 35 go into those micro volutes, close up? And the gouges that follow it? All five videos of lesson 22 are inside the school, with the whole Hashemi course around them.
How it's done
- Start with the V you own. A 60 works, so does a 45, and even a 90. I like a 35 for tight spots, and on this panel mine is a number 16.
- Make the separation cut. Before a number 8 or 9 goes in for a flip, run the V along that line first.
- Keep the pressure light. With no support underneath, don't press too hard. Many light passes are safer than one push, and the piece grows more fragile as you go.
- Support the piece with your hand. However careful you are, some pressure is still there, so I hold the part I am working on.
- Try sweeps until one fits. Put a gouge to the shape. Too big or too small, take the next one, until one fits perfectly.
- Leave the rest for the back. Leave it when it gets too fragile. Coming at it from behind later is much, much safer.
Frequently asked questions
Is a 60 degree V tool good enough to start with?
Yes, for most people. My sharpening lessons call the 60 the most common one, the V you will reach for nine times out of ten. I carved part of a Roman leaf with a 60 and said a 45, even a 90, would still work.
Can you undercut with a V tool?
I do, and the 35 is one I use a lot for it. Working the Corinthian leaf, I laid one flat wall of a 45 against the background and went around little by little, as a first pass only. Be careful there, because I have broken tools doing extreme undercuts.
Does the angle change how hard a V tool is to sharpen?
Same trouble on all of them. My V-tool problem lesson names the 60, 35, 45 and 90 as all able to show one fault while you sharpen, mostly near the keel side. Once you understand the three main parts, the job gets much, much easier.
What to carve next