

Alexander Grabovetskiy, woodcarver, School of Woodcarving · Published 2020
What does "pretty sure" mean when a wood carver says it?
Quick answer: Pretty sure is what I said in part 7 of Venice Room 43, about a ridge you could see. Earlier in that part I had doubts about its size. In other lessons I said it about a tool in a gap, a burr I had not felt, and a movement I was not checking.
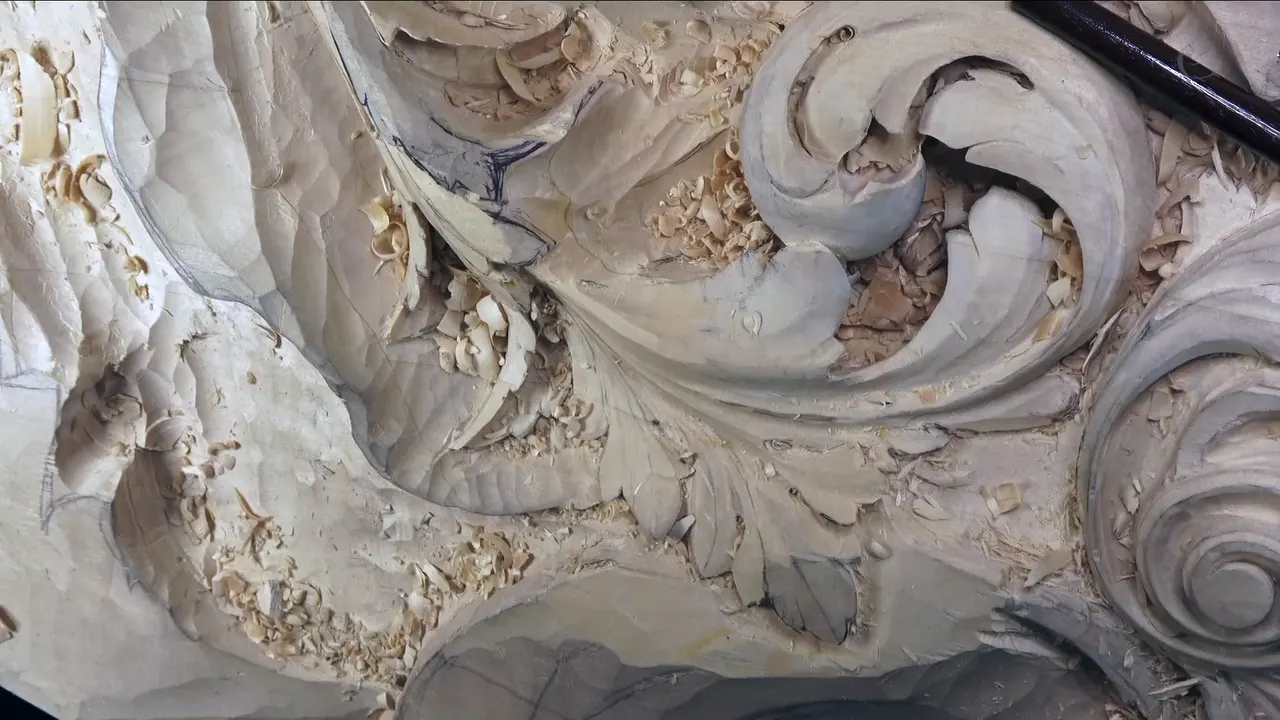

In Venice Room 43, part 7, I said, "I'm pretty sure you're able to see the ridge I created, the shadow." Earlier in that part came a different line: "Not sure if it's big enough or not though." Both lines are about a ridge.
Have you ever looked at a ridge and could not tell if it was big enough? Does your hand go over a spot just to find out? Then you know where I stood. Below is that part in my words. After it come the same two little words in other lessons of mine, and what followed them.
What did I say about the ridge in part 7?
This part opens on a hope: that way, it would give me beautiful movement. Then a correction: it should give me beautiful movement. The tool I named was a number 4.
The number 4 gave me a ridge, but not a big one. "But still ridge." Was it big enough? Maybe I should use a little deeper. My hand covered the spot again, because I wanted to see if I had enough ridge for the pipe.

On this side I was not creating too deep of a cuts. Whether I would do that later, I was not sure, and as of now I did not think I needed to.
The concave came next, and my plan for it was "let me start this concave from all the way underneath." It would be part of this movement. Then came the line from the top of this page. The ridge had gone all the way, I said, and that was good. A moment after that: "I think that is actually really good." Then: "Let me get rid of this chunk."

Right now, it was just all about giving more details, and I also needed to go underneath of this. The far side asked for the same thing, an excavation on the inside, like on the opposite side. Filming it was in doubt, because that spot is too far from my point of view and maybe my head would be in the way of the camera. It would be just excavation on inside, like a plug cutting.

A skew was my plan to clean a little bit of one part, because it did not look too good. Maybe I should use a back bend, I said. I saw the grain change direction there, and a back bend would not be a good tool to use. The words were, "Use a number seven and just get rid of," and then, "And now I can probably excavate on inside."
I did not want to lose the feel of this part. I wanted it like a big leaf. Like a huge leaf. The excavation would happen right there.

My name for the next cut is a plug cut, because I am kind of removing a plug. It takes care. Carving from an up-down position is different from carving with the grain. The grain goes that direction, and it is not the same, I would say.
Later on I would probably leave a little more material on this side and make a little deeper cut right there. For now, I would just make a preliminary start, and then, "So you got an idea." And I was going to just do it off camera.
What came right before and right after part 7?
Part 6 begins with a clean-up. I know most of it is going to be covered, I said, with the leafage and with the flowers. But I was not going to leave it rough: "I'm going to clean it." A straight tool is not the best tool for the job, so I needed a spoon. In an area like that, a small concave would look really good. I also needed to make sure the edge of this movement was right and made sense. Otherwise, I said, it is just not good.

Later in that part I said there would also be somewhat deep excavation on the inside, so it would feel like this is really growing from underneath. There was a check too: "But let me see if it's dry enough or not." After a smaller number 11, I said, "I think it's really good." The pipe still waited, and I said, "I need to create that pipe right here."
Part 8 starts with a plan: my big skew, one inch (25.4 mm), for a preliminary shape. The piece was big, I said. It was hard to get without sticking my head in a camera view. The head would be somewhat big and visible from the bottom, and "So for me, really important not to mess it up." One spot did not look too good. Another looked okay. A section might need to be a little wider, and maybe I would do something else. I had just added a couple of elements, I said, which I think would tie the rest of the movement together. The movement, I said, would be my focal point element.
Further on in part 8 came "the birth of a piece of art." I consider that going to be a piece of art.
When a gouge had to fit a gap, what came after "pretty sure"?
In part 7 of workshop 67 there was a big space. "I don't have to waste time." The test was whether half an inch (12.7 mm) would fit, and the words were "pretty sure it will." Then the same size in a number 9, to excavate. "Big chunk." The limit came after that: "I have a limitation with this tool. It actually has a tendency to go deeper, and I don't really need to go deeper."

Venice Room 71, part 7, called for a little bigger tool. Could 10 millimeters (about 0.4 in) do it? My answer, "pretty sure I'm able to, but I'm going to check." The check followed. "Of course, I'm able to." It's not the question of ability, I said, and the question is how it will look.

Hashemi lesson 13, part 1, had a check too. I was pretty sure a straight gouge, like a number 9, would do it. I put it this way: "Let me check if I can use a number nine in 10 millimeters" (about 0.4 in). "Yes." "I am able to." That matched what I did right there, so I would repeat it on the inside, like a law of repetition design.

Furniture panel lesson 18, part 12, went around a petal. I wanted even smaller. "Let me check if number seven will work," I said, and "pretty sure it will." Number 7, 4 mm (about 0.16 in). A little bigger than an eighth of an inch, I said. A number 2 at 12 millimeters, which is 0.47 in, might get into this section. "And yes, looks like it will fit perfectly."

Floral and molding lesson 8, part 3, wanted an excavation right underneath. "Let me get some kind of gouge first." The same words came again about a number 9. The first excavation would only remove that part and expose some of the material, because I would need the extra material right there.
What does it sound like before I have checked?
The vase with grape leaves has it too. I called it a really nice project even for a beginner, not that complicated, and "pretty sure you'll be able to pull it." You'll be able to make it, I said, if you understand the logic. Then, about a movement going up: "I'm not checking," and "pretty sure I'm right on the money." Or maybe just a little off the golden ratio I was talking about.

Later came a point, with this side and that side. I put it right there. "See? It's right on the golden ratio point." That was lesson 1, part 6, of my vase course.
My in-person sharpening course has the same move on the opposite side of an edge. "I didn't feel it," I said, and "pretty sure there's a burr. Just try it." A felt wheel was the next step, to take care of that burr or wire edge. Some people break it off with a piece of wood, but I don't like that way, or breaking stuff.

A second moment in lesson 1, part 7: "It is done." Then "pretty sure it's already sharp," and right after, "But I usually like to take it even more to extreme." Leather came next, and the secret weapon, mirror paste. It goes on the leather, and I can strop it.
The next step in the Venetian flowers rosette was a groove around, the deepest spot, with a number 11 veiner at 12 mm, that is 0.47 in. That was lesson 1 of the course, in part 3. The depth was pretty close to half an inch (12.7 mm) in that case, and that is how deep the first cut would go. The question of going deeper came next. I would stay about an eighth of an inch (3 mm) from the line.

Over in Room 60, part 1, one side was going big. About it I said, "I want to do that big." Some of that extra material was something I did not need, I said, and it was going away. I could excavate a little deeper, I said, if I wanted to. It looks like an easy decision. It was a really hard decision how to make that transition to the ceiling, which would be visible from all points from below.

Venice Room 40, part 10, asks it out loud: "Okay, can you see it?" My answer was, pretty sure you can. The inside would be cleaned, like I said before. The plan for this side was to outline it a little bit, and that will be a shell. That shell has to go underneath, I said.

What comes after the "but"?
Doubt can follow in the same breath. In Hashemi flowers lesson 13, part 1, I said, "Well, nothing is impossible." Then "pretty sure I can make a pierced look." Then, "I'm just not sure how it's going to look." Next: "Let me think." A half-inch number 8 spoon gouge was the likely start.

Lesson 38, part 2, of that same course wanted something also interesting, an extra leaf right at the top. Whether it would help, I was not sure, but "pretty sure it's going to create nice movement." I had extra material, some thickness, and a V tool at the beginning.
The other ending sits in Room 77, part 8. A section had to go and be kind of blended. Here is what I said: "pretty sure I can just hold it and attack that from opposite side." The miss followed, in my own words: "And I almost broke it." Little too aggressive, I guess, today.

A repair with CA glue followed. It is not a glue I really like, but in this case it was a good one, and the work was paint grade, so I did not worry about it. Still, I had to be careful.
Lesson 28 of the furniture panel, part 1, had a gouge with no markings. "pretty sure there's no markings, it's just a gouge," I said, and it was a number 8 or something, at 3 mm, which is about 0.12 in. Some excess could come off, but not at the cost of this edge, which would sit on top of future molding.
Here is the same thing in one table, lesson by lesson.
| Lesson | The call I was sure of | My next words |
|---|---|---|
| Room 43, part 7 | The shadow of that ridge was visible | That ridge went the whole way, I said |
| Workshop 67, part 7 | A half-inch tool would fit a big space | Then the limit I found in that tool |
| Venice 71.7 | A tool a little bigger than the last would work | Ability was not the question |
| Hashemi 13 | A number 9 could do the job | A check first, and then a plain yes |
| Panel 18, part 12 | Number 7 would work for the petal | Then a number 2 came up |
| Vase 1 | My movement was on the money | Maybe a little off the golden ratio |
| Sharpening 1 | A burr sat on the edge, though I did not feel it | The wheel, to take off the burr |
| Room 77, part 8 | I could hold it and attack from the opposite side | And I almost broke it, a little too aggressive |
| Workshop 40, part 10 | You could see it, I said | The inside would get cleaned a little later on |
Where can you watch part 7?
You can watch part 7 in the workshop 43 lesson, with all twelve parts, inside the Venice Room Part 4 course. That course holds workshops 38 to 49 of the same relief board, and all of it is wood carving, one gouge at a time.

Is there a ridge on your board right now that you cannot judge from where you stand? Then bring that board along, and carve it with me in the room. The tuition opens every workshop, and you can start here.
How it's done
- Name the hope and the tool. I hoped for beautiful movement in this part, with a number 4.
- Cover the spot with a hand. Over the spot went my hand, to judge the ridge for the pipe.
- Start the concave low. I planned to start the concave from underneath, as part of the movement.
- Say what you can see. I said "pretty sure" you could see the ridge I created, the shadow, and that the ridge had gone the whole way, which was good.
- Plan the inside cut. I planned a plug cut on the inside of the far side, and I said it takes care, since up-down is different from with the grain.
Frequently asked questions
Which gouge did I use for the ridge in part 7?
My plan was number 4. Whatever its width, it left a ridge, not a big one, and my words were, "But still ridge." Next I wondered about a little deeper, and a hand went over the spot to judge it for the pipe.
Did I film the inside cut in part 7?
Filming it was in doubt, because the spot sits far from my point of view, and I thought my head might block the camera. At the end of the part I said the work would go on off camera. Like the opposite side, it would be dug out from the inside.
Which tool did I set aside where the grain changes direction?
A back bend, after first thinking about it. I saw the grain change direction in that area, and I said that would not be a good tool to use. Next came a number 7, and after it I could probably excavate on the inside.
What to carve next