
Alexander Grabovetskiy, woodcarver, School of Woodcarving · Published 2018
How do you keep a wood carving clean while you carve it?
Quick answer: Keeping a carving clean means wearing gloves before the delicate stage begins. Skin leaves an oily film that soaks into fresh fibre and darkens over the following weeks. Thin rubber ones let the fingers feel everything. On pierced work it matters twice over, since many hollows can never be reached again.
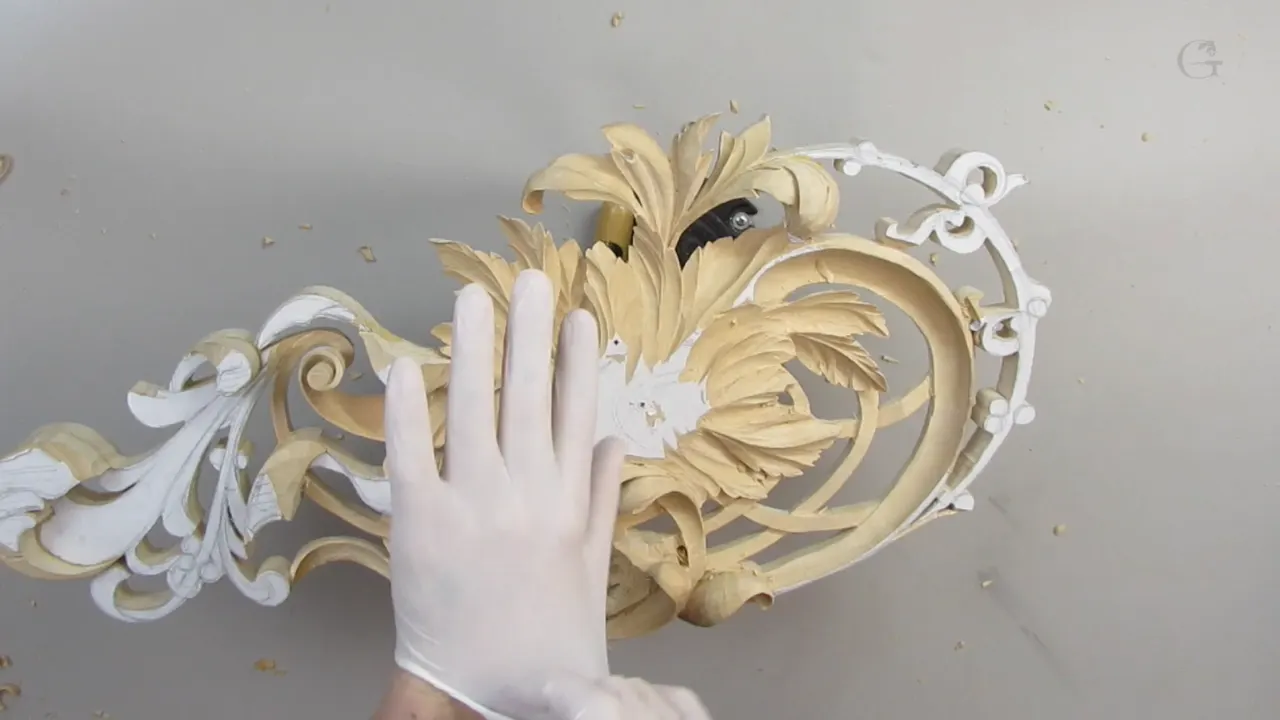
Keeping a carving clean means keeping skin off it. Hands carry oil no washing removes, the oil sinks into open fibre, and grey thumbprints appear that no scraper lifts out. I put on powder free rubber gloves, the medical kind. They do nothing for my hands. They keep the basswood white.
Nobody warns you about this, and then one day you turn your panel to the light and there are your own fingers all over it.
Workshop 13 of Carving Hashemi Flowers is where I stop and show the answer, because this panel has reached the stage where half its surface can never be touched again. Watch the frames in order and you will catch the moment my bare hands go into a glove and stay there.

What actually dirties a carving
- Skin oil from clean hands.
- Sweat, which gets worse in summer and worse again under pressure.
- Ground in dust.
- The steel, bruising a finished edge it happens to lean on.
- Pencil, which lifts off later.
Why does wood get dirty from clean hands?
Skin is oily by design. Wash your hands, dry them, wait two minutes, and the film is back, because your body puts it there on purpose to stop your skin cracking. Every one of us has it. Press a fingertip onto raw lime and you leave a small patch of that film behind. Nitrile and rubber both stop it; cotton mostly stops it; a clean dry hand does not stop it at all.
Fresh carving is thirsty. The surface you have just carved is open fibre with nothing sealing it, so the oil wicks in rather than sitting on top, and it darkens as it oxidises. A week later the mark is grey and it is under the surface, not on it.

A coarse hardwood might let you scrape it away. On lime the mark is often deeper than the thickness you have left to spare.
Which gloves do you want?
| The glove | Where it earns its place | Grip | Where I go to find a box |
|---|---|---|---|
| Thin rubber, powder free | Detail work where the fingers must read the tool | Fine | Sold as medical gloves |
| Plain cotton | Long sessions, and they wash and come back | Poor, they slide on a polished handle | Amazon, in bulk |
| Work gloves with rubber dots | Heavy waste | Best of the three by a clear distance | Hardware shop |
| Nothing at all | Roughing, where the surface is going away anyway | Perfect | Free |
Buying powder free is the part I say out loud, and the part people skip at the shop. A powdered glove sheds into every hollow you have just opened, and then the cleaning problem has simply changed shape rather than gone away.
Do gloves cost you any feel?
Less than you expect from a thin rubber one. I can still tell when an edge has gone dull, still feel the fibre change direction, still steer a 3 mm gouge gouge inside a hollow the width of a pencil. What suffers is my hold on the handle, and that matters only when moving real waste.
My honest habit is to swap. Gloves go on for the delicate stage and come off the moment I pick up a one inch gouge to clear a wall, and this very workshop shows both: the frame where the one inch number 7 appears has my forearm bare.

What makes it matter more on a pierced panel?
The places your hand can reach today and your rag will never reach tomorrow. By workshop 13 this panel has hollows that run underneath finished foliage, and some of them are open at one end only. I will never get a scraper in there. Whatever the surface looks like at the moment I carve it is what it will look like in fifty years.
None of that holds for a flat relief panel, where almost everything stays reachable to the last. openwork changes the arithmetic, the same way it changed the arithmetic on the back of a pierced panel.

So on this panel the rule turns absolute. Gloves for anything that will still be visible when the piece goes on a wall.
Is this the same thing as cleaning up a carving?
Two different jobs, and I want to separate them properly. Cleaning up means taking out the facets and ridges a rough gouge left, which is a carving problem with a carving answer, and I have written about cleaning up without sandpaper and about when to clean a carving up on their own pages.
Keeping clean means stopping dirt from arriving at all. One is subtraction. The other is prevention, and prevention is cheaper here for a simple reason: the repair for a thumbprint is removing wood you may not have.

What else leaves a mark besides your hands?
Your tools. A gouge laid against a finished edge while you carve something behind it will bruise that edge, crush the fibre flat, and leave a shiny line you will see the moment a finish goes on. Watch me in workshop 13 and you will notice I am constantly checking where the steel is, not just where it is going.
A carving knife dropped point first into a hollow does the same in one second. So does a clamp. So does the bench, when you set a panel down face first because the phone rang and your hands were full.

How do you pry without prying against the carving?
Put your own finger in the way. I pinch the blade between thumb and forefinger, tuck a third finger underneath as a pad, and when the tool needs to lever at all it levers against that finger rather than against the panel. The steel never contacts the carved surface. My knuckle takes the load instead, and my knuckle is replaceable in a way the panel is not. The pad finger also stops the blade skating if the edge slips off a corner, which on end grain happens more often than any of us admit.

This is the fix for the habit I described in hoiking, and it works because a finger is soft. Wood crushes. Skin gives, then comes back.
Twice in this workshop the camera pushes in on a magnified circle to show that hand, which tells you how much it matters and how hard it is to see at normal size.

Where do you rest your hands on work this thin?
Two points, chosen deliberately, and no more. I hunt for the thickest surviving part of the panel, set two fingertips there, and everything else stays off. When I say on camera that I barely touch anything, that is literal, and the cuts get correspondingly small.
Micro cuts are the price. A shaving at a time, checking after each one, which sounds slow until you compare it against a crack. The whole approach carries over from air carving, and if you have not read that one it explains the grip in more detail.

Does any of this change which tools you reach for?
It changes almost all of them. Where a straight gouge could only reach its target by leaning on a finished detail, I pick a shape that travels round the obstacle instead. A back bent gouge climbs uphill over a curl that a straight tool could only ride across. A spoon gouge drops its edge below the rim while the handle stays clear of everything.

Small helps too. A 3 mm Dockyard gouge takes a chip so light the panel never registers it, and three of those beat one confident pass with something bigger. An eighth of an inch and three thirty seconds are the sizes I keep naming in this session.
Why carve across the grain here?
Control. Across the fibre the tool wants to go straight and the wood does not grab it, which means a small gouge behaves predictably in a spot where you cannot afford surprises. I say on camera that I am working across rather than against, and correct myself, because the two are not the same thing and the difference shows in the surface.
Against the grain tears. Across it cuts cleanly if the edge is sharp. In a hollow with an entrance 5 mm wide you take whichever of the two the space gives you, and mostly it gives you across.

Do you plan a pierced hole or decide as you go?
I decided this one halfway through the workshop. The section bothered me, I said out loud that I was not sure it was possible, and then I went and made it possible, because a hole there would throw a shadow nothing else could produce.
A drawing and a panel differ right there. The drawing is only a proposal. There is a whole method for piercing without a drill without touching a drill, and once you have it, deciding to pierce late costs you a morning rather than a redesign.

The hollow ended up deep enough that the leaf above it now stands completely in the air, connected to nothing underneath. Look at it from the side and there is daylight. No drawing asked for that. The panel suggested it, I agreed, and the shadow underneath is the reason I agreed.
What is the law of repetition?
A shape you have already carved once earns the right to appear again. I hollowed the outside of that curl, turned to its inner face, and repeated the identical movement instead of inventing a second one. The two halves now read as one piece of foliage rather than two decisions sitting side by side.

Ornament has always worked this way. Any tool catalogue, Ashley Iles included, offers far more sweeps than a carver picks up on one panel, and that is not poverty of imagination, it is the same law showing up in the toolbox. Go through the Getty collection and count how few distinct curves a Rococo frame actually contains.
It also protects you at this stage. A repeated movement is one you have already found the grip for, already know the tool for, already know which side to attack from. On a panel that can crack, familiarity is a safety feature and not just a style.
Does extreme undercutting make the dirt problem worse?
It makes it permanent, which is a different thing. I like extreme excavation, I say so in this workshop, and every millimetre I take underneath is another surface that will never be reachable again. The shadow is worth it. The discipline it demands is not optional.
There is a fuller argument for undercutting work nobody sees elsewhere in the school, including the part about work nobody will ever see. On a relief panel that hangs above eye level, the undercut is doing more for you than the front face.

Does it look fussy to carve in gloves?
A little, and I have been teased about it. The cotton ones are bright white and make my hands look like a magician's, and the rubber dotted pair I use for heavy work are an unfortunate colour nobody would choose.
I wear them anyway. Grinling Gibbons had no rubber to reach for, and the limewood drops of his period sit in the V and A sculpture collection carrying three centuries of handling that nobody holds against them. A panel you deliver next month gets judged differently.

What to try on your own bench
Buy one box of powder free gloves, put a pair on before your next detail session, and carve an hour in them. Your hands will sweat. You will take them off twice and put them back on, and by the third time the habit sticks.
Then hold your work up to a window and look at the last thing you carved bare handed. The marks are there. All 49 workshops of Carving Hashemi Flowers are inside the school, gloves and all.

One last detail from this session that has nothing to do with cleanliness. Near the end I went back to a flow line I had already declared finished, with a nearly flat number 3 at 20 mm, because looking at it from another angle made it wrong.
It happens most workshops. You accept a shape, you rotate the panel, and the shape has an opinion you had not heard yet. That is also why I carve in gloves, come to think of it: the piece gets handled far more often than a beginner imagines.

The ribbons start moving at the end of this session and take over the next one, and they are the part of this acanthus panel students most often call impossible.
How it's done
- Buy powder free. Get a box of thin medical gloves with no powder in them, because powder settles into every hollow you open.
- Rough out bare. Leave your hands bare while the surface you are touching is still going to be carved away.
- Glove up at the detail stage. Pull a pair on the moment you start work that will still be visible when the piece hangs.
- Swap for heavy waste. Take them off again for a one inch gouge, where grip on the handle matters more than the surface does.
- Watch the steel too. Keep track of where the blade rests, since a gouge leaning on a finished edge bruises the fibre flat.
- Build a finger pad. Tuck one finger under the blade so any leverage loads your knuckle rather than the carving.
- Pick shapes that go round. Reach for a back bent or a spoon whenever a straight tool would have to lean on something finished.
- Check under a window. Turn the panel toward daylight at the end of a session and look for grey patches where fingers have been.
Frequently asked questions
Does washing your hands help?
Only for a minute or two. Your body replaces that oil film on purpose, to keep skin from cracking, and raw fibre drinks it in rather than letting it sit on the surface.
Do gloves ruin your feel for the tool?
A thin one barely changes anything. Dullness, fibre direction and the moment an edge catches all come through. Hold on the handle suffers, which only matters when moving real waste.
Can you sand a fingerprint out?
Occasionally, on a coarse hardwood with material to spare. Lime takes the stain deeper than the thickness you can afford to lose on a pierced panel, making the repair cost more than the mark.
What to carve next