

Alexander Grabovetskiy, woodcarver, School of Woodcarving · Published 2020
What does shadow play mean in wood carving?
Quick answer: Shadow play is my name for what a concave, an undercut or a deep spot gives carved wood: light travels in and a dark shadow sits beside it. In Venice Room 44, part 3, a number 3 and a 3 mm number 11 dug one spot for that reason alone.
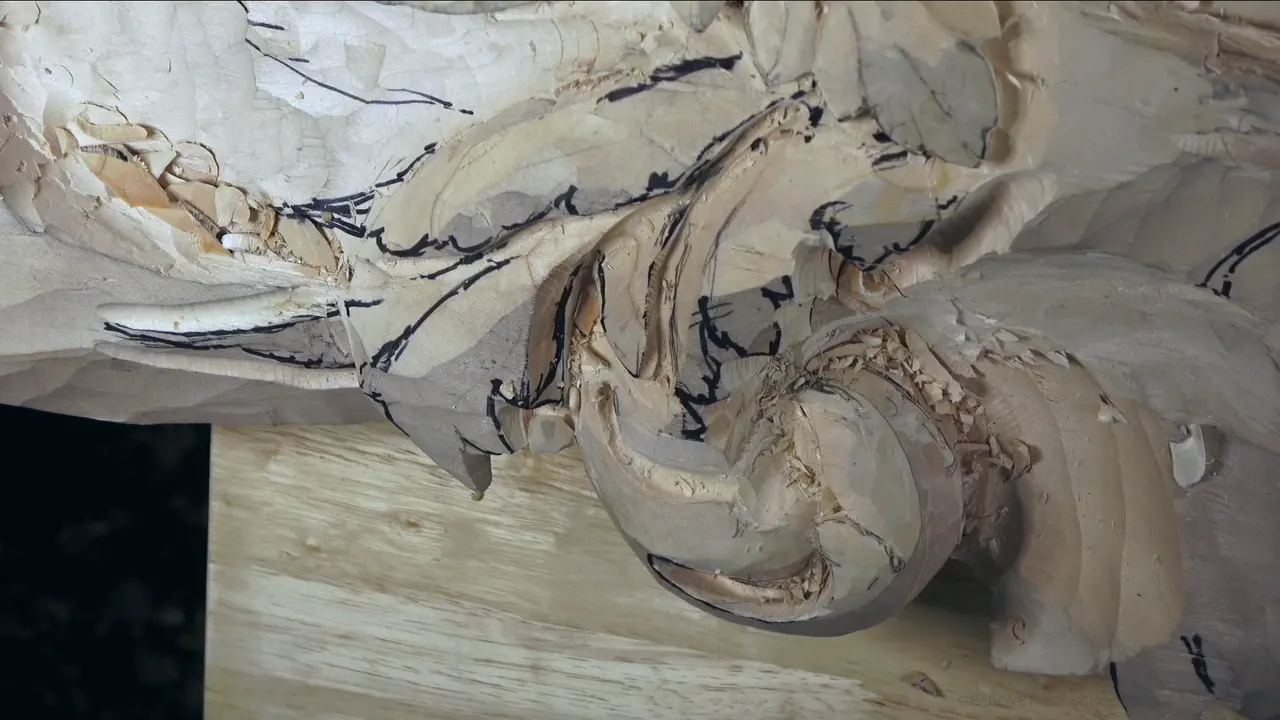

Shadow play is my phrase for what a concave, an undercut or a deep spot does on carved wood, so light travels in and a dark shadow sits right beside it. Painters call the play of light and shadow chiaroscuro. Part 3 of Venice Room 44 has me digging one spot out, and I gave a single reason for it, which was shadow play.
Have you looked at a carved leaf where the hollows read darker than the wood around them? And did the edges look a little brighter? Dark and light sit side by side there, and a carver puts them there on purpose. The video runs a bit over seven minutes, so beside it I put the same words from my other wood carving lessons, and I name each lesson as I go.
What did I dig in part 3, and why?
One deep spot, and the minutes before it set it up. Something that looked really tiny and small on the flat drawing was bigger now in the wood, I said. I could exaggerate this eye if I wanted to.
Next I wanted to figure out where the end would be, somewhere right there, with some small subdivisions in this case too. A different tool, like a number 3, was for pre-establishing the endpoint. Please understand, I added, that is not the final.

Probably good, I said a little later. One piece needed to be chipped out right now, though, because it just doesn't make sense anymore when it's too big. Maybe an extra separation right there. But for now I don't need that material.
Taking too much was out, too, since some concaves and convexes still had to come. Just to give a main shape, I said, two times over. Then I changed my mind on the spot. I'm going to take it all the way to the point, I began, and then, well, actually, no. I wanted to get that point rolled in, so let me stop right there.

How deep did that spot need to be?
Deep enough for a big shadow. I really would love to see a deep, big eye and deep excavation right here, I said. Yes, I will make some movements on the inside, but I really want to see a big shadow. And I fixed my own word right away. Deep shadow, I should say.

A number 3 came first, and it was just a straight down cut. After it, a number 11 of 3 mm (about 1/8 in), and take this out, I said.

I think it's really important to create spots like that, I told you. Again, the only reason I'm doing it is because I really want to see shadow play. Light and a shadow. Okay, that is good, I said after it.
The part before this one had the same wish in it. In part 2 I said maybe I need to make a little more shadow right there, and that this was probably what I'd do.
Did the rest of part 3 go to plan?
Not all of it. The next thing to figure out was one movement, I said, and a small section would go underneath. Maybe yes, maybe no, but I think it should. And then, looks like I don't like what I see. Maybe I need to bring this separation right here and make extra movement, because I was really not too happy about how far that sticks out. But it's okay. Not a big deal.

This needed to come down also, I said, and I was using 3 mm again. That 3 mm is European size, a little shorter version of tools. Under a minute later the tool was a little too big, and I said I need to use 2 mm, a number 11 but 2 millimeters (about 0.08 in). I also don't want to make this edge too weak too early.

The video ends before that spot is settled. I'm still not too happy about that part, I said. Maybe I should do something else. First of all, I don't think I want to do big separation.
How often do I say it?
Many times, and I said so myself. I told you in lesson 7 of my Hashemi Flowers course that it was almost impossible to see, but believe me, like I said before, many times, maybe already too many times, light and a shadow will create beautiful movements.
My grape vase, in lesson 3, got a plainer line from me. Shadow is really important in wood carving, I said. In the Venice Room, workshop 101 called the same work a game first, and then a play.
Which hollows give shadow play?
Concaves, first of all. On my Venetian Flowers Rosette, in lesson 4, I said every concave gives me some kind of shadow play. It's not really a deep concave, but still. For it I'd need the long bent, number 7. I know I've got too many lights going on, I added, kind of bright, but you should be able to catch it.

On the Lily Box, in lesson 6, I said I can give one part a concave cut, and it gives some really good shadow play. The same number 7 would do it, a quarter inch (about 6 mm).
Lesson 8 of that box had a smaller one. I could make another small, really tiny concave there, starting from nothing and ending with a notch, going downhill, and it gives a bit of shadow play.
A bigger tool came up in Venice Room 67. I'd try 7 millimeters (about 9/32 in), I said, starting with almost no pressure and then increasing the depth, for extra shadow play. That spot ran along the grain, and the opposite side makes more sense grain-wise, so that is where I wanted to try it from.
In my Hashemi course, lesson 16, I said those concave cuts on acanthus leaves, and especially on the claws, make beautiful shadow play when the light hits.

For Acanthus over Moldings, in lesson 3, I said that where there's an eye, it has to go gradually, not a straight line down, and that makes more shadow play. If you have a concave, you're going to get shadow.
Does an undercut make shadow play too?
It does, even a small one. On my Furniture Panel, lesson 19, the tool was a number 11 of half a millimeter (about 1/50 in), and I said I'd undercut a little bit under one movement. It's going to give me shadow play, not that much, though, I said. Got to be careful, I was working against the grain. The same, with the same tool, was my plan for this side.

Back on the Lily Box, in lesson 8, too much force on one spot could damage the detail below, I said. But I still wanted to kind of undercut a little bit, and that gives a little shadow play too.
My Roman acanthus leaf, in lesson 16, called for something in between. My goal was to make it not really an undercut, just a little bit inward on the inside, not like 90 degrees, because I wanted some shadow play there also.

Lesson 28 of the furniture panel had a concave that was going to die right underneath one spot. I said that gives me really beautiful shadow play, and it doesn't have to be really deep.
A deep undercut gives the most. Back on that Roman leaf, in the same lesson, I said a deep one is going to give me the most shadow play, so the light would travel on the inside, and that's going to look nice.
How does the light get inside?
Through an opening, or a hollow it can reach into. In lesson 8 of the Lily Box I had just made an opening, and I said I hope it makes an interesting effect. Light is going to travel inside, I said, and make a really nice effect.

The upper part in lesson 7 was going to look like it grows right above the lower one, and that gives extra shadow play. Light goes in, and there's some shadow. Then 2 mm (about 5/64 in) was a little too big. I'll use one and a half (about 1/16 in), I said, and the mallet.

Some openings stay a hope. My Hashemi course, in lesson 44, has a spot I said I don't have to connect, because it's going to be invisible. If I'm able to, which I doubt, since it's a tiny spot, the light is going to travel in and make a beautiful effect. Be careful with the tools there, I said. You can easily break them.
In lesson 48 of the same course I said I really don't have to do that, but just because I connected those two sides, I get a lot more of it.
My grape onlay, in lesson 5, had one spot I was already right through. Can you see that light penetrates right inside? I asked. Light and shadow play, it's actually what wood carving is all about, I told you. It's just how you place those spots with the lights and the shadows.

What does a plug cut add to the play?
A dark spot, which is what I'm after, I said in Venice Room 53. The plug cut there took a number 9 of 3 mm, one-eighth of an inch. Again, it's not necessary what I'm doing, I said, and sometimes you don't even see this on an original acanthus. But it gives me more of that play. Here's my plug, and it casts beautiful shadow.

A pipe in Venice Room 128 was one I said I'd follow with 2 millimeters (0.08 in), and right after it I said I don't really have to do that pipe, but I think extra shadow will help me.
The care it costs shows in Venice Room 63. One tool was not that sharp, so I said I'd use a different number 9, a smaller one. I didn't want to mess up that transition, because it's a beautiful movement, and it gives me really nice shadow play.
Most of the time people are not going to even pay attention to it, I said on that Roman leaf, but you'll know it's done. No need to go all the way. It's a handy tool to have, a really small, tiny number 11. Almost impossible to see on a camera, I said of the shadow it casts, but just believe me.
Can a stain do the same job?
People saw some of my work online and asked how I painted it, how I stained it, because it has dark and light spots. I didn't stain it at all, I said in Venice Room 65. Because I know how to play with shadows and light, I'm able to make that look just by pure carving. With stains, yes, you can get an even richer look.
The grape onlay got another way of saying it. You can't fake it with the color, I said, and then, I mean, you could.
How do you see shadow play while you carve?
I change the lights and look again. Near the end of one video in lesson 6 of the Lily Box, I said let me try different lights, and you can see how those shadows play. I said I'd turn one of the lights and dim this one a little, and then, I think it looks good.

Two movements side by side help too. In the same workshop 65, one looked a little too dull next to another, because I don't have that shadow play there, I said. So I'm going to do exactly the same on this leaf, I said, then made it this section of the leaf.
Right now I don't see enough, I said on the grape onlay, lesson 6, and it was the number 11 again, 2 mm (roughly 5/64 of an inch), with my flute to three o'clock.
Where the light comes from matters too. In Acanthus over Moldings, lesson 7, I talked about it. Woodworkers would place a bench by the window, I said, because they would get the light from the window. In my case the window is behind me, with a bunch of lights at the front.

Where should the shadow fall?
Where the light source tells it to. My rosette, in lesson 2, gets its light from above. If I would like to exaggerate and play with the shadows, I said, most logically I'd make a lot deeper shadow on this side. Which means that petal is supposed to go underneath this one.
The vase began with a choice of tool, in lesson 2. My choice was a number 11 veiner in 10 millimeters, three-eighths of an inch in this case, a U-shaped tool. With it I can exaggerate one side against the other, I said, and that is important, because we can play with the shadows.
Where did I say it?
The lessons on this page, one per row, with the work and what I said it gives.
| Lesson | What I carved into the wood | Words I used |
|---|---|---|
| Venice 44.3 | Number 3 straight down, then a 3 mm number 11 to take it out | Deep shadow, I said |
| Rosette 4 | A concave cut that is not really a deep one | A kind of shadow play |
| Lily Box 7 | Work that makes the upper part grow above the lower one | Light goes in |
| Furniture Panel 19 | Half a millimeter number 11 under one movement | Not that much |
| Roman Acanthus 16 | A deep undercut on the leaf | The most of it, with light traveling inside |
| Hashemi 48 | Two sides connected while I worked from this side | A lot more |
| Venice 53 | A plug cut with a number 9 | A dark spot, the thing I'm after |
| Grape Onlay 5 | Right through one spot, so light gets inside | What it's all about |
Some rows are a hope and some are done, and the last column keeps close to my words.
Where should you start with your own?

Try it yourself, the way I told you on the Roman leaf. The shadow goes on the inside in the concaves, I said there, and the edges catch the light. Once you've done it, play with shadow and light, and you'll see what I mean.
The workshop 44 page covers the whole lesson, and the Venice Room Part 4 course holds all twelve workshops of this acanthus relief. Every course of mine is one click away if you start here.
How it's done
- Find the end of the shape. In part 3 I wanted to know where the end would be first, and a number 3 was there to pre-establish it. That was not the final.
- Hold back some wood. Wood stayed for later, since concaves and convexes still had to come out of it.
- Go down, then dig. One straight down cut with the number 3, then the number 11 at 3 mm to clear the spot.
- Dig for the dark. That spot had one job, and I named it out loud, shadow play.
- Step down a size. Once the 3 mm got too big, a 2 mm was next on my list, and I didn't want that edge too weak too early.
- Look before more. At the end of part 3 one part still didn't please me, and I wondered out loud if I should do something else there.
Frequently asked questions
Which gouges made the deep spot in part 3 of workshop 44?
First a number 3 went straight down, and next came a number 11, 3 mm wide (0.12 in), to take the wood out. Later in that part, the 3 mm, a European size and a bit shorter, was too big for one spot, so the next one I needed was 2 mm, still a number 11.
Does a wider tool give more depth for the shadow?
The decision you have to make is how deep you can carve, I said on my grape onlay in lesson 4. If you can fit 2 or 2 and a half millimeters (about 5/64 or 3/32 in), you get a lot more depth than with just 1 millimeter (about 1/25 in).
Does every carving need deep undercuts for shadow?
Not always. I don't want to be too deep, I said in lesson 3 of the grape vase, and it was only a 16th of an inch (about 1.6 mm). I really like deep undercuts for the beautiful shadow, but maybe it's not as important on a piece like that. To clean inside I can use a 3 mm tool (roughly 1/8 in) upside down.
What to carve next