

Alexander Grabovetskiy, woodcarver, School of Woodcarving · Published 2020
What does "I don't want to lose it" mean when a wood carver says it?
Quick answer: To me, not wanting to lose it is about a line, ridge, edge or small detail I am guarding while my tool works right beside it. In Venice Room 46, part 9, that was the feel of one ridge I had to rework, a readable line, and a detail that curls backward.
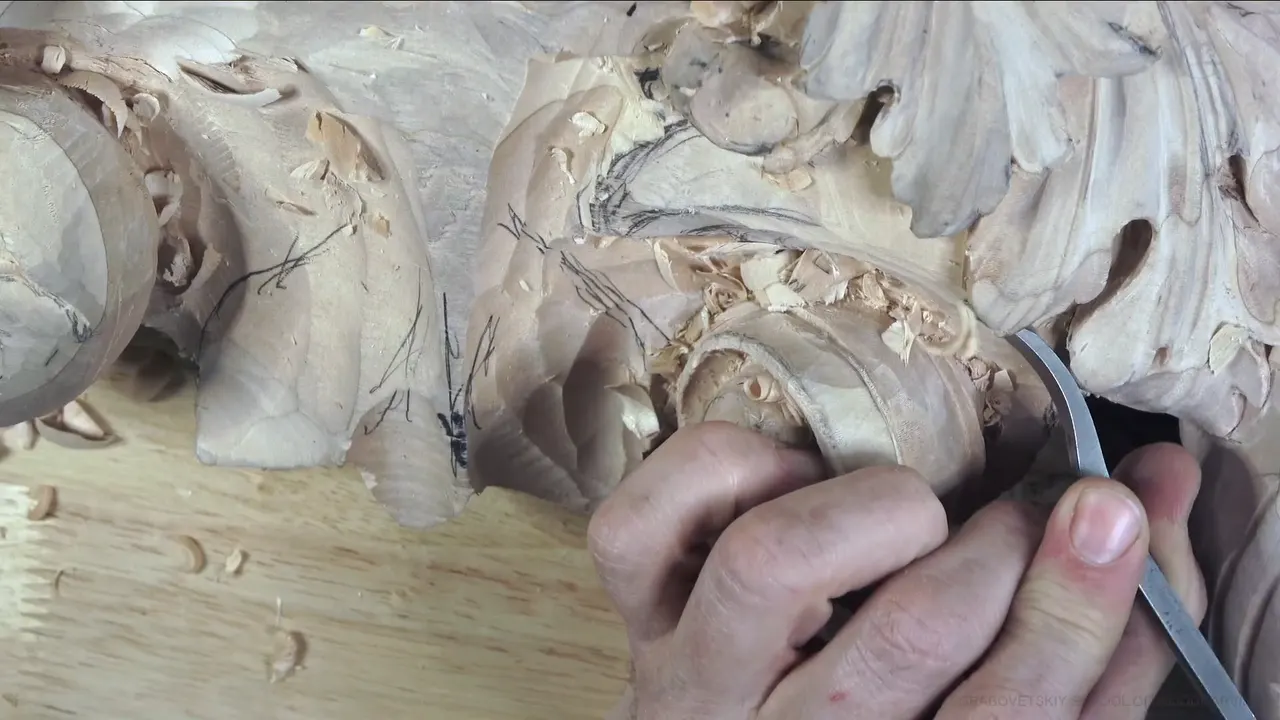

"I do not want to lose it" is what I say about a line, ridge, edge or small detail I mean to keep while my tool works right next to it. In Venice Room 46, part 9, it was a ridge first. Then came a line that will be really readable, and then a little detail that curls backward. Fine details in wood carving sit right beside the bigger work, so the words come out of my mouth on course after course.
Have you ever looked at a carved leaf and seen one clean ridge run down it? Have you wanted a line like that on your own piece? Keeping it comes down to what the tool does right beside it. Below is what I said and did in part 9, in the two parts on either side of it, and in lessons from other courses where I said the same thing, each one named and linked.
What keeping a line takes
- In part 9 one line needed a blend, and a ridge beside it, one that needed rework, still had to keep its feel.
- A small curl backward detail needed the tool to go around it.
- Straight walls kept the design's edge on the Lily Box.
- On a chamomile rosette I named a small number 11 first, since two pieces had to match.
- Wood I left on early in part 10 gave me room to change my mind.
- The final undercut waits until everything else is developed.
Which ridge was I close to losing in part 9?

The video opens on a blend. Now I need to really blend that line, I said. The feel of this ridge had to survive the blend. I kind of have to keep it, but that is a little too big of a ridge. So I have to rework.

Next comes a stretch with no talk. The frames from that stretch show a flat tool standing at the ridge. Then: "Clean that underneath." And then a moment I did not like. What I just did, that's no bueno, I said. Hit that point. That's not good. So I've got to be more careful.
How does a line stay readable while you smooth it?

Again, a really readable line, and one I meant to keep. But double check how gradual it moves, and I still have to chop a little bit. It just goes not really smoothly up. Then: chop slightly more.
Then I said what I meant by gradual. When you look in three-dimensional world, it has to be gradually moving up, up, up, and then down. That's the whole shape of it in one breath.

Next came a change of tool, said out loud as a maybe. Maybe I should use just a spoon to work on this line. I'll use just number three, but a spoon. That way I'll know I can get a lot more nice gradual movement. The frames that follow show a tool with a bent shank in my hand, on the outside of the volute's coil.

Why work around a curl that rolls backward?
Right after the spoon came the second thing I was guarding, a detail, and I named it: that's curl backward detail. So the tool had to go around it.

One part earlier, in 8, the worry was the same, about a different spot: a really nice detail going on underneath. Get a smaller tool, I told myself. Remove around that element. I know it's a small detail, but it's going to be visible. Even if it's not going to be visible, I said, it's still going to make me happier.
That last line is the honest one.

When is a carved line good enough to leave for now?
When it moves gradually, the high spots are gone, and it is about what I want to see, even if it still needs to get nicer later. And now I think I've got that somewhat gradual, I said. Check, double check. And check again. Then something better showed up: I'm actually able to move this line even underneath. It's going to give me even better look.
Everything has to be gradual, okay? Gradual and subtle. The line was staying, but not as a really sharp line. Maybe I can just get a bigger tool, I said. This is a little too big, maybe. About maybe half an inch (12.7 mm), I would say. And clean up little better.

Then came the finger check, with my hand right on the wood. I can get all the high spots. So now it's really tangent line. Beautiful movement, tangent going all the way to this point, going like this, and I can feel that with the finger. Just really nice.
I did not call it done. Although it's not the end yet, I said, I still have to make it nicer a little later. But as of now, it is about what I want to see. Let me sharpen my pencil.
Near the end of part 9, I told you the truth about who sees more. You actually see much better than I see, because you look much closer. Then maybe one more cleanup cut, and after it, I said, I can make my divisions and eyes and pipes and so on.
What did parts 8 and 10 of workshop 46 add?

Part 8 gave the reason I wait. One line there is the main line, and I was guarding that one too. See why I'm not undercutting right away, all the way until I develop everything? I'm always going back to the same area, and until I'm happy with everything, I don't start my finalization of the movements.
Part 10 shows what waiting buys you. See how nice that I did not take too much material out? I'm able to create whatever I want now. I have so much material I can work with. Later in that video there was an edge I really liked, a really nice and beautiful edge, and a concave was planned beside it.
With the concave, it is possible to lose it, I said. Then I asked myself the question out loud, and my answer was, of course not. Before the concave, I really need to make my preliminary cut and clean up cut, I call it. Later on, I'm going to undercut underneath. But as of now, I just need that ridge.
Where else do I say it, and what do I do about it?
The same words come up in my other courses, beside a real line or edge. The table puts part 9 and part 10 beside six lessons from other courses, with the thing I was guarding and what I did, or said I'd do, about it.
| Lesson | What I meant to keep | What kept it, or was meant to |
|---|---|---|
| Venice 46.9 | The feel of a ridge that needed rework | Rework it, then blend that line |
| Venice 46.10 | A really nice and beautiful edge by a concave | Preliminary cut and cleanup cut first |
| Lily Box 4.10 | The design's edge, on that one layer | Walls at 90 degrees, no undercut |
| Hazelnuts 6-1 | Boundary of a hazelnut not carved yet | Square to the background, as planned |
| Chamomile 4-1 | Border that has to match the first piece | Number 11 of 2.5 mm, not a seven |
| Rosette 1-2 | Line of the molding around the flowers | Close to the molding's level for now |
| Grape vase 3.1 | Middle line, plus a ridge on each side | A pass between the two ridges |
| Modern acanthus 3-1 | Gradual movement right beside a rolling part | Little by little |

How does a straight wall keep an edge?

In lesson 4 of my Lily Box course, part 10, the edge of the design was the thing to keep. I have to make straight down cuts, like perfect 90 degrees, I said, and that way I'm not going to lose it. Same number seven I used before. Make sure you don't undercut it, I told you. Just 90 degrees down. From a different angle you could see it, a really 90 degrees wall.
Carving Hazelnuts, lesson 6, had a boundary for a nut not carved yet. My plan was a straight down cut with the same tool, square to the background, so the boundary of that future hazelnut would hold.
Lesson 11 of my butterfly plate had damage near a line. Let me get my knife, I said, and I talked through a fix: set it slightly inside that concave, not too much, at the same angle as before, not as deep, about a millimeter or a millimeter and a half (about 1/25 to 1/16 in). Take my time, I said, and be as accurate as possible to my scoring line.
Why pick a smaller tool beside a border?

My Chamomile and Bow Rosette, lesson 4, had me answer a question before anyone asked it. If you asked me why I don't just take a number seven and start creating that shape, my answer was that edge. If it would be just one I had to do, I could do it that way. But there are two pieces like that, and they have to match each other, so I need to establish that border and not go beyond it. The tool I named was a number 11, 2 millimeters, and then I fixed my own number: it's actually 2.5 (about 3/32 in) to be exact.
With my Roman acanthus leaf, lesson 3, it was the pipes, those parts right there. For this I said I'd probably need a small gouge, a really tiny one, about one-eighth of an inch (about 3 mm). Well, it's not numbered, but I would say it's closer to number eight. Then down into the wood with a slight wiggle.

Lesson 9 of the Lily Box brought a ridge again. I could do a concave there, I said, or maybe take this one underneath the line and make the other one flip a little above it. I thought that would look better. The tools I named were a one millimeter (about 1/25 in), moving gradually from almost nothing, and then half a millimeter (about 1/50 in) to get even deeper right there.
And in lesson 5 of the same box, it was the detail of a ridge with a part next to it that had to come out, and the grain there showed knots and curls. Some meat was left. It's better to probably attack that from two sides, I said: just go halfway, and then attack from the opposite direction.
What if the line you keep is the drawing itself?

Right then, on my vase with grape leaves, lesson 1, I wanted to outline my main movement, so it would not get lost. Then the center line. I need to outline, I said, and then: let me use a green color.
Back on that vase, lesson 3 had the middle line and a ridge on each side of it. The plan was a pass right between those two grape leaf ridges, and both ridges were to stay. Where two meet in a triangle there's a micro vein going in, so right there we kind of have to blend. I also told you that if the big tool feels wrong in your hand, a number eight or a number nine of a quarter inch (about 6 mm) can do the same job.
On the Greek acanthus leaf, lesson 5, I said I'd redraw some of my lines again, and the details right there were the reason. One line there should go a little deeper. That leaf has a V cut inside, and I said we have to be accurate to the history.

For my Venetian flowers rosette, lesson 1, the first depth was only a start, since the inside will go much deeper and slope under the molding. I wanted the line of the molding left alone, so I worked only about level with it, and I left a little space between my line and the tool, maybe five, four or three millimeters (about 3/16 to 1/8 in). The rosette stock, I said, was eight quarter, about an inch and seven-eighths (about 48 mm).
And on Acanthus over Moldings, lesson 10, the knife could create that movement, I said, and my molding was the thing to keep.
Can you lose it anyway?

It happens, and it happened to me in a lesson. On my Modern Acanthus, lesson 3, I went in little by little with a number nine, 20 millimeters, three quarters of an inch. The gradual movement in that spot was really important, but on the other hand I really wanted to get in and create a rolling motion. A number nine of 10 millimeters, three eighths of an inch, was the next one I named.
See what I just did? Just made the mistake, talking too much, and now the whole thing had to come down lower. Please don't do that mistake, I said.
In lesson 4 of Carving Hazelnuts it was a meeting point, a little triangle. Really important to get that triangle, I said. My pick there was a skew chisel, though any knife will do, with only a slight cleaning, because it's not the final stage. Workshop 46 had its own slip too, in part 9, the one I called no bueno. My answer there was more care, and checking more than once.
Where do you start on your own board?
Is there a line on your piece right now that you like? Can you point to it? Then you already have the first half of it. The other half is what the tool does near it: a smaller size, walls straight down, or some wood left on for later.
The workshop 46 page covers the whole lesson, and the Venice Room Part 4 course holds all twelve workshops of this acanthus relief. All my courses are one click away if you start here.
How it's done
- Name what stays. Before the tool goes near it, say which line, ridge or edge you are keeping. The ridge in part 9 got named in the same breath as the blend I needed.
- Make the wall 90 degrees. The Lily Box walls went straight down beside the design edge, and I told you not to undercut there.
- Go around with a smaller tool. I told myself in part 8 to get a smaller tool and remove around that element, small as it was.
- Leave material on for now. Don't take a lot out early. The wood still there in part 10 let me do whatever I wanted next.
- Hold back the final undercut. Develop everything first, the way I said in part 8, and only then start finalizing the movements.
- Check it with your finger. Check, double check, check again. When the line felt right under my finger in part 9, I called it really nice. Still not the end.
Frequently asked questions
Why carve straight down beside an edge you need to save?
On my Lily Box I made those walls perfect 90 degrees, with the same number seven as before, and told you not to undercut there. A straight wall like that keeps that edge. From another angle you could see it, a real 90 degrees wall.
Should a smaller tool go first next to a border?
For my chamomile rosette, it did. I named a number 11 of 2.5 millimeters, about 3/32 in, over a number seven, because two pieces had to match and I could not go past that border. With only one piece to carve, I could have done it the other way.
Is it worth leaving extra wood beside a ridge?
I was glad, in part 10 of workshop 46, that I did not take too much material out. Now I was able to create whatever I wanted. The undercut underneath was for later, and as of then I just needed that ridge, with so much material still there to work with.
What to carve next