

Alexander Grabovetskiy, woodcarver, School of Woodcarving · Published 2020
What does "easy" mean when a wood carver says it?
Quick answer: Easy is what I call one step on the board, out loud, at the moment it comes up. In Venice Room 46.8 I said it twice, just after I had the overall idea for an acanthus movement. Once a plug was out in workshop 48, going deep underneath was easy right then.
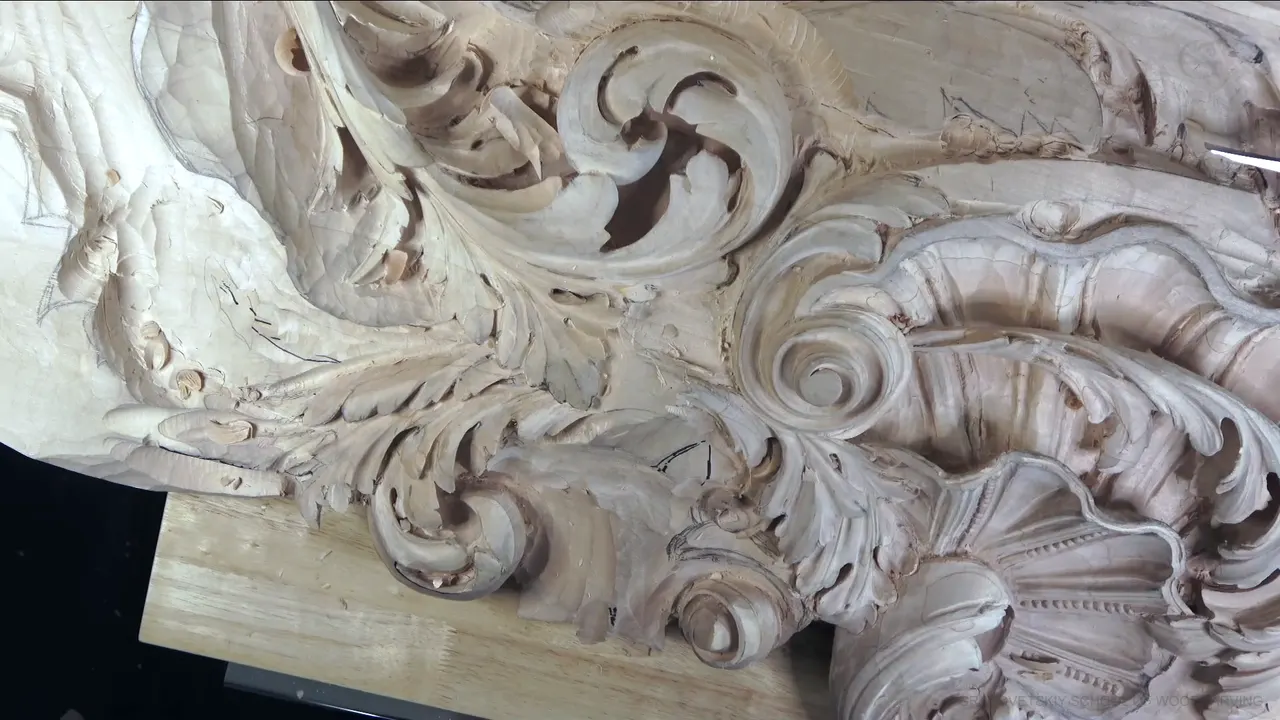

Easy is a word I say out loud about a step on the carving in front of me. In Venice Room 46.8 it came twice in a row, right after I told you that at least I'd got the overall idea of an acanthus movement. So is wood carving easy? Some steps I called easy on camera, and some I called not easy, on the same kind of board.
Have you heard a carver say easy while the tool is still in the wood? Did you wonder if it would be easy for you, too? Each time I said it is here, with what came right before it, and the spots where I said the opposite.
Part 8 runs about seven and a half minutes. That's short, so other lessons sit beside it here, and each one links to its own page.
Where easy came up on camera
- This Venice Room board, once the overall idea was there.
- Workshop 48, once a plug was out.
- The furniture panel, with a knife line already there to catch.
- One spot I broke in workshop 40.
- That same panel again, where the same words were a warning about doing too much.
- Spots I called not easy, a high one among them.
What was easy in part 8?
The overall idea came right before it. In part 7 I'd said I would establish some kind of acanthus movement this way, because I thought it would tie really nicely. This part opens with more of it. There would be some kind of eye underneath, which would tie together the movement on its side. "But at least I've got the overall idea," I said, and then, "So just like that. Easy. It is easy."

Part of it would be hidden anyway by the flowers. Still, you'd be able to detect that something was going on there. Let me outline it first, I said. That's why I hadn't taken out the whole chunk. After that I wanted that separation, or division, and there would be another one.

Was I happy with every chunk?
Not with one of them. That would be the approximate position, I said, although I was not really happy about that chunk being that far, so I wanted to hide it somehow. I wanted to get a little closer to that one. All I needed was pretty much an indication of the movement, an indication of the same line. Hope it makes sense, I told you, and then, okay, wonderful.

Then some material had to come out. I don't need it, I said, and I'd use just the bigger number 11, to remove around. Just a little bit, not much. Like I said, most of it would be hidden anyway, though I'd still develop some leaves there.

Could the leaf wait?
It could. I thought about getting an idea right away of how my leaf would grow, somewhere right there. But I don't have to do it right away, actually, I said next. After I establish this, I can do that.
Next I wanted a really nice line, like a really nice flowing line. There was a really nice detail going on underneath, and twice I said I didn't want to lose it.

Get a smaller tool, I said, and remove around that element, like that, and in the close view a thin tool sits at the scroll's edge right then. I know it's a small detail, I said, but it's going to be visible. Even if it's not visible, it would still make me happier.


Okay, just go around, I can always refine everything, and now I can establish the movement.
Which line was the main line?
The one going all the way like that. A second part was going to grow from the side of it, I said, but that line is the main line, and I do not want to lose it. Maybe I could actually give an extra movement going that direction and go underneath that one. I'll figure this out a little later, I said, but now I need to get underneath this detail.

See why I'm not undercutting right away, all the way, until I develop everything? I asked you that on camera. I'm always going back to the same area, and only when I'm happy with everything do I start my finalization of the movements. My Venice Room Part 4 course page has the long version of when the final undercut goes in. The last thing I said I'd do was get this movement somewhat done, and the part closes on "That is good."

Why was it easy right there?
In workshop 48 a plug was already out. Just because I had that plug removed, for me it was easy right then to get really deep underneath and create a really clean and nice surface. Even if you don't see it, I said, that's going to be clean and nice.
Over on my furniture panel, a knife had been there first. I used a number one double bevel and hit straight down, and I said why it was easy. "Because I do have a previous cut by knife, for me, it's easy to catch the line. Really easy to catch that line."
Earlier on that same panel, I said I'd do the final cleaning with the router plane. I checked if it would fit in the profile, and it did. It doesn't have to be exact on the line, I said, as close as possible, and if you're just slightly off, that is okay. For me, now, it was easy to get in with just a router plane and clean it.
Measuring came easy in workshop 79 too. Sometimes it's hard to use even calipers, I said, but a pointing machine is good. With the piece lying flat on my workbench, measuring to the point right from the surface of the bench is pretty much really easy for me.

A drawing can do it too. Back in workshop 39 I drew a detail with a marker on plastic, so I could flip it and reuse it on the same design in a different position. Easy, simple trick, but it helps a lot, I said. In my Byzantine acanthus course I said the same about flipping a pattern to repeat a movement. Easy, right? Super easy.
Numbers can be easy as well. The easiest way to figure out where my center line goes, in workshop 49, was to divide the line in 10, approximately. The golden ratio, I said, is 0.62, so 62 parts out of 100, or six parts out of 10. That's easy to figure out. Five parts is the middle, and I move slightly to the side, just eyeballing, to get about six.

Which spots did I call not easy?
A spot I had to work around in workshop 40 was one. I would say it's not easy, I said. Okay, it's not really easy. I had to carefully approach my way in, and maybe I should use really small tools and excavate deeper. Five millimeters, about 3/16 in, was a little too big, so the next one I named was a 4 mm (5/32 in) number 11, with even smaller if that was too big also.
Then, oops. That is not what I want to see, I said. That's okay, although it's not too okay, but it's okay. To outline it, the best tool would probably be a number one back bent. Maybe I should be able to use a straight tool, I said, and right after that, yes, I am, actually.

Another part was on my way in workshop 47. That's not easy to attack area, I said, but I really needed to undercut, and the deepest undercut would be right there. My plan was a back bent, 10 millimeters (about 3/8 in), number five. The area wasn't impossible, I said, but it wasn't the easiest also.
A high spot did it in workshop 66. It's not easy because this is a high spot, I said, and I don't want to break it, although it's solid yet. I had not undercut anything there, but I still needed the full depth of it, because like I said, I'm after that shadow. My first try was maybe a number nine spoon, 15 mm (about 0.6 in). A bigger nine, maybe 20 mm (about 0.8 in), would not fit. The number eight medium bent did.
That same workshop 48 had one spot inside I called not the easiest. You could create a really nice and beautiful concave there, I said, but don't get too crazy with that. It'll be much harder to work in that area with a lot of concaves and convexes inside.

Can the same words be a warning?
They were, on my furniture panel. Again I needed the same number 11, to get closer to the line, I said, and then careful, careful, careful, not to do too much. Because it's easy, I said. It is easy. Those are the same three words as in part 8, only this time they were about overdoing it.
Tools can be easy to break, too. With a really long bevel like this one, I said in workshop 41, I wouldn't use it on a hardwood, because you can break the tool, and it's easy to break. So I went to a different number seven with a little smaller bevel. See, that's much better, I said right after.

Is wood carving easy to learn, then?
Some of it isn't, at least not at the very start. During workshop 62 I was talking about complicated movements, the ones that slope and still have to be visible from all of the points. It's not that easy when you just start, I said, even if it looks simple. It was confusing for me too, when I started to carve those.
Others I called easy. Doing the leaves on a rosette in my flower rosette course, I said I'll just use a knife, because it's easy, and I'd set my outline with the same knife I was holding. You could use different gouges, I said, but I think it's not that necessary in this case.
For the Hashemi flowers course, I flipped a piece upside down off camera, found my high points on the other side, and took my undercut over to them. I was a little ahead of the game, I said. But it's easy, and I think you can probably handle it without even any instruction.
A bubbly background on an antique rosette is a stumbling block for lots of wood carvers, I said in my antique style rosette course. It's actually really easy. I used leather punches, the ones with bubbles, and tried them on a piece of scrap first. It just works fine.

Does the wood make a difference?
It can. Sometimes you get difficult pieces, even basswood, I said in workshop 78, and that one was one of those pieces. Some pieces are really a piece of cake to carve, really easy. That one gave me a little bit of resistance, even with super sharp tools.
I gave mahogany the same word in my Greek acroterion course. Easy to carve, I said, and for sanding, it sands really nicely. In that same video I said my great-grandfather was called a redwooder, because he worked mostly in redwoods, such as mahogany and cherry.

Was a broken spot easy to fix?
That one was. Working on the inside in workshop 40, I broke a spot, and I didn't like what I had just done. But it's really easy to clean, I said, just like that. One small concave could go down the whole way, and it would give me a really nice movement too. I didn't need a big deep concave. My number three left it nice and long and good, except one place where I still had to shave a little more.

How did each one go?
Each one is in this table, with the lesson and what was around it.
| Lesson | My words | What came before it or after it, on the board |
|---|---|---|
| Venice 46.8 | Easy, twice in a row | Said once I had the overall idea of the movement |
| Lesson 48 | Deep underneath, easy at that point | That plug had been removed before |
| Furniture panel | The line was easy to pick up | A knife had gone in there before |
| Room 40 | Not really easy | One spot to work around, maybe with really small tools, and a 4 mm (5/32 in) eleven named next |
| Workshop 47 | That's not easy to attack area | Another part sat on my way |
| Venice Room 66 | A high spot, not easy, one I didn't want to break | A medium bent fit where the bigger nine would not |
| Panel, again | The same words, as a warning | I'd said careful three times, close to the line |
Where can you watch part 8?
You'll find it in the Venice Room Part 4 course, inside workshop 46, as one of twelve parts. Part 7 comes before it and part 9 after, on a carved relief board that I work with gouges and, at times, a mallet.
Can you see the step on your own board that would make the next one easy? On this one, the overall idea came first. Then the outline, before the whole chunk. If you want to watch every pass, the tuition opens every workshop of the Venice Room.
How it's done
- Get the overall idea first. Here, an eye was still to go underneath, but the idea of the movement was there before I said easy.
- Outline before the chunk goes. Let me outline it first, I said, which is why the whole chunk was still there.
- Mark the separation. Next I wanted that separation, or division, with one more to come.
- Take a little with the bigger eleven. Just a little bit, not much, since most of it would hide behind flowers.
- Go around the small detail. Get a smaller tool and remove around that element, I said. Small, but it would be visible.
- Hold the final undercut. Not undercutting until I develop everything, I said, since I keep going back to the same area.
Frequently asked questions
Is carving easy when you first start?
Parts of it, and parts not. Back in workshop 62 of the Venice Room I said sloping movements that must read from every point are not that easy at the start, even if they look simple, and they confused me too back then. Setting a rosette leaf outline with a knife, I called easy.
What makes a step easy on a carving?
A step done before it, on my boards. With a plug removed in workshop 48, getting really deep underneath was easy for me right then. A knife had already gone in on the furniture panel, so catching the line with a number one double bevel was really easy.
Can easy be a warning in wood carving?
Yes. On the furniture panel I said careful three times, not to do too much, and that it is easy. A really long bevel used on a hardwood can break the tool easily, so I went to a number seven with a smaller bevel.
What to carve next