

Alexander Grabovetskiy, woodcarver, School of Woodcarving · Published 2020
What does "keep an eye on" mean when a wood carver says it?
Quick answer: Keeping watch is how I guard the one thing a cut could ruin. In the fourth part of workshop 46, that was the rim of a volute and how hard I pressed beside it. In my other lessons the same words covered depth, thickness, grain, my line and where my hand sat.
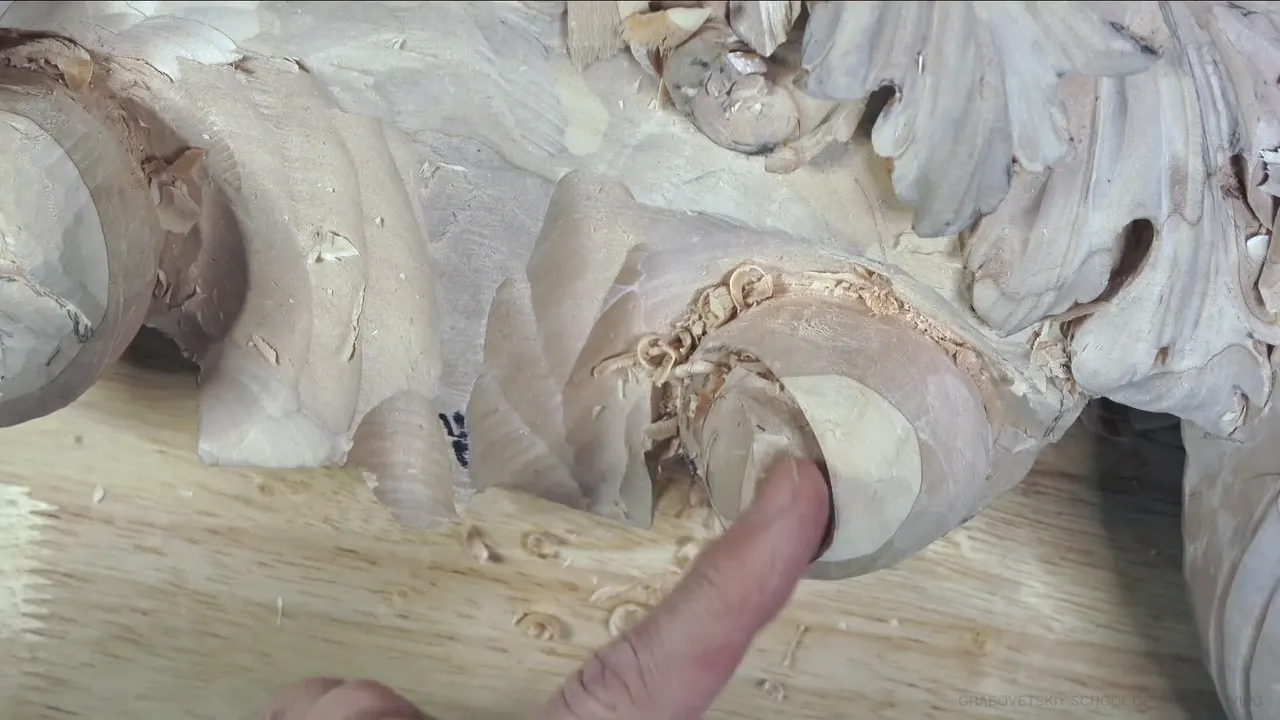

"Keep an eye on" is how I say I am watching the one thing in a cut that could go wrong while my tool works. In Venice Room 46, I watched the rim of a volute while I dug out the inside of it. In other lessons the same words were about depth, the wood left under a cut, the grain, my line, or where my hand sits.
Have you ever pushed a gouge and felt a thin wall give a little? Do you hold your breath on the last pass? Then you already know what I mean. Below is what I watched in this video, and the same watching in lessons from other courses, each one named and linked.
The six things I watch
- The rim in front of a hollow, since heavy pressure can break it.
- The depth of a cut, and what sits behind the wood I am carving.
- The wood left beneath the cut.
- Grain, and a change of direction when it turns.
- The line I mean to protect.
- Where my own hand rests.
What was I watching in this part of workshop 46?

The video opens on a tool I could not find. I started with 3 mm (about 1/8 in), or even 2 mm (about 0.08 in), and my 3 mm was not in its place. I must have misplaced it somewhere, I said, so I took another 3 mm. It was still a number 11, just a different one, a European size.
Now come the words this page is about. Again, I was watching what I did to the edge, to see whether I pressed too hard. I wanted that edge in one piece. Breaking it, I told you, is always a possibility.

Next came what I said about taking my time and about how hard to press. Take time and dig out the wood little by little, since one big mistake from pressing too hard throws away all those efforts.
Next I checked the work. What was the depth of the hollow, and how nice a shadow was I getting? A stopping point was coming, I said. At that point I would not be able to reach in. From a different point of view, the way you would look inside, I showed you the hollow. Once more I reminded myself about the pressure on that edge.

Here is where I changed my mind. Barely any pressure, I said, yet I was still cranking against that edge. Right here it's ready, I said, and in the next breath it actually was not. I had thought the edge was too weak, and it was not, so I went in from all the way right there, and from the other side too. I also apologized, because I covered the spot and you probably did not see it.
Probably that was the deepest I could go with the 3 mm (about 1/8 in). Going deeper meant a switch to 2 mm (about 0.08 in). Some time later I said that was probably enough, so I didn't want to overdo it.
Which gouges came next, and why not a number 7?

Cleanup of that movement came first, and then I wondered which gouge to take, a number 7 or a number 6. My try was number 6 first, on one side of the movement. Sanding all the inside was off the table, because there was no reason to, and I could make a beautiful dome effect there.

That was number 6. For a little nicer shape of the volute itself, maybe bigger, a second number 6 was my plan. After it, my plan was the number 11 again. Waste chips I didn't need were its job.

Straight with a number 7, I said, it is possible to do these volutes with no problem, but the effect is different. A 7 reaches only a certain point and leaves no dome inside. The dome is what gives the deeper shadow. Elsewhere that is fine. Here, I really liked my way.
Then, for a different technique, I pointed you to another course. In Carving Hashemi Flowers I have a high volute, and the technique there is different. I believe I used a number 7 on it, if I am not mistaken.
How hard do I press next to an edge?

Pressure is one thing I watch. Hashemi lesson 11 had me working carefully against the grain, and reaching from the opposite direction turned out to be easier. My reminder was about pressure, since that part had become more fragile. Pressing much was off my list, because I could always attack it from the backside and remove the waste.
Over in lesson 45 sat a connecting point I wanted to keep. Carefully, a number 11 went in, and I could not crank against that piece, since it was already fragile. My words for it were short: must be no pressure, and can't create too much pressure at all.

A detail beside my cut asked for the same care in lesson 2. Across the grain, from the side, was one way in that I named, and the edge got my attention because I would not hit that detail. Kind of have to be really careful here, I said.
Part 3 of workshop 46 carried the same warning. Rotate a straight number 11 and it reaches a power point where it smooshes the edge, one more thing to catch and not do. A mallet changes the thing I watch. In workshop 38, I told you to keep your eyes on a spoon gouge under the mallet, because it jumps like a spring and can break.
How deep do I let a cut go?
Depth comes next. Part 2 of this workshop had me wanting no mistake of cutting too deep. It is not pierced work, I said, so going all the way was off the table.

Workshop 38 gave the reason in plain words. A part sat there that I didn't want to damage, and that is why I watch every cut and how far down it goes.

Furniture Panel, lesson 16 was background clearing. Not too deep, I told you, just straight down. I know I have said it many times, but I have to remind myself a lot.

In lesson 15 of that course I was taking about 1/32 in (about 0.8 mm), a bit more in some spots, and my plan for the final background was a router plane. A later part of the same lesson had the thought of a little more time with the number 11 veiner for a slightly deeper cut. One rule came with it. Make sure you don't cut deeper than the background is supposed to be, I said, and then I added: really watch it.

Room to go deep changes with the piece. Lesson 18 of that course called for a number 16 V tool, and I planned to go kind of deep while watching that I did not go to the very bottom. About half an inch (about 13 mm) stayed between my back and that cut.
Lesson 49 sent me at it from two sides, one after the other, to get really deep. I was already really deep, I said, and one more push makes a hole. A couple of holes sit on that flower, which is fine, but I try to avoid them if it is possible.
Hazelnuts lesson 4 had the background as its danger. The cut on the hazelnut could not reach it, because that would be a big mistake. Overdoing it was the worry in lesson 16 of the Hashemi course, and I called it a really bad idea.
What else sits close to my cut?
A high point sat nearby in Hashemi lesson 13. A number 8, about 5/8 in (about 16 mm), was my pick, and I watched not to get too close to it, since that part still had to flip over and grow in its direction. Easy to overdo, I said, and I wanted no part of it. So I planned to remove one section and take a different spoon, a number 9.
A leaf stood beside my cut in lesson 10. First came a V cut, a preliminary separation cut with a number 16 at 6 mm (a bit under 1/4 in), and I took care to avoid the leaf. Then a number 7 gave me my movement.
How much wood is left under the cut?

Next comes the wood beneath the cut, and how much of it I have left. How much thickness I had was the question in Hashemi lesson 40. I could take the leaf lower, I said, but not at the edge. Closer to the middle there was another 3/16 in, which is about 5 mm, so I could excavate a little more, with real care.
A spot where two grains met came up in lesson 10 too. I call that a marriage line. I cleaned it from both sides until it disappeared. After that, the thickness of the leaf needed a look, and it seemed I still had plenty. A shorter warning came in lesson 14: watch the material thickness. Easy to overdo, I said.

Hashemi 16 was a thin one. How thick a wall I had, I said, and I did not have too much, so I would approach it really carefully. My undercut in lesson 38 sat at 35 degrees, not 45, and I still noted how much material was left underneath.
Thin is sometimes the goal. A number 9 came out in Byzantine Acanthus, lesson 5, and I said the bigger tool is better. Everything goes to the edge, with a watch on how far the cut runs, if you want the leaf to look light and almost airy. Thick, I said, but people will think it is paper thin. Careful as it nears the edge, I warned, and don't take too much from the middle of the leaf.
Where does my hand go?

My own hand counts too. A smaller V tool, a number 16, was my plan in lesson 11 of that course, and I mentioned what my hand was doing. My pinky sat below the piece and made support.

Lesson 17 repeated it. Where you place your hand matters when the parts are fragile. Be really careful with every cut, and don't crank against the piece. A finger can take the pry, I told you, but wood can't, and prying against the wood would not be really smart.
Does the grain change what I watch?

The grain moves my eye. Lesson 1 of that course gave the advice: be careful and see what the grain does. If you need to change direction, just do it. One piece in lesson 9 needed extra care because the grain ran one way. A smaller tool was next on my list, a number 8, about 16 mm (5/8 in).
Hazelnuts lesson 3 had a looser job. I outlined the husk and did not have to be super accurate. All I needed was a look at what the grain of the wood does.
Which line am I protecting?

A line is one more thing I protect. Flower Rosette, lesson 1 showed me rotating the tool and watching constantly, with my eye on the line. I removed just above it, leaving about 1/16 in (about 1.6 mm).
Workshop 46 itself had a ridge to protect in part 5. The plan was a small one, starting at 5 mm (3/16 in) in one spot and going to about an eighth of an inch (about 3 mm) all around. I called it the ridge I wasn't going to touch, and I was eyeballing it. Part 3 had a slope I wanted to keep. In that same 5 mm, a number 11 veiner set my deeper grooves, and going deep like that was not what I wanted.

Greek Acroterion, lesson 3 made it plain. Angle the tool, check how it goes, and watch this line, which was really important to me. A gouge would make the final cut on the palmetto later.
Where did each of these come from?
| Lesson | The thing I was watching at that moment | My next move was this |
|---|---|---|
| Venice 46.4 | The edge on a hollow that could break under pressure | Slow digging, then a smaller tool |
| Venice 46.2 | Depth of a cut beside work that is not pierced | Stop before the other side |
| Hashemi 11.2 | Pressure on a part that had turned more fragile | Attack it from the backside |
| Furniture Panel 16 | Depth while clearing the background of a panel | Straight down, not too deep |
| Hashemi 40.1 | Thickness left under a leaf I wanted lower | A little more, with care |
| Hashemi 17.5 | My hand's place beside fragile parts | Pry against a finger only |
| Hashemi 1.4 | The direction of the grain in that cut | Change direction when needed |
| Flower Rosette 1 | My line while I rotated the tool | Left 1/16 in (about 1.6 mm) of wood above it |
Where do you start at your own bench?
Is there a spot on your piece that could break or go too deep? Can you point to it? Then you know what to watch. Give the next cut all the time it needs.
The workshop 46 page covers the whole lesson, and the Venice Room Part 4 course holds all twelve workshops of this relief. All my courses are one click away if you start here.
How it's done
- Name what could break. I named the edge out loud, and whether I was pressing too hard against it.
- Dig a little at a time. Slow is safer here. Press too hard once and the effort is gone.
- Look inside. Check how deep the hollow is and how nice a shadow it gives. I showed the view from inside, the way you would look in.
- Switch to a smaller tool. When the first number 11 reached the deepest it could go, I said a smaller one was the way to get deeper.
- Stop short. I called it probably enough, so I would not overdo it.
- Put your hand where it helps. Support came from a pinky under the work.
Frequently asked questions
Why watch the edge when you dig out a hollow?
Too much pressure can break the edge, and I called that always a possibility. A slow dig beats the kind of mistake that wastes all that work, and that was my reason on this volute.
What do you do when an edge looks too weak?
On the volute I first called a spot ready, then took it back. I had thought the edge was too weak, and it was not, so I could go in from that spot and from the other side. A fragile part in lesson 11 of the Hashemi course got the backside.
How deep is too deep?
Workshop 46 gave one limit: it is not pierced work, so going through to the other side was out. The furniture panel's limit was the background, and I told myself to stay straight down.
What to carve next