

Alexander Grabovetskiy, woodcarver, School of Woodcarving · Published 2020
What does flip mean in acanthus carving?
Quick answer: A flip is my word for a leaf or a curl that grows out from underneath another part and ends up above it. In workshop 27 of the Venice Room I said a piece would sit above another one. Other lessons use the word for dug-out walls, undercuts and overlaps.
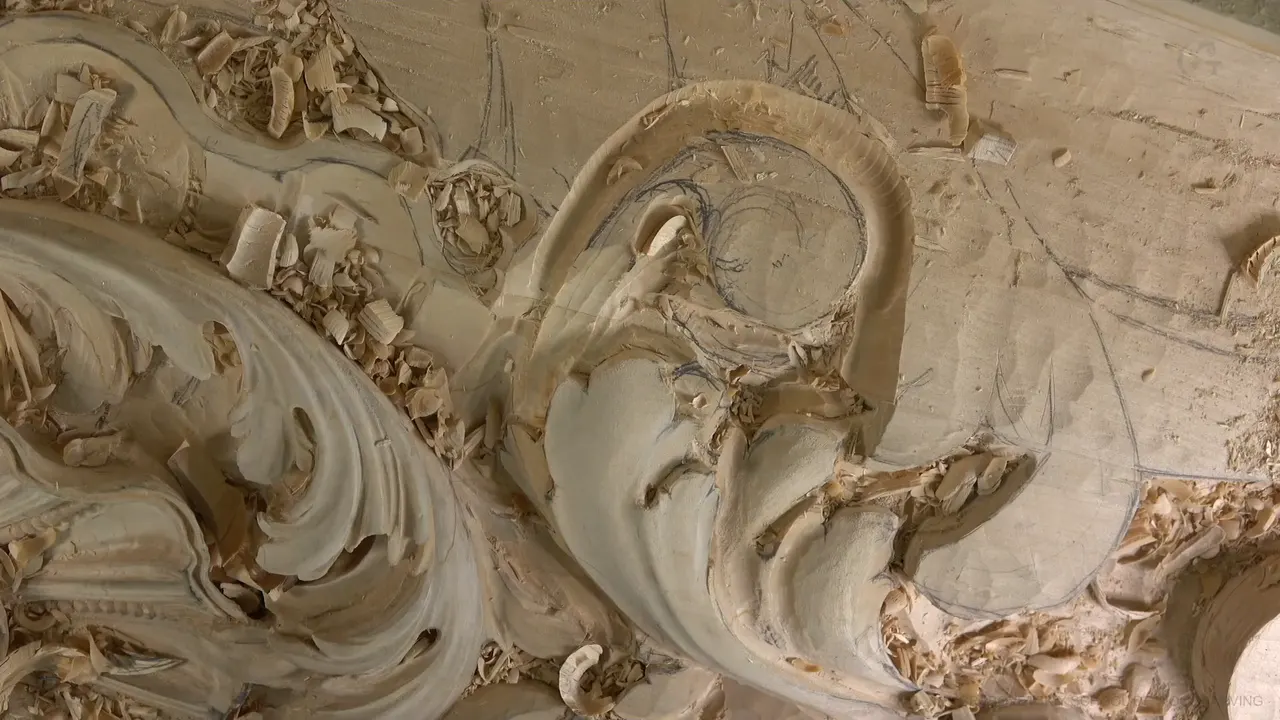
A flip is my word for a leaf or a curl that grows out from underneath another part, turns, and lies on top of it. I used it in workshop 27 of the Venice Room, part 1, when I said "It's going to flip just like that, okay?" and carved one piece so that it would sit above its neighbor.

Have you ever looked at a carved acanthus and felt a leaf in relief was lying beside the others, when it should have been coming out from under them? The word helps me name that problem. I use it in many courses, so I followed it through my Venice Room workshops, my furniture panel, Hashemi flowers and a few more.
What does flip mean in wood carving?
In my lessons the word describes where one part of a design goes in relation to the part next to it. A section starts low, sometimes close to the background, rises, and ends up above something else. My other names for it were a flipping movement, a flipping motion and a flip-over. It is a wood carving word I use on camera, and below you will hear me doubt it more than once.
The spine of this page is the first video of workshop 27. By its captions it runs about eight minutes, all on one element of a ceiling board: a head that went backward, which I wanted bigger. The word comes up three times in that video. Past that video I follow the word through other lessons, and I say in plain words which lesson a line comes from.
How did I plan one flip in workshop 27?
I looked at the element and thought I could probably work on it right then. My first question was how it would look from below, in real life. As of that moment the element was "kind of small, just that head, and that just goes backward." One change came to mind: "First of all, I want to make it a little bigger." And I told the camera, "We'll see if I'll be able to or not, because I already excavated a lot."
Next came the line that gave me this page. The piece would turn just like that, but it would stop short of the far back, because, as I put it, I did not think it would look nice. I began developing the idea as a bigger piece. The first job, I said, was to excavate around it, just to get the overall shape. Only then could I make it feel as if it were flipping.

For that first step I took a number nine, or a number 11, and said either would work, "same idea." I put the width at probably 20 millimeters, which I called three-quarter of an inch (that is 0.79 in, so the two figures agree). This area belonged to a different acanthus movement, so I said I had to attack it from the opposite direction.
A flatter tool came next. I thought of a number five at one inch (25 mm) and said it was probably not going to work, so I picked a number three at one inch and chopped. A little deeper cut on the other side was also on my list.

Here is the plan I care about most. Part of the piece would go underneath the section beside it. "I know it's going to be almost invisible," I said. The part would go in, and this piece would "flip right on top of that one."

I admitted the piece looked a little off at that stage. You would understand once I got it done, I told you, and you would see the development of my idea. Before that I mentioned rounding the piece right away, probably, and a bit later that another spot needed rounding really substantially.

Which tool made the wood room for it?
To keep this piece above the section beside it, I had to dig a little with a number 11 or a number nine, and I said it did not really matter which. The one I was using was a number 11, 10 mm wide (0.39 in).
After that I stopped to think about the shape. A small hollow, a gouge concave, was one choice, but I said I should not probably do that: "There should be convex." I asked myself which tool to use, and a number seven, I said, would probably work the best in that case.

That short stretch shows two jobs side by side. This is my reading, not a quote: wood taken away from the lower part so the upper part has room, and a rounded top on the piece that sits above.
Does a flip start from underneath the leaf?
In lesson 22 of that panel, part 2, I said I could go almost to the background, because "it's supposed to flip, and that flipping motion is supposed to start somewhere." In that case the start sat "almost from under ground."
That video also has a fillet. I planned a fillet to round one side so that the piece read as turning over, probably with a number three, a quarter inch wide (6 mm). My reason for removing wood in chunks was the grain: that part of the leaf was aligned with it, and I said it is sometimes not the best idea to carve that way, because it can split and damage the carving. See the grain for yourself before you try it.

Lesson 19 of the same panel, part 6, gives another reason to hide the start. I outlined a flower with a tool 1 mm wide (0.04 in), going above a molding, and said the leaf would flip underneath the rose. Even if the effect is invisible, your brain still picks up that something is underneath, I said, and the leaf is "just flipping over that something." That way it makes sense to your brain, I said.

A shorter version sits in the Hashemi course, lesson 18, part 2. After I blended along a marriage line, I said, "you can clearly see, hopefully, this goes from the underneath and flips and goes above that one." That, I told you, was my goal. Workshop 38 of the Venice Room, part 10, has a round shape that was "growing now from underneath and just flips this direction," and I said I needed to keep an eye on how deep my cuts went. You can see it in the Venice Room 38 lesson.
Why do I keep looking for another word?
Here is a pattern I noticed while collecting these lines for you. I was not sure the word was right, and the camera caught me hunting for another. My wish in the panel design course, lesson 14, part 5, was an acanthus that looked like it was "actually flipping from the back." Then I fixed myself: "Not flipping, but overlapping, I should say." The leaf should look like it overlaps from the backside and goes in that direction.

The same happened in lesson 21, part 12. A big part of an acanthus movement was about to flip, and I stopped: "Not flipping, but go right above that detail." Next I said I believed I had left approximately one millimeter (0.04 in) of wood right there, and I wanted to be sure of that.
Hashemi lesson 11 has two of these. In part 6 I made the same kind of cut from the opposite direction, so one part of a leaf looked really deep underneath, "and this is just flipping above." I asked, "I'm not sure, can I say that even?" and then answered myself that it was actually just above that one, which was probably the more accurate way to say it. The line came from a #16 V-tool, 6 millimeters wide (about 1/4 in).

The doubt shows best in part 11 of lesson 20. I had half a millimeter on the tool and was taking care of a triangle, and I noted I could undercut underneath of "this flip." Next: "I don't know even if I can call that a flip or not, but it's actually exactly what it is. It's flipping thing." The full doubt is in that lesson.

In Hashemi lesson 15, part 4, I did stop hunting. I took the shape to an extreme: I dug out the wall and undercut the side. "That way you can see it has a true flipping movement," I said. "It's how I call it. It just flips." I added that I hoped you could see on the camera what I meant. The lesson is Hashemi 15.

How do I remove the wood under a flip?
In the lines below the digging is under the leaf. Over in part 8 of that lesson, I told you I had first undercut under one side, and it looked "like it's flipping nicely and still creates the shadow underneath." I could have gone to an extreme and done more, I said, but I did not have to. For the opposite side I picked a number 11, half a millimeter wide.

Can a flip look too weak?
Back in workshop 27, part 11, I worried that a flip might be too weak. More excavation in one area would add flipping motion. "I have to be careful because I don't want to create too weak movement," I said. "But I also don't want to underdo it, because I think it just gives extra definition, extra depth."
The tool was a number nine, and I first said about half an inch. Then I corrected myself: "Well, this is 5/8. I'm sorry, it's not half an inch." So the figure is 5/8 of an inch (16 mm). I called the result a really nice flipping movement, and I repeated that I had to be careful not to make it too weak. It was already looking good. "At a certain point, I have to just stop."

Part 7 says the same in fewer words. I was excavating underneath "because I really want to make it feel like it's flipping," using a number 11 that is 10 millimeters wide (0.39 in). Number 10 would do the same operation, I said, and so would number nine. Part 10 shows a smaller version: a 2 millimeter number 11, undercutting a little under one side with a smaller tool because not much material was left. It was supposed to read as a flip from the inside.

Below, a table lines up eight of my own lines on the word, with what the leaf did. The last column holds a few words straight from the video.
| Where | What the leaf did | Kind | Words |
|---|---|---|---|
| Venice Room 27.1 | Piece that goes on top of another | On top | Right on top of that one |
| Flowers lesson 15.4 | Wall dug out and the side undercut | Full movement | It has a true flipping movement |
| Hashemi 11.6 video | Leaf part going deep under a neighbor | Just above | And this is just flipping above |
| Panel design 14.5 | Acanthus that overlaps from the back side | Overlap word | It should look like it overlaps |
| Upper panel 21.12 | Big acanthus part going above a detail | Right above | But go right above that detail |
| Flower panel 20.11 | Undercut under a shape I hesitated naming | Maybe flip | It's actually exactly what it is |
| Workshop 27.11 video | Hollow dug under to deepen the movement | Too weak | Not to do it too weak |
| Hashemi 45.4 clip | Choice of which piece goes on top | Open choice | Now I have to decide which |
Which part flips over which?
Sometimes the answer is a choice, and I said so. Hashemi lesson 45, part 4, shows me with a V-tool, saying, "Now I have to decide which one is going to flip over which." Looking at it, I said, "naturally, this can go above this one or that one." Just before, I had a number 11 in hand, said maybe I could use a knife, and planned to clean with a small gouge again, and I said the effect was really 3D, "depthness."
Part 1 of Hashemi lesson 13 has a flip I planned as an addition. "Let me think," I said, about the look and the best choice. "I think maybe I'll make an inner flip also." It would be about the same movement as the one beside it, turning toward a different direction, with a concave cut at one place, so I took a spoon gouge, a half-an-inch number eight (13 mm), and said I would try it. See Hashemi 13.
The same thinking out loud shows in part 3 of workshop 27. one part would go on top, with a separation next to it, and one piece needed to be a bit bigger. Of one part I said, "That is going to be flipping from this direction," and added that I would need an extra division there. I apologized for thinking out loud. The point of the division had to be decided before the outline.

How would I plan a flip at home?
This is my reading of the lines above, and I am giving it as a plan, not as a rule I said. Decide which part sits above and which part sits below. Excavate around the lower one first, as I did in workshop 27, and plan to hide the start of the upper one, as in lesson 22 of the panel. A smaller tool suits the undercut, as in lessons 19 and 20. Look at the shape from a few angles, and stop when it reads, as I said at the end of part 11.
If you want to see where the word came from, open the Venice Room 27 lesson first. The whole set of Venice Room workshops has the rest of the ceiling board.

How it's done
- Pick the upper part. Choose which part will sit above its neighbor. In Hashemi lesson 45 showed me it could naturally go either way.
- Dig around first. Excavate around the shape to get the overall shape, with a gouge about 20 millimeters (3/4 in) wide.
- Tuck the start in. Let the piece go in under its neighbor, almost invisible, so the turn begins low.
- Undercut below it. Pick a smaller tool, such as a gouge 10 millimeters across (about 0.4 in), and dig under the part you want above.
- Round the top. Make the upper piece convex, and stop when it reads without looking too weak.
Frequently asked questions
What did I mean by flip in the first Venice Room video?
I meant a piece that goes under its neighbor in one place and turns over it in another. I said it would be almost invisible where it went in, and that the piece would turn over its neighbor.
Do I know the right word for it?
Sometimes not. In several lessons I corrected myself in the middle of a sentence and said overlapping or above. Hashemi 15 is where I settled it: it is how I call it.
Which tools did I use for the wood around a flip?
The first dig took a number 9 or 11, 20 millimeters (3/4 in) wide. For the piece I wanted to keep above, a 10 millimeter number 11 (about 0.4 in) did the work.
What to carve next
- Advanced Carving: Venice Room Workshops 26-37
- Advanced Carving: Venice Room 27
- Advanced Carving: Venice Room 38
- Carving Furniture Panel 14
- Carving Furniture Panel 19
- Carving Furniture Panel 20
- Carving Furniture Panel 21
- Carving Furniture Panel 22
- Carving Hashemi Flowers 13
- Carving Hashemi Flowers 15
- Carving Hashemi Flowers 45