

Alexander Grabovetskiy, woodcarver, School of Woodcarving · Published 2020
What does "to a certain point" mean when a wood carver says it?
Quick answer: "To a certain point" is how I mark the limit of one tool, one depth or one stage, and then I switch, stop or save the rest for later. Concaves were still to come around one eye in Venice Room 41.12, so I said I didn't need the extreme right now, only the certain point.
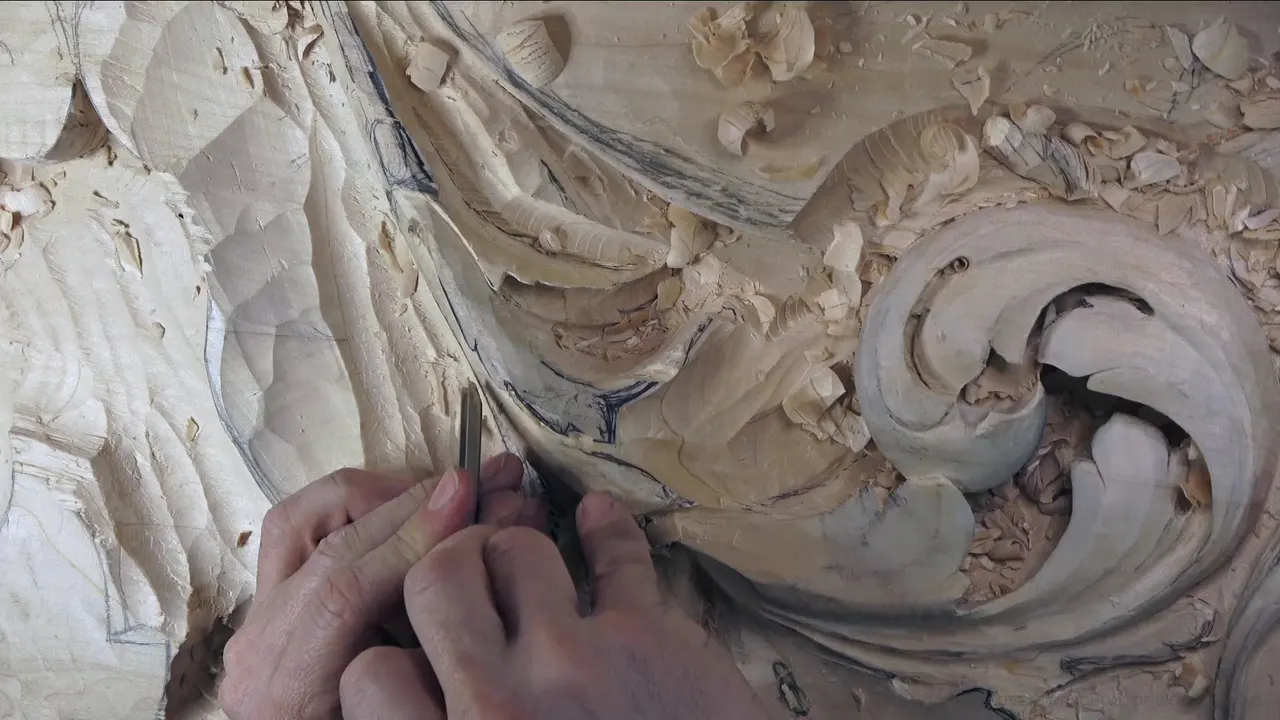

"To a certain point" is my phrase for how far a tool, a depth or a stage of the job can go before something has to change. In part 12 of Venice Room workshop 41 I said it about one eye on an acanthus leaf. Later on, around this eye, I will develop some concaves, so I don't really need to go to the extreme right now. But to the certain point.
Have you ever felt a gouge stop getting into a hollow, with the wood beside it in the way? Did you ever look at a deep spot and wonder if one more pass is one too many? Then you've met the point this phrase is about. It isn't one number. It moves with the tool, the depth and the stage of the wood carving, and on carved ornament like this panel it comes up again and again.
Part 12 runs about seven and a half minutes. The rest of this page comes from other workshops and courses where I said the same words, and each of those lesson pages is public and linked, so you can check the moment yourself.
Six places the phrase draws a line
- Near the eye in part 12, the full depth could wait for concaves that come later.
- A straight gouge works until it runs out of room, and then a spoon or a smaller tool takes over.
- A number seven reaches a volute only so far, and it can't make the dome that throws a deeper shadow.
- Past a certain depth an edge goes weak.
- Some original work stops a concave there, and I wasn't sure I'd like that.
- Even a sharp new tool holds its edge for a while, then it needs resharpening.

What did I mean by it in part 12 of workshop 41?
The eye came first. I wasn't really happy with how one spot looked, so maybe I needed to bring it a little bigger, because the center of this eye has to sit about six parts out of 10 between two points. That's the golden ratio in simple terms, 1.62, or 62 parts out of 100.
Deep enough. I said it three times in a row there, after I said I didn't want to go too deep.
The job had its own rules too. On most of my commission work I have the freedom to design from scratch, and this room just had to be more authentic to Venice in the Middle Ages.

Just after the three minute mark I needed to blend that in, maybe with a number three. Maybe a smaller one, I said, but let me try the big one first. A bit later it looked like my number three needed to be sharpened, and I needed a smaller one. Really a smaller one.
That's when the phrase came. The concaves around that eye were a later job, so the depth there could wait for them, and I went only to the certain point.
How deep did the shadow line go beside that edge?
About as deep as the edge could take. Right after the eye, I probably needed a tiny tool, 1 millimeter or maybe 1.5 (about 1/16 in), and I said let me try 1.5 first. Just go down, but not too much. I was making some shadow cut there, and if I go too deep, this edge becomes really weak, and I don't want to see it that weak.

I can go around later, I said, undercut much deeper and make the separations much bolder. For now it was fine. Then I said that's probably the deepest I can go without breaking the edge. Deeper would be a mistake.
So part 12 holds both halves of the phrase. One depth waits for later work, and the other stops where going on would break the edge.

Near the end it all needed blending again with the same number three, not upside down, the normal way. One spot I said I'd clean a little later.
When does one gouge reach its limit?
Once it can't get in anymore, or can't leave the shape I want. Many of these passages are about the tool, and workshop 23 says it plainly. There is a certain point when the straight tool won't go in, so now a spoon gouge or a spoon veiner can go there. I said I'd use a 2 mm one (about 0.08 in), because I really needed a smooth transition, and a rough spot inside would show from the bottom, and for me that's a mistake.

Back in workshop 18 it came up too. There's a certain point where I have to switch to a spoon gouge, I said, but so far I was getting a really nice, smooth look with a straight tool. A few parts earlier, with a 1 mm number 11 veiner, I told myself to go in to the certain point, because at some spot I wasn't going to be able to do anything else. This is not going to work, I said, and asked myself which tool to use.
Even the corner of a number seven won't help me at some point, I said a little later. But I took that back a bit. It still helps, but we'll see how far I can go.

Workshop 42 has two clear examples. With a number 11, 12 millimeters, about half an inch, at some point I won't be able to use it, and I need a spoon, which is pretty much right now. A 7 mm one (about 0.28 in) was still too big, so I needed a smaller one. Later I called one tool probably the best for that concave. I have to switch to a smaller tool, I said next, and the point is now. I got to take seven.
The limit can be the shape a tool leaves, too. On a volute in workshop 46, I said a straight number seven can do those volutes with no problem, but the effect will be different. With the number seven I could get just to the certain point, and I couldn't make the dome inside that gives a deeper shadow. In some other cases that's okay, but in this case I really like it this way.

Danger comes with a straight tool as well. During workshop 57 I said I could probably use a straight tool to the certain point. Then came a number seven, 14 millimeters (about 0.55 in), and a warning. With the straight tool you have to stop at the right point, or you dig in, you have to clean, and you get a valley that isn't consistent. A spoon gouge in this case would probably be the tool of choice.
Over in workshop 66 the order ran the other way. I used the smaller tools first and cleaned up with the bigger ones. I could dig even deeper with a 14 mm number nine, but again, there's a point when I can't do anything with it, and I need a different tool. Use it from the opposite direction, upside down, I said, and right there I needed a spoon, maybe a 15 mm number nine (about 0.59 in).

My fingers sat really close to the edge of a number nine in workshop 20, so I could control it much better. I can do it with the number nine up to the certain point, but now probably another tool has to take over, I said.
It was a spoon again in workshop 27. At a certain point I need the spoon again, and in certain cases I could even use a mallet, I said.
The same thing happened in workshop 32. Beyond a certain point this tool won't fit, I said, and I have to go to a much smaller one, maybe already a spoon. A 5 mm spoon (about 0.2 in) came next, and then just deep enough, with no need to go really deep.
Grain sets a point of its own. On the Roman acanthus leaf, lesson 16, I was slicing downward, and until a certain point, like the midpoint, that gave me a really clean and nice surface. Then it changes, because of the grain.

Why be careful how deep you go underneath?
It can get almost too deep, and workshop 43 gives two reasons. One, I can make it too weak. Two, I still have to finish it, so I have to get inside somehow.
On a smaller scale, in workshop 19, a three millimeter number nine, one-eighth of an inch, could dig kind of deep. I had to be careful, though, because past a certain point it gets too deep and too dangerous, and I can break my tool. Which I don't want to do.
Two parts before part 12, in workshop 41 itself, I said it another way. I could take it to the extreme if I wanted to, little by little, shaving more and more and more. But there's always a point when you can't do any more. It gets too weak, and that would be a big mistake.

Depth can grow on purpose, too. In workshop 40 I said I could use a deeper concave on one side, to the certain point, because I had a pipe there that needed to stand out anyway. Not too deep, but slightly deeper. Next, the tool told me something else. It looks like this tool needs to be sharpened, I said, and then I corrected myself. I don't think, I know. I feel it.
This part sits between those two. By the eye I held back for the concaves, and beside the edge I went as far down as I could without breaking it.
Did the old carvers leave a concave at that point?
Original work does show it. Later in workshop 43, now I need to blend it, I said, because it's deep to the certain point. I'd seen original work where people left it like that, just the concave to that point, but I wasn't sure if I was going to like it. Next, a small number three would blend it in completely.

Can a stage stop there and still be right?
A stage can stop there. In workshop 61 I'd done both sides to a certain point and said I was going to keep it like that. Cleaning the inside could wait, because I still had to develop an upward movement.
A flipping movement in workshop 27 was already looking good, and I'd got to be careful not to make it too weak. At a certain point, I said, I have to just stop. That's it. Just stop.
Smooth has a point too. One spot in workshop 19 I called nice and smooth, at least to a certain point. There were tool marks I'd left from earlier passes, which I shouldn't.

On my tray of blessing, once I reached a certain point the passes got shallower and shallower, so I didn't dig out too much. I'll probably go deeper later on, I said.
And in workshop 70 I said I couldn't do anything beyond that point yet, since there was still more to establish. Up to a certain point, though, I could work there.
Does a sharp edge last only to a certain point?
For a day or two, maybe longer. In a lesson on brand new tools, I said even tools that come out of the box sharp and ready to go will hold the edge one day, two days, maybe longer. There's still going to be a point when you have to resharpen, no matter what brand you buy. In my case, any brand, high end or not, I still reshape it, resharpen it, and strop or buff it before I use it.

Which tool or depth hit its point, workshop by workshop?
| Where | Limit | Next |
|---|---|---|
| Venice Room 41.12 | Depth around the eye, with concaves still to come | Not all the way yet |
| Workshop 23 | No room left to get the straight tool in | Spoon veiner or spoon gouge |
| Roman acanthus 16 | Slicing downward gave a clean surface, until about the midpoint | Grain changes it after that |
| First part of 42 | Number 11 at 12 mm, about half an inch | Pretty much right now, a spoon |
| Volute, workshop 46 | Straight number seven, fine for those volutes up to a point | Could not make that dome |
| Venice Room 57 | A straight tool that can dig in and leave a valley | A spoon, probably the tool of choice |
| My tray of blessing | Passes growing shallower and shallower, so no big excavating yet | Probably deeper later on |
| Tools from the box | A brand new sharp edge, for a while | Resharpen, whatever the brand |
Read down the last column. The answer changes with the job, a smaller tool here and a spoon there.

What about your own bench?
Has a tool ever started to drag on you in a hollow? Is there a spot on your board where you can't tell whether to go on or stop? Then stop at the right point, the way I put it in workshop 57, and pick up the tool that fits the next stretch of your relief work.

Part 11 comes right before this one, and the workshop 41 lesson page is public. Workshops 38 through 49 make up Part 4 of the Venice Room, and tuition gives you access to every part of it.
How it's done
- Ask what comes later in that spot. In part 12 I planned concaves around the eye for later, so I left the full depth for them.
- Go in as far as the tool allows. With a 1 millimeter veiner, I told myself to go in to the certain point, since past it the tool couldn't do anything else there.
- Switch once the straight tool stops fitting. Then a spoon tool can go where the straight one can't.
- Know where to stop. Dig in past that point using a straight tool and you have to clean a valley that isn't consistent. No bueno.
- Keep the edge strong. Go about as deep as you can without breaking the edge, and call anything deeper a mistake.
- Blend now, clean later. My plan was to blend it all again with the same number three, the normal way up, and leave one spot to clean a little later.
Frequently asked questions
Why not carve around an acanthus eye to full depth right away?
Concaves will come around that eye later, so in part 12 the full depth could wait, and I went only so far. Beside it I kept the shadow line from going too deep, or the edge turns really weak. Undercutting much deeper can come later.
When do you switch from a straight gouge to a spoon?
When the straight tool can't get in anymore. Under a part people will see from the bottom, in workshop 23, I said I'd use a 2 mm one for a smooth transition. A 12 mm number 11 in workshop 42 reached its point, and a spoon had to come in right then.
Is it fine to leave a concave deep only to a certain point?
Original work I saw had exactly that, just the concave to that point, as I said in workshop 43. On my own board I wasn't sure I'd like it, and my plan there was to blend it with a small number three.
What to carve next