

Alexander Grabovetskiy, woodcarver, School of Woodcarving · Published 2020
What does a wood carver mean by "the same hole"?
Quick answer: The third part of Venice Room 54 has me rotating in with a quarter inch (about 6 mm) size, and going on to a smaller tool. I said every cut around the hole will head for the same hole, and under a division, at the undercut, everything is supposed to head for it too.
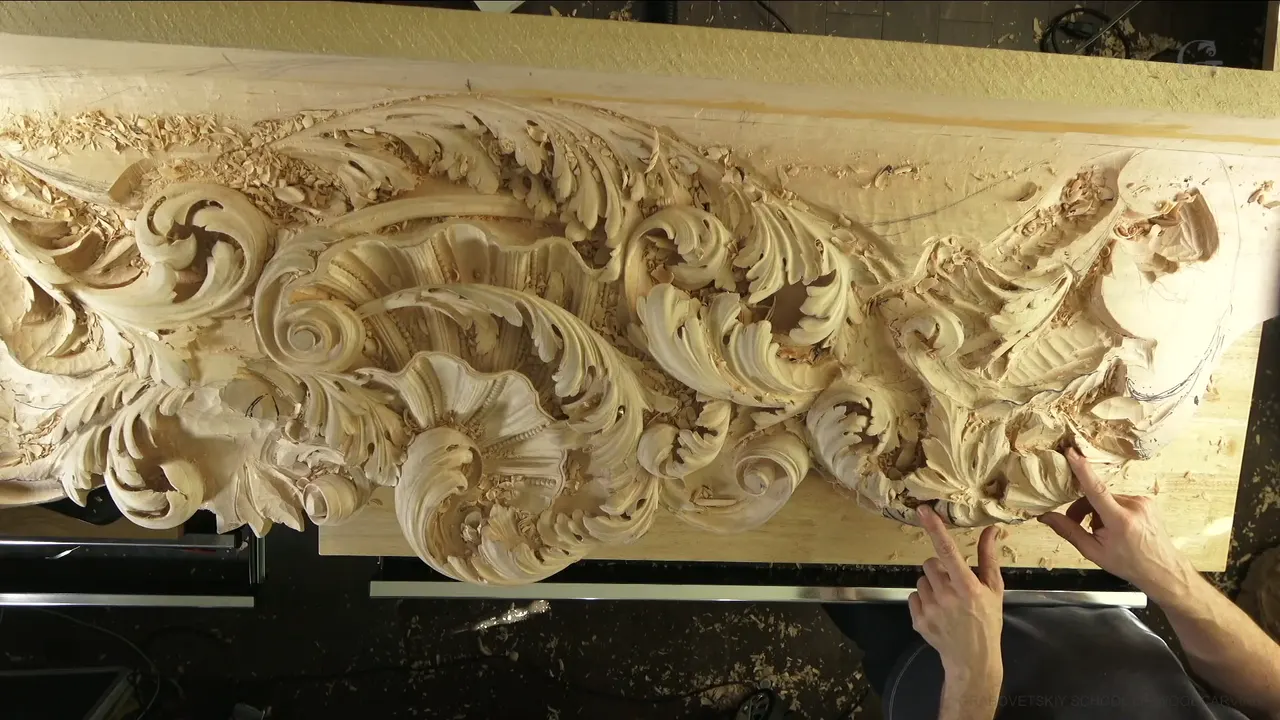

Workshop 54, part 3, is where I said that all the cuts around a hole will head for the same hole. My tool was a quarter inch (6.35 mm) size, then 3 millimeters, one-eighth of an inch. Under a division, at an undercut, I said everything is supposed to head for it too. Other lessons carry the same words.
Have you ever opened a deep spot and wondered where the cuts beside it should end? Would you like to hear the tool sizes I named, and the depth I want? Part 3 gives you the hole, the undercut and the depth. The lessons below show where else I said it, in my own words.
What did part 3 say of the same hole?

The part opens with "Use a bigger tool and go in." More shadow already showed up, I told you, and I could really see the development of this part. Excavating the deep point right there looked possible to me, and I wanted to see if a quarter inch is too big or okay. "I'm going to start my plug."

You may not have seen what I was doing, and I apologized for that. It was a rotation cut, and I said "go in. Go in." Look at what it created: just a hole on the inside. I need to change the position and go a little more on angle. That was a quarter inch, of course, and a smaller tool could probably replace it already.

If my hands covered the view, I asked you to understand why. Right then I was using three millimeters, which is one-eighth of an inch. As deep as I wish, I could create. You see a lot more than I do, I told you, because the camera sits a little bit away from me.
"There's no limit how deep I can go until it completely disappears." Then: "And all the cuts around it will go to the same hole." To the same hole. Enough for now, I think, and I can always make it deeper.
How did I undercut under the division?

My plan was to undercut underneath this division a little bit. I have to forget about the word "kind of." It's a true undercut. I was using five millimeters (about 0.2 in), number 11, and it was a little too big. "So let me use the four millimeters" (about 5/32 in). "Now go and carefully attack."
The hole right there got the same words from me. That's going to give me so rich shadow, because it is not just a simple hole. It's going to cast a shadow from both sides, this side and the right-hand side. Before I undercut right there, I need to develop the right-hand side.

A little bigger picture shows how deep that shadow is. Like I said, it makes an outline for the overall movement, the main movement. Finished details are not going on that main movement yet, because I still sometimes can hit the edge and break it. The final detail is going to be added a little later.
A better shape for the element sticking from underneath is what I can do now. "Much better movement. That's what I need." And I clean it a little bit, with my skew.
How deep did I want the holes to go?

Before developing the main idea of that element, I showed the overall picture again, how it looks in the composition. "See those two deep spots?" Another deep spot sits on another side, and farther along there is another, and another, and another.
My reason, in my words: "to place overall design, like uniformity." If I wouldn't excavate too deep in those two areas, it would look different. It wouldn't look developed. It would look off. Still nice, but not as it's supposed to look in overall depth.
"I'm always trying to get about the same depth." Some spots are about 50 millimeters, about two inches deep, and some about one inch, like 25 millimeters or so. That's why I create those excavations on about one level. What I have to do next is the same as what I did right there, but with the hole underneath the main development excavated.
What did parts 2 and 4 add?

Part 2 has me pretty much right away undercutting, with a triangle to get rid of. I need a smaller tool there, maybe five millimeters (0.2 in), because seven millimeters (roughly 0.28 in) was a little too big. "But five millimeters is perfect." Going all the way to the hole is part of it, and see, it opens up and gives a beautiful shadow around the main element. That shadow works like a picture frame. It just frames the main movement.
Part 4 has me planning a quarter-inch (close to 6 mm) number nine, placed on an angle to start my excavation. "You really don't see the true picture," I told you. You look through the lens, and my camera sits a little away from me, otherwise my head would always be in the way. I don't see that hole or that plug, but on the screen I can see there is a plug.

I can excavate deeper, and deeper, and deeper. "And that's time to remove the plugs." A drill is an option for some spots, if you'd rather not do it that way. Not always possible, because of the angle limitation, how you can do it. The smaller tool is an eighth of an inch, three millimeters, still a number nine, and I'll continue my excavation deeper. Inside the hole there's so much junk, I said, and maybe I should use my hairdryer and clean it a little bit.
Where else did I say it?
Here is each place in my words, with the course named as it is named in the school.
| Lesson | My words | What I was doing at the bench when I said it |
|---|---|---|
| Workshop 52, part 11 (Venice Room) | the rest of the cuts, I have to bring to that hole | Rotating the tool to lift out a plug, the grain not in my favor |
| Workshop 53, part 10 (Venice Room) | everything going to go to that same hole | Lifting out a plug, with a quarter inch (about 6 mm) next |
| Workshop 54, part 3 (Venice Room) | To the same hole. | Rotating in, then 3 mm (1/8 inch) |
| Workshop 64, part 3 (Venice Room) | bring all of my cuts to the same hole | Using the same tool, little by little, without forcing too much |
| Workshop 66, part 11 (Venice Room) | now everything to that same hole | Connecting two cuts |
| Hashemi Flowers 45, part 4 | bring all my cuts to the same hole | Working with a small gouge toward the center |
| Hashemi Flowers 48, part 1 | go all the way to the same point, to the same hole | Planning a number 11 at 1 millimeter (about 0.04 in) |
| Furniture Panel 31, part 1 | everything goes to the same hole, to the same plug cut | A plug cut with the tool straight down |
How did workshops 51, 52 and 53 handle the hole?

Part 11 of Venice Room 51 has "Same hole like I've done on another sides with the number nine." In the same part I was using two millimeters (about 0.08 in), number 11, on an eye, and I said it beautifully develops.
Venice Room 52, part 11, shows me removing a plug and still rotating my tool. The grain of the wood is not in my favor, so maybe I should use a mallet to help me a little bit. Out pops the plug. Sometimes the chips come out as really perfect, clean, rounded plugs.
A deep excavation is what I want there, because I want to cast a lot of shadow. I can go as deep as I want, and the trick is just to make that rotation. "See how much material I'm removing?" The reason I did not finish the piece last time is that I knew I wanted to excavate a lot more. I don't want to put final details until I create my "final destination of depth."

With the 10 millimeters (0.4 in) done, a smaller tool is next: a quarter inch, close to six millimeters, still a number nine, with a really long bevel. A short bevel makes it hard to do the rotation and remove that material. Even smaller is the tool after that, also a number nine, three millimeters (about 1/8 in). "Doesn't matter what kind of tool you're going to use." All wood carving is about the light and the shadow.

I really want to see that shadow, I said in part 10 of workshop 53. I'll chop straight down and start moving toward my future hole. I'm cutting inside, matching my direction of the movement. Nobody's going to look inside right there, and it isn't going to be visible, but it will cast so deep shadow.
Smaller comes next, a quarter inch, roughly six millimeters, the same number nine. After that I'll switch to 1/8 inch, three millimeters, and after that to one millimeter (about 1/25 in), number nine. It will be invisible to the human eye. "But the point is creating this hole just to give that motion, that shadow."
Did workshops 64, 66 and 82 add anything?

Venice Room 64, part 3, says the same tool can bring every cut to the same hole, little by little, without forcing too much. Digging too deep in that direction on the side is something to watch, otherwise it won't make too much sense, although it's okay as long as I get my proper shadow. I told you, "I could go as crazy as I wish, but then they're going to create another problem." That problem is how I'll be able to finish it. So only to a certain degree.

Part 12 has me ready to start digging underneath a leaf. Attacking from multiple positions, from multiple angles, calls for care, because I do not want to destroy the edge of the leaf, and I am working along the grain. When it was really deep already, I said it's time to remove that plug. "Just a single cut already created that deep shadow." I'll continue working toward that hole, and everything is going to bring to the same hole.
I really need to outline it with the black color, I said. It's not black color, but shadow, darker color. Maybe someday I have to explain to you all five levels of shadow. It's really important to understand in the design process, but I'd rather not overcomplicate stuff. The basic stuff is understanding, before I start drawing, the light source and what kind of shadow it's going to cast. How the light travels matters too, and how many light sources I have, if it's from above, from the window, from the side, from the door opening.

I said we'll create a dark spot, shadow, in Venice Room 66, part 11. "It's not going to give me that pop look." My plan: go from this side and connect those two cuts, and bring everything over to the hole. The tool is a number nine in 1/8 of an inch, 3 millimeters. Any other brand will do as long as it's a true number nine, like a half a circle. After that I connected those two points, I mean two cuts, and now I can just excavate and clean everything underneath and give that lightness.

Part 7 of Venice Room 82 has me saying "I hope you already know what is plug cut." A line is right there, and now I can plug cut it. "There you go." I was through, and everything now goes through that hole. I also said "let me get 1 millimeter" (0.04 in), and later, "you can see that creates beautiful, beautiful shadow."
Did flowers and a furniture panel use it too?

Carving Hashemi Flowers 45, part 4, has me working toward the center. A small gouge has to bring that in to make it grow from inside out. I'll take a number three, but with care, because I have the grain just along the grain and I easily can destroy that. Maybe an even smaller gouge comes next, then maybe a knife, and a small gouge again to clean it. That actually creates the really 3D look, depthness.

Part 1 of Carving Hashemi Flowers 48 wants the movement on the bottom one kept, so I undercut and remove as much as possible between the upper and the lower one, with an eighth of an inch (about 3 mm). "Carefully. Don't want to overdo it." Probably now a number 11, 1 millimeter (about 1/25 in). In part 6 of that workshop I said I could extremely undercut that way and actually connect two sides. I'm not sure if it's a wise idea or not. That would give me more shadow again.

Carving Furniture Panel 31, part 1, has another plug cut coming right away, exactly the same idea. "And that's why I call it plug." My tool is straight down, 90 degrees. I'd rather not overdo it, because my background has to be at the same level. It's better to be a little higher at this stage than to go the whole way.
Carving Plate with Butterflies 10, part 2, has the plural. "With the same tool, I'm going to create the same holes. If you remember, I call it the plug cut because it just removes the plug."

In Carving Lily Box 8, part 13, a smaller back bend is probably next. Number five and two millimeters (0.08 in) will just clean and bring it all to the same hole. My apology, you can't see. Definitely, though, you can see the tool is traveling the whole way.
Does my livestream say it too?

In my April 2020 livestream on creating shadows I said I'll bring everything to the same cut, and it's already giving me that shadow. Number 11 with a mallet, probably, will bring it to that cut even deeper. That tool is a veiner. I'm approximately one inch (about 25 mm) deep, just eyeballing. Underneath this movement a shadow is needed too, without cutting too much, because I still did not develop that end. All of it heads for the same hole, I said.
What is the hole for?
Part 3 says the hole casts a shadow from both sides. The picture frame shadow around the main element, in my words, comes from part 2, where it just frames the main movement. Workshop 53 has me creating the hole just to give that motion, that shadow. In workshop 52 I want a deep excavation because I want to cast a lot of shadow.
Workshop 54 has the words in other parts too. In part 5 I said I can undercut deeper, laying my tool on one of the sides, and "everything to the same opening, to the same hole." Part 6 has my tool struggling, because I've got a really low bevel, and that's not the best tool right now to use for this operation. Part 9 has "Everything just goes to the same hole" while I'm creating really deep excavation that gives me beautiful shadow.
The full Venice Room 54 lesson and the whole Venice Room Part 5 course are inside the school. Start here to watch the videos.
How it's done
- Open the hole. Start the plug with a rotation cut, and go in. What it creates is just a hole on the inside.
- Change the angle. Change the position and go a little more on angle.
- Try a smaller tool. A smaller tool could probably replace the quarter inch, and I was using three millimeters (0.118 in) right then.
- Aim the cuts at the hole. Every cut around it heads for the same hole, with no limit how deep until it completely disappears.
- Undercut the division. Five millimeters was slightly too big for the undercut under this division, so I said I'd try four millimeters (0.16 in).
- Match the other deep spots. Deep spots run from 1 in (25 mm) to 2 in (50 mm), at a matching depth.
Frequently asked questions
Which tool sizes came with the hole in part 3?
A quarter inch (6.35 mm), and then three millimeters (0.118 in). For the undercut it was five millimeters (a bit under 1/4 in), number 11, slightly too big, so I said, let me use the four millimeters (0.16 in).
How deep did I say the spots go?
About 50 millimeters in some spots, which is two inches deep, while others are an inch, like 25 millimeters.
How much thickness did I leave in part 4?
Approximately 3 millimeters to 5 millimeters (about 1/8 to 3/16 in) of thickness right there, because I need that for the development of the upper part.
What to carve next