

Alexander Grabovetskiy, woodcarver, School of Woodcarving · Published 2020
How do you make the eye of an acanthus leaf more pronounced without going through the back?
Quick answer: Making an acanthus eye more pronounced is one small pass with a small tool, followed by a look at the back. In Venice Room workshop 17, part 10, I used a number 3 on the eye, then checked the backside, as I said, to avoid overdoing it.
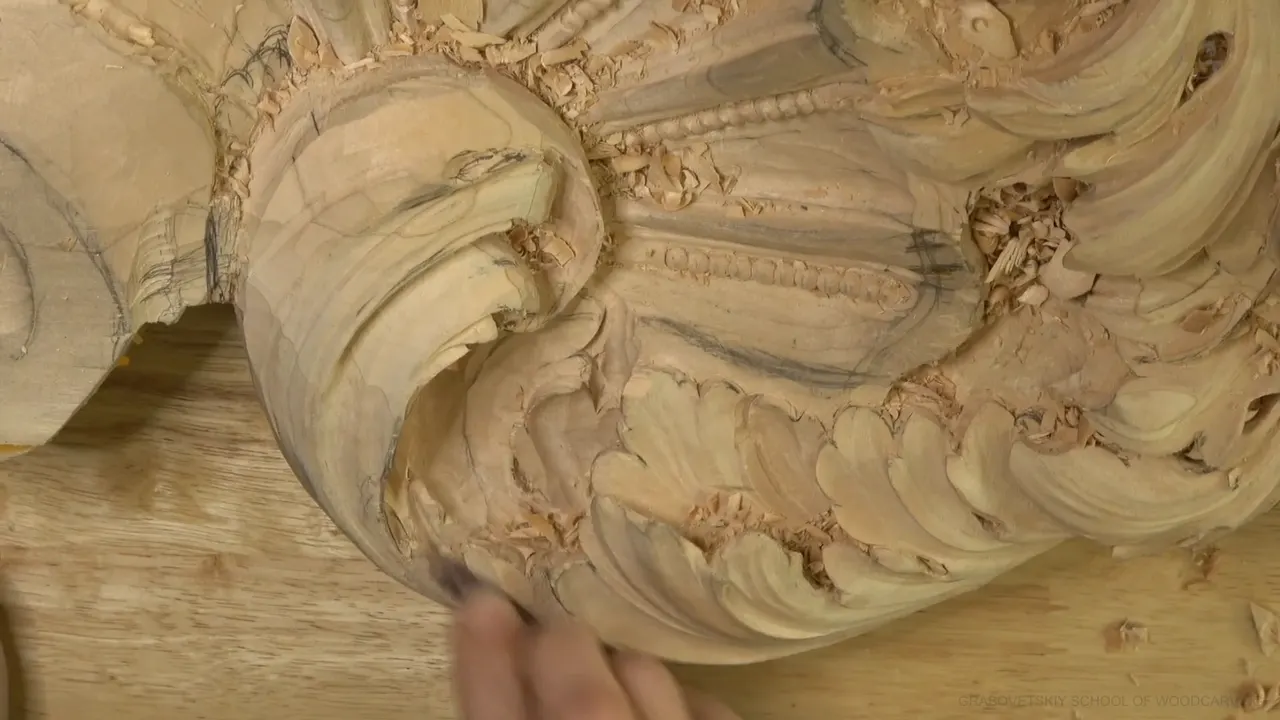
Making the eye of an acanthus leaf more pronounced is a small job with a small tool and a check of the backside. In part 10 of workshop 17 in my Venice Room I used a number 3 to make the eye a little more pronounced, and then I checked the backside, because I did not want to overdo it and get all the way through.
I told you why on camera. I've done it too many times, I said, especially when I carved flowers. I have that tendency, and I do.
Have you ever taken an eye one pass deeper and wondered how much wood stood behind it? Do you check the back before you go in again, or after? Then this page is for your bench.
The video is short, so I added what I said about eyes and thin walls in other courses. Each of those lines comes from a public lesson page, and I link every one so you can read the page around it.

Eyes, thin walls and small tools in six lines
- The number 3 went to work on the eye.
- The backside got a look first.
- Two sides got a number 11.
- I asked about a deeper concave inside, then decided to leave it alone.
- Where nobody looks, I wanted only a hint of that movement.
- In other courses I turn to the opposite side, and I feel the wood with my fingers.

How can you make an acanthus eye more pronounced?
Deeper by a little, using a small tool, plus a look behind it. The eye came up in part 10 at 00:52, and I said it needed to be excavated a little more in that area. Next came a reason to stop short: it was not going to be visible from that side, so I really didn't need to. Just the indication of that movement. Twice, in nearly the same words, that came out of my mouth.

Around 02:58 I named maybe a 1 mm number 11 (0.04 in) to clean up the excavation, and that spot would be invisible, I said. At 03:28 came the number 3, to create that eye a little more pronounced. I gave no width for it, so I won't make one up.
The 1 mm number 11 (about 1/25 in) came at 04:20, named twice in a row. Two sides were next. At 04:55 I added maybe 2 mm (roughly 0.08 inch) to clean up, a little cleanup.

A question came out loud next. Going that direction inside was not really needed, I told you, but should I get the deeper concave right there, or leave it like that? I will just leave it like that, I said, and I blended a little at the side.
Why look behind the eye while it gets deeper?
My answer is one sentence from 03:41. "I got to check the backside because I don't want to overdo it and get all the way through." Eleven seconds on, the habit came out, and flowers were part of it.
The same worry shows up in my Hashemi flowers course, lesson 48. Again, I could overdo it, I said. Just keep an eye if it's already becoming too thin.

Lesson 16 of that course has a wall, and I told you I don't have too much of it, so I was going to have to be really careful how I approach it. Over in lesson 10 the thing I watched was the thickness of a leaf, and it looked like I had plenty yet. Soon after I said, let me check what's going on other side.
How can I see how much wood is left behind an eye?
I look at the other side, again and again. Workshop 68 carries my line that I would check the opposite side constantly, because I really do not want to mess it up. A few seconds later it looked like I was still safe.
Workshop 66 had the same check. Some flowers were coming, so I was not afraid to go deep, but I still had to be mindful how much material I had left on another side. Okay, I said.

Part 8 of workshop 67 opens with a verdict. It's already deep enough, and if I were just to go too deep, it would be a big mistake. I double-checked from the opposite side. Safe, I said. Workshop 38 is the shortest version, and the whole line is double-check how thick material I have.
My fingers help too. In the modern acanthus course I told you to put your finger underneath and feel how thick the material is, and not to overdo it. Part 12 of workshop 17 has me checking a bump with my fingers, because sometimes fingers give me a lot better idea what is going on.
What do I do when the wood is too thin to go deeper?
I stop, or I change direction. In lesson 3 of the modern acanthus course I told you, don't make it too thin, because it's a weak area and you're going to break it. I kept approximately 1/8 of an inch (about 3 mm) of thickness there.

Lesson 8 of the Tray of Blessing says it too. Keep an eye how much thickness you have, I told you, and at one spot the thickness ran short, so I had to be careful how much to excavate. Here I'm okay.
Workshop 75 had one section that was maybe a little too deep. I was okay, because I still had plenty of thickness there, and I read about 20 mm (0.8 in) of the material I had left. Still, I wished it hadn't happened.
Workshop 82 shows another move. Going deeper could damage this side, I told you, and I probably had to aim a little different direction. Workshop 81 gave another reason. I cannot go too deep, I said, because I don't want to destroy the movement.

Workshop 71 had a line that looked too straight to me, so I changed my mind on the go. See, I said, that was a good thing that I did not dig too deep from the beginning.
How much deeper than the main movement should an eye go?
A little deeper. Part 11 of workshop 51 opens on it: there's nothing complicated about excavating an eye, but this eye needs to be a little deeper than the main movement. That way, you can see the movement going in.
I was on a 2 mm (0.079 in) number 11 there, and the same tool could safely undercut right there to develop even better shadow. Part 6 of that workshop has me saying probably 5 mm (about 0.2 in). After that came maybe that's a little too big, then 3 mm (roughly 0.12 inch), and 2 mm was what came next. It's got to be a really nice shadow casting eye, I said.

Workshop 5 of my first Venice Room course gives a reason. If I carve a little deeper at the area of the eye, I said, it's going to look more authentic, more organic. Workshop 72 has a deeper eye coming, a really deep excavation, because we need to exaggerate.
Workshop 65 adds a limit. After a shadow I called absolutely gorgeous, I said please understand, that is not always. It's just in this particular case, Venetian-style wood carving.
Which small tool goes into an eye?
A very small one. Part 1 of workshop 67 includes a thought: I could probably get that eye excavation a little deeper right away, so you understand what I mean. But I needed a smaller tool. Maybe let me try 1.5 mm (about 0.06 in), I said, then I'll just go with the 1 millimeter (0.04 inch) or so.
That area would be invisible pretty much from all points of view, I told you. I did it anyway, for the sake of the camera and for the sake that you see it. Let me use 1 millimeter (0.04 inch) now, I said.

Furniture panel lesson 22 has the same pair. Let me establish the eye first, I said, with a number 11 at 1 mm (0.039 in), and I would follow with half a millimeter (0.02 in) to exaggerate that eye even deeper. Just preestablishing, I added.
Workshop 158 put the shadow in the eye right away. For a pass that was not straight down, but a little angled, a number 9 at 2 mm (0.08 inch) went in. A 1 mm tool (about 1/25 in) followed. It removed what I didn't need, and the shadow, I said, was beautiful.
Roman acanthus lesson 8 names it: that is an eye, and I need to make it deeper. Digging in on an angle started with a number 8. Later, I said, we're going to undercut because of the light and the shadow.
Do I finish an eye on a side nobody sees?
Only partly. Part 10 has me saying at 01:08 that all I need is the indication of that movement, and at 05:14 I decided against a deeper concave inside. Over in workshop 67 I dug an eye I called invisible, and I still did it for the camera.

The first seconds of part 10 were different work. I used that sandpaper again to soften everything and see how it looks. My verdict at 00:38: it doesn't look too bad, but it doesn't look too good either, because I needed to move that direction a little bit.
Then an edge started bugging me. I kind of don't like the edge, how it looks right here, I said at 01:26, and a gouge could probably fix the overall movement. It looked all right, but still not quite appealing.
A concave right there came next. By 02:46 I had created extra movement, and I think it looks much better, I said. Except this is still not so good, I added, and next I named a smaller tool.
Near 05:48 I tried something I had not thought about. It's actually a good tool to get in, I said, and I can use it almost like a saw. I just got in really deep. Wow, a new way of using this tool.
What if the eye is done and something still bugs me?
I say so, and I keep going. Around 06:31 it was one of those days when something bugs me, and I was still not too happy with the overall result. It's not like it's bad, don't get me wrong, but something doesn't add up.

Around 07:09 I thought out loud about a number seven at 4 mm (nearly 0.16 in) and a couple more lines. One and two, and yes, I think it helps. It does help.
The separation looked not so good after all. Maybe 3 mm (0.12 in) could give a semi-round one, just like that. Undercutting and cleaning were still ahead, but at least I could get a first overall feel of how it's supposed to look.

One more spot was maybe too sharp. Maybe 1 mm (0.039 in) could get a kind of long line right there. Much better, I said at 09:17.
My next tool, at 09:32, was a quarter-inch (about 6 mm) number nine again, and I told you that pipe still doesn't make sense if you look really close to it. From that point a slightly longer concave went on. For now, I said, it stays as it is.

Where does this part lead?
Toward the shell. Around 10:35 I wanted to show it not as the overall picture, but a little farther away. That is overall movement, at least this part of the movement.
Not bad at all, I said, especially once we get to the shell part and everything is moving in the same directions. That's going to give me really good dynamic. This part belongs to the same shell. Huge shell, right there.

Part 11 picks up from here. I wanted to add a subdivision inside and some kind of concave, because my goal was to see it from the bottom. Part 12 begins with a bump, and I check it by feel. The lesson before and the lesson after sit beside workshop 17 in the course.
A short record of eyes and thin walls
Six places where I watched an eye or a wall are below, in my own words from the videos.
| Where | What I did near an eye or a thin wall | What I said about it |
|---|---|---|
| Venice 17.10 | Number 3 went on the eye | It needed to stand out a bit more |
| Same part, 17.10 | I turned to the back before another pass | Going through was the worry I named |
| Workshop 51 | One number 11 took the eye deeper | You can then see the movement going in |
| Hashemi 16 | I watched the thickness of a wall | There was little wall to work with |
| Workshop 75 | I read the wood left under one section | I wished it had not happened |
| Modern acanthus 3 | I kept a thin layer there | A thin spot is a weak area, and a weak area breaks |
What would you check on your own bench?
Is there an eye on your leaf that wants one more pass? Could you turn the carving over, or put a finger underneath, before that pass? Then you have the same choice I had in part 10.
The part I described is one video of the lesson. Workshop 17 holds the rest, and the course page is Advanced Carving: Venice Room, Part 2. The craft behind it is wood carving, a branch of woodworking. A gouge belongs to the chisel family. A relief is carved on a flat background, and an acanthus leaf has deep spots that hold shadow. A concave is a hollow in the wood. The room is in the style of Venice, and my sizes are in millimeters and inches. I softened the surface with sandpaper at the start of the part, and sculpture is the wider family of the craft.

Which pass on your eye would you check from behind first?
How it's done
- Decide how much of the eye shows. From one side the eye would not show, so a hint of that movement was enough.
- Clean the excavation first. I named maybe a smaller number 11 to clean up the excavation.
- Deepen the eye. Number 3 did the job on the eye.
- Turn to the back. Before going on, I turned to the back of the carving.
- Go at two sides. Next came a number 11, and I said I would attack two sides, then maybe a little more to clean up.
- Leave a concave alone. I asked if a deeper concave belonged there, and I decided to leave it.
Frequently asked questions
Should I check the back of a carving while I carve the front?
Yes, I do. In part 10 of workshop 17 I looked at the backside before the next pass, and in other lessons I go to the opposite side too. A finger underneath tells me how thick the wood is.
Which tool deepens an acanthus eye?
Part 10 had a number 3, when I wanted the eye to stand out a bit more, then a very small number 11 on two sides. Workshop 51, part 11, had a number 11 dig the eye, and the same tool could safely undercut.
Do I finish an eye on a side nobody sees?
Only partly. Part 10 has the eye out of sight from that side, so a hint of the movement was enough. Workshop 67 had me digging one that was invisible from nearly every point of view, and I did it for the camera.
What to carve next