

Alexander Grabovetskiy, woodcarver, School of Woodcarving · Published 2020
How deep can you excavate a carving when a small brush still has to reach inside to paint it?
Quick answer: Excavation depth for a painted carving is the point where a small brush can still reach the bottom of every hollow. Venice Room 25.10 puts it in its first minute: too much depth makes that reach hard (00:23). Here, the dig stops at the main level of the background.
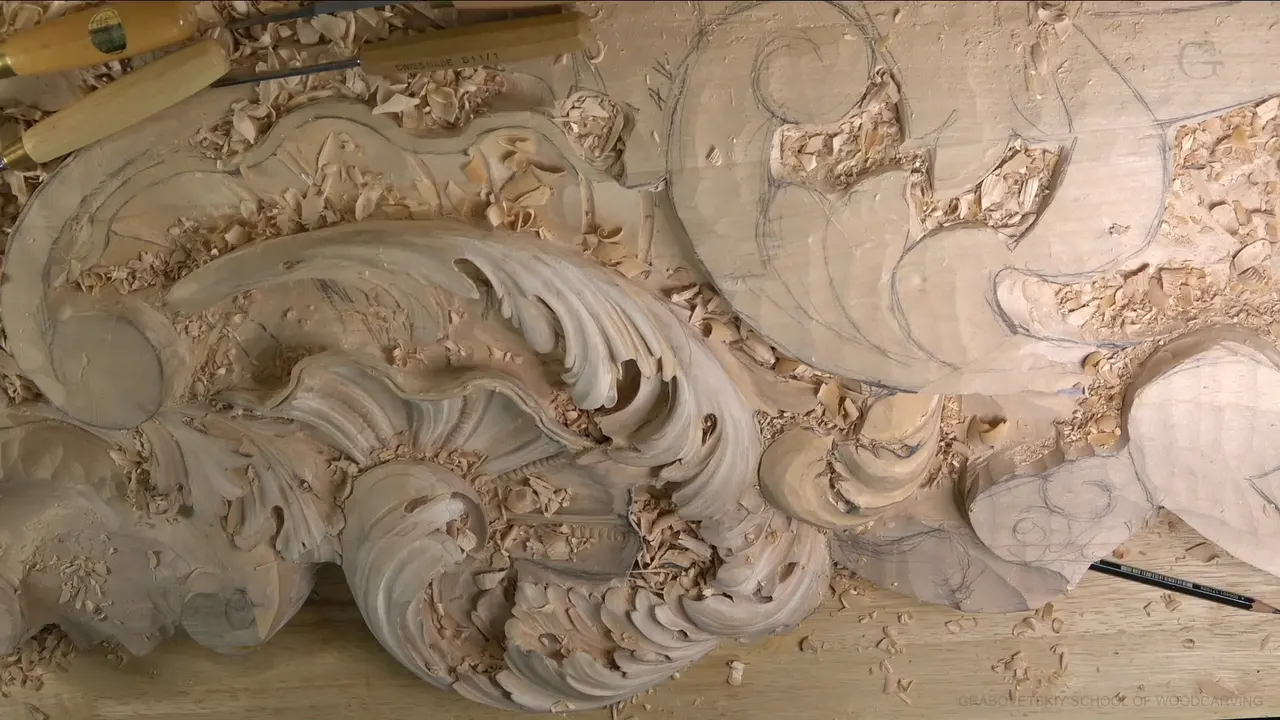
Excavation depth for a carving that gets painted is a stop I set before I dig, because a small brush has to reach every spot I hollow. Venice Room 25.10 carries it in its first minute: dig too deep, and reaching in gets much harder (00:23, 00:28).
I went through my other Venice Room lessons and a few other courses for the same worry. Every lesson I quote is linked where it comes up, and my cue times sit beside it. Over and over, a different stop shows up.
Ever hollowed a spot so deep you could not picture a brush getting in? Do you wonder how far a carving can go before a coat of paint cannot follow? This part shows where I stopped.

Where did I stop digging in this part?
The part opens with the rule, and I fix my own wording as I go. No need to excavate too deep, because I don't want to make a problem for myself at the finish. Then I correct myself: at the paint, I should say (00:06, 00:19).
The reason is the brush. Past a certain depth, it becomes a lot harder to reach in (00:23). I plan to brush the piece, since brush marks should show for the client also (00:31, 00:36).

Shallow everywhere was not the plan. At 00:59 the line is: excavate a little deeper right here. Later I like the overall movement, and all I need is the semi-final form (01:25, 01:35).

Cleaning comes next, then a little rounding, and by 04:12 I am really happy with the overall shape (02:01, 04:19). A new section follows, with a separation and another eye, a smaller one (04:36, 04:54). For that eye there are a couple of ways, and I have no preference, though I like smaller tools. A number five and a number six, attacking from two sides, could excavate it (04:57, 05:23). An extra leaf also sticks out from underneath the main movement, and I call it preliminary, just pre-establish it (05:46, 05:54).

Then comes the deep work, and the line this page is built on. I will need the small number nine or number 11 to excavate carefully underneath, and I am using a number nine, 3 millimeters, one-eighth of an inch (06:40, 06:54).
Kind of deep, but not too deep, is the call. Only down to the main level of the background (07:05, 07:15). Overdoing it is possible. I don't want that (07:20). At 07:34 I say I'll go in a little deeper right there (07:34, 07:40).

Two stops sit in that one minute. The brush must reach, and the digging ends where the background starts. The part closes on a plan: now I could probably establish my form (07:48).
When did I stop digging in my other Venice Room lessons?
A stop is a call I make in the middle of the digging. Workshop 8 puts it plainly: at some point I must quit excavating and decide how deep I want it to show, since I still have to think about painting on the inside (05:15, 05:23). Going all the way through is possible if I wish, but the question is whether I need to (05:28, 05:32).
Edges come next, and I could use a number six, three-quarter of an inch (19 mm). Going too deep there would make cleaning much harder (05:42, 06:02).

The eye in workshop 9 got the same treatment. I could go to the extreme, and then comes the trouble of getting paint inside (06:37, 06:48). That's why I think ahead about how far that hollow will go. Deep, but not as deep, and I should stop right there (06:56, 07:16). A little earlier I add that even with a stain I would still have to think about how to stain it (06:21, 06:24).

Workshop 11 finds me holding back on how much to take out. Painting it was the goal, and I had to keep that in mind (04:17, 04:33). I could excavate a little more, and a few seconds later I judged it enough shadow (04:40, 04:55). One element there was going to flip above my shell, so I did not want to go too low. Plenty of space remained. Too crazy was not the plan (05:21, 05:57).
Part 12 of that workshop has a smaller tool at 2 millimeters or so (about 0.08 inch). Same limit again, for the sake I mentioned too many times about paint, since the painting comes later (04:17, 04:50). I also kept a chunk of wood there, because other parts were still to develop, and wood I didn't have to remove stayed put (05:09, 05:16). Undercutting started a little later, though I held back on being too crazy about it, since the shell still needed developing (05:47, 06:22).

One line from workshop 35 repeats it. Deeper and deeper and deeper, but only to the point where I still had to think about the finishing (06:52, 07:04).
What do I do when the deep spot also shows from below?
Two pressures pull against each other. Workshop 42 has the finish in my mind, but on the other hand, you look from below, and that's visible, so it has to be kind of clean (02:18, 02:32). Maybe I would get the excavation a little deeper, I add (02:37).

Workshop 26 shows the same pull. The spot has to be deep, because it is visible from the bottom, yet the stop had to come at some logical point, since the finish stays in mind (06:41, 07:09). At approximately 10 millimeters in (about 0.4 inch), another subdivision was coming right there (07:17, 07:21).

A smaller tool is my way in. Workshop 51 has me switching to probably a smaller tool, a number nine, and I could excavate even deeper (06:19, 06:33). Depth was mine to pick, but the finish still needed a thought. In that case a tiny small brush could get the finish on the inside (06:37, 06:56).

Workshop 65 gives the shortest version. Deep excavation, really deep excavation, and the paint question answered in one word: easy, with the artist brush. Sometimes it still takes a pause before I start (00:06, 00:24).
Back bent gouges are loved in workshop 76, because I can remove the waste and open up even bigger on the inside, with an even deeper shadow. I also have to be mindful of the painting, with a small brush, of course (03:47, 04:19). For the underneath I would need a smaller back bend, maybe a number seven. A mallet was out, since the main body of the carving already stood there, so I could try excavating a little deeper by hand (04:32, 04:58).
Workshop 82 adds a number 11 at 3 millimeters (about 0.12 inch), going to start. It starts deep, though not too deep, since the finish was still on my mind. I still wanted some shadow (04:51, 05:28).

The workshop 144 to 155 course has me planning on probably 2 millimeters (about 0.08 inch). Too extreme was out, because I have to finish it and put some kind of paint inside. I can go as deep as I wish, but how would I finish it? (04:07, 04:35).

Which finish decides how deep I carve?
The finish I plan sets the stop, and I name it each time. In workshop 8 all of it had to be painted, and the paint would be original, like a chalk-based paint, the way it used to be in Europe and still is in a lot of parts of it (02:42, 03:01). On that same piece I wanted some kind of curliness and a little more of the background out (01:46, 02:03). There is a page on chalk paint too.
Workshop 23 lists three finishes in one breath. Just before, I was all the way through at one spot (01:44, 01:48), and then the paint question came (02:06). Too much excavation is possible. It looks beautiful unfinished, but if you must finish it, with stain or paint or even just a clear coat, you can dig where you can't reach, and that is not so good (02:12, 02:37).

So I think about depth whenever I plan to finish. For flowers, really complicated stuff, with really three-dimensional excavation, I never finished. Grinling Gibbons, I add, never actually applied any finish, pretty much, and left it raw (02:40, 03:17). A page on Grinling Gibbons tells his own story.
A paint grade job lets me stop sooner. In the Floral and Molding panel course depth was not needed, since that piece was paint grade and all of it would be painted (01:26, 01:31). I add that I don't have to overcomplicate stuff (01:36). I had started painting some of that job, kind of sad, but it is what it is. That's what the client wants (01:41, 01:48).
The Venetian Flowers Rosette course gives the reason in my own words. Really deep isn't needed, because I have to keep in mind that I'll paint it later, and somehow I have to get there (15:15, 15:26). A half a millimeter number 11 (about 0.02 inch) was possible, and I think it gives really beautiful shadow, although nobody's going to see that (15:52, 16:03). From above it looks actually awesome (16:27, 16:35).

In Acanthus over Moldings 10 I say you can dig as far as you like, but in my case not so far, and the paint is the reason I name (06:39, 06:49). The Hashemi Flowers course adds that some customers ask me to make it really smooth and sand it, and they even paint over my carving. What can you do (08:00, 08:18).
Does a client who wants brush marks change how I carve?
A client who asks for brush marks changes how I paint, and the carving has to take it. Workshop 14 repeats the reason. I will have to paint that, as I mentioned before many times, and the client wants to see the strokes, so it takes a brush and not a spray (00:24, 00:42). Right before that I say I really like those tool marks (00:17, 00:21). Some of the carving would give me that feel too, like a stroke (00:47, 00:52).

Workshop 82 shows how paint and surface work together. It's paint grade, but brushed on with a really thick paint, so brush marks will show, since I'm using chalk paint, and that gives me some texture anyway. Why not leave some texture right there on the surface? (06:22, 06:45). I was probably going to use a lot more of those rifflers (06:08).

My tool marks get the same comparison in other courses. In the Roman Acanthus lesson 16 I still want to see the micro facets, because that is my hand work, and it's like brush marks, so I should still recognize it (54:58, 55:18).
The Dining Table Apron course turns the line around. A carving leaves what looks like paint or brush marks, though what you see is tool marks, and that's why I don't use any sandpaper (50:16, 50:30). The April 2020 livestream says it with a painter's picture: I don't like to see too many tool marks, but they are like brush marks on an artist canvas, they make it unique, and they catch the light (43:45, 43:56).
In Modern Acanthus 7 a brush mark looks better to me, because it gives more dimension (07:51, 07:57). Modern Acanthus 5 has me taking facets down while keeping some. Taking them out completely was not my goal, and I still wanted to see brush marks (04:58, 05:03).
What do my five stops have in common?
Five of the stops above sit in the table, each with my own words from the cue I gave.
| Name | Move | Where | Words |
|---|---|---|---|
| The eye cut | Not as deep, because of the paint | Workshop 9 | So I should stop right there |
| Deep from below | Deep, because it is visible from below | Lesson 26 | I got to stop logically somewhere |
| Tiny brush inside | Deeper is fine with a tiny brush | Room 51 | How I'm going to finish it |
| Artist brush paint | Really deep, painted with the artist brush | Venice 65 | How am I going to paint |
| Paint grade panel | I don't have to be really deep | Panel 9 | It's going to be all painted |
Three of the five are about reach, one is about sight from below, and one is about the finish alone.
Where else does the same habit show?
Workshop 9 holds the habit in one line: think ahead about the depth of that hollow (06:56, 06:59).
The acanthus is the leaf these hollows belong to, and Advanced Carving: Venice Room, Part 2 covers workshops 13 through 25. Pages on wood carving, relief, Venice, wood finishing, gesso, primer and the rasp cover the wider craft. Pick one hollow of your own and ask where a brush would go.
How it's done
- Name the brush first. A deep hollow is a hard place for a brush (00:23).
- Stop at the background. The digging ends at the background, no lower (07:05, 07:15).
- Use a small tool for the deep spot. The underneath got a number nine at 3 millimeters (one-eighth of an inch) in this part (06:40, 06:54).
- Think ahead on the eye. Workshop 9 has me thinking ahead about the depth of that hollow (06:56, 06:59).
Frequently asked questions
How deep did I go in this part?
I said at 07:15 that the digging ends where the background sits. A small number nine did the underneath, and I wanted the excavation to stop there (06:50, 07:15). Depth past that point makes the brush work harder, which I flagged at 00:23.
Why do I brush instead of spraying?
The client wants to see brush marks, the strokes, so workshop 14 has the paint going on by brush only, and no spray. Some of the carving gives me that stroke feel too, and Part 25.10 voices the same client wish at 00:31 (00:33, 00:49).
Can a carving be too deep for a finish?
Workshop 23 says yes in plain words: dig too much and you can't get to the spot afterward. That goes for stain, paint or even a plain clear coat, and I add that planning a finish means working out how deep to excavate first (02:12, 02:53).
What to carve next