

Alexander Grabovetskiy, woodcarver, School of Woodcarving · Published 2020
What counts as the main shape of a carved pipe, and when is it done enough to move to the details?
Quick answer: A carved pipe's main shape is the form I cared about before any cleaning. In Venice Room 25.6 I said so at 03:39. I named it done at 07:05, and in other lessons that phrase meant a boat, a bowl or a movement.
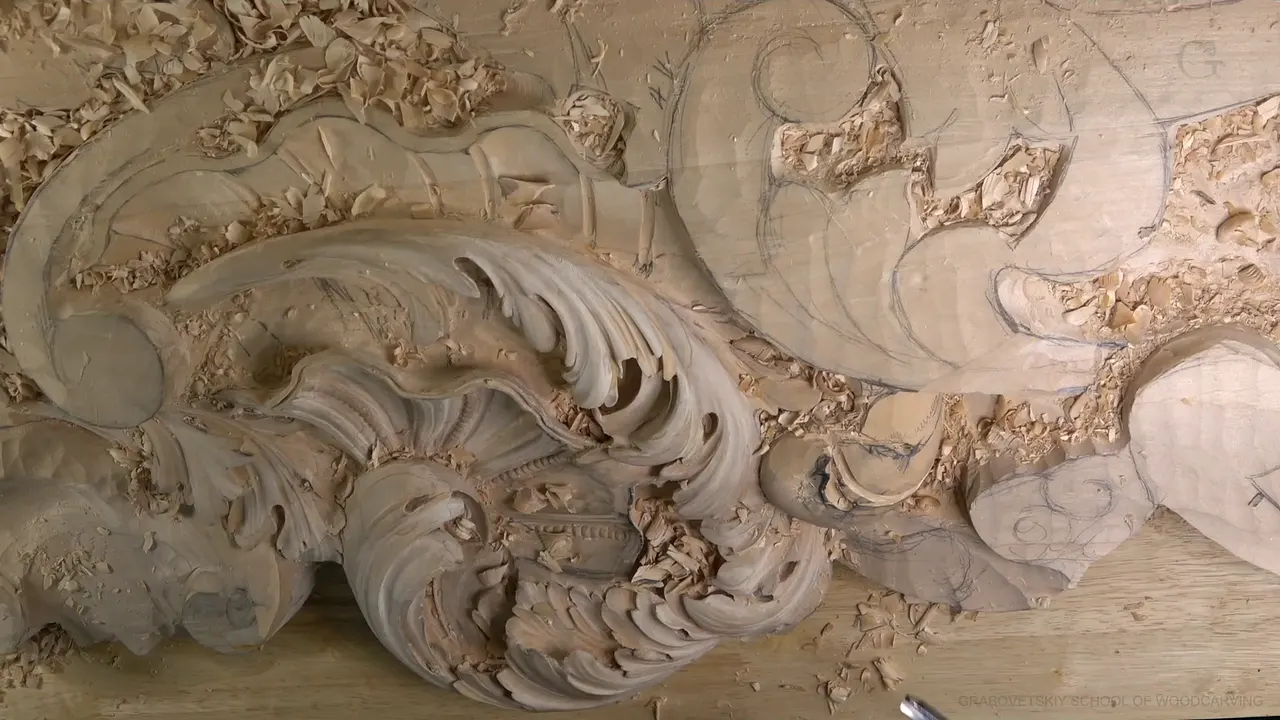
Main shape is the word I use for the form I care about first, before I clean a single tool mark on a carved pipe. Other lessons of mine use the same two words for other things, and that is the plain story on this page.
This part is about eight minutes of work on one pipe. I went through my other courses for the same two words, and every lesson I quote is linked where it comes up, with my own condition beside it.
Ever stopped a carving because it looked rough and wondered if you had ruined it? Do you ask when a shape is good enough to leave alone for now? Watch what I did on this pipe before I answered.

What did I do to the pipe before I called it the main shape?
The part opens at 00:24 with me telling you it doesn't look too good yet. It will, I added (00:24, 00:29).
A number 11 gouge came first, probably a little bigger, seven millimeters, a little bigger than a quarter inch. Its side would shape slightly, since a subdivision was coming and I wanted a really nice transition into it (00:35, 01:03).
Next, a flatter gouge, maybe number three, to knock down a ridge. The spot beside it needed rounding a little more, and I planned to ride the way around the pipe. At 02:22 I called it my pipe (01:10, 02:22).

The concave got a number nine, to make it a little nicer, running to a spot on the leaf (02:27, 02:38). A smaller flat gouge, number three and a quarter inch, was next, for a ridge I didn't really need and a tool mark to clean a little (03:02, 03:25).

Then came the line this page is built on. How clean each pass is, I really don't worry about at this point. Clean or not, not now. All I worry about is just the main shape, which was still not what I wanted to see. It had to look good (03:31, 03:49).
The second side got a different concave. Less pronounced, done first, probably with the number nine, running almost all the way from a point on the leaf and around (04:11, 04:44). For a lesser sweep there I was probably going to use a number nine, half an inch, 14 millimeters. Carving right on the side of the pipe called for care again (05:08, 05:47).

Less pronounced meant no need to excavate too deep (05:50). I would shave a little to the edge. One part was raising up and I was not too happy with it, because it was sticking too much, so I added a knock down of that ridge too (06:14, 07:05).

And here you go, I said. That is the main shape of this one. Subdivisions and other concaves and convexes came next on my list (07:05, 07:17).
One more thing from that minute. By the way, I said, I had studied how the old carvers did concave and convex work, and sometimes they took the opposite approach. Convex here, concave there. Maybe I would do it, I said, and we would see. A plan only (07:21, 07:43). The part ends as I get ready to blend a little nicer into the pipe side (07:48, 07:58).
How do I use main shape in other lessons?
It is not one thing. My own words change between lessons, and the table further down keeps five of them.
A fishing boat came up in workshop 22. It had a front part and an end, and a bigger number 11 would create my main shape, with care not to touch the part beside it (02:02, 03:05).

The Hashemi Flowers course has a boat for a leaf. The overall shape would look more like a boat, with the high point at the highest spot, and all the rest had to be gone. Hopefully you understand, I said (03:54, 04:34).
Leaves follow one logic in workshop 83, acanthus or any leaf. Even with a division coming, the shape of the main leaf is a normal leaf you see every day on trees and plants. A fisher's boat works too, I said, and it makes things much easier (05:16, 05:52).

A bowl showed up in workshop 49. This bowl's main shape, also called the head of acanthus, was in place, and one part would sit lower than the other (00:07, 00:21).

Hollows and bumps took the word in workshop 53. Both sides were getting a blend for a clean surface. Then I listed it. Concave, convex, concave, a roll down this way, and some of it raised later. Those are the main concaves and convexes, I said (02:52, 03:41).

Movement is the answer in workshop 20. Catching the shape of the movement was the main big idea, I said. A side sitting a little too high got a flatter gouge (04:40, 05:11).
I corrected my own word in workshop 69. First I wanted to establish the main movement. Then my word changed to the main shape, form, if you wish (07:04, 07:14). So there is no single definition on this page, only what I said each time.

How do I treat tool marks until the shape is there?
Same answer, again and again. Marks can wait. How it looks at this stage is no concern, I said in workshop 52, since it's not final and we are just developing the main shape (06:47, 06:54).
One breath of mine in workshop 70 holds the whole order. Okay, but still not final, final. Later I would clean everything and make it nice and smooth. Right then I was after the shape. Cleaning up would be repetition for me (06:38, 07:24).

I planned a big skew chisel in workshop 19 to knock down a little of the shape (01:59, 02:07). An excavation was preliminary in workshop 34, I said, and I would clean it up a little later. That was the main shape. Then I had to shape it nicely (00:43, 01:12).
The Chamomile and Bow Rosette course turns it into a promise. I will clean a little later, I said, but I've got the main idea (21:27, 21:32). Furniture Panel 27 adds that I can always refine later (19:14, 19:18).
The reason is in Furniture Panel 32. It does not have to be perfect at this point, because I am only removing the bulk and getting the shape done (09:38, 09:50).

One warning came from a different spot in workshop 52. Going too deep was off the table, I said, because that would damage the surface, and then tool marks would be hard to get rid of. I wanted to avoid that. Next I told you I had the shape (02:48, 03:03).
Which things do I leave for after the main shape?
Wood, mostly. Leaving wood was my goal in workshop 44, since more shaping was waiting. The job was to give a main shape, and I said let me stop there, since I wanted a point rolled in (01:57, 02:30).

There is a condition in workshop 43. I was just giving the shape, although I needed to excavate much deeper in that area, because I really wanted the head to develop (07:03, 07:24).
Something looked really big in workshop 71, convex and concave, and I said it's okay. Extra movements were coming. Just the shape was my need at that point (06:37, 07:02).
Deep concaves were not wanted in workshop 89, only the main shape (04:50, 04:59). Over in workshop 88 I stayed on the shape so the work would be somewhat close to the final design. Not the final design, I said (01:49, 02:00).
Even a question can wait. Right after calling a shape done in workshop 34, I asked myself if I needed the eye. Maybe not, I said, but it still needed to be readable (01:08, 01:47). A bigger concave was on my mind in workshop 14, to raise an edge even more, while I was only giving the shape (07:04, 07:57).
Which words do I use when it is overall shape or main form?
The job is the same and the words change. Part 1 of workshop 19 has a boat, or just a leaf, sometimes a fishing boat. That was the overall shape, I said, and then you start the main separations, at least three main parts, and lots of times five (00:23, 00:50). Later I told myself to give the overall shape first and start excavating (04:32, 04:36).
Another part of workshop 19 calls the stage catching overall shape, which is essentially all I was doing. Maybe a number nine, I said, 5/8 of an inch, 16 millimeters, and the overall movement looked good (01:35, 02:36).
Less still was enough in workshop 16. Not much, I said, since more hollows and bumps were yet to come. A semi-clean surface was all I was after. Nice, clean surfaces were not my concern, only the high spots had to go (05:29, 05:49).
A concave and a convex sat on opposite sides in workshop 115, and then I said it is just overall shape yet, with details a little later. I liked the feel already, with the middle ridge and the movement giving me a shadow. Obviously, I added, it's not the end (04:34, 05:14).
A reason for the order sits in workshop 135. My center went in before the others, because it was more stable and there was less chance to break it. After that I could give an overall shape without losing the locations of my separations (05:03, 05:30). Even with separations coming in workshop 137, I would outline the main form first (06:53, 06:59). A sentence in workshop 14 sums it up. The overall shape was in place, I said, so I could refine the details of that movement (06:54, 07:02).
What must I not lose while I shape it?
The form itself, checked from many sides. Workshop 63 is the clearest case I have of it. More sculpture than anything else, I said, pretty much sculpting the shape, and constantly checking and rechecking from different points of view. If it didn't make sense, I was redoing it. I could slope a lot more in one spot, since it was too bulky (00:39, 01:28).

The other half comes from workshop 84. A small number three, about 10 millimeters, about three-eighths of an inch, would start the form. I would probably measure again, but not as much, because losing the main shape was the worry here. That point, the main architectural part, was not something I wanted to lose (05:34, 07:14).
My finger became a leverage point in workshop 25, part 7, and I raised an edge slightly, not much. The shape had to stay, and there was not too much material (06:46, 07:06). Workshop 31 has me saying I did not need to round more. A little, maybe, but not much, and then it would be the shape (00:31, 00:55).
How did I tell the main shape was done?
I said so, and the next sentence named the next job. Trying to catch the shape in workshop 48, I said I think I did it. Eyes and divisions underneath were still to do, but the main form was there (01:12, 01:40).

Back to workshop 49. With the shape in hand, you can see how it moves, and it is time for better divisions. The middle line would be reestablished. It would be a pipe, the raised part, convex (04:42, 05:07).
My pick in workshop 50 was a number three sweep, to create my final form. That way I could see exactly what was going on, and my ridges, pipes and smaller divisions could start (02:28, 03:19).
A number six, one inch, was my pick in workshop 60 to give the movement its main shape. It looked good, I said, and then a midline had to go all the way to the center line (05:15, 06:03). Plainest of all is workshop 132. We've got the shape. Now I have to redraw everything and establish the details (02:19, 02:23).
Five of the names above sit in the table.
| Name | Move | Where | Words |
|---|---|---|---|
| Fishing boat shape | A front, an end, one boat movement | Workshop 22 | Careful not to touch that one |
| Head of acanthus | Called the bowl, with one part lower | Workshop 49 | I showed it from another angle |
| Concave, convex, concave | Those three, plus a roll down here | Workshop 53 | Later some of it gets raised |
| Normal leaf shape | Division or not, still a normal leaf | Workshop 83 | That makes it much easier, okay |
| Movement and form | I called it movement, then shape, form | Workshop 69 | I don't worry about final shape |
The first two names are shapes of a real thing, a boat and a bowl. The last three come from hollows, leaves and plain form.
Where else does the same habit show?
In Hashemi Flowers 7 the same thing shows on a leaf edge. I just followed the main shape. The edge was not the final form yet (05:38, 05:46).
The acanthus is the leaf these pipes belong to, and Advanced Carving: Venice Room, Part 2 covers workshops 13 through 25. For the wider craft there are pages on wood carving, sculpture, relief, woodworking and hand tools. Pick one pipe of your own and look at what its next job is.
How it's done
- Hold off on cleaning. Tool marks could wait, I said, while the shape was still not right (03:31, 03:49).
- Name the ridge tool. A flatter gouge, maybe a number three, was my pick for the ridge beside the pipe (01:10, 06:44).
- Carve a concave on each side. One was less pronounced than the other, so I did not need to excavate too deep (04:11, 05:50).
- Say when the shape is done. Subdivisions came next, I said, once the shape was named (07:05, 07:17).
Frequently asked questions
When did you call the shape of this pipe done?
At 07:05, after a last ridge came down and the lighter concave on the second side was in. Subdivisions with other concaves came next on my list, and blending a little nicer into the pipe side was a plan after that.
Do you clean tool marks before the shape is right?
Not at that stage. Clean passes were not my worry then, I said, and workshop 70 gives the order. Later on I would clean everything and make it nice and smooth, but right then I was after the main shape.
Does the word mean the same thing in every lesson?
No. I said it myself when I corrected my word, from the main movement to the main shape, form, if you wish. Elsewhere I used a fishing boat, a bowl and a normal leaf shape. You can check each one yourself in the lessons linked above on this page, with my cue times beside them.
What to carve next